
Popular categories
Looking for a yarn?


Comments / Questions (22)
![]() Elisa wrote:
Elisa wrote:
Mi è stato detto di contattare il rivenditore Drops x avere più dettagli,ma non ne ho uno. A occhio ,a.grandi linee mi serve solo sapere dopo quanti cm dall' inizio dello scaldacollo devo iniziare gli aumenti per una taglia di una bimba di 9 anni. Devo sempre iniziarli dopo 8 cm o è meglio un po' prima?magari 7? Devo ripeterlo ogni 3,5 cm come per la taglia adulta o faccio ogni 4 cm?grazie
22.09.2025 - 13:09DROPS Design answered:
Buonasera Elisa, deve prendere le misure della bimba e riadattare le spiegazioni. Purtroppo in questa sede non ci è possibile riadattare i modelli alle singole esigenze. Buon lavoro!
03.10.2025 - 00:49
![]() Elisa wrote:
Elisa wrote:
Ho fatto questo modello con i ferri 4 e mezzo dato che è per una bambina di 9 anni quasi , gliel'ho provato e sarebbe perfetto se non fosse che,dopo gli 8 cm iniziali,nel punto in cui si iniziano gli aumenti,non le rimane compatto ma le fa come una riga,non capisco perché,magari perché troppo largo? Se lo facessi interamente con i ferri 4 ?Oppure come potrei adattarlo? Attendo risposta grazie
21.09.2025 - 18:10DROPS Design answered:
Buonasera Elisa, purtroppo in questa sede non ci è possibile adattare i modelli alle esigenze di tutti, ma può rivolgersi al suo rivenditore DROPS di fiducia per un'assistenza più personalizzata. Buon lavoro!
22.09.2025 - 01:05
![]() Elisa wrote:
Elisa wrote:
Ho già scritto un lungo commento ma essendoci un limite di parole forse non sono riuscita a spiegare meglio (come adattare il lavoro per una bambina di 9 anni-l'ho già fatto con i ferri 4 e mezzo ma è un po' largo) non ci sarebbe un contatto mail dove poter chiedere in maniera più dettagliata?
21.09.2025 - 00:29DROPS Design answered:
Buonasera Elisa, purtroppo in questa sede non ci è possibile adattare i modelli alle esigenze di tutti, ma può rivolgersi al suo rivenditore DROPS di fiducia per un'assistenza più personalizzata. Buon lavoro!
22.09.2025 - 01:05
![]() Elisa Mercante wrote:
Elisa Mercante wrote:
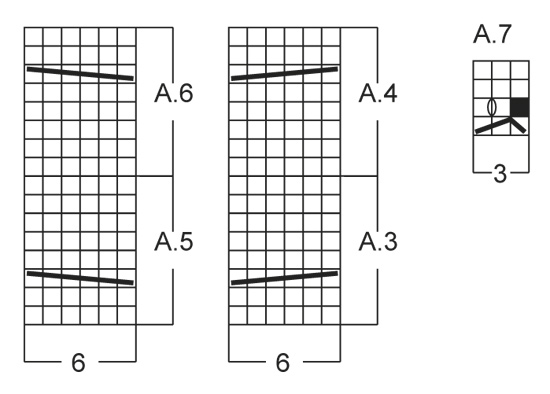
Chiedo un' informazione sulle spiegazioni dello scaldacollo,dopo gli 8 cm in cui si inizia ad aumentare non ho capito bene come procedere,c'è scritto di fare 2 rov, 3 maglie della treccina,2 rov,6dritti,1rov,6dritti,1gettato,1rov, 1gettato poi 6dritti,1rov,6,dritti (diagrammi A5 e A6) e di ripetere in questo modo così ê scritto,ma dove dovrei fare gli aumenti , non dovrei avere A7 cioè la treccina da 3 maglie? È stata omessa oppure non ho capito bene? Grazie
12.08.2025 - 15:41DROPS Design answered:
Buonasera Elisa, gli aumenti si ottengono con i gettati. La parte tra gli asterischi si ripete 6 volte sul giro per un totale di 12 aumenti. Buon lavoro!
12.08.2025 - 22:19
![]() Herve wrote:
Herve wrote:
Je ne peut plus avoir le diagramme pour le bonnet MILENA
01.01.2025 - 16:06DROPS Design answered:
Bonjour, les diagrammes se trouvent en bas de page, Bon tricot!
01.01.2025 - 20:05
![]() Jana Dvořáková wrote:
Jana Dvořáková wrote:
Dobrý den. Chtěla bych upozornit na chybu v českém překladu u čepice Milena. V návodu stojí: "Ve výši 21 cm, měli bychom mít dokončenu 1 celou sekvenci vzoru A.1" Správně by mělo být:" Až dosáhnete výšky 21 cm dokončete jednu rozpracovanou sekvenci vzoru A.1. Jinak je čepice krásná. Díky. Jana
10.11.2019 - 18:03DROPS Design answered:
Dobrý den, Jano, díky za připomínku! Zde nejde o chybu, jen trochu jinými slovy říkáte totéž. Podstatné je, že před změnou vzoru a začátkem ujímání je třeba dokončit celou sekvenci vzoru původního. Každopádně děkuji a přeji příjemné chvíle s jehlicemi! Hana
10.11.2019 - 20:05
![]() Corinne GUILLET wrote:
Corinne GUILLET wrote:
Bonjour, Je viens de terminer mon bonnet, il est superbe et tout à fait à ma taille. J'adore, vivement cet hiver pour en profiter. Merci pour votre aide.
01.04.2019 - 10:47
![]() Corinne GUILLET wrote:
Corinne GUILLET wrote:
Bonjour, que signifie "Tricoter ensuite 1 côte au POINT MOUSSE" Le point mousse je connais mais je le tricote où sur le diagramme ?
26.03.2019 - 15:02DROPS Design answered:
Bonjour Mme Guillet, cela signifie qu'il faut tricoter 1 tour endroit, 1 tour envers (cf POINT MOUSSE) sur toutes les mailles, tout en augmentant 22 mailles au 1er tour = vous avez maintenant 110 mailles. Tricotez ensuite le diagramme A.1 avec l'aiguille circulaire 5. Bon tricot!
26.03.2019 - 15:54
![]() Elin Grethe Selnes wrote:
Elin Grethe Selnes wrote:
På første omgang gjør du i A.7 tre masker om til en. Hvordan kan du da strikke to masker ut av denne ene på omgangen etter?
21.12.2018 - 16:57DROPS Design answered:
Hei Elin. På 1 omgange i A.7 gjør du 3 masker om til 2, slik: Du tar 1 maske løst av, så strikker du 2 masker rett (ikke rett sammen) og så trekker du den løse masken over disse 2 = 1 maske felt (den du tok løst av). God fornøyelse
02.01.2019 - 10:29
![]() Mayumi wrote:
Mayumi wrote:
I am having trouble reading the A1 pattern. I begin at the bottom row and move right to left, correct? Then on the second row, do I move left to right or do I always move right to left ? Also, the second row has a black box. That is a decreased stitch, but when I get to the third row, that\\\"black square\\\" has become white--but I don\\\'t see where I have picked up a stitch? It looks like it should add back up to 22 stitches so I\\\'m confused. Can someone explain this to me?
12.06.2018 - 01:09DROPS Design answered:
Dear Mayumi, since you are working in the round, you will read each row in diagram from the right towards the left. The black box at the beg of A.1 is for the st you have decreased on row 1 (= by slipping 1 st, K2, psso= 2 sts), just work K1,YO,K1 (= 3 sts again) - this video shows how to knit this mock cable. Happy knitting!
12.06.2018 - 08:55
|
|||||||||||||||||||||||||||||||
Milena#milenaset |
|||||||||||||||||||||||||||||||
|
|
|||||||||||||||||||||||||||||||
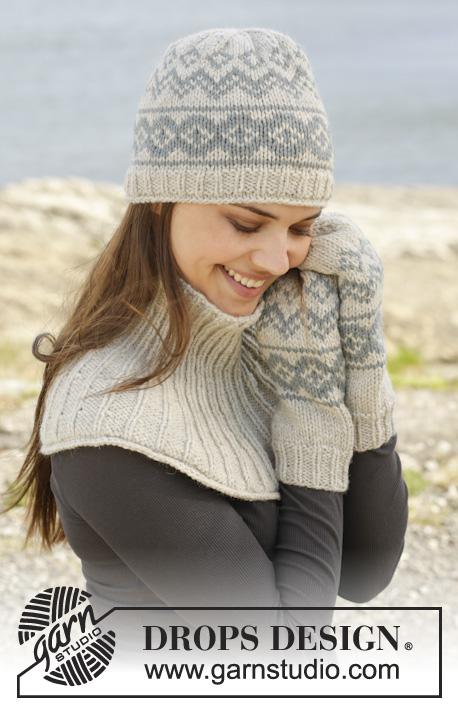
Knitted DROPS hat and neck warmer with cables in ”Alaska”.
DROPS 156-14 |
|||||||||||||||||||||||||||||||
|
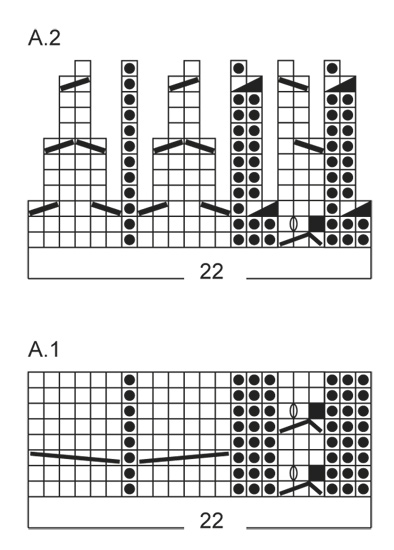
PATTERN: See diagrams A.1-A.7. GARTER ST (in the round on circular needle): * K 1 round and P 1 round *, repeat from *-*. 1 ridge = 2 rounds. ---------------------------------------------------------- HAT: Worked in the round on circular needle, switch to double pointed needles when needed. Cast on 88 sts on circular needle size 4 mm with Alaska. K 2 rounds, then work rib (= K 2/P 2) for 3 cm. Work 1 ridge in GARTER ST - see explanation above AT THE SAME TIME on 1st round inc 22 sts evenly = 110 sts. Switch to circular needle size 5 mm. Work A.1 (= 22 sts) 5 times in width. REMEMBER THE KNITTING TENSION! Continue with pattern. When piece measures 21 cm, adjust after 1 whole repetitions of A.1, work and dec according to A.2 (= 5 repetitions). When A.2 has been worked 1 time vertically, 30 sts remain on round. K all sts twisted tog 2 by 2 = 15 sts. Cut the yarn and pull it through the remaining sts, tighten tog and fasten. The hat measures approx. 26 cm vertically. ---------------------------------------------------------- NECK WARMER: Worked top down in the round on circular needle. Cast on 96 sts on circular needle size 4 mm with Alaska. Work 2 ridges in GARTER ST - see explanation above AT THE SAME TIME on last round inc 24 sts evenly = 120 sts. Switch to circular needle size 5 mm. Then work as follows: * P 2, A.7 (= 3 sts), P 2, A.3 (= 6 sts), P 1, A.5 (= 6 sts) *, repeat from *-* the entire round (= 6 times in total). NOTE: Do not work YOs in A.7 twisted on next round, they should make holes. Continue the pattern like this. When A.3/A.5 have been worked 2 times vertically, work A.6/A.4 1 time vertically (work the remaining sts as before). Then work A.3/A.5 and continue A.7 as before until finished measurements. REMEMBER THE KNITTING TENSION! When piece measures 8 cm, inc as follows: * P 2, A.7, P 2, A.3/A.4, 1 YO, P 1, 1 YO, A.5/A.6 *, repeat from *-* the entire round (= 6 times in total) = 132 sts on needle. P YOs twisted on next round, they should not make holes. Repeat inc every 3½-3 cm 3-4 more times, AT THE SAME TIME when piece measures 10 cm, inc 1 st before every A.3/A.4 and 1 st after every A.5/A.6 (= 3 sts P between A.3/A.5 and A.7), repeat inc every 12-7cm 1-2 more times = 192-216 sts on needle after all inc. P YOs twisted on next round, they should not make holes. There are now 9-11 sts P between every A.3 and A.5 and 4-5 sts P between A.3/A.5 and A.7. When piece measures 24-26 cm, switch to circular needle size 4 mm and work 1 ridge over all sts AT THE SAME TIME on 1st round dec 24 sts evenly = 168-192 sts. Cast off. |
|||||||||||||||||||||||||||||||
Diagram explanations |
|||||||||||||||||||||||||||||||
|
|||||||||||||||||||||||||||||||
 |
|||||||||||||||||||||||||||||||
 |
|||||||||||||||||||||||||||||||
 |
|||||||||||||||||||||||||||||||
Have you finished this pattern?Tag your pictures with #dropspattern #milenaset or submit them to the #dropsfan gallery. Do you need help with this pattern?You'll find 18 tutorial videos, a Comments/Questions area and more by visiting the pattern on garnstudio.com. © 1982-2026 DROPS Design A/S. We reserve all rights. This document, including all its sub-sections, has copyrights. Read more about what you can do with our patterns at the bottom of each pattern on our site. |
|||||||||||||||||||||||||||||||


With over 40 years in knitting and crochet design, DROPS Design offers one of the most extensive collections of free patterns on the internet - translated to 17 languages. As of today we count 324 catalogues and 12290 patterns translated into English (UK/cm). 12290
We work hard to bring you the best knitting and crochet have to offer, inspiration and advice as well as great quality yarns at incredible prices! Would you like to use our patterns for other than personal use? You can read what you are allowed to do in the Copyright text at the bottom of all our patterns. Happy crafting!
Post a comment to pattern DROPS 156-14
We would love to hear what you have to say about this pattern!
If you want to leave a question, please make sure you select the correct category in the form below, to speed up the answering process. Required fields are marked *.