
Popular categories
Looking for a yarn?


Comments / Questions (63)
Rainbowis wrote:
Yes according to instruction received on 18.05.2015 and remaining 158 St. Regards.
28.07.2015 - 13:19DROPS Design answered:
Dear Mrs Rainbowis, the 5th marker should be placed between 1st and 2nd makers (where you have 40 sts between these markers) and the 6th marker should be placed between the 3rd and 4th marker (where you have 40 sts between these) = these new markers are for the sides of jumper. Happy knitting!
29.07.2015 - 10:06Rainbowis wrote:
Hi, I finished the dec until I had 158 sts, however, when I count to add th 5th and 6th markers which is bet. 1st & 2nd - 3rd & 4th I found that the 40th sts is the same marker of the 2nd & 4th sts !!!?? They are not the middle as the pattern instructed. :$ Regards.
24.07.2015 - 12:10DROPS Design answered:
Dear Mrs Rainbowis, did you dec 1 st before 1st and 3rd marker and 1 st after 2nd and 4th marker ?
27.07.2015 - 17:17Rainbowis wrote:
Repeat dec every 1-1-1½-2-3½-3½ cm 4-4-4-3-2-2 times. hi, the above means that I'll continue after the first Dec line or 2 in stockinett st the measure a 11/2 cm and then Dec, correct? Regards, Rainbowis
17.05.2015 - 13:52DROPS Design answered:
Dear Mrs Rainbowis, work 1st dec, *then work 1½ cm in stocking st and work one more dec*, repeat from *-* a total of 4 times = 5 times in total, 10 sts dec and 158 sts remain. Happy knitting!
18.05.2015 - 09:54Rainbowis wrote:
Thanks for helping me.
11.05.2015 - 18:01Rainbowis wrote:
Dec 1 st before 1st and 3rd marker and 1 st after 2nd and 4th marker (NOTE! 1st marker is 1st marker on row from RS!) the above is puzzeling me can't get it? that means the one on the left needle is the 2nd as the 1st is on the right needle!!??
11.05.2015 - 15:30DROPS Design answered:
Dear Mrs Rainbowis, the 1st marker is the first one you inserted, ie the first after the 23th st worked in stocking st, the 2nd is the one inserted after the 40th st ... Happy knitting!
11.05.2015 - 17:44Rainbowis wrote:
Hi, i need more clarification for my last question. 1st marker at 23rd st., 2nd marker at 40th st., 3rd marker at 48th st., 4th marker at 40th st. and 5th marker at 23rd st which will be at the beg from the right side. so I will make the decrease for the 1,2,3 & 4 but the last one (5) make nothing? Regards,
11.05.2015 - 11:15DROPS Design answered:
Dear Mrs Rainbowis, you should have 4 markers (size L): 1st marker after 23th st in stocking st, 2nd marker after 40th st in stocking st, 3rd marker after 48th st in stocking st, 4th marker after 40th sts in stocking st, 23 sts in stocking st remain before beg of round. Happy knitting!
11.05.2015 - 13:13Rainbowis wrote:
Hi, in the body part the pattern said 4 markers while I work it counts 5 marker!? Does after the 48th sts no marker is replaced? ? Thanks.
09.05.2015 - 09:39DROPS Design answered:
Dear Mrs Rainbowis, you may have a total of 5 markers, including the marker for beg of round, there will be no dec on this one, dec are done on the 4 marker placed 4 cm from new sts under sleeves. Happy knitting!
11.05.2015 - 10:04
![]() Caroline Brent wrote:
Caroline Brent wrote:
I've just finished this jumper, it's beautiful, and I love the shaping, the pattern was so easy to follow, thank you. Caroline
02.03.2015 - 21:49Rainbowis wrote:
I don't think that you get my last question. I finished that part until it says that I'll cont. Knitting till the marker and then starting using the diagram.. Do I miss something here?
20.02.2015 - 16:05DROPS Design answered:
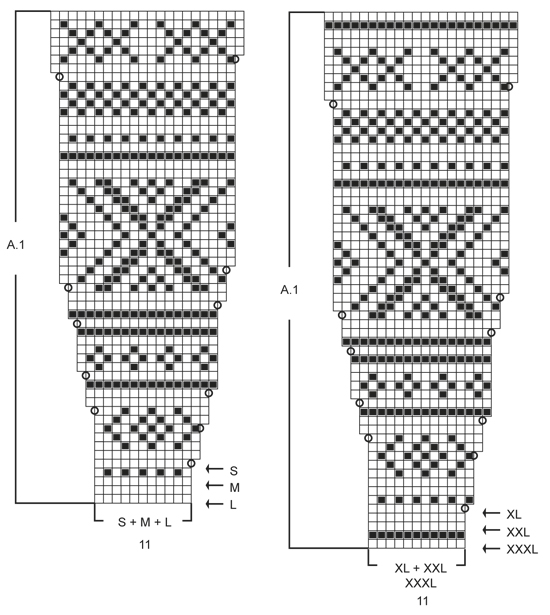
Dear Mrs Rainbowis, after you have worked the short rows for elevation, you continue now in the round and start diagram A.1: in size M, starting at the arrow and repeat the 11 sts in A.1 a total of 12 times around. Read more about diagrams here. Happy knitting!
20.02.2015 - 17:42Rainbowis wrote:
So I will start from bottom right side, let's say the diagram says k 11 the square are 11, then I'll turn the piece and k 11 the next row? Taking into consideration that I have 132 St on needles. Thanks,
20.02.2015 - 09:45DROPS Design answered:
Dear Mrs Rainbowis, the elevation for back neck is worked in stocking st, not following the diagrams, work first the short rows with K11 from RS, P20 from WS etc.. until they are all done (= last row is P56 sts from WS), then start A.1 following diagram. Happy knitting!
20.02.2015 - 13:39
|
||||||||||
Elinor Dashwood#elinordashwoodsweater |
||||||||||
|
|
||||||||||
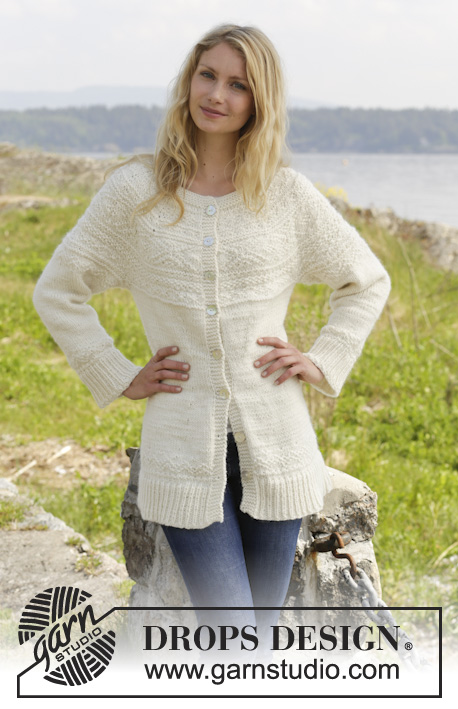
Knitted DROPS jumper with round yoke and textured pattern, worked top down in "Alaska". Size: S - XXXL.
DROPS 157-5 |
||||||||||
|
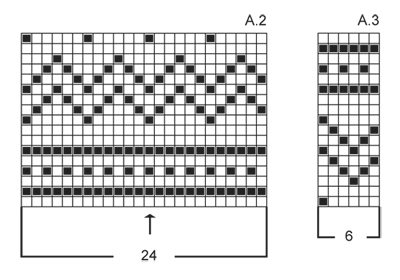
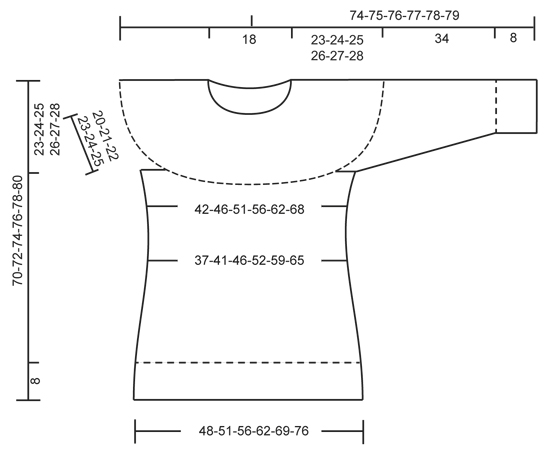
GARTER ST (in the round on circular needle): * K 1 round and P 1 round *, repeat from *-*. 1 ridge = 2 rounds. PATTERN: See diagrams A.1 to A.3. The diagrams show all rows in pattern seen from RS. INCREASE TIP 1 (applies to yoke): Inc 1 st by making 1 YO, on next round work YO twisted (i.e. work in the back loop of st instead front) to avoid holes. INCREASE TIP 2: Work until 1 st remains before marker, 1 YO, K 2 (marker is between these), 1 YO. On next round work YO twisted (i.e. work in the back loop of YO instead of front) to avoid holes. DECREASE TIP (applies to waist + sleeve): Dec as follows after marker: Slip 1 st as if to K, K 1, psso. Dec as follows 2 sts before marker: K 2 tog. ---------------------------------------------------------- JUMPER: Worked in the round, top down. YOKE: Cast on 69-76-80-84-87-91 sts on circular needle size 4 mm with Alaska. Work 4 ridges in GARTER ST - see explanation above. Insert a marker at beg of round = mid back. Now switch to circular needle size 5 mm. Work in stocking st AT THE SAME TIME inc 41-45-52-59-67-85 sts evenly – READ INCREASE TIP 1! There are now 110-121-132-143-154-176 sts on round. Then work an elevation back and forth in the neck from mid back as follows: K 9-10-11-12-13-14, turn piece and P 18-20-22-24-26-28. Turn piece, K 27-29-31-33-35-37, turn piece and P 36-38-40-42-44-46. Turn piece and K 45-47-49-51-53-55, turn piece and P 54-56-58-60-62-64. Turn piece and K over all sts until marker. On next round, work and inc according to pattern A.1 – choose diagram for correct size. REMEMBER THE KNITTING TENSION! When entire diagram A.1 has been worked 1 time vertically, there are 220-242-264-286-308-352 sts on needle. On next round work 1st row in A.2, AT THE SAME TIME inc 8-8-8-10-16-0 sts evenly = 228-250-272-296-324-352 sts. Work next round as follows: 2nd row in A.2 over the first 31-35-39-43-48-53 sts, slip the next 51-55-57-61-65-69 sts on a stitch holder for sleeve, cast on 8 new sts (= under sleeve), continue with A.2 over the next 64-70-80-88-98-108 sts (= front piece), slip the next 51-55-57-61-65-69 sts on a stitch holder for sleeve, cast on 8 new sts under sleeve, A.2 over the next 31-35-39-43-48-53 sts. There are now 142-156-174-190-210-230 sts for body. BODY: Continue in stocking st. When piece measures 4 cm from new sts under sleeve, insert 4 markers in piece as follows: 17-20-23-25-28-31 sts in stocking st, insert a marker, 36-38-40-44-48-52 sts in stocking st, insert a marker, 36-40-48-52-58-64 sts in stocking st, insert a marker, 36-38-40-44-48-52 sts in stocking st, insert a marker, 17-20-23-25-28-31 sts in stocking st. Now beg dec - READ DECREASE TIP. Dec 1 st before 1st and 3rd marker and 1 st after 2nd and 4th marker (NOTE! 1st marker is 1st marker on row from RS!). Repeat dec every 1-1-1½-2-3½-3½ cm 4-4-4-3-2-2 times in total = 126-140-158-178-202-222 sts. Now insert a marker in the middle of the 36-38-40-42-48-52 sts in each side (i.e. between 1st and 2nd marker and between 3rd and 4th marker) = 5th and 6th marker. When piece measures 14-15-16-17-18-19 cm from the new sts under sleeve, beg inc – remember INCREASE TIP 1! Inc before 1st and 3rd marker and after 2nd and 4th marker. Repeat inc every 3 cm 4 more times, AT THE SAME TIME on 2nd, 3rd and 4th inc, inc 1 st on each side of 5th and 6th marker (= sides) – READ INCREASE TIP 2! When all inc are done there are 158-172-190-210-234-254 sts on needle. When piece measures 31-32-33-34-35-36 cm from new sts under sleeve, inc 4-2-2-0-0-4 sts evenly = 162-174-192-210-234-258 sts. Then work A.3 over all sts. When A.3 has been worked vertically, inc 42-45-51-66-78-90 sts evenly = 204-219-243-276-312-348 sts. Work 1 round in stocking st. Then switch to circular needle size 4 mm and work rib as follows: * K 1, P 2 *, repeat from *-*. Continue like this until rib measures 8 cm. Cast off with K over K and P over P. SLEEVE: Worked in the round on double pointed needles. Slip the 51-55-57-61-65-69 sts from stitch holder back on double pointed needles size 5 mm. Work 2nd row in A.2, cast on 8 new sts under sleeve at the end of row = 59-63-65-69-73-77 sts. Insert a marker in the middle of the 8 new sts (i.e. 4 sts on each side of marker). Then work in the round. Continue with pattern according to diagram A.2 – NOTE: Adjust pattern according to the middle, arrow in diagram marks middle st on top of sleeve, AT THE SAME TIME when piece measures 4 cm from marker, beg dec – READ DECREASE TIP! Repeat dec every 2-1½-1½-1½-1½-1 cm 8-10-11-10-12-14 more times = 41-41-41-47-47-47 sts remain. When piece measures 34 cm in all sizes, inc 1 st = 42-42-42-48-48-48 sts. Then work pattern according to diagram A.3. When A.3 has been worked 1 time vertically, inc 3 sts evenly = 45-45-45-51-51-51 sts. Now switch to double pointed needles size 4 mm and work rib (K 1/P 2). Cast off with K over K and P over P when rib measures 8 cm. ASSEMBLY: Sew the holes under the sleeves. |
||||||||||
Diagram explanations |
||||||||||
|
||||||||||
 |
||||||||||
 |
||||||||||
 |
||||||||||
Have you finished this pattern?Tag your pictures with #dropspattern #elinordashwoodsweater or submit them to the #dropsfan gallery. Do you need help with this pattern?You'll find 25 tutorial videos, a Comments/Questions area and more by visiting the pattern on garnstudio.com. © 1982-2026 DROPS Design A/S. We reserve all rights. This document, including all its sub-sections, has copyrights. Read more about what you can do with our patterns at the bottom of each pattern on our site. |
||||||||||


With over 40 years in knitting and crochet design, DROPS Design offers one of the most extensive collections of free patterns on the internet - translated to 17 languages. As of today we count 324 catalogues and 12290 patterns translated into English (UK/cm). 12290
We work hard to bring you the best knitting and crochet have to offer, inspiration and advice as well as great quality yarns at incredible prices! Would you like to use our patterns for other than personal use? You can read what you are allowed to do in the Copyright text at the bottom of all our patterns. Happy crafting!
Post a comment to pattern DROPS 157-5
We would love to hear what you have to say about this pattern!
If you want to leave a question, please make sure you select the correct category in the form below, to speed up the answering process. Required fields are marked *.