
Popular categories
Looking for a yarn?


Comments / Questions (62)
![]() Christa wrote:
Christa wrote:
Wenn ich nach 20 Reihen eine neue Lochreihe anfange, habe ich nur noch 6 statt 8 Maschen zwischen den Mustern. Ist das so richtig?
21.01.2015 - 22:17DROPS Design answered:
Sie müssten immer 8 M zwischen den Mustern haben. Haben Sie alle Umschläge beachtet?
27.01.2015 - 23:15
![]() Karen wrote:
Karen wrote:
Bonjour j'ai acheté ce modèle mais je ne comprends rien au diagramme , de quel manière tricote t'on les rangs envers? Merci
16.01.2015 - 19:30DROPS Design answered:
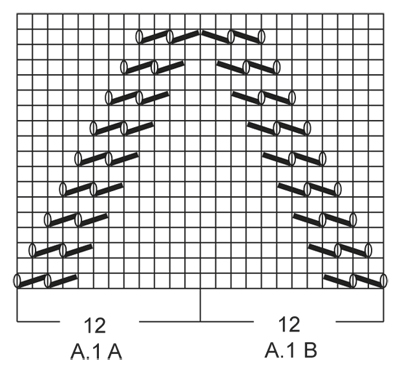
Chère Karen, dans le diagramme 1 case = 1 m x 1 rang, commencez en bas à droite du diagramme et lisez de droite à gauche sur l'endroit et de gauche à droite sur l'envers, ainsi, sur l'envers, on tricot en jersey env (= à l'env sur l'env). Bon tricot!
19.01.2015 - 09:52
![]() Solvår Elgaaen wrote:
Solvår Elgaaen wrote:
Er det feil på mønsteret på denne? mønsteret på ryggen skal jo møtes på midten,men det får ikke jeg til å stemme. På forhånd takk for hjelpen. Mvh Solvår Elgaaen
08.01.2015 - 22:53DROPS Design answered:
Hej Solvår, Nej der er ikke fejl i mønsteret, følger du A.1A og A.1B mødes det automatisk på midten. God fornøjelse!
02.02.2015 - 15:17
![]() Annelies wrote:
Annelies wrote:
Welke foto bedoel je. Volgens het patroon moet je na 20 naalden met een nieuw gaatjespatroon beginnen. Dit begrijp ik ook niet helemaal.
23.12.2014 - 20:06DROPS Design answered:
Hoi Annelies. De foto van het model. Hier zie je hoe het gaatjespatroon herhaalt. Na 20 nld (1 herhaling van de teltekening) begin je opnieuw met de teltekening. Maar je gaat ook door met de gaatjes opschuiven in de vorige herhalingen.
24.12.2014 - 11:29
![]() Annelies wrote:
Annelies wrote:
Ik heb het patroon nu een keer gebreid maar heb geen flauw idee hoe ik verder moet. Hoe moet ik de volgende naalden breien?
21.12.2014 - 16:24DROPS Design answered:
Hoi Annelies. Je gaat door met het verschuiven van de telpatroon - dus de "gaatjes" verspringen steeds 1 st (in de breedte). Je begint ook opnieuw met het patroon als je deze 1 keer in de hoogte hebt gebreid. Zie ook de foto. Fijne feestdagen!
22.12.2014 - 19:49
![]() Lola Arias wrote:
Lola Arias wrote:
Cuantas madejas de Drops alpaca deberia compar para realizar este patrón en una talla XL?
19.12.2014 - 16:39DROPS Design answered:
Hola Lola. Necesitas para la talla XL 12 ovillos de Alpaca y 9 ovillos de Kid-Silk.
25.12.2014 - 11:17
![]() Anne Lise Weigand wrote:
Anne Lise Weigand wrote:
Danke, und Kid Silk muß ich dann nicht mitrechnen.?
13.12.2014 - 07:53DROPS Design answered:
Genau, das brauchen Sie nicht mitrechnen. Die Wolle wird ja in der Anleitung doppelt genommen (Kid-Silk + Alpaca), um die Lauflänge zu errechnen, brauchen Sie daher nur die einfach Länge berechnen, wenn Sie nur mit einfachem Faden wie mit Brushed Alpaca Silk stricken. Die Gesamtlauflänge für die Originalgarne wäre ja Kid-Silk + Alpaca durch 2 geteilt, was dann wieder aufs Gleiche rauskommt, nämlich auf die einfache Länge.
14.12.2014 - 09:44
![]() Anne Lise wrote:
Anne Lise wrote:
In große L. Und wie rechne ich es selber aus für andere Modelle. Brusched alpacka silk ist günstiger
10.12.2014 - 11:58DROPS Design answered:
550 g Alpaca = 11 x 50 g á 167 m Lauflänge = 1837 m, 1 Knäuel Brushed Alpaca Silk hat 140 m (= 25 g), also 1837 m geteilt durch 140 m = aufgerundet 14 Knäuel.
10.12.2014 - 22:46
![]() Anne Lise Weigand wrote:
Anne Lise Weigand wrote:
Kan man diese Jacke im bruschd alpaca silk stricken und wie viel Wolle brauche ich dazu?
07.12.2014 - 21:27DROPS Design answered:
Ja, Sie können die Jacke in Brushed Alpaca Silk stricken, Sie stricken sie dann einfädig und nicht mit 2 Fäden wie in der Anleitung angegeben. Brushed Alpaca Silk gehört in Garngruppe C, 1 Faden von C entspricht 2 Fäden von Garngruppe A (die beiden Originalgarne Alpaca und Kid-Silk gehören beide in A). Die Jacke bekommt mit Brushed Alpaka Silk einen etwas anderen, luftigeren und leichteren Charakter. Die benötigte Menge errechnen Sie anhand der Lauflänge der Garne, welche Größe möchten Sie denn stricken?
07.12.2014 - 22:14
![]() Bonnamour Mireille wrote:
Bonnamour Mireille wrote:
Je ne comprends pas ,combien de mailles entre les deux diagrammes,sur le dessin il se rejoignent et sur la photo ils sont en série merci de m'éclairé
24.11.2014 - 10:53DROPS Design answered:
Bonjour Mme Bonnamour, vous tricotez d'abord 9-12 fois le diagramme A.1B (= 12 m), puis 9-12 fois le diagramme A.1A (= 12 m) avec 6 m point mousse au début et à la fin du rang. Au milieu, les motifs se rejoindront comme dans le diagramme. Bon tricot!
24.11.2014 - 11:59
|
|||||||||||||
First in Line#firstinlinecardigan |
|||||||||||||
 |
 |
||||||||||||
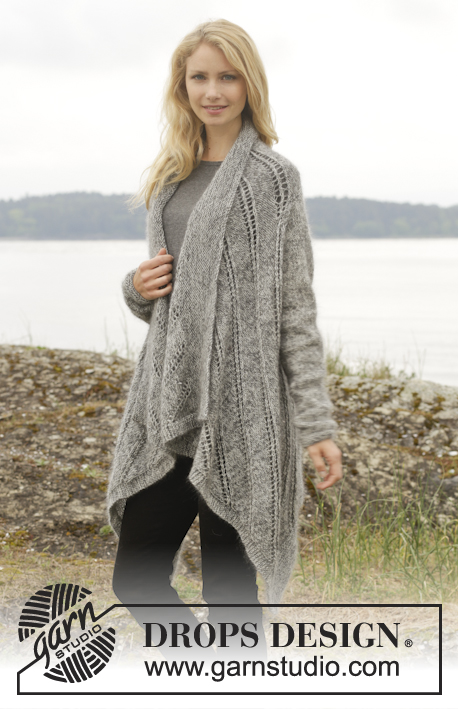
Knitted DROPS jacket in garter st with lace pattern in ”Alpaca” and ”Kid-Silk”. Size: S - XXXL.
DROPS 156-25 |
|||||||||||||
|
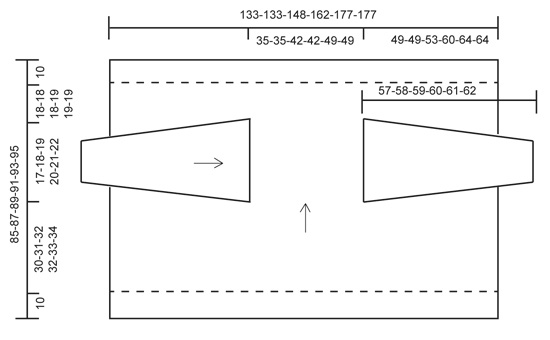
GARTER ST (back and forth on circular needle): K all rows. 1 ridge = 2 rows K. PATTERN: See diagram A.1. The diagram shows all rows in pattern seen from RS. NOTE: Diagram does not fit vertically when repeated, but continue eyelet rows diagonally upwards as before, AT THE SAME TIME beg a new eyelet row every 20th row in each side of piece. I.e. 1st eyelet row in A.1 beg 4 rows before the other. ---------------------------------------------------------- JACKET: Cast on 228-228-252-276-300-300 sts on circular needle size 4 mm with 1 strand of each yarn (= 2 strands). Work in GARTER ST - see explanation above - for 10 cm. On next row from RS switch to circular needle size 5 mm and work as follows: Work 6 sts in garter st, PATTERN A.1B (= 12 sts) – see explanation above, over the next 108-108-120-132-144-144 sts (= 9-9-10-11-12-12 repetitions in width), A.1A (= 12 sts) over the next 108-108-120-132-144-144 sts (= 9-9-10-11-12-12 repetitions in width), finish with 6 sts in garter st. Diagram A.1 is displaced 1 st towards mid back on every row from RS. REMEMBER THE KNITTING TENSION! Continue this pattern until piece measures 40-41-42-42-43-44 cm. Adjust so that last row is from WS. Work next row as follows - from RS: Work 6 sts in garter st, work pattern as before over the next 72-72-78-90-96-96 sts, garter st over the next 11 sts, pattern as before over the next 50-50-62-62-74-74 sts, garter st over the next 11 sts, pattern as before over the next 72-72-78-90-96-96 sts, finish with 6 sts in garter st. Work like this for 3 rows AT THE SAME TIME on last row cast off the middle st in every 11 sts ridge = 226-226-250-274-298-298 sts. Now divide piece and work opening for armhole. RIGHT FRONT PIECE: Slip the last 143-143-161-173-191-191 sts on a stitch holder, only work over the first 83-83-89-101-107-107 sts. Continue pattern as before, i.e. work as follows from RS: 6 sts in garter st, A.1B as before, finish with 5 sts in garter st. Work until piece measures 17-18-19-20-21-22 cm from where piece was divided. NOTE: Adjust so that last row is from WS. Slip sts on a stitch holder and work left front piece. LEFT FRONT PIECE: Slip the last 83-83-89-101-107-107 sts back on needle, work as right front piece, work A.1A instead of A.1B. NOTE: Adjust so that last row is from WS. Slip sts on 1 stitch holder and work back piece. BACK PIECE: Slip the remaining 60-60-72-72-84-84 sts back on needle. Continue pattern, work the 5 sts in each side in garter st. When back piece measures 17-18-19-20-21-22 cm, adjust so that last row is from WS and adjust according to front piece, slip all parts back on same circular needle size 5 mm. Now work as follows: Work in garter st and pattern as before over front piece until the 5 sts in garter st, work 5 sts in garter st, cast on 1 new st, 5 sts in garter st, pattern over back piece as before until the 5 sts in garter st, work 5 sts in garter st, cast on 1 new st, 5 sts in garter st, pattern and garter st over front piece as before = 228-228-252-276-300-300 sts on needle. Work 2 ridges in total over the 11 sts between each front piece and back piece. Continue with pattern with 6 edge sts in garter st in each side of piece until piece measures 75-77-79-81-83-85 cm in total. Switch to circular needle size 4 mm. Work in garter st. Cast off when piece measures 85-87-89-91-93-95 cm. SLEEVE: Worked back and forth on circular needle. Cast on 32-35-37-38-39-41 sts (incl 1 edge st in each side of piece) on circular needle size 4 mm with 1 strand of each yarn (= 2 strands). Work 4 ridges. Switch to circular needle size 5 mm. Now continue piece in stocking st. When piece measures 9 cm, inc 1 st inside 1 edge st in each side of piece. Repeat inc every 3-3-3-2½-2½-2½ cm 13-13-14-15-16-17 more times = 60-63-67-70-73-77 sts on needle. Work in stocking st until piece measures 52-53-54-55-56-57 cm. Cast off edge st in each side of piece at beg of the next 2 rows = 58-61-65-68-71-75 sts remain on needle. Then cast off for sleeve cap in each side of piece at beg of every row as follows: Cast off 4 sts 5 times in total = 18-21-25-28-31-35 sts remain on row. Cast off the remaining sts. Piece measures approx. 57-58-59-60-61-62 cm. ASSEMBLY: Sew in sleeves. Sew underarm seams inside 1 edge st. |
|||||||||||||
Diagram explanations |
|||||||||||||
|
|||||||||||||
 |
|||||||||||||
 |
|||||||||||||
Have you finished this pattern?Tag your pictures with #dropspattern #firstinlinecardigan or submit them to the #dropsfan gallery. Do you need help with this pattern?You'll find 20 tutorial videos, a Comments/Questions area and more by visiting the pattern on garnstudio.com. © 1982-2026 DROPS Design A/S. We reserve all rights. This document, including all its sub-sections, has copyrights. Read more about what you can do with our patterns at the bottom of each pattern on our site. |
|||||||||||||


With over 40 years in knitting and crochet design, DROPS Design offers one of the most extensive collections of free patterns on the internet - translated to 17 languages. As of today we count 324 catalogues and 12290 patterns translated into English (UK/cm). 12290
We work hard to bring you the best knitting and crochet have to offer, inspiration and advice as well as great quality yarns at incredible prices! Would you like to use our patterns for other than personal use? You can read what you are allowed to do in the Copyright text at the bottom of all our patterns. Happy crafting!
Post a comment to pattern DROPS 156-25
We would love to hear what you have to say about this pattern!
If you want to leave a question, please make sure you select the correct category in the form below, to speed up the answering process. Required fields are marked *.