
Popular categories
Looking for a yarn?


Comments / Questions (195)
![]() Rhonda Cunningham wrote:
Rhonda Cunningham wrote:
Thank you for your previous help. After completing the first row of A.z I am comfused. When you refer to substituimg a ch3 at the beginning of a "dc row" does that refer to a new row from the edge of the piece that begins with a dc or does it include the interiror rows of 11/13 dcs? In the first row there are 13 dcs and later there is only 11, so i assume adding a 3Ch to relace those 2 st. But as I worked the A.z pattern, the width of the piece kept increasing. thanks, Rhonda
20.01.2016 - 02:42DROPS Design answered:
Dear Mrs Cunningham, replace 1st dc with 3 ch at beg of row, so that when row starts with 1 dc, 3 ch, work 5 ch (first 3 ch = 1st dc). Inserting markers between each repeat may help you to get correct number of sts when working upwards. Happy crocheting!
20.01.2016 - 11:58
![]() Barb Collier wrote:
Barb Collier wrote:
In the diagram explanation you indicate triple over 5 chain space but you are indicating to comment put forth that it should be dc. Which one is correct?
15.01.2016 - 16:53DROPS Design answered:
Dear Mrs Collier, sorry I'm not sure about which part of diagram you are talking about, could you please give more informations? Thank you!
16.01.2016 - 10:58
![]() Minerva Nicola wrote:
Minerva Nicola wrote:
I am 91 years old and crocheted since I was a teenager. I love the pattern and wanted so much to make it, but regretfully, the instructions on this pattern are the most confusing I have ever encountered and not worth the attempt to decipher it..
12.01.2016 - 17:37DROPS Design answered:
Dear Mrs Minerva, remember that you will always get help from your DROPS store when requested. You are also free to ask your question here. Happy crocheting!
13.01.2016 - 10:26
![]() Rhonda Cunningham wrote:
Rhonda Cunningham wrote:
Can you tell me what RS and WS mean in the directions?
11.01.2016 - 02:05DROPS Design answered:
Dear Mrss Cunningham, RS row = row worked from right side (facing outside), WS row = row worked from wrong side (facing inside). Happy crocheting!
11.01.2016 - 11:25
![]() Jennifer Wingard wrote:
Jennifer Wingard wrote:
I just want to say thanks for the beautiful patterns and free tutorials you provide. I find the work challenging but manageable and always inspiring! This pattern in particular required a couple of practice swatches, and it has been worth the extra effort.
07.01.2016 - 03:02
![]() MELISSA wrote:
MELISSA wrote:
HI. LOVELY PATTERN. I SAW YOUR ANSWER TO THE COLLAR QUESTION, AND I HAVE CROCHETED IT TO THE RIGHT FRONT SIDE, BUT I AM UNSURE ABOUT WHAT TO DO WITH THE COLLAR WHEN IT IS CROCHETED TOGETHER. HOW DOES IT ATTACH TO THE BACK OF THE PIECE?
09.12.2015 - 21:03DROPS Design answered:
Dear Melissa, when you have crocheted the 2nd front piece and collar, sew together both collar (last row against last row), then the shorter length of collar (towards shoulder) is then sewn along neckline on back piece. Happy crocheting!
10.12.2015 - 09:57
![]() Karoline wrote:
Karoline wrote:
Ik heb moeite met de mouwen. Uit de uitleg is niet duidelijk waar stk over het achterpand moet komen. Wat doe ik met de 31 losse? Is 2de tour AZ de tweede lijn van AZ? Het lijkt maar niet uit te komen
07.12.2015 - 19:10DROPS Design answered:
Hoi Karoline. De 31 l zijn voor de mouw. Je haakt volgens het patroon zoals beschreven: Haak nu de 1e toer in A.1-A.3 over de l aan de goede kant en ga TEGELIJKERTIJD verder in patroon over het achterpand als hiervoor (dus haak de 4e toer in A.z over deze st). De tweede toer van A.Z is de derde rij. A.Z is gemarkeerd aan de rechterkant. Als je de lossen haakt, haak je dan de derde rij van A.Z en dan klopt het met de vierde rij, als je patroon over de lossen haakt.
09.12.2015 - 12:58
![]() Helen wrote:
Helen wrote:
Sehr geehrte MitarbeiterInnen von Drops, vorab, herzlichen Dank für die tollen Design, ich habe schon viele schöne Stücke hergestellt. Bei dem vorliegenden Modell habe ich allerdings ein Problem mit dem Stück zwischen A1 A2 A3. Könnten Sie mir bitte dieses näher erläutern?
27.11.2015 - 18:28DROPS Design answered:
Liebe Helen, bitte beschreiben Sie genauer, an welcher Stelle Sie nicht weiterkommen. Geht es um die 1. R in A.z? Und teilen Sie bitte mit, welche Größe Sie häkeln.
05.12.2015 - 17:22
![]() Iris Anderson wrote:
Iris Anderson wrote:
First time to read your directions, have crocheted most of my life but do not understand your directions at all.
25.10.2015 - 21:12DROPS Design answered:
Dear Mrs Anderson, you are welcome to ask your question here - for any individual assistance, please contact your DROPS Store they will help you even per mail or telephone. Happy crocheting!
26.10.2015 - 11:37
![]() Linda Jakobsen wrote:
Linda Jakobsen wrote:
Jeg kan ikke forstå den første række fra vrangsiden. Kan det skæres mere ud i pap for jeg er ikke så god til at læse en opskrift
25.09.2015 - 13:20DROPS Design answered:
Hej Linda. Laver du f.eks. str S, saa har du lige heklet fra retten: Hækl A.1 – se forkl, over de første 8 lm, A.2 over de næste 12 lm, A.3 over de næste 5 lm, 1 st i hver af de næste 4 lm, A.1, A.2, A.3, 1 st i hver af de næste 4 lm, A.1, A.2 over de næste 12 lm og A.3. Saa paa vrangen spejlvender du: A.3, 12 m A.2, A.1, 4 st, A.3, A.2, A.1, 4 st, 5 m A.3, 12 m A.2 og A.1 over de sidste 8 m. Du kan laese her hvordan du laeser diagrammet
14.10.2015 - 13:25
|
||||||||||||||||||||||
Shining Star#shiningstarcardigan |
||||||||||||||||||||||
 |
 |
|||||||||||||||||||||
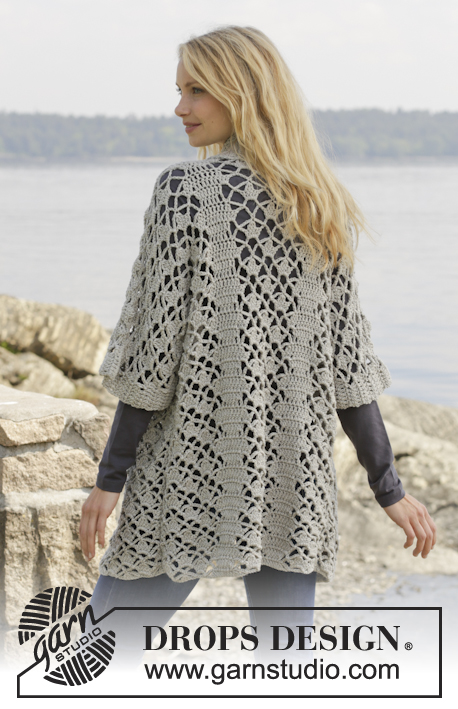
Crochet DROPS jacket with lace pattern and shawl collar in ”Merino Extra Fine”. Size: S - XXXL.
DROPS 157-18 |
||||||||||||||||||||||
|
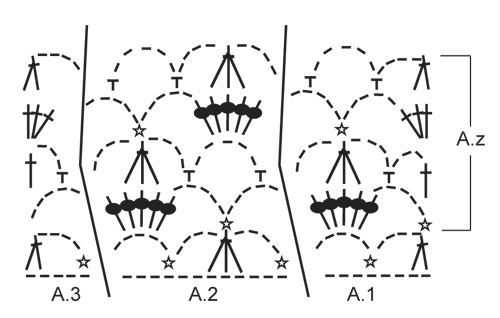
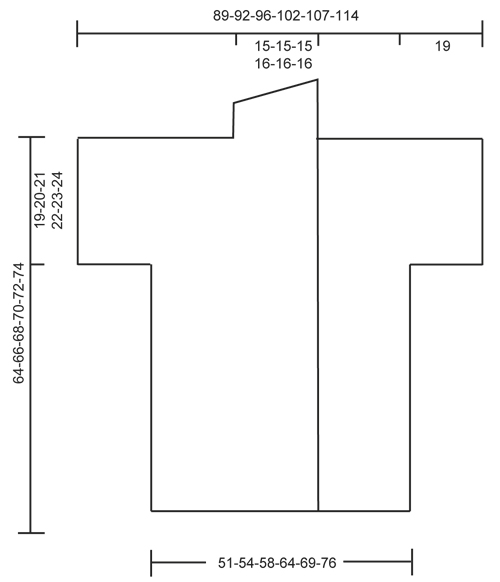
CROCHET INFO: Replace first tr at beg of every tr row with 3 ch. PATTERN: See diagrams A.1-A.3. ---------------------------------------------------------- BACK PIECE: Worked back and forth. Work 83-87-93-101-111-121 ch on hook size 5 mm with Merino Extra Fine. Then work as follows from RS: Work A.1 – see explanation above, over the first 8 ch, NOTE: Replace 1st tr with 3 ch – see CROCHET INFO above, A.2 over the next 12-12-12-12-24-24 ch, A.3 over the next 5 ch, 1 tr in each of the next 4-6-9-13-6-11 ch, A.1, A.2, A.3, 1 tr in each of the next 4-6-9-13-6-11 ch, A.1, A.2 over the next 12-12-12-12-24-24 ch and A.3. Then repeat A.z vertically until finished measurements. NOTE: On 1st row in A.z (= from WS) work as follows: Work A.3, A.2 1-1-1-1-2-2 times in width, A.1, 3 ch (replace 1 tr), 1 tr in each of the next 2-4-7-11-4-9 tr, 3 ch (replace 1 tr), 1 dc in next st, A.3, A.2, A.1, 3 ch (replace 1 tr), 1 tr in each of the next 2-4-7-11-4-9 tr, 3 ch (replace 1 tr), 1 dc in next st, A.3, A.2 1-1-1-1-2-2 times in width and A.1. REMEMBER THE CROCHET TENSION! When piece measures approx. 45-46-47-48-49-50 cm, adjust to finish with 2nd row in A.z - cut the yarn. Then work sleeves as follows: Work 29 loose ch, beg from WS and continue A.3, A.2 and A.1 and tr over back piece as before and finish with 31 loose ch, turn piece. Now work 1st row in A.1-A.3 over ch from RS, AT THE SAME TIME continue with pattern over back piece as before (i.e. work 4th row in A.z over these sts) as follows: Work 1 tr in each of the first 6 ch, A.1 over the next 8 ch, A.2 2 times in width (i.e. work last A.2 over the last 5 ch, then work the rest of A.2 over A.1), work A.2 1-1-1-1-2-2 times in width as before, A.3, 1 tr in each of the next 4-6-9-13-6-11 tr, A.1, A.2, A.3, 1 tr in each of the next 4-6-9-13-6-11 tr, A.1, A.2 1-1-1-1-2-2 times in width, then work A.2 2 times in width (i.e. work the first A.2 over A.3 and the next 6 ch), A.3 over the next 5 ch and 1 tr in each of the last 6 ch. Continue this pattern until piece measures approx. 62-64-66-68-70-72 cm - adjust to finish after a row from WS. Then finish each shoulder/sleeve separately as follows: RIGHT SHOULDER/SLEEVE: Work 6 tr, A.1 1 time and A.2 3-3-3-3-4-4 times, A.3, 1 tr in each of the next 4-6-9-13-6-11 tr. Turn and work pattern as before. Continue like this until piece measures 64-66-68-70-72-74 cm in total, adjust to finish with a whole repetition of A.z. Fasten off. LEFT SHOULDER/SLEEVE: Work the left shoulder/sleeve the same way but reversed, work A.1 instead of A.3 at beg of row. RIGHT FRONT PIECE: Worked back and forth. Work 63-65-70-74-81-86 ch (incl 3 ch to turn with) on hook size 5 mm with Merino Extra Fine. Work 1 tr in 4th ch from hook, 1 tr in each of the next 5-5-7-7-9-9 ch (= band), A.1 over the next 8 ch, A.2 over the next 12 ch, A.3 over the next 5 ch, 1 tr in each of the next 4-6-9-13-6-11 ch, A.1 over the next 8 ch, A.2 over the next 12-12-12-12-24-24 ch, A.3 over the last 5 ch. Then repeat A.z vertically until finished measurements. NOTE: On 1st row in A.z (= from WS) work as follows: Work A.3, A.2 1-1-1-1-2-2 times in width, A.1, 3 ch (replace 1 tr),1 dc in next st, 1 tr in each of the next 2-4-7-11-4-9 tr, 3 ch (replace 1 tr), A.3, A.2, A.1, 3 ch (replace 1 tr), 1 dc in next st, 1 tr in each of the next 5-5-7-7-9-9 tr. When piece measures approx. 45-46-47-48-49-50 cm, adjust to finish with 2nd row in A.z. Cut the yarn. Then work 29 loose ch for sleeve and continue as on back piece. When piece measures 64-66-68-70-72-74 cm, adjust to finish with a whole repetition of A.z (i.e. last row is from RS) - cut the yarn. Then work shawl collar. SHAWL COLLAR: Work shawl collar back and forth, beg from RS as follows: Work 1 tr in each of the first 6-6-8-8-10-10 tr, 1 tr in first tr on A.1, * 3 tr in next ch-space *, repeat from *-* 2 more times, 1 tr in next tr, * 3 tr in next ch-space *, repeat from *-* 2 more times, 1 tr in last tr in A.3, 0-0-0-1-1-1 tr in next tr = 27-27-29-30-32-32 tr. Then work short rows over band sts as follows: ROW 1 (WS): 5 dc, 5 htr, 17-17-19-20-22-22 tr ROW 2 (RS): Work 1 tr in each of the 27-27-29-30-32-32 sts. Repeat these 2 rows until piece measures approx. 10 cm on the most narrow part – adjust to finish with 2nd row (RS). Fasten off. LEFT FRONT PIECE: Work as right but reversed. Work according to diagram A.3 instead of A.1 at beg of row. When piece measures 45-46-47-48-49-50 cm, adjust to finish with 2nd row in A.z, work as before over front piece from WS, then work 31 loose ch for sleeve. When piece measures 64-66-68-70-72-74 cm, adjust to finish with a whole repetition of A.z (i.e. last row is from RS), work shawl collar. NOTE: There is no need to cut the yarn. ASSEMBLY: Place front pieces on top of back piece and work the shoulders as follows: 1 dc through both layers, * 3 ch, 1 dc in next ch-space *, repeat from *-* along the entire shoulder/sleeve and finish with 1 dc. Work the sides tog as follows: 1 dc, * 3 ch, 1 dc in ch-space on next row *, repeat from *-* along the entire side and finish with 1 dc. Work tog under sleeves as follows: * 1 dc in ch in next ch-space, 3 ch *, repeat from *-* and finish with 1 dc. Work collor tog mid back as follows: 1 dc *1 ch, 1 dc in st*, repeat from *-*. Sew the collor to the neck. |
||||||||||||||||||||||
Diagram explanations |
||||||||||||||||||||||
|
||||||||||||||||||||||
 |
||||||||||||||||||||||
 |
||||||||||||||||||||||
Have you finished this pattern?Tag your pictures with #dropspattern #shiningstarcardigan or submit them to the #dropsfan gallery. Do you need help with this pattern?You'll find 8 tutorial videos, a Comments/Questions area and more by visiting the pattern on garnstudio.com. © 1982-2026 DROPS Design A/S. We reserve all rights. This document, including all its sub-sections, has copyrights. Read more about what you can do with our patterns at the bottom of each pattern on our site. |
||||||||||||||||||||||


With over 40 years in knitting and crochet design, DROPS Design offers one of the most extensive collections of free patterns on the internet - translated to 17 languages. As of today we count 324 catalogues and 12290 patterns translated into English (UK/cm). 12290
We work hard to bring you the best knitting and crochet have to offer, inspiration and advice as well as great quality yarns at incredible prices! Would you like to use our patterns for other than personal use? You can read what you are allowed to do in the Copyright text at the bottom of all our patterns. Happy crafting!
Post a comment to pattern DROPS 157-18
We would love to hear what you have to say about this pattern!
If you want to leave a question, please make sure you select the correct category in the form below, to speed up the answering process. Required fields are marked *.