
Popular categories
Looking for a yarn?


Comments / Questions (195)
![]() Sissy wrote:
Sissy wrote:
Etter vask er jakken helt ødelagt og mange timers arbeid (pga av en elendig oppskrift) og garn går rett i søpla. Den ble vasket etter anvisningen. 40 g finvask, litt milo, ingen skyllemiddel, lett sentrifugering og tørket flat. Jakken er nå fotsid kåpe! Burde få erstatning. Dette garnet er tydeligvis ikke egnet for slikt hullmønster
24.04.2016 - 22:51DROPS Design answered:
Hej Sissy. Det er synd, men hvis den er for löst heklet (heklefasthed ikke overholdt) eller den kan have ligget for laenge i vandet, saa kan dette altsaa godt ske. Det bedste du kan göre er at hekle en pröve först og saa vaske den - saa ved du praecis hvordan garnet reagerer i din maskine.
25.04.2016 - 12:34
![]() Sølvi wrote:
Sølvi wrote:
Hvordan skal denne egentlig monteres sammen? Forklaringen er dårlig (Som resten av oppskriften) og instruksjonsvideoene gir heller ingen god forklaring. Det står jo bare fm i lm-buene og lm i mellom. Hva med stavene innerst på skulderen og ytterst på ermet. Hvordan skal disse monteres sammen? Her er det ingen lm buer å sette fastmaskene i? Det ser jo helt merkelig ut når jeg prøver å sette det sammen ihht oppskrift.
21.04.2016 - 21:20Ann-Catrine Höckert wrote:
Har nu alla delar färdig, virkningen gick som en dans utan problem :) men vid monteringen fick jag bakslag. Montering av kragen ??? har kollat videon o provat men ack nej, tyvärr har modellen så långt hår att kragen inte syns, brukar funka att kolla hur resultatet skall vara så brukar det lösa sej! Rekommenderar att modellerna skall sätta upp håret det är ju ingen skönhetstävling de är med i ! Hur monteras kragen?? Noga beskrivning! Tack på förhand!
08.04.2016 - 08:51DROPS Design answered:
Hej, Här hittar du förklaring till montering av kragen: Virka ihop kragen mitt bak såhär: 1 fm, *1 lm, 1 fm i nästa m*, upprepa från *-*. Sy kragen till halsen! Fråga också gärna i butiken du har köpt ditt DROPS garn. Lycka till!
08.04.2016 - 09:05
![]() METZGER wrote:
METZGER wrote:
Bonjour, j'essaie de faire le modèle shining mais j'ai une question pour le dos, sur la photo j'ai l'impression que le bloc où il y a plusieurs brides n'est pas de la même largeur un rang sur deux (pour ma taille XL, il faut 11 brides) mais sur mes premiers rang les rangées sont droites. pourriez-vous me préciser les explications où si je me trompe dans la réalisation de ce modèle. Bien cordialement et surperbes créations, Sandra
06.04.2016 - 12:31DROPS Design answered:
Bonjour Mme Metzger, et merci. Cette impression doit être due aux rangs où on va avoir 3B au début/à la fin du diagramme, elles se rajoutent alors visuellement aux groupes de brides au milieu du point ajouré. Bon crochet!
06.04.2016 - 14:41
![]() Petra wrote:
Petra wrote:
Hallo. ik misschien een domme vraag. Wanneer ik op hoogte ben voor het begin van de mouwen staat er knippen draad af. Moet ik nu aan de andere kant mijn draad aan het achterpand vast maken en 29 lossen haken. Het patroon telt 24 in totaal. Wat doe ik met de overige 4 lossen. Groetjes Petra
02.04.2016 - 13:35DROPS Design answered:
Hoi Petra. Je knipt de draad af, haakt de 26 lossen (deze lossen worden de mouw) en dan begin je aan de verkeerde kant zoals beschreven en haakt verder over het achterpand tot je aan de andere kant van het achterpand bent en haakt aan het eind van de toer en haakt 29 lossen (dus 3 l om mee te keren en 26 l voor de mouw). Als je de volgende toer haakt, haak je patroon over de 26 l (= mouw), patroon zoals eerst over achterpand en patroon over de 26 l (= mouw)
05.04.2016 - 16:59
![]() BONNARD Michèle wrote:
BONNARD Michèle wrote:
Je me permet de revenir vers vis au sujet du col châle COL CHÂLE: ......(Crocheter le col châle en allers et retours, en commençant sur l'endroit ainsi: 1 B dans chacune des 6-6-8-8-10-10 premières B, 1 B dans la 1ère B de A.1, *3 B dans l'arceau suivant*, répéter de *-* encore ........ Il n'est pas préciser de quel côté commencer ce col. Je vous remercie de bien vouloir me l'indiquer? Salutations
31.03.2016 - 16:03DROPS Design answered:
Bonjour Mme Bonnard, le col châle se commence sur l'endroit (devant droit), c'est-à-dire sur le côté extérieur du devant (côté bordure devant). On aura plus de hauteur sur le côté extérieur et moins côté couture le long de l'encolure dos. Bon crochet!
31.03.2016 - 17:50
![]() Petra wrote:
Petra wrote:
Hallo, Ik heb een vraag over de mouwen, er staat knip de draad van het achterpand af bij de juiste hoogte, Vervolgens staat er, haak 29 lossen voor de mouw, waar en hoe bevestig ik deze aan het achterpand. Is misschien een domme vraag maar kom er even niet uit. Groetjes Petra
30.03.2016 - 10:14DROPS Design answered:
Hoi Petra. Zie mijn antwoord hierboven
05.04.2016 - 17:06
![]() Katheryn Nowlin wrote:
Katheryn Nowlin wrote:
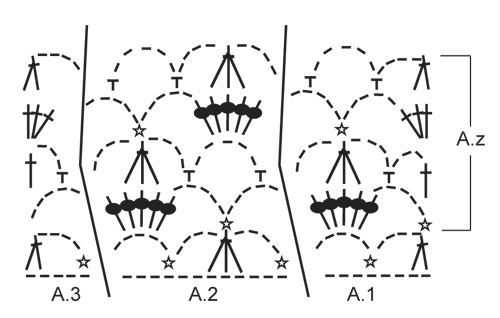
The graph terms are not clear from all the comments and the tutorial only shows A1 A2 A3 But not how to work 2 A2's or even Turning the work. Have you done the actual Pattern in Stitch terms rather than of graph terms?
28.03.2016 - 21:20DROPS Design answered:
Dear Mrs Nowlin, after you have worked 1st A.2 in width, start again from the beg of A.2 and repeat the same sts in A.2 as before. Repeat the sts in A.2 in width until you have worked the number of sts stated for your size. When turning, replace 1st dc at beg of every dc row with 3 ch. For any further personnal assistance, you are welcome to contact your DROPS store, even per mail or telephone. Happy crocheting!
29.03.2016 - 10:35
![]() BONNARD Michèle wrote:
BONNARD Michèle wrote:
Bonjour J'adore vos modèles mais je suis en train de réaliser le modèle 157/18, et je suis sur le devant droit et j'ai un problème après avoir monter 29 mailles je ne comprends pas comment repartir pas 3 OU A1. Merci de bien vouloir me préciser. Salutations.
21.03.2016 - 11:37DROPS Design answered:
Bonjour Mme Bonnard, après avoir monté vos 29 ml avec le fil, continuez comme avant sur les mailles suivantes en crochetant le rang 3 de A.z sur le devant, et au rang suivant sur l'endroit, continuez comme vous avez fait pour le dos: les brides de bordure devant, le point fantaisie comme avant et terminez par 6B pour la bordure de la manche. Bon crochet!
21.03.2016 - 13:22Gabriela Nieva wrote:
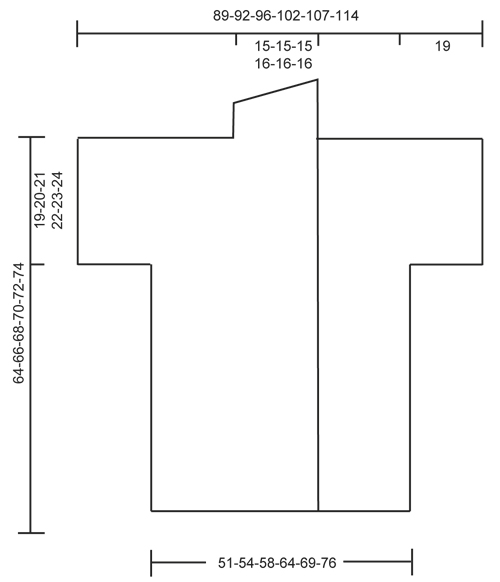
Hola. Saludos desde México. Gracias por poner a nuestra disposición tan lindos patrones. Solo tengo una duda. En las instrucciones para la espalda dice: cuando la labor mida aproximadamente 45-46 etc. Pero en el último gráfico muestra las medidas 64-66. ¿Cuál es la medida correcta? Espero que me puedan ayudar.
14.02.2016 - 07:23DROPS Design answered:
Hola Gabriela . El patrón y las medidas son correctos. 45-46 cm es la medida parcial de la espalda desde el borde inferior hasta la sisa y 64-66 cm es la medida de la chaqueta entera
21.02.2016 - 23:08
|
||||||||||||||||||||||
Shining Star#shiningstarcardigan |
||||||||||||||||||||||
 |
 |
|||||||||||||||||||||
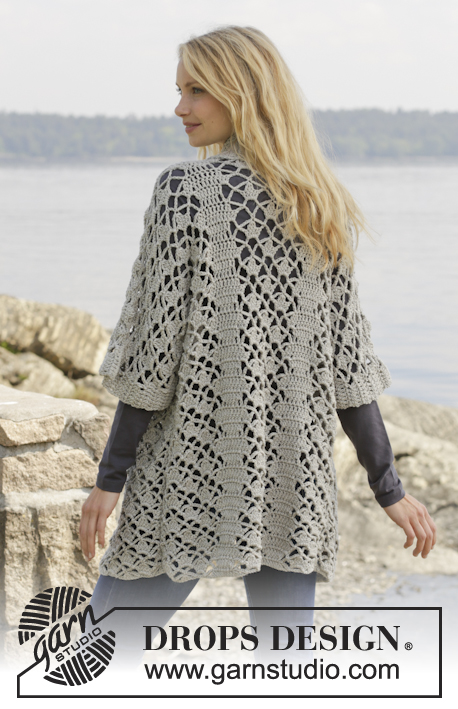
Crochet DROPS jacket with lace pattern and shawl collar in ”Merino Extra Fine”. Size: S - XXXL.
DROPS 157-18 |
||||||||||||||||||||||
|
CROCHET INFO: Replace first tr at beg of every tr row with 3 ch. PATTERN: See diagrams A.1-A.3. ---------------------------------------------------------- BACK PIECE: Worked back and forth. Work 83-87-93-101-111-121 ch on hook size 5 mm with Merino Extra Fine. Then work as follows from RS: Work A.1 – see explanation above, over the first 8 ch, NOTE: Replace 1st tr with 3 ch – see CROCHET INFO above, A.2 over the next 12-12-12-12-24-24 ch, A.3 over the next 5 ch, 1 tr in each of the next 4-6-9-13-6-11 ch, A.1, A.2, A.3, 1 tr in each of the next 4-6-9-13-6-11 ch, A.1, A.2 over the next 12-12-12-12-24-24 ch and A.3. Then repeat A.z vertically until finished measurements. NOTE: On 1st row in A.z (= from WS) work as follows: Work A.3, A.2 1-1-1-1-2-2 times in width, A.1, 3 ch (replace 1 tr), 1 tr in each of the next 2-4-7-11-4-9 tr, 3 ch (replace 1 tr), 1 dc in next st, A.3, A.2, A.1, 3 ch (replace 1 tr), 1 tr in each of the next 2-4-7-11-4-9 tr, 3 ch (replace 1 tr), 1 dc in next st, A.3, A.2 1-1-1-1-2-2 times in width and A.1. REMEMBER THE CROCHET TENSION! When piece measures approx. 45-46-47-48-49-50 cm, adjust to finish with 2nd row in A.z - cut the yarn. Then work sleeves as follows: Work 29 loose ch, beg from WS and continue A.3, A.2 and A.1 and tr over back piece as before and finish with 31 loose ch, turn piece. Now work 1st row in A.1-A.3 over ch from RS, AT THE SAME TIME continue with pattern over back piece as before (i.e. work 4th row in A.z over these sts) as follows: Work 1 tr in each of the first 6 ch, A.1 over the next 8 ch, A.2 2 times in width (i.e. work last A.2 over the last 5 ch, then work the rest of A.2 over A.1), work A.2 1-1-1-1-2-2 times in width as before, A.3, 1 tr in each of the next 4-6-9-13-6-11 tr, A.1, A.2, A.3, 1 tr in each of the next 4-6-9-13-6-11 tr, A.1, A.2 1-1-1-1-2-2 times in width, then work A.2 2 times in width (i.e. work the first A.2 over A.3 and the next 6 ch), A.3 over the next 5 ch and 1 tr in each of the last 6 ch. Continue this pattern until piece measures approx. 62-64-66-68-70-72 cm - adjust to finish after a row from WS. Then finish each shoulder/sleeve separately as follows: RIGHT SHOULDER/SLEEVE: Work 6 tr, A.1 1 time and A.2 3-3-3-3-4-4 times, A.3, 1 tr in each of the next 4-6-9-13-6-11 tr. Turn and work pattern as before. Continue like this until piece measures 64-66-68-70-72-74 cm in total, adjust to finish with a whole repetition of A.z. Fasten off. LEFT SHOULDER/SLEEVE: Work the left shoulder/sleeve the same way but reversed, work A.1 instead of A.3 at beg of row. RIGHT FRONT PIECE: Worked back and forth. Work 63-65-70-74-81-86 ch (incl 3 ch to turn with) on hook size 5 mm with Merino Extra Fine. Work 1 tr in 4th ch from hook, 1 tr in each of the next 5-5-7-7-9-9 ch (= band), A.1 over the next 8 ch, A.2 over the next 12 ch, A.3 over the next 5 ch, 1 tr in each of the next 4-6-9-13-6-11 ch, A.1 over the next 8 ch, A.2 over the next 12-12-12-12-24-24 ch, A.3 over the last 5 ch. Then repeat A.z vertically until finished measurements. NOTE: On 1st row in A.z (= from WS) work as follows: Work A.3, A.2 1-1-1-1-2-2 times in width, A.1, 3 ch (replace 1 tr),1 dc in next st, 1 tr in each of the next 2-4-7-11-4-9 tr, 3 ch (replace 1 tr), A.3, A.2, A.1, 3 ch (replace 1 tr), 1 dc in next st, 1 tr in each of the next 5-5-7-7-9-9 tr. When piece measures approx. 45-46-47-48-49-50 cm, adjust to finish with 2nd row in A.z. Cut the yarn. Then work 29 loose ch for sleeve and continue as on back piece. When piece measures 64-66-68-70-72-74 cm, adjust to finish with a whole repetition of A.z (i.e. last row is from RS) - cut the yarn. Then work shawl collar. SHAWL COLLAR: Work shawl collar back and forth, beg from RS as follows: Work 1 tr in each of the first 6-6-8-8-10-10 tr, 1 tr in first tr on A.1, * 3 tr in next ch-space *, repeat from *-* 2 more times, 1 tr in next tr, * 3 tr in next ch-space *, repeat from *-* 2 more times, 1 tr in last tr in A.3, 0-0-0-1-1-1 tr in next tr = 27-27-29-30-32-32 tr. Then work short rows over band sts as follows: ROW 1 (WS): 5 dc, 5 htr, 17-17-19-20-22-22 tr ROW 2 (RS): Work 1 tr in each of the 27-27-29-30-32-32 sts. Repeat these 2 rows until piece measures approx. 10 cm on the most narrow part – adjust to finish with 2nd row (RS). Fasten off. LEFT FRONT PIECE: Work as right but reversed. Work according to diagram A.3 instead of A.1 at beg of row. When piece measures 45-46-47-48-49-50 cm, adjust to finish with 2nd row in A.z, work as before over front piece from WS, then work 31 loose ch for sleeve. When piece measures 64-66-68-70-72-74 cm, adjust to finish with a whole repetition of A.z (i.e. last row is from RS), work shawl collar. NOTE: There is no need to cut the yarn. ASSEMBLY: Place front pieces on top of back piece and work the shoulders as follows: 1 dc through both layers, * 3 ch, 1 dc in next ch-space *, repeat from *-* along the entire shoulder/sleeve and finish with 1 dc. Work the sides tog as follows: 1 dc, * 3 ch, 1 dc in ch-space on next row *, repeat from *-* along the entire side and finish with 1 dc. Work tog under sleeves as follows: * 1 dc in ch in next ch-space, 3 ch *, repeat from *-* and finish with 1 dc. Work collor tog mid back as follows: 1 dc *1 ch, 1 dc in st*, repeat from *-*. Sew the collor to the neck. |
||||||||||||||||||||||
Diagram explanations |
||||||||||||||||||||||
|
||||||||||||||||||||||
 |
||||||||||||||||||||||
 |
||||||||||||||||||||||
Have you finished this pattern?Tag your pictures with #dropspattern #shiningstarcardigan or submit them to the #dropsfan gallery. Do you need help with this pattern?You'll find 8 tutorial videos, a Comments/Questions area and more by visiting the pattern on garnstudio.com. © 1982-2026 DROPS Design A/S. We reserve all rights. This document, including all its sub-sections, has copyrights. Read more about what you can do with our patterns at the bottom of each pattern on our site. |
||||||||||||||||||||||


With over 40 years in knitting and crochet design, DROPS Design offers one of the most extensive collections of free patterns on the internet - translated to 17 languages. As of today we count 324 catalogues and 12290 patterns translated into English (UK/cm). 12290
We work hard to bring you the best knitting and crochet have to offer, inspiration and advice as well as great quality yarns at incredible prices! Would you like to use our patterns for other than personal use? You can read what you are allowed to do in the Copyright text at the bottom of all our patterns. Happy crafting!
Post a comment to pattern DROPS 157-18
We would love to hear what you have to say about this pattern!
If you want to leave a question, please make sure you select the correct category in the form below, to speed up the answering process. Required fields are marked *.