
Popular categories
Looking for a yarn?


Comments / Questions (195)
![]() Renee wrote:
Renee wrote:
Oh! I think I got it, now...the sleeve chains! I've been trying to work the A1-A3 pattern over those chain stitches. I read most of the English Q/A's, and think the sleeve chains are to be attached to the back, for working sleeves with the pattern (A1-A3), later. Correct?
27.12.2016 - 03:24DROPS Design answered:
Dear Renee, you have first to crochet 29 ch for 1st sleeve, then work pattern as before across the row (=A.1-A.3), and crochet 31 ch for 2nd sleeve. Turn and work A.1-A.3 over all sts, in both chains for the sleeves as well as in the sts from previous row on back piece. Happy crocheting!
29.12.2016 - 14:34
![]() Monika Dinges wrote:
Monika Dinges wrote:
Liebes Drops Team, ich habe nun diese wunderschöne Weste fertiggestellt. Aber wie und wo mache ich diesen sSchalkragen fest? Vielen Dank schonmal, eure Moni
21.11.2016 - 20:04DROPS Design answered:
Liebe Frau Dinges, die Ende den beiden Schalkragen (vom rechten und linken Vorderteil) zusammennähenn, dann die Seite vom Schalkragen gegen Hals am Rückenteil zusammennähen. Viel Spaß beim häkeln!
22.11.2016 - 08:56
![]() Monika Dinges wrote:
Monika Dinges wrote:
Bei der 1. rückreihe verstehe ich die stäbchen dazwischen nicht. ich häkle xxl und verstehe: A3-A2/ 2x-A1 3Lm-1fm-4Stb-1fm-3Lm A3-A2usw. ist das korrekt? oder evt. umgekehrt 1fm-3Lm-4Stb-3Lm-1fm. Vielen Dank
28.10.2016 - 21:15DROPS Design answered:
Liebe frau Dinges, bei der 1. Rückreihe in der Größe XL häkeln Sie so: A.3, (A.2 x 2), A.1 dann 3 Lm, 1 fm in die nächste M, 1 Stb in die nächsten 4 Stb, 3 LM, A.3, A.2, A.1, 3Lm, 1 Stb in die nächsten 4 Stb, 3 Lm, 1 fm in die nächste M., A.3, (A.2 x 2), A.1.
31.10.2016 - 09:12
![]() Monika Dinges wrote:
Monika Dinges wrote:
Hallo, ich verstehe die erste Rückreihe nicht. soll ich die von links nach rechts häkeln? oder wie ist das gemeint?
28.10.2016 - 08:36DROPS Design answered:
Liebe Frau Dinges, die 1. Reihe wird von der Vorderseite gehäkelt, dh: A.1, dann A.2 und A.3. Die 1. Reihe in A.z beginnt von der Rückseite, dh: mit A.3 anfangen, dann A.2 wiederholen, und mit A.1 enden. Von der Vorderseite lesen Sie das Diagram von rechts nach links und von der Rückseite lesen Sie das Diagram von links nach rechts.
28.10.2016 - 09:48
![]() Sven Danch wrote:
Sven Danch wrote:
Vielen Dank für die schnelle Antwort. Aber wann fange ich dann mit den 6 Stb. für das Bündchen an?
15.09.2016 - 12:27DROPS Design answered:
Lieber Herr Danch, ich habe leider zuerst zu schnell gelesen, nach der Reihe mit den LM, müssen Sie wie beschrieben häkeln, dh je 1 Stb in die ersten Lm, A.1 über die nächsten 8 Lm, weiter wie beschrieben und mit A.3 und je 1 Stb in den letzten 6 Lm häkeln. (siehe gesamte Beschriebung unter 4. Absatz vom Rückenteil).
15.09.2016 - 12:58
![]() Sven Danch wrote:
Sven Danch wrote:
Hallo, ich habe auch eine Frage zu den Ärmeln am Rückenteil. In der Anleitung steht: "Die Ärmel wie folgt ansetzen: 29 lockere Lm häkeln, dann mit einer Rück-R beginnen und A.3, A.2, A.1 und Stb am Rückenteil wie zuvor weiterhäkeln, enden mit 31 lockeren Lm, wenden" Aber wenn ich die nachfolgende Anleitung weiterlese, muß ich ja die Luftmaschen zuerst auf beiden Seiten anschlagen bevor ich mit dem Muster beginne. Mit bestem Dank Sven
15.09.2016 - 09:56DROPS Design answered:
Lieber Herr Danch, den Faden müssen Sie jetzt erst abschneiden. Dann häkeln Sie 29 lockere Maschen (= 1. Ärmel), dann A.3, A.2 und A.1 am Rückenteil wie zuvor häkeln, dann 31 lockere Maschen häkeln (= 2. Ärmel). Bei der nächste Reihe häkeln Sie dann die 1. Reihe von A.1-A.3 über die Lm (= Ärmel) und 4. Reihe A.z über den restlichen Maschen (= Rückenteil). So häkeln Sie gleichzeitig beide Ärmel.
15.09.2016 - 11:41Maureen wrote:
When adding chains for the sleeves on the back piece, how do I go from a chain to a treble? I presumed that I needed to do a slip stitch and 3 chains, but this leaves a step in the work for the next row. On the other side of the work, when you finish with 3 dc group, the yarn will be above the work, not sitting at the lower level as in the first side.
12.08.2016 - 08:12DROPS Design answered:
Dear Maureen, when adding sts for sleeve you first chain 29 chains, then crochet next row over back piece (simply work in the sts over back piece as before), and crochet 31 chains at the end of this row. On next row, work in pattern as explained, ie with 6 tr at the beg and end of row (sleeve edges). Happy crocheting!
15.08.2016 - 10:41Maureen wrote:
I have been having the same problem as (it seems) just about everyone else. The problem with the double crochet sections arises from thinking that 3 chains are used as a substitute either side of the double crochets- ON EVERY ROW. They are not....... This is done ONLY in the first row. I have spent many hours trying to get this to look right and the penny finally dropped.
04.08.2016 - 12:13
![]() Lori wrote:
Lori wrote:
I am doing the large size, and it seems that the double crochet part is meant to alternate from 9 to 7, 9 to 7 on and on? This isn't what it looks like in the picture, though. A lot of people are asking this question, but you don't actually say that this is how it is to be done.
16.07.2016 - 01:34DROPS Design answered:
Dear Lori, it looks fine, you will have either 9 dc or 7 dc with 3 ch before and after (these 3 ch replace the 1st and last of the 9 dc). Happy crocheting!
18.07.2016 - 08:41Nurul wrote:
Thank you for the explanation. So, on front left from the short row, continue chain for sleeve? How to chain for sleeve? And should i cut the yarn to continue on new sts + front right?
29.06.2016 - 19:46DROPS Design answered:
Dear Nurul, if first row in sleeve on right front piece has to be started at the end of a WS row on left front piece, just chain and start sleeve at beg of next row from RS. If you are unsure how to do, you can also cut the yarn as you did for right front piece, just remember to chain on the right side of left front piece for the sleeve. Happy crocheting!
30.06.2016 - 08:34
|
||||||||||||||||||||||
Shining Star#shiningstarcardigan |
||||||||||||||||||||||
 |
 |
|||||||||||||||||||||
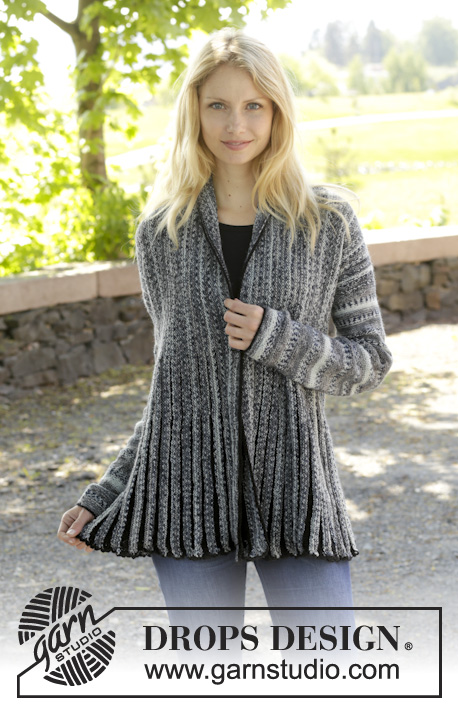
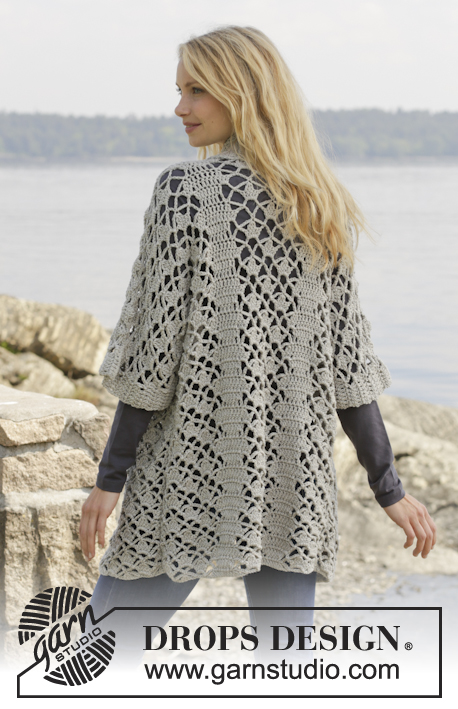
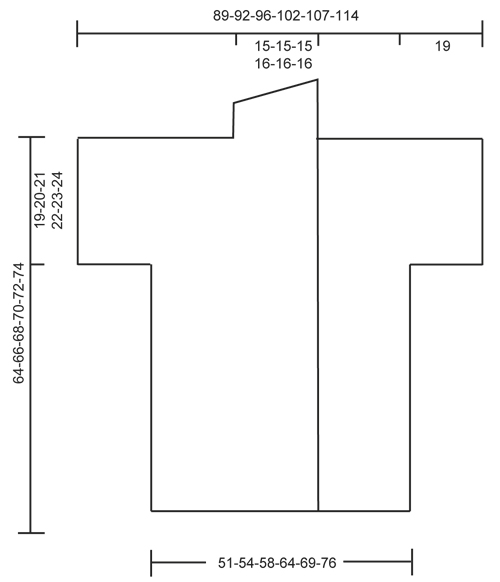
Crochet DROPS jacket with lace pattern and shawl collar in ”Merino Extra Fine”. Size: S - XXXL.
DROPS 157-18 |
||||||||||||||||||||||
|
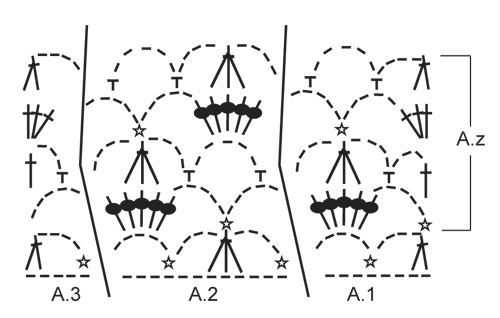
CROCHET INFO: Replace first tr at beg of every tr row with 3 ch. PATTERN: See diagrams A.1-A.3. ---------------------------------------------------------- BACK PIECE: Worked back and forth. Work 83-87-93-101-111-121 ch on hook size 5 mm with Merino Extra Fine. Then work as follows from RS: Work A.1 – see explanation above, over the first 8 ch, NOTE: Replace 1st tr with 3 ch – see CROCHET INFO above, A.2 over the next 12-12-12-12-24-24 ch, A.3 over the next 5 ch, 1 tr in each of the next 4-6-9-13-6-11 ch, A.1, A.2, A.3, 1 tr in each of the next 4-6-9-13-6-11 ch, A.1, A.2 over the next 12-12-12-12-24-24 ch and A.3. Then repeat A.z vertically until finished measurements. NOTE: On 1st row in A.z (= from WS) work as follows: Work A.3, A.2 1-1-1-1-2-2 times in width, A.1, 3 ch (replace 1 tr), 1 tr in each of the next 2-4-7-11-4-9 tr, 3 ch (replace 1 tr), 1 dc in next st, A.3, A.2, A.1, 3 ch (replace 1 tr), 1 tr in each of the next 2-4-7-11-4-9 tr, 3 ch (replace 1 tr), 1 dc in next st, A.3, A.2 1-1-1-1-2-2 times in width and A.1. REMEMBER THE CROCHET TENSION! When piece measures approx. 45-46-47-48-49-50 cm, adjust to finish with 2nd row in A.z - cut the yarn. Then work sleeves as follows: Work 29 loose ch, beg from WS and continue A.3, A.2 and A.1 and tr over back piece as before and finish with 31 loose ch, turn piece. Now work 1st row in A.1-A.3 over ch from RS, AT THE SAME TIME continue with pattern over back piece as before (i.e. work 4th row in A.z over these sts) as follows: Work 1 tr in each of the first 6 ch, A.1 over the next 8 ch, A.2 2 times in width (i.e. work last A.2 over the last 5 ch, then work the rest of A.2 over A.1), work A.2 1-1-1-1-2-2 times in width as before, A.3, 1 tr in each of the next 4-6-9-13-6-11 tr, A.1, A.2, A.3, 1 tr in each of the next 4-6-9-13-6-11 tr, A.1, A.2 1-1-1-1-2-2 times in width, then work A.2 2 times in width (i.e. work the first A.2 over A.3 and the next 6 ch), A.3 over the next 5 ch and 1 tr in each of the last 6 ch. Continue this pattern until piece measures approx. 62-64-66-68-70-72 cm - adjust to finish after a row from WS. Then finish each shoulder/sleeve separately as follows: RIGHT SHOULDER/SLEEVE: Work 6 tr, A.1 1 time and A.2 3-3-3-3-4-4 times, A.3, 1 tr in each of the next 4-6-9-13-6-11 tr. Turn and work pattern as before. Continue like this until piece measures 64-66-68-70-72-74 cm in total, adjust to finish with a whole repetition of A.z. Fasten off. LEFT SHOULDER/SLEEVE: Work the left shoulder/sleeve the same way but reversed, work A.1 instead of A.3 at beg of row. RIGHT FRONT PIECE: Worked back and forth. Work 63-65-70-74-81-86 ch (incl 3 ch to turn with) on hook size 5 mm with Merino Extra Fine. Work 1 tr in 4th ch from hook, 1 tr in each of the next 5-5-7-7-9-9 ch (= band), A.1 over the next 8 ch, A.2 over the next 12 ch, A.3 over the next 5 ch, 1 tr in each of the next 4-6-9-13-6-11 ch, A.1 over the next 8 ch, A.2 over the next 12-12-12-12-24-24 ch, A.3 over the last 5 ch. Then repeat A.z vertically until finished measurements. NOTE: On 1st row in A.z (= from WS) work as follows: Work A.3, A.2 1-1-1-1-2-2 times in width, A.1, 3 ch (replace 1 tr),1 dc in next st, 1 tr in each of the next 2-4-7-11-4-9 tr, 3 ch (replace 1 tr), A.3, A.2, A.1, 3 ch (replace 1 tr), 1 dc in next st, 1 tr in each of the next 5-5-7-7-9-9 tr. When piece measures approx. 45-46-47-48-49-50 cm, adjust to finish with 2nd row in A.z. Cut the yarn. Then work 29 loose ch for sleeve and continue as on back piece. When piece measures 64-66-68-70-72-74 cm, adjust to finish with a whole repetition of A.z (i.e. last row is from RS) - cut the yarn. Then work shawl collar. SHAWL COLLAR: Work shawl collar back and forth, beg from RS as follows: Work 1 tr in each of the first 6-6-8-8-10-10 tr, 1 tr in first tr on A.1, * 3 tr in next ch-space *, repeat from *-* 2 more times, 1 tr in next tr, * 3 tr in next ch-space *, repeat from *-* 2 more times, 1 tr in last tr in A.3, 0-0-0-1-1-1 tr in next tr = 27-27-29-30-32-32 tr. Then work short rows over band sts as follows: ROW 1 (WS): 5 dc, 5 htr, 17-17-19-20-22-22 tr ROW 2 (RS): Work 1 tr in each of the 27-27-29-30-32-32 sts. Repeat these 2 rows until piece measures approx. 10 cm on the most narrow part – adjust to finish with 2nd row (RS). Fasten off. LEFT FRONT PIECE: Work as right but reversed. Work according to diagram A.3 instead of A.1 at beg of row. When piece measures 45-46-47-48-49-50 cm, adjust to finish with 2nd row in A.z, work as before over front piece from WS, then work 31 loose ch for sleeve. When piece measures 64-66-68-70-72-74 cm, adjust to finish with a whole repetition of A.z (i.e. last row is from RS), work shawl collar. NOTE: There is no need to cut the yarn. ASSEMBLY: Place front pieces on top of back piece and work the shoulders as follows: 1 dc through both layers, * 3 ch, 1 dc in next ch-space *, repeat from *-* along the entire shoulder/sleeve and finish with 1 dc. Work the sides tog as follows: 1 dc, * 3 ch, 1 dc in ch-space on next row *, repeat from *-* along the entire side and finish with 1 dc. Work tog under sleeves as follows: * 1 dc in ch in next ch-space, 3 ch *, repeat from *-* and finish with 1 dc. Work collor tog mid back as follows: 1 dc *1 ch, 1 dc in st*, repeat from *-*. Sew the collor to the neck. |
||||||||||||||||||||||
Diagram explanations |
||||||||||||||||||||||
|
||||||||||||||||||||||
 |
||||||||||||||||||||||
 |
||||||||||||||||||||||
Have you finished this pattern?Tag your pictures with #dropspattern #shiningstarcardigan or submit them to the #dropsfan gallery. Do you need help with this pattern?You'll find 8 tutorial videos, a Comments/Questions area and more by visiting the pattern on garnstudio.com. © 1982-2026 DROPS Design A/S. We reserve all rights. This document, including all its sub-sections, has copyrights. Read more about what you can do with our patterns at the bottom of each pattern on our site. |
||||||||||||||||||||||


With over 40 years in knitting and crochet design, DROPS Design offers one of the most extensive collections of free patterns on the internet - translated to 17 languages. As of today we count 324 catalogues and 12290 patterns translated into English (UK/cm). 12290
We work hard to bring you the best knitting and crochet have to offer, inspiration and advice as well as great quality yarns at incredible prices! Would you like to use our patterns for other than personal use? You can read what you are allowed to do in the Copyright text at the bottom of all our patterns. Happy crafting!
Post a comment to pattern DROPS 157-18
We would love to hear what you have to say about this pattern!
If you want to leave a question, please make sure you select the correct category in the form below, to speed up the answering process. Required fields are marked *.