
Popular categories
Looking for a yarn?


Comments / Questions (29)
![]() Daniela wrote:
Daniela wrote:
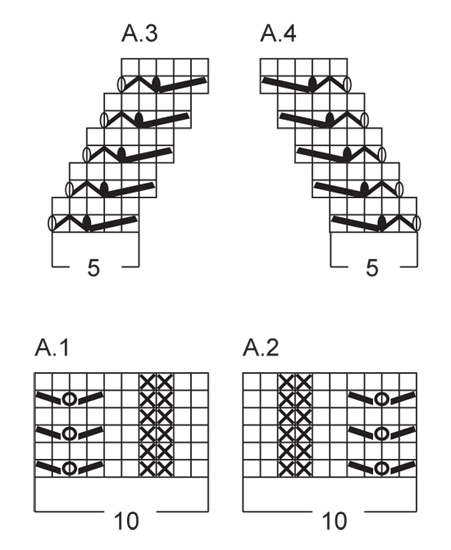
Buongiorno, si ho lavorato esattamente come dice lei, ma nel giro seguente nella doppia gettata devo lavorare solo un rovescio e lasciar cadere l'altra maglia altrimenti non viene il buco grande. Ho visto il video relativo e fa in questo modo. Mi scusi per il disturbo ma sto diventanta matta, ormai è una questione di principio riuscire a fare questo schema! Grazie mille!
26.01.2015 - 10:56DROPS Design answered:
Buongiorno Daniela. Al ferro successivo, nella m gettata doppia deve lavorare 2 m rov, la seconda sarà a rov ritorto. In questo modo il numero delle m non cambia. Buon lavoro!
26.01.2015 - 11:03
![]() Daniela wrote:
Daniela wrote:
Se è giusto dove sbaglio? Io lo leggo così il diagramma A1: 2D, 2 R, 2 D, 2 maglie insieme, 1 doppio gettato, passare una maglia, 1 D, accavallare la maglia passata. Ho accavallato 1 volta, quindi ho 1 maglia in più ma ho diminuito 2 volte quindi sul ferro rovescio mi trovo 9 maglie anzichè 10. Grazie per l'attenzione!
25.01.2015 - 17:01DROPS Design answered:
Buonasera Daniela, il diagramma A.1 e A.2 sono lavorati su 10 m in questo modo: A.1 (2 m dir, 2 m rov, 2 m dir, 2 m insieme a dir, 1 doppio gettato, 1 accavallata semplice = 2 diminuzioni, 2 aumenti, quindi nessuna variazione del n° di m); A.2 è speculare. E' sicura di lavorare in modo corretto il doppio gettato? Buon lavoro!
25.01.2015 - 19:53
![]() Daniela wrote:
Daniela wrote:
Gli schemi A1 e A2 sono sbagliati. A rovescio mi trovo 1 maglia in meno. Qualcuno sa aiutarmi? Grazie
18.01.2015 - 13:27DROPS Design answered:
Buongiorno Daniela, i diagrammi A.1 e A.2 sono corretti: è sicura di aver lavorato 1 doppio gettato nei ferri 1, 3 e 5 del diagramma come indicato? Buon lavoro!
19.01.2015 - 11:05
![]() Katharina wrote:
Katharina wrote:
Ich verstehe leider nicht, wie ich den doppelten Umschlag -welcher in der Hinreihe entsteht -in der Rückreihe stricken soll. Mein Strickbild sieht nicht so aus wie auf dem Bild. Irgendetwas mache ich falsch. Danke für die Hilfe.
15.12.2014 - 20:22DROPS Design answered:
Der doppelte Umschlag ist ein ein einziger, doppelt so großer Umschlag zu sehen. D.h. Sie stechen in der Rück-R in den ersten Umschlag, der nun kommt, ein und stricken ihn links, den 2. Umschlag lassen Sie dann einfach von der Nadel gleiten. So haben Sie ein besonders großes Loch. Es gibt auch ein Video dazu, unter "Videos" neben dem Foto.
17.12.2014 - 08:55
![]() Rhiannon Schmitt wrote:
Rhiannon Schmitt wrote:
Wandern A3 und A4 automatisch zur Mitte, oder müssen bei den 17M (in Größe M) in jeder 2. Reihe eine M weniger und folglich bei den mittigen 46M (in Größe M) in jeder 2. Reihe 2M mehr gestrickt werden? Vielen Dank vorab für die Hilfe :-)
07.07.2014 - 14:01DROPS Design answered:
Sie stricken A3 und A4 1x in der Höhe wie im Diagramm gezeigt (darin ist die Verschiebung ja enthalten), danach stricken Sie folgerichtig weiter, also immer weiter in jeder Hin-R 1 M in Richtung Mitte versetzt, die Anzahl der glatt-re-M in der Mitte wird also immer weniger und an den Seiten dafür mehr.
14.07.2014 - 22:41
![]() Pamela wrote:
Pamela wrote:
El tejido me disminuye cuando ago la cenefa de los costados
03.07.2014 - 22:57DROPS Design answered:
Hola Pamela. ¿Puedes concretar la pregunta? ¿En que parte del patrón tienes el problema? Ten en cuenta el comentario: "ATENCIÓN: A.3 y A.4 se desplazan 1 pt hacia el centro del delantero y el centro de la espalda en cada fila del LD"., por si el problema está ahí.
06.07.2014 - 10:04
![]() Birgit wrote:
Birgit wrote:
A1 innefattar 4 kantmaskor.
29.05.2014 - 19:13
![]() Karin Petersen wrote:
Karin Petersen wrote:
Så vidt jeg kan tælle, mangler de 4 kantmasker i hver side. I opskriften står i parentesen inkl 4 kantmasker i hver side. Det forstår jeg som om de er medregnet i masketallet man skal slå op! Men så passer det ikke med mønster og maskerne i mellem. Skal der slås 8 masker ekstra op til kantmasker? Med venlig hilsen Karin
29.05.2014 - 17:03DROPS Design answered:
Hej Karin. Antallet af masker er inkl de 4 kantmasker i hver side, du skal ikke slaa flere op. Mönstrene (A.1 og A.2) löber over 10 masker hver og de 4 förste/sidste af disse masker er kantmaskerne (altsaa de 2 r, 2 vr).
20.06.2014 - 12:06
![]() Heidi wrote:
Heidi wrote:
Er det feil i mønsteret? Skal ikke pinne 2 (fra rangen) også starte med A1? Slik at hver pinne starter med stolpemaskene?
20.05.2014 - 22:17DROPS Design answered:
Hei Heidi. Nej, mönstret er korrekt. Du starter med A.1 (Höjre forkant) og afslutter med A.2 (venstre forkant). Naar du saa strikker vrangen skal du starte med A.2 og afslutte med A.1
21.05.2014 - 12:29
![]() Voisin wrote:
Voisin wrote:
Il est indiqué que le point principal employé est un point mousse avant les explications données, alors qu'il s'agit d'un point jersey.
25.04.2014 - 12:05DROPS Design answered:
Bonjour Mme Voisin, on explique comment tricoter le point mousse en allers et retours, pour tricoter les diagrammes, suivez bien la légende (1 m end sur l'end, env sur l'env = jersey end). Bon tricot!
25.04.2014 - 13:46
|
|||||||||||||||||||||||||||||||
Linda Cardigan#lindacardigan |
|||||||||||||||||||||||||||||||
|
|
|||||||||||||||||||||||||||||||
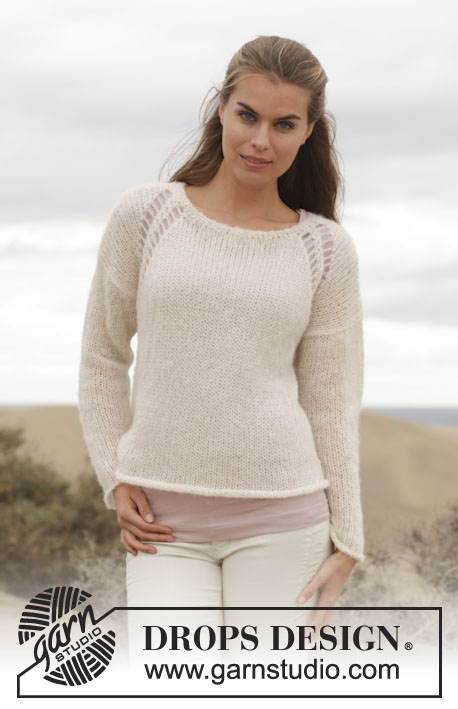
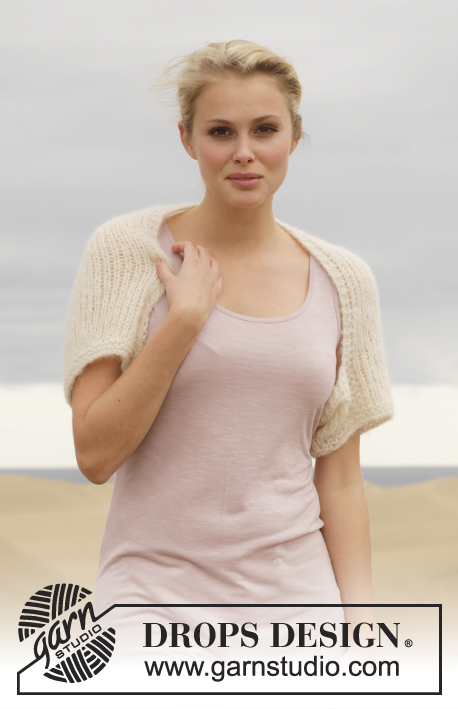
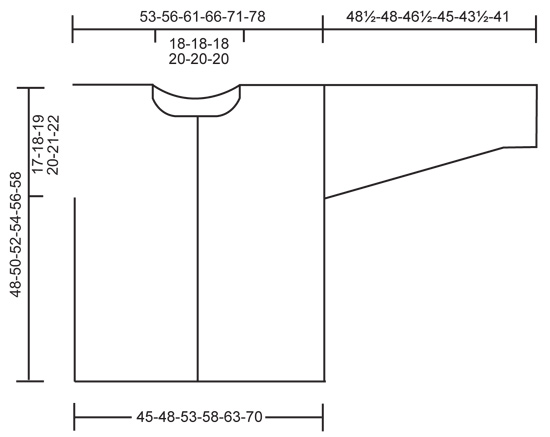
Knitted DROPS jacket with lace pattern in ”Brushed Alpaca Silk”. Size: S - XXXL.
DROPS 154-22 |
|||||||||||||||||||||||||||||||
|
GARTER ST (back and forth on needle): K all rows. 1 ridge = 2 rows K. PATTERN: See diagrams A.1-A.4. The diagrams show all rows in pattern seen from RS. BUTTONHOLES: Cast off for buttonholes on right band. 1 button hole = cast off 4th st from mid front. On next row cast on 1 new st over the cast off st. Cast off for buttonholes when piece measures: SIZE S: 9, 15, 21, 27, 33 and 39 cm SIZE M: 11, 17, 23, 29, 35 and 41 cm SIZE L: 7, 14, 21, 28, 35 and 42 cm SIZE XL: 8, 14, 20, 26, 32, 38 and 44 cm SIZE XXL: 9, 15, 21, 27, 33, 39 and 45 cm SIZE XXXL: 5, 12, 19, 26, 33, 40 and 47 cm ---------------------------------------------------------- BODY: Worked back and forth on circular needle. Cast on 116-124-136-148-160-176 sts (incl 4 band sts in each side) on circular needle size 8 mm with Brushed Alpaca Silk. Work as follows from RS: A.1 (= 10 sts), K 96-104-116-128-140-156, finish with A.2 (= 10 sts). On next row (= WS) work as follows: A.2 over the first 10 sts, P 96-104-116-128-140-156, A.1 over the last 10 sts. Repeat these 2 rows upwards. Remember BUTTONHOLES - see explanation above. When piece measures 27-28-29-30-31-32 cm (adjust so that next row is from RS), insert 2 markers in the piece AT THE SAME TIME work from RS as follows: A.1 over the first 10 sts as before, stocking st over the next 15-17-20-23-26-30 sts, A.3 (= 5 sts), 1 st in stocking st (= right front piece), insert 1 marker (= mid under sleeve), 1 st in stocking st, A.4 (= 5 sts), stocking st over the next 42-46-52-58-64-72 sts, A.3 (= 5 sts), 1 st in stocking st (= back piece), insert 1 marker (= mid under sleeve), 1 st in stocking st, A.4 (= 5 sts), stocking st over the next 15-17-20-23-26-30 sts, finish with A.2 over the last 10 sts as before (= left front piece). Move the markers upwards when working. NOTE: A.3 and A.4 are displaced 1 st towards mid front and mid back on every row from RS. Continue pattern like this. When piece measures 31-32-33-34-35-36 cm, finish each part separately. Now divide the piece between each marker. RIGHT FRONT PIECE: = 31-33-36-39-42-46 sts. REMEMBER BUTTONHOLES! Continue to work A.1, in stocking st and A.3 as before AT THE SAME TIME when piece measures 40-42-43-45-46-48 cm (adjust so that next row is from RS), cast off for neck from RS as follows: Cast off the first 13-13-13-14-14-14 sts, work as before over the remaining sts. Then on next row from RS, cast off 1 st from neck, repeat cast off 1 more time (= 2 times in total) = 16-18-21-23-26-30 sts remain on needle. Work as before until piece measures 48-50-52-54-56-58 cm. Cast off. LEFT FRONT PIECE: Work as right but reversed. Work diagram A.2 and A.4 instead of A.1 and A.3. Cast off for neck at beg of row from WS. BACK PIECE: = 54-58-64-70-76-84 sts. Work A.3/A.4 and in stocking st as before. When piece measures 43-45-47-49-51-53 cm (adjust so that next row is from RS), cast off for neck from RS as follows: Work 17-19-22-24-27-31 sts as before, cast off the next 20-20-20-22-22-22 sts, work 17-19-22-24-27-31 sts as before. Now finish each shoulder separately. Cast off 1 st on next row from neck = 16-18-21-23-26-30 sts. Work as before until piece measures 48-50-52-54-56-58 cm. Cast off. SLEEVE: Worked back and forth on circular needle. Cast on 25-26-28-28-30-31 sts (incl 1 edge st in each side) on circular needle size 8 mm with Brushed Alpaca Silk. Continue with stocking with 1 edge st in GARTER ST - see explanation above - in each side of piece. When piece measures 12-7-7-11-10-10 cm, inc 1 st inside 1 edge st in garter st in each side of piece, repeat inc in each side of piece inside 1 edge st in garter st every 4-4-4-3-3-2½ cm 8-9-9-10-10-11 more times (= 9-10-10-11-11-12 times in total) = 43-46-48-50-52-55 sts on needle. Cast off when piece measures 48½-48-46½-45-43½-41 cm. Knit another sleeve. ASSEMBLY: Sew the shoulder seams. Sew the sleeve seams inside 1 edge st. Sew in sleeves. Sew the buttons on to left front piece. NECK EDGE: Worked back and forth on needle. Pick up 60-70 sts around the neck on circular needle size 8 mm with Brushed Alpaca Silk. Work 2 ridges. Cast off. |
|||||||||||||||||||||||||||||||
Diagram explanations |
|||||||||||||||||||||||||||||||
|
|||||||||||||||||||||||||||||||
 |
|||||||||||||||||||||||||||||||
 |
|||||||||||||||||||||||||||||||
Have you finished this pattern?Tag your pictures with #dropspattern #lindacardigan or submit them to the #dropsfan gallery. Do you need help with this pattern?You'll find 22 tutorial videos, a Comments/Questions area and more by visiting the pattern on garnstudio.com. © 1982-2026 DROPS Design A/S. We reserve all rights. This document, including all its sub-sections, has copyrights. Read more about what you can do with our patterns at the bottom of each pattern on our site. |
|||||||||||||||||||||||||||||||


With over 40 years in knitting and crochet design, DROPS Design offers one of the most extensive collections of free patterns on the internet - translated to 17 languages. As of today we count 324 catalogues and 12290 patterns translated into English (UK/cm). 12290
We work hard to bring you the best knitting and crochet have to offer, inspiration and advice as well as great quality yarns at incredible prices! Would you like to use our patterns for other than personal use? You can read what you are allowed to do in the Copyright text at the bottom of all our patterns. Happy crafting!
Post a comment to pattern DROPS 154-22
We would love to hear what you have to say about this pattern!
If you want to leave a question, please make sure you select the correct category in the form below, to speed up the answering process. Required fields are marked *.