
Popular categories
Looking for a yarn?


Comments / Questions (24)
![]() Karen wrote:
Karen wrote:
Bonjour, Je ne comprend pas le début de vos explications concernant le 1er rang après le montage des 81 ml. Pouvez vous m'expliquer ? Merci
13.09.2013 - 16:06DROPS Design answered:
Bonjour Karen, on crochète volontairement une chaînette plus longue, et on saute des ml dès le 1er rang pour que le montage ne soit pas trop serré, ainsi sur la base de 81 ml, vous allez procéder ainsi : 1 ms dans la 2ème ml à partir du crochet (1ère ml = 1ère ms), 1 ms dans chacune des 2 ml suivantes, *sautez 1 ml, 1 ms dans chacune des 6 ml suivantes*, répéter de *-* tout le rang = 70 ms. Bon crochet !
13.09.2013 - 16:37
![]() Denise Neumann wrote:
Denise Neumann wrote:
Ist es jetzt korregiert??
17.08.2013 - 19:44Rolf answered:
Jawohl
17.08.2013 - 20:22
![]() M. Rohrmüller wrote:
M. Rohrmüller wrote:
Sehr geehrtes Team, danke für die tollen Anleitungen. Allerdings sind meiner Meinung nach die Zeichenklärungen für die Luftmaschen und die Stäbchen vertauscht. Liebe Grüße M. Rohrmüller
10.08.2013 - 10:41DROPS Design answered:
Liebe Frau Rohrmüller, vielen Dank für den Hinweis, wir werden das sofort korrigieren.
10.08.2013 - 13:40
![]() Eva wrote:
Eva wrote:
Hinweis: Die Legende zum Diagramm ist für Luftmaschen und Stäbchen vertauscht ;))
09.08.2013 - 10:31
|
||||||||||
Candy Rose#candyrosedress |
||||||||||
|
|
||||||||||
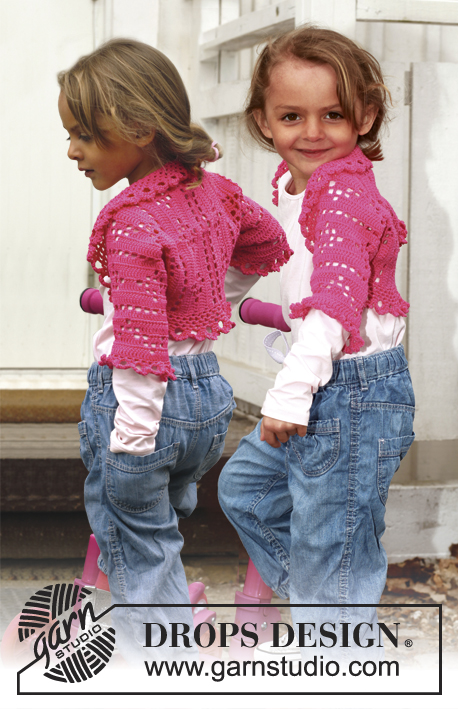
Crochet dress with lace pattern in DROPS Muskat. Size children 3 - 12 years.
DROPS Children 24-29 |
||||||||||
|
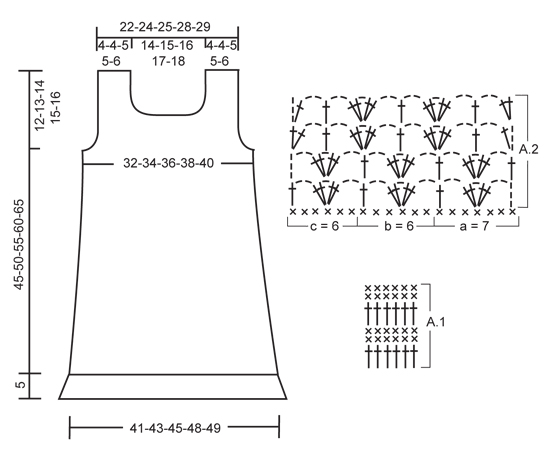
CROCHET INFO: On every dc row replace first dc with 1 ch. On every tr row replace first tr with 3 ch. PATTERN: See diagrams A.1 and A.2. DECREASE TIP: Dec 1 st by working 2 sts tog. Work 2 dc tog as follows: Insert hook in first st and pull thread through, insert hook in next st and pull thread through, make 1 YO and pull thread through all 3 loops on hook. Work 2 tr tog as follows: Work 1 tr in first st but wait with last pull through, work 1 tr in next st but on last pull through, pull thread through all 3 loops on hook. -------------------------------------------------------- DRESS: To make the texture the same on the piece work it back and forth in 2 parts, and sew tog when finished. FRONT PIECE: Work 81-85-88-93-97 ch with Muskat on hook size 4 mm. Continue with 1 dc in 2nd ch from hook, then 1 dc in each of the next 2-6-9-7-4 ch, * skip 1 ch, 1 dc in each of the next 6 ch *, repeat from *-* the entire row = 70-74-77-81-84 dc (first ch = 1 dc). Turn and work 1 dc in every st - READ CROCHET INFO! Continue with diagram A.1 (1st row = 1 tr in every dc). REMEMBER THE CROCHET TENSION! When piece measures 18-20-21-22-23 cm, dec 4 sts evenly - READ DECREASE TIP! Repeat dec every 4-4-5-5-6 cm 3 more times = 54-58-61-65-68 dc. When piece measures 33-37-41-45-49 cm, dec for armholes in each side. This is done as follows: Work sl sts over the first 3-4-4-4-4 sts, then work until 3-4-4-4-4 sts remain, turn piece. On next row work the second and third and the 2 next to last sts in each side tog – SEE DECREASE TIP! Repeat dec on every row 4 more times. After all dec, 38-40-43-47-50 sts remain on row. When piece measures 38-43-47-51-55 cm, dec for neck. This is done by working each shoulder separately. 1ST SHOULDER: Work over the first 12-12-13-14-15 sts, turn and work the first 4 sts tog 2 by 2, then work the rest of row. Turn and work until 2 sts remain before neck, work these tog, turn. On next row work the first 2 sts tog, then work the rest of row. Turn, work until 2 sts remain, work these tog = 7-7-8-9-10 sts remain on shoulder. Continue A.1 until piece measures 45-50-55-60-65 cm, fasten off. 2ND SHOULDER: Work as first shoulder - make sure to start on correct row in diagram and to finish at the top with the same row as 1st shoulder. FLOUNCE AT THE BOTTOM: Now work a flounce at the bottom of dress as follows: Beg by working 1 row with dc from RS – inc evenly so that there are a total of 79-85-85-91-97 dc. Turn and continue with diagram A.2 as follows: a over the first 7 sts, then b until 6 sts remain, finish with c. Work the 4 rows in A.2 one time, the flounce measures approx. 5 cm, fasten off. BACK PIECE: Work as front piece to and with armhole dec = 38-40-43-47-50 sts on row. Continue to work until piece measures approx. 43-48-53-58-63 cm. Then finish each shoulder separately as follows: Work 1 row over the first 9-9-10-11-12 sts, turn, work the first 2 sts tog, work the rest of row. Turn and work until 2 sts remain towards neck, work these tog. Turn, work 1 st in every st the entire row, fasten off. Repeat on the other shoulder. Work flounce at the bottom the same way as on front piece. ASSEMBLY: Sew shoulder seams edge to edge to avoid a chunky seam. And sew side seams edge to edge to make them less visible. EDGE AROUND ARMHOLE AND NECK: Work as follows around the armholes and neck line. 1 dc, * 2 ch, skip approx. 0.5 cm, 1 dc *, repeat from *-* around the entire opening and finish with 2 ch and 1 sl st in first dc at beg of round. CROCHET FLOWER Work on hook size 4 mm with Muskat. Work 4 ch and form a ring with 1 sl st in first ch. ROUND 1: * 1 dc in ch-ring, 3 ch *, repeat from *-* a total of 3 times and finish with 1 sl st in first dc from beg of round = 3 ch-spaces. ROUND 2: Crochet as follows in every ch-space: 1 sl st, 5 tr and 1 sl st = 3 leaves. Turn piece - work next round on the back of the flower. ROUND 3: 1 ch, work 1 dc around first dc from 1st round, 4 ch, work 1 dc at the bottom in the mid of first leaf from 2nd round, * then 4 ch, work 1 dc around next dc from 1st round, then 4 ch, work 1 dc at the bottom in the mid of next leaf from 2nd round *, repeat from *-* until there are a total of 5 ch-spaces, finish with 4 ch and 1 sl st in first dc from from beg of round = 6 ch-spaces. Turn piece - work next round on the front of the flower. ROUND 4: Crochet as follows in every ch-space: 1 sl st, 6 tr and 1 sl st = 6 leaves. Fasten off. Sew the flower on to the dress. |
||||||||||
Diagram explanations |
||||||||||
|
||||||||||
 |
||||||||||
Have you finished this pattern?Tag your pictures with #dropspattern #candyrosedress or submit them to the #dropsfan gallery. Do you need help with this pattern?You'll find 7 tutorial videos, a Comments/Questions area and more by visiting the pattern on garnstudio.com. © 1982-2026 DROPS Design A/S. We reserve all rights. This document, including all its sub-sections, has copyrights. Read more about what you can do with our patterns at the bottom of each pattern on our site. |
||||||||||


With over 40 years in knitting and crochet design, DROPS Design offers one of the most extensive collections of free patterns on the internet - translated to 17 languages. As of today we count 325 catalogues and 12298 patterns translated into English (UK/cm). 12298
We work hard to bring you the best knitting and crochet have to offer, inspiration and advice as well as great quality yarns at incredible prices! Would you like to use our patterns for other than personal use? You can read what you are allowed to do in the Copyright text at the bottom of all our patterns. Happy crafting!
Post a comment to pattern DROPS Children 24-29
We would love to hear what you have to say about this pattern!
If you want to leave a question, please make sure you select the correct category in the form below, to speed up the answering process. Required fields are marked *.