
Popular categories
Looking for a yarn?


Comments / Questions (36)
![]() Ankie wrote:
Ankie wrote:
Ik heb het patroon moeten aanpassen want het vestje werd veel te ruim bij de schouders. Ik heb 3x elke 4de toer, 4x elke 3e toer, en 4x elke 2e toer geminderd. Na deze aanpassing klopten de maten en zat het vestje perfect.
18.04.2014 - 23:15
![]() Rebecca wrote:
Rebecca wrote:
Jag har samma fråga som Maria innan. För i instruktionen står det att man ska "virka fram och tillbaka med fm" och så står det att man ska läsa virktips. I virktipset verkar det som om varannat varv ska vara fm och vartannat stolpe, kan det stämma? Som kommentar till svaret på Marias kommentar, undrar jag hur man virkar stolpar med fm? Betyder det att "virka fram och tillbaka med fm" betyder virka stolpar?
10.02.2014 - 08:50DROPS Design answered:
Du ska virak fram och tillbaka med fm som det står. Virktipset gäller generellt, både när du virkar fram och tillbaka med fm och när du senare kommer virka randmönster där det också är stolpar. Så när du virkar fm fram och tillbaka så gäller "Varje varv med fm börjar med 1 lm som inte ersätter första fm på v".
11.02.2014 - 01:15
![]() Maria wrote:
Maria wrote:
Kan det vara så att instruktionerna är fel översatta och att det ska vara stolpar istället för fm? I instruktionerna på engelska står det så och på bilden tycker jag att det ser ut som stolpar. Räcker den angivna garnmängden till hela koftan om man virkar fm? Tacksam för svar!
15.01.2013 - 00:35DROPS Design answered:
Du virkar stolpen med fm. Du virkar längs vänster framkant og totalt 6 v fram och tilbaka
16.01.2013 - 16:24
![]() Aina Claesson wrote:
Aina Claesson wrote:
Modell 136-14 Är antalet luftmaskor för ärmen rätt? Sämmer inte när man virkar fm/st enl beskrivningen och det totala antalet maskor man ska ha efteråt
04.04.2012 - 18:24
![]() Gerti wrote:
Gerti wrote:
Frisch und maritim. Für "Summer in the City" ebenso geeignet wie für den Urlaub am Meer. Namsvorschlag: "Brise"!
01.01.2012 - 20:32
![]() Dubois wrote:
Dubois wrote:
Inspiration marine
31.12.2011 - 16:15
![]() FUZIER wrote:
FUZIER wrote:
A associer à la jupe e-186 et à mettre dans sa petite valise pour un week-end chic à la mer !
19.12.2011 - 23:20
![]() DO wrote:
DO wrote:
Un petit gilet à porter en bord de mer très mignon
17.12.2011 - 11:08
![]() Madou wrote:
Madou wrote:
De halsuitsnijding en de mouwtjes zijn prachtig. Het marineaspect blijft aantrekkelijk.
17.12.2011 - 10:31
![]() Mona Holmstrand wrote:
Mona Holmstrand wrote:
En enkel o fin modell
10.12.2011 - 16:50
|
|
Marina#marinacardigan |
|
 |
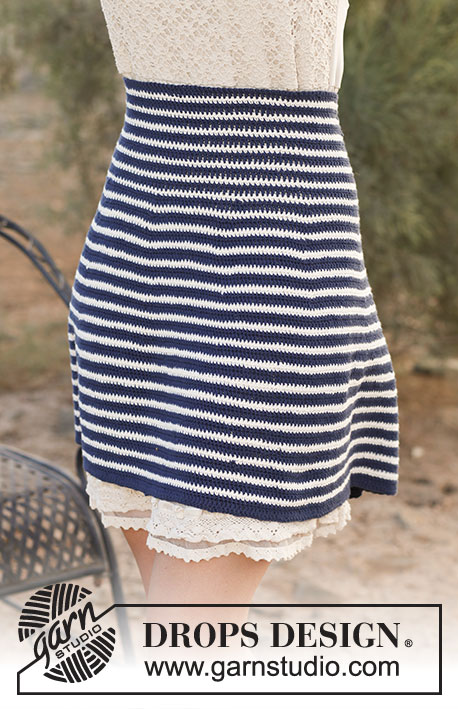 |
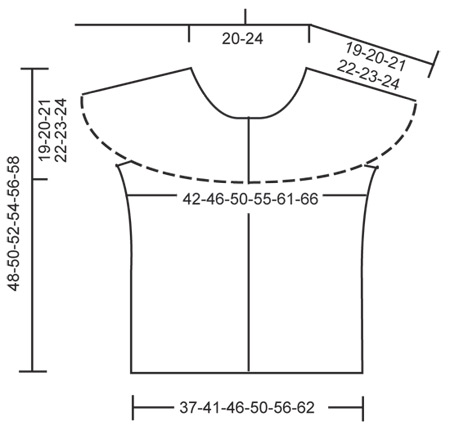
Crochet DROPS jacket with short sleeves and round yoke in ”Safran”. Size: S - XXXL
DROPS 136-14 |
|
|
STRIPE PATTERN: * Work 2 dc rows with off white, then 1 tr row with navy blue and 1 dc row with navy blue *, repeat from *-* for approx. 12 cm, finish after 1 whole repetition. CROCHET TIP: Beg every dc row with 1 ch and beg every tr row with 3 ch – these do not replace first dc/tr on row. DECREASE TIP (applies to neck): Dec at beg of row by working sl st over the no of sts to be dec. Dec at end of row by working until same no of sts to be dec remains, turn piece. -------------------------------------------------------- BODY: Worked back and forth from mid front. Work 192-210-234-257-290-318 ch on hook size 3 mm with navy blue. Turn and work 1 dc in 2nd ch from hook, then work 1 dc in each of the next 1-5-1-3-1-1 ch, * skip 1 ch, work 1 dc in each of the next 6 ch *, repeat from *-* the rest of row = 164-180-200-220-248-272 dc. Then work dc back and forth for 15-16-17-18-19-20 cm - READ CROCHET TIP! REMEMBER THE CROCHET TENSION! Insert 2 markers in the piece; 41-45-50-55-62-68 dc in from each side (= 82-90-100-110-124-136 dc between markers on back piece). Continue with STRIPE PATTERN - see explanation above. AT THE SAME TIME on 1st row in stripe pattern, inc 1 st on each side of markers in the sides – inc by working 2 sts in 1 st. Repeat inc every 2 cm 4 more times = 184-200-220-240-268-292 sts on row. When stripe pattern has been worked, piece measures approx. 27-28-29-30-31-32 cm. Continue with navy blue as follows: * 2 dc rows, 1 tr row, 1 dc row *, repeat from *-* until finished measurements. When piece measures 29-30-31-32-33-34 cm, work next row as follows: Work as before over the first 41-44-49-53-60-65 sts, then work 62-69-69-76-76-83 ch (= over sleeve), skip 10-12-12-14-14-16 sts and work over the next 82-88-98-106-120-130 sts, work 62-69-69-76-76-83 ch (= over sleeve), skip 10-12-12-14-14-16 sts and work over the last 41-44-49-53-60-65 sts. Turn and work pattern as before over all sts on front and back piece, over ch-row on each sleeve work as follows: 1 dc/tr (depending on where you are in the pattern) in each of the first 6 ch, * skip 1 ch, 1 dc/tr in each of the next 6 ch *, repeat from *-* over all ch. There are now 272-296-316-344-372-404 sts on row. Insert 15-16-16-17-17-18 markers in the piece as follows: Insert first marker after 10-13-16-12-18-15 sts, then insert the next markers 18-18-19-20-21-22 sts apart, then 10-13-15-12-18-15 sts remain after last marker. Work 2 more rows with pattern before beg dec. Then on next row dec 1 st before every marker (i.e. dec 15-16-16-17-17-18 sts) – dec by skipping 1 st. Repeat dec on every 4th row 7 more times and then on every other row 2-3-4-5-6-7 times – NOTE: Dec alternately before and after all the markers. AT THE SAME TIME when piece measures 40-42-44-46-48-50 cm (measured mid front), dec for neck – Read DECREASE TIP. Dec on every row in each side: 8 sts 1 time, 4 sts 1 time, 2 sts 1 time and then 1 st until all dec on yoke are done. After all dec, approx. 70 to 90 sts remain on row, work 1 more row, cut the thread. LEFT BAND: Work approx. 85 to 105 dc with navy blue along left band – make sure that no of sts neither tightens nor widens the edge. Work a total of 6 dc rows back and forth, cut the thread. RIGHT BAND: Work as left band but after 2 rows, work 5-5-5-6-6-6 button holes evenly – see explanation below – bottom button hole should be approx. 2 cm from cast on edge and upper button hole should be approx. 3 cm from the top (there should also be 1 button hole on the neck edge). 1 button hole = work 2 ch, skip 2 dc and fasten with 1 dc in next dc. On next row work 2 dc in every ch-loop. NECK EDGE: Work approx. 120 to 140 dc around the neck (also over bands) with navy blue. Work 4 more dc rows back and forth – AT THE SAME TIME on 2nd row work 1 button hole over the others on right band. Cut and fasten the thread. ASSEMBLY: Sew on buttons. |
|
 |
|
Have you finished this pattern?Tag your pictures with #dropspattern #marinacardigan or submit them to the #dropsfan gallery. Do you need help with this pattern?You'll find 7 tutorial videos, a Comments/Questions area and more by visiting the pattern on garnstudio.com. © 1982-2026 DROPS Design A/S. We reserve all rights. This document, including all its sub-sections, has copyrights. Read more about what you can do with our patterns at the bottom of each pattern on our site. |
|


With over 40 years in knitting and crochet design, DROPS Design offers one of the most extensive collections of free patterns on the internet - translated to 17 languages. As of today we count 325 catalogues and 12298 patterns translated into English (UK/cm). 12298
We work hard to bring you the best knitting and crochet have to offer, inspiration and advice as well as great quality yarns at incredible prices! Would you like to use our patterns for other than personal use? You can read what you are allowed to do in the Copyright text at the bottom of all our patterns. Happy crafting!
Post a comment to pattern DROPS 136-14
We would love to hear what you have to say about this pattern!
If you want to leave a question, please make sure you select the correct category in the form below, to speed up the answering process. Required fields are marked *.