
Popular categories
Looking for a yarn?


Comments / Questions (219)
![]() Marie wrote:
Marie wrote:
Je veux faire ce modèle pour une grandeur large adulte (je l'ai fait pour bébé et papa a trop aimé!!). Avez vous des indications pour moi ou un modele semblable pour me guider. Merci beaucoup pour votre aide!
05.10.2015 - 13:17DROPS Design answered:
Bonjour Marie, vous pouvez ajuster un modèle adulte dans la tension souhaitée en l'adaptant à ce modèle. Contactez votre magasin DROPS pour toute aide/assistance complémentaire. Bon tricot!
05.10.2015 - 16:25
![]() Hilde wrote:
Hilde wrote:
Moet er geen steken opgenomen worden hals rugpand?
25.09.2015 - 14:58DROPS Design answered:
Hoi Hilde. Nee, je eindigt hier ook met ribbelst voordat je afkant voor de hals.
28.09.2015 - 12:08Sue wrote:
I really love the look of this pattern. I'm at the point where I've done 2 rows in garter stitch over the 5 stitch band on both sides of the front. I now would be knitting on the wrong side but the V-neck decrease is only made from the right side. Do I just do another row of the moss stitch and then decrease on the next row? Thanks for your help.
25.09.2015 - 01:21
![]() Mélanie wrote:
Mélanie wrote:
Bonjour je voudrais savoir le nombre de pelote de laine pour une taille 2ans. Merci d'avance de votre réponse. Cordialement Mélanie
19.09.2015 - 16:52DROPS Design answered:
Bonjour Mélanie, la quantité requise pour chaque taille est indiquée, au poids, à droite de la photo: 100 g Baby Merino ou 150 g BabyAlpacaSilk en taille 2 ans - chacune de ces qualités fait 50 g pour 1 pelote, il vous faudra ainsi 2 pelotes Baby Merino ou 3 pelotes BabyAlpacaSilk. Bon tricot!
21.09.2015 - 08:46
![]() Helena wrote:
Helena wrote:
Het spencertje is hartstikke leuk geworden ..alleen begrijp ik de toegevoegde waarde van de rondbrei nld niet! Dit maakt het breien extra lastig ... Mijn inzien had het ook op een rechte nld gekund ... Compliment voor het patroon.
01.09.2015 - 10:35Vandana wrote:
Want to make 2 yr. But my gauge is 6.8 st per 1 inch / 2.5 cms. If I make 3-4 yr size, will it be around size required for 2 yr?
10.08.2015 - 06:53DROPS Design answered:
Dear Vandana, pattern is written with a tension of 24 sts x 32 rows in stockinette st = 4" x 4" - try with smaller needle or adapt / adjust to your tension and following the measurement chart. Happy knitting!
10.08.2015 - 10:44
![]() Marie wrote:
Marie wrote:
Hej Drops. I str 12/18 er jeg nået til at tage ind til v-hals. Der står at jeg skal tage 1 m ind på hver 2. p. Men hvor i arbejdet? Jeg er også i tvivl om, hvordan jeg skal strikke 4p retstrik over de midterste masker, når jeg ikke har delt arbejdet endnu. Kan I hjælpe?
26.07.2015 - 08:36DROPS Design answered:
Hej Marie, du tager ind til V-hals indenfor de 5 kantm mod midt foran. Når du strikker hele stykket frem og tilbage så strikker du de 9-10-x-x m på hver side af mærketråden i retstrik. Når du har strikket 4 pinde mere lukker du de midterste 8-10-x-x m af til ærmegab (4-5-x-x på hver side af mærketråden) og fortsætter med stykkerne hver for sig. God fornøjelse!
28.07.2015 - 13:32Mariana Quillehauquy wrote:
Me equivoco o la parte donde dice cuerso tiene un error dice 164 puntos es mucho para un niño de 2 años
04.05.2015 - 03:21DROPS Design answered:
Hola Mariana, los pts son correctos. El cuerpo se trabaja con 160 pts. Tensión de la muestra 24 pts = 10 cm; 160pts = aprox 65 cm, que se corresponden con las medidas del cuerpo en el diagrama de abajo (31 cm x 2 lados + la cenefa que se monta encima).
04.05.2015 - 10:29
![]() SILVIA wrote:
SILVIA wrote:
Buon giorno. Sono in difficoltà a capire come effettuare le diminuzione per lo scalfo della manica. Nella spiegazione si parla di prima e dopo il bordo dei 5 punti a maglia legaccio, ma "Diminuire come segue dopo il bordo. Quando l'ultima maglia..." ma quale ultima maglia che sono all'inizio del ferro? L'ultima delle due che devo lavorare insieme? Grazie.
25.03.2015 - 09:32DROPS Design answered:
Buongiorno Silvia. Abbiamo corretto il testo: il riferimento è alla prima m e non all’ultima. La ringraziamo per la segnalazione. Buon lavoro!
25.03.2015 - 09:47Baasiq wrote:
Sliczny wzor. czy mozna prosic o przetlumaczenie na jezyk polski. pozdrawiam
14.03.2015 - 16:48DROPS Design answered:
Oczywiście, w ciągu tygodnia znajdzie się na stronie. POZDRAWIAMY
14.03.2015 - 17:03
|
|
Junior#juniorvest |
|
 |
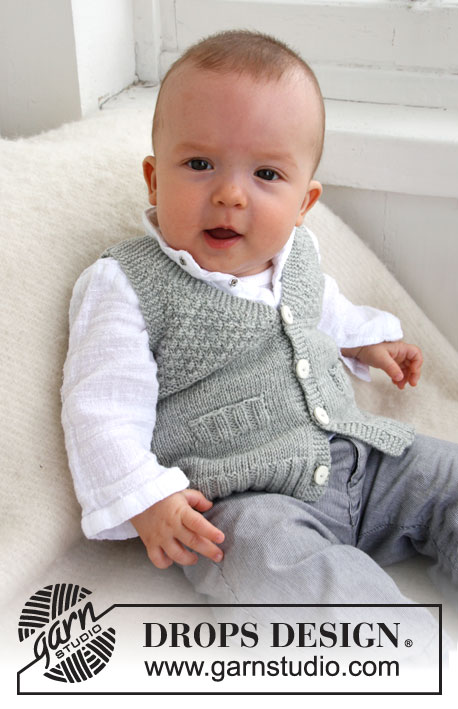 |
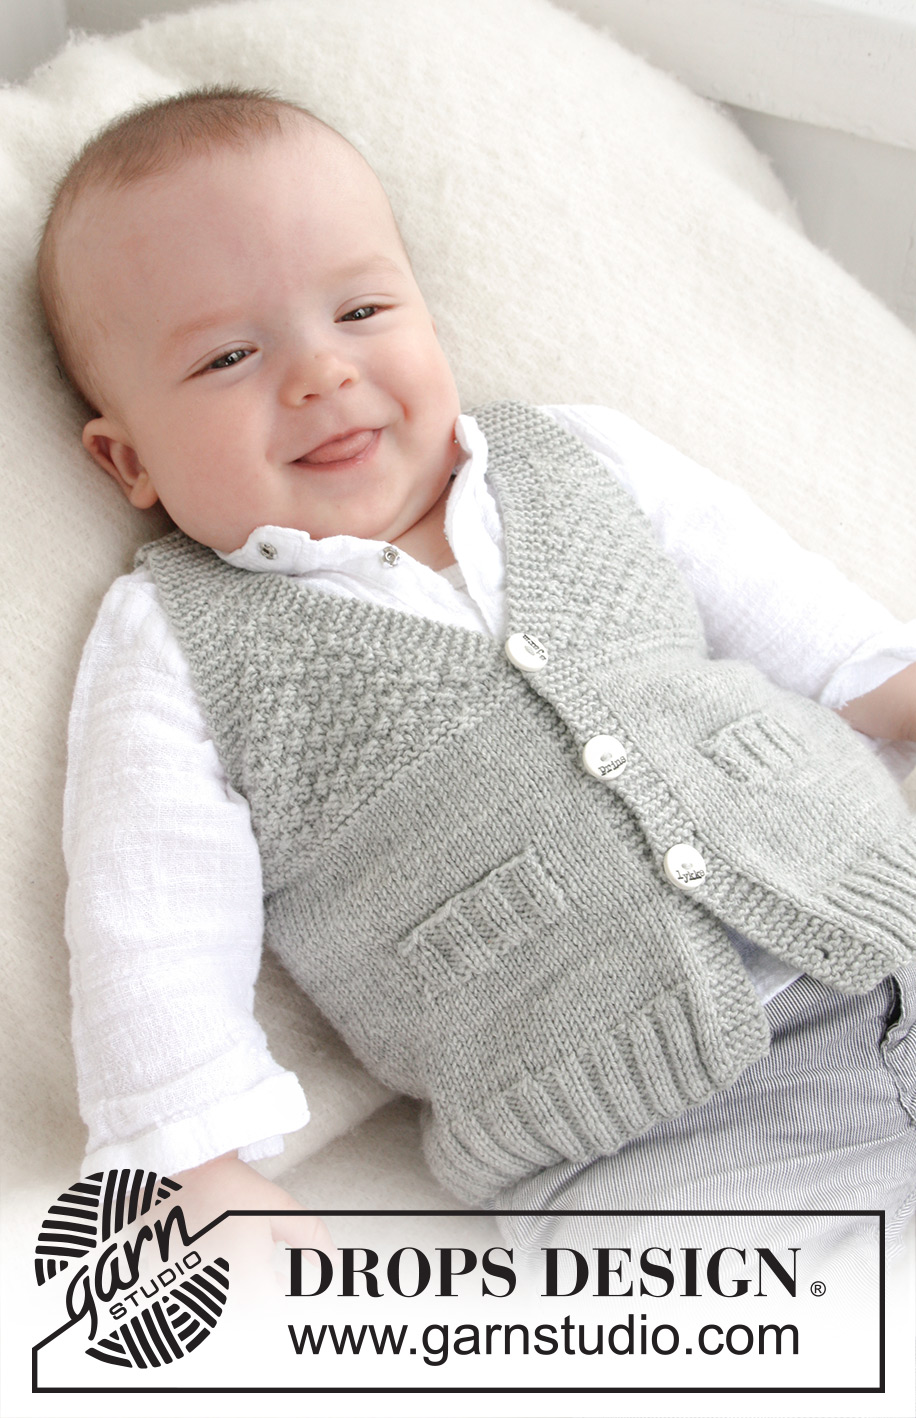
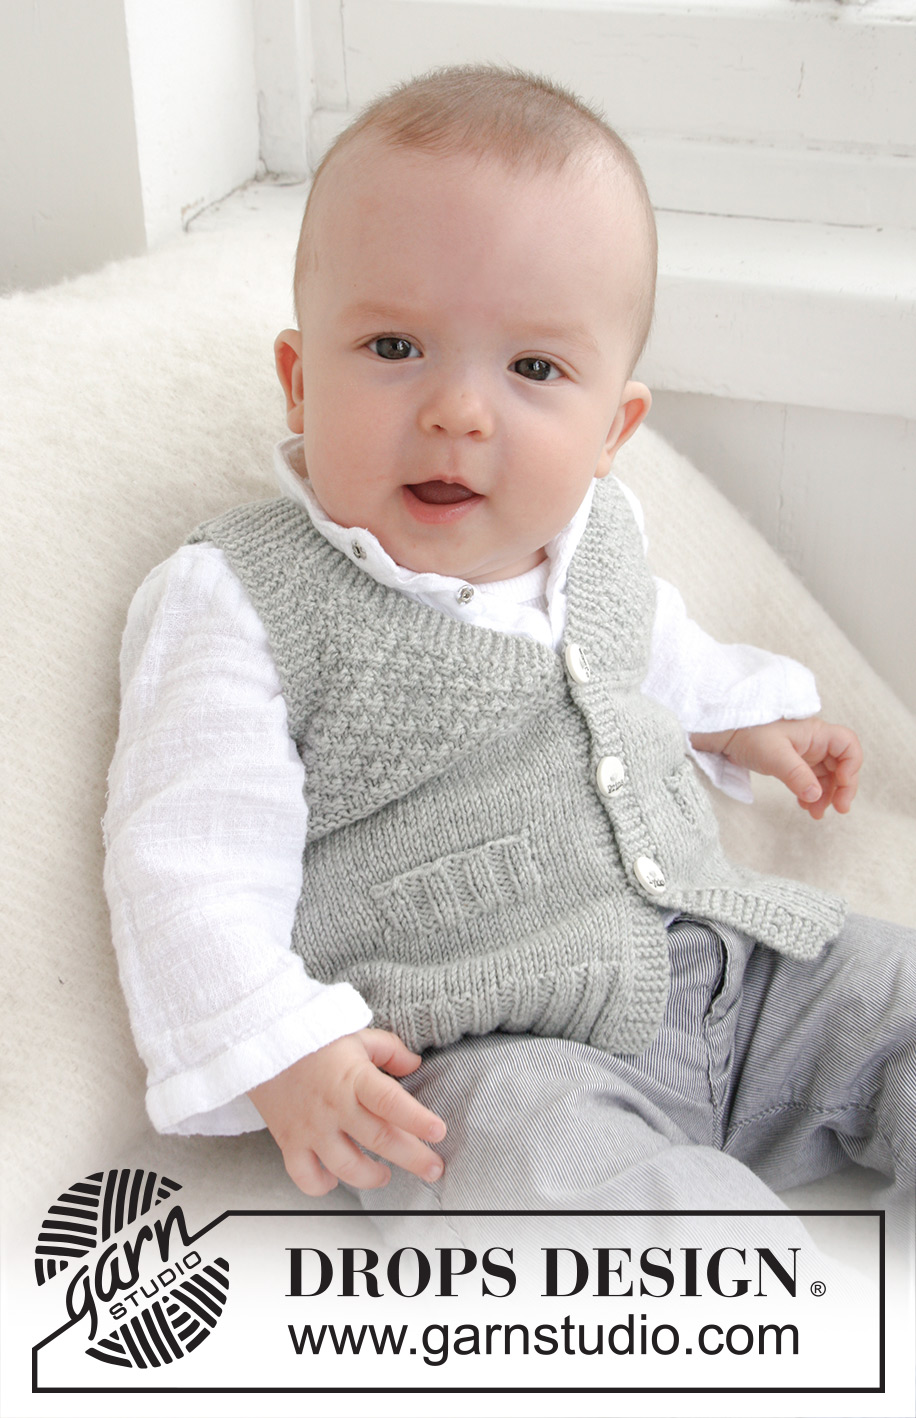
Knitted vest with V-neck and textured pattern for baby and children in DROPS BabyMerino or DROPS BabyAlpaca Silk
DROPS Baby 21-8 |
|
|
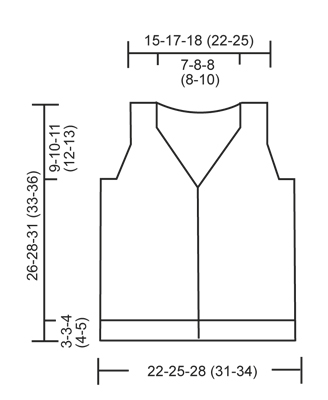
GARTER ST (back and forth on needle): K all rows. DOUBLE MOSS ST: Row 1: * K 2, P 2 *, repeat from *-*. Row 2: K over K and P over P. Row 3: P over K and K over P. Row 4: As row 2. Repeat row 1 to 4. BUTTON HOLES: Cast off for button holes on right band. 1 button hole = K tog 2nd and 3rd st from edge and make 1 YO. Cast off for button holes when piece measures: SIZE 1/3 MONTHS: 2, 6, 10 and 14 cm. SIZE 6/9 MONTHS: 2, 7, 11 and 16 cm. SIZE 12/18 MONTHS: 2, 7, 12 and 17 cm. SIZE 2 YEARS: 2, 8, 13 and 19 cm. SIZE 3/4 YEARS: 2, 8, 14 and 20 cm. DEC FOR V-NECK AND ARMHOLES IN DOUBLE MOSS ST: All dec are done from RS! DEC AS FOLLOWS BEFORE BAND/SLEEVE EDGE: When last st should be K: K 2 tog. When last st should be P: P 2 tog. DEC AS FOLLOWS AFTER BAND/SLEEVE EDGE: When first st should be K: Slip 1 st as if to K, K 1, psso. When first st should be P: P 2 twisted tog (i.e. work in back loop of st instead of front). -------------------------------------------------------- -------------------------------------------------------- BODY: Worked back and forth on circular needle from mid front. Cast on 148-168-184 (204-224) sts on circular needle size 2.5 mm with Baby Merino. Work first row as follows from RS: 5 sts in GARTER ST (= band) - see explanation above, * K 2, P 2 *, repeat from *-* until 7 sts remain, finish with K 2 and 5 sts in GARTER ST (= band). Continue rib like this with 5 sts in garter st in each side until piece measures 3-3-4 (4-5) cm - REMEMBER BUTTON HOLES on band - see explanation above. Switch to circular needle size 3 mm and work in stocking st but continue bands in garter st as before. AT THE SAME TIME on first row after rib, dec 32-36-40 (44-52) sts evenly (do not dec over bands) = 116-132-144 (160-172) sts. Insert a marker 31-35-39 (43-45) sts in from each side (= 54-62-66 (74-82) sts between markers on back piece). REMEMBER THE KNITTING TENSION! When piece measures 7-7½-8 (9-10) cm, work next row as follows from RS: 5 sts in garter st, 21-21-27 (27-31) sts in stocking st, slip the last 16-16-20 (20-24) sts that were worked on a stitch holder for pocket slit, work until 10-10-12 (12-12) sts remain on needle, slip the last 16-16-20 (20-24) sts that were worked on a stitch holder for pocket slit, work 5-5-7 (7-7) sts in stocking st and finish with 5 sts in garter st. On next row cast on 16-16-20 (20-24) new sts over each of the 2 stitch holders with sts = 116-132-144 (160-172) sts. Continue in stocking st and in garter st until piece measures 13-14-16 (16-18) cm. Now K 4 rows over all sts (= 2 ridges). Then work DOUBLE MOSS ST - see explanation above (continue bands in garter st as before). READ ALL OF THE FOLLOWING SECTION BEFORE CONTINUING! When piece measures 15-17-18 (20-21) cm, work 2 rows in garter st over the first 5 sts on needle (do not work the other sts on needle), then work 1 row over all sts before working 2 rows in garter st over the first 5 sts on needle in the other side of piece (this is done so that the V-neck looks nice). Then dec for V-neck - see explanation above: Dec 1 st every other row (i.e. every row from RS) a total of 12-13-16 (16-16) times. AT THE SAME TIME when piece measures 16-17-19 (20-22) cm, work 4 rows in garter st over the middle 18-20-20 (20-20) sts in each side (i.e. over 9-10-10 (10-10) sts on each side of both markers) – work the other sts as before. On next row, cast off the middle 8-10-10 (10-10) sts in each side for armhole and finish front and back piece separately. BACK PIECE: = 46-52-56 (64-72) sts. Work double moss st with 5 sts in garter st in each side (= sleeve edges). AT THE SAME TIME dec for armholes - see explanation above: Dec 1 st every other row (i.e. on every row from RS) a total of 5-6-6 (6-6) times = 36-40-44 (52-60) sts. Continue in double moss st and in garter st until piece measures 24-26-29 (31-34) cm. Now work in garter st over all sts until finished measurements. AT THE SAME TIME when piece measures 25-27-30 (32-35) cm, cast off the middle 16-18-20 (20-24) sts for neck = 10-11-12 (16-18) sts remain on each shoulder. Now finish each shoulder separately. Continue with garter st until piece measures 26-28-31 (33-36) cm, cast off. LEFT FRONT PIECE: Continue with double moss st and in garter st while AT THE SAME TIME dec for armhole in the side as on back piece and continue dec for V-neck as before. After last dec, 10-11-12 (16-18) sts remain on needle. Work garter st over all sts until piece measures 26-28-31 (33-36) cm and cast off. RIGHT FRONT PIECE: Work as left front piece but reversed. POCKET SLIT: Slip the 16-16-20 (20-24) sts from stitch holder on one front piece back on needle size 2.5 mm. Work rib K2/P2 with 1 st in garter st and K 2 in each side (seen from RS). When pocket slit measures 2½-2½-3 (3-3) cm, loosely cast off with K over K and P over P. Sew pocket slit to front piece with duplicate sts in each side. Sew pocket opening to bottom of pocket slit (where sts were put on a stitch holder) on the back of piece. Work another pocket slit the same way on the other front piece. ASSEMBLY: Sew the shoulder seams. Sew on buttons. |
|
 |
|
Have you finished this pattern?Tag your pictures with #dropspattern #juniorvest or submit them to the #dropsfan gallery. Do you need help with this pattern?You'll find 13 tutorial videos, a Comments/Questions area and more by visiting the pattern on garnstudio.com. © 1982-2026 DROPS Design A/S. We reserve all rights. This document, including all its sub-sections, has copyrights. Read more about what you can do with our patterns at the bottom of each pattern on our site. |
|


With over 40 years in knitting and crochet design, DROPS Design offers one of the most extensive collections of free patterns on the internet - translated to 17 languages. As of today we count 324 catalogues and 12290 patterns translated into English (UK/cm). 12290
We work hard to bring you the best knitting and crochet have to offer, inspiration and advice as well as great quality yarns at incredible prices! Would you like to use our patterns for other than personal use? You can read what you are allowed to do in the Copyright text at the bottom of all our patterns. Happy crafting!
Post a comment to pattern DROPS Baby 21-8
We would love to hear what you have to say about this pattern!
If you want to leave a question, please make sure you select the correct category in the form below, to speed up the answering process. Required fields are marked *.