
Popular categories
Looking for a yarn?


Comments / Questions (59)
![]() Ingrid Muriaas-Iversen wrote:
Ingrid Muriaas-Iversen wrote:
Synes at garnforbruk er veldig knapt. Strikkefastheten min er ok i bredden, men litt for fast i høyden og da får jeg ikke nok garn. Ikke første gang jeg opplever dette.
20.07.2013 - 00:22
![]() Elisa wrote:
Elisa wrote:
Hallo, gibt es eine Möglichkeit, die 8 Maschen in der 4. Runde von M5 jeweils auf beiden Seiten der beiden Markierungen abzuketten, ohne dass an der einen Markierung ein Spalt zwischen diesen abgeketteten Maschen entsteht? Ich würde die "Linie" mit den zusammengestrickten Maschen (alle 2 bzw. 2,5 cm) genau an den Seiten des Kleides belassen, da diese Maschen doch etwas auffallen.
28.05.2013 - 00:09
![]() Andrea wrote:
Andrea wrote:
Hallo,ich habe zwar erst ca. 12cm gestrickt,bin aber in Sorge etwas falsch gemacht zu haben, da sich das Strickteil von unten her einrollt. Gibt sich das noch oder was muss ich ansonsten machen? Vielen Dank für eine Antwort.
27.04.2013 - 17:11DROPS Design answered:
Liebe Andrea, habe Sie gesehen, dass die untere Kante zum Schluss an der Reihe links nach innen gefaltet und angenäht wird? Danach kann sich eigentlich nichts mehr rollen.
29.04.2013 - 07:53
![]() Leena Winter wrote:
Leena Winter wrote:
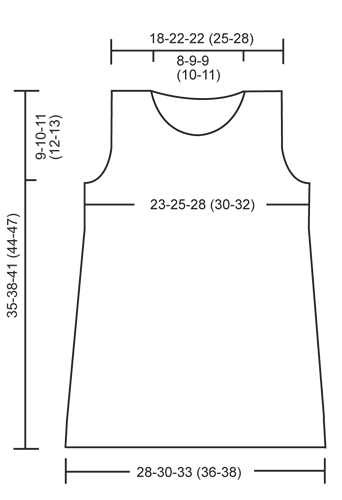
Teen pikkkutytön mekkoa, jonka piirroskuvassa on helmaosan pituudeksi merkitty 41 cm (koko 80/86 cm) ja yläosan 11 cm. Ohjetekstissä kuitenkin työ siirretään pyöröosuuden jälkeen etu- ja takakappaleeksi suorille puikoille 30 cm:n korkeudessa. Onko tässä joku mittavirhe?
19.03.2013 - 13:53DROPS Design answered:
Mittapiirroksessa ei ole virhettä. Työn koko pituus on 35-38-41 (44-47) cm.
09.04.2013 - 15:45
![]() Claudia wrote:
Claudia wrote:
Hallo, ich bin gerade mit dem Abketten der Maschen für die Armausschnitte fertig, sodass ich nun das Vorder- und Rückteil separat weiterstricke. Nun weiß ich bei dem nächsten Schritt nicht weiter. Wenn ich die 4 M Krausrippe (= 4 M re?) gestrickt habe und die 1 M abnehmen soll, dann ist das bei mir nicht am Rand, sondern eben die 5. M im Gestrick. Ist das richtig? Vielen Dank schon für die Antwort!
04.01.2013 - 17:33DROPS Design answered:
Liebe Claudia, ja das ist richtig, Es wird nicht am Rand oder über den Blendenmaschen abgenommen sondern daneben, also die 5. M im Strickstück.
07.01.2013 - 09:18
![]() Carolin Schaireiter wrote:
Carolin Schaireiter wrote:
Wie stricke ich die rückreihen bei vorher- und rückenteil wenn hin und zurück gestrickt wird. MuSs ich die andere Farbe auch in.der rückreihe stricken?
28.11.2012 - 10:29DROPS Design answered:
Hallo Carolin, jede 2. R ist eine Rückreihe, wenn in Hin-und Rück-R gestrickt wird. Bitte stricken Sie die in der betreffenden Reihe im Diagramm angegebenen Farben. Viel Spaß beim Stricken!
28.11.2012 - 11:05
![]() Paula Pülz wrote:
Paula Pülz wrote:
Ich verstehe leider nicht, was im Schritt "Zusammennähen" mit den Kordeln gemacht werden soll. Wie entsteht der Schließmechanismus für die Schulter? Wie soll man eine Kante an der Rückseite annähen? Vielen Dank für Ihre Hilfe!!!
23.02.2012 - 14:33DROPS Design answered:
Mit der Schnur macht man eine Öse für das Knopfloch. Diese Schnur näht man in der Rille (1 R. re. von der Rückseite) an. Zum Schluss näht man die Kante auf der Rückseite der Arbeit an.
27.02.2012 - 13:21
![]() DROPS Design NL wrote:
DROPS Design NL wrote:
Kies Nederlandse taal onder Kies taal / choose language
06.12.2011 - 09:46
![]() R Geelhoed wrote:
R Geelhoed wrote:
De beschrijving van het patroon is in het engels, zou dat gewijzigd kunnen worden in de nederlandse taal?
05.12.2011 - 18:57
|
|||||||
Princess Dream#princessdreamdress |
|||||||
|
|
|||||||
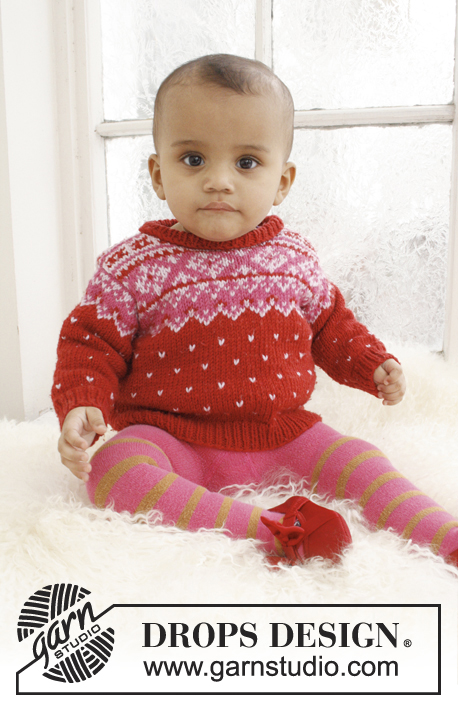
Knitted dress with Nordic pattern for baby and children in DROPS BabyMerino
DROPS Baby 21-17 |
|||||||
|
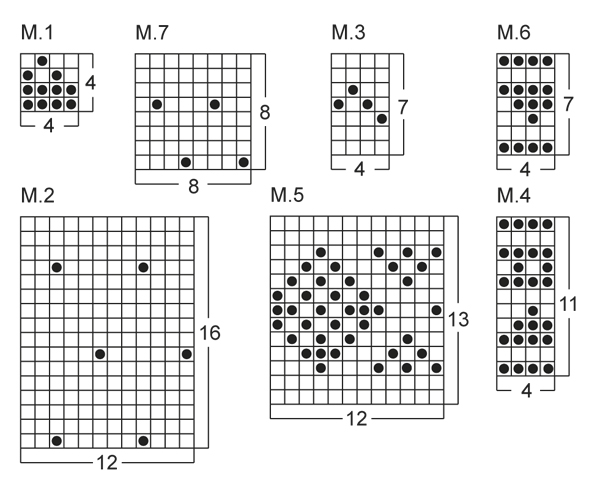
PATTERN: See diagrams M.1 - M.7. DECREASE TIP 1 (applies to body): Dec 1 st on each side of marker as follows: Work until 2 sts remain before marker, slip 1 st as if to K, K 1, psso, (marker), K tog the next 2 sts. DECREASE TIP 2 (applies to armholes): Dec 1 st in each side as follows: Work 4 sts in garter st, slip 1 st as if to K, K 1, psso, work until 6 sts remain, K the next 2 sts tog, work 4 sts in garter st. GARTER ST (back and forth on needle): K all rows. ---------------------------------------------------------- BODY: Worked in the round on circular needle. Cast on 144-156-172 (188-200) sts with cerise on circular needle size 2.5 mm. K for approx. 2.5 cm, then P 1 round = folding edge, measure piece from here and work in stocking st until finished measurements. REMEMBER THE KNITTING TENSION! K 1 more round and insert a marker in each side (= 72-78-86 (94-100) sts between markers on front and back piece). Then work diagram M.1 1 time vertically. Continue in stocking st with cerise until piece measures 3 cm. Now dec 1 st on each side of every marker - Read DECREASE TIP 1 above = 4 sts dec on round. Repeat dec like this every 2-2½-2½ (2-2½) cm a total of 6-6-7 (8-8) times = 120-132-144 (156-168) sts. READ ALL OF THE FOLLOWING SECTION BEFORE CONTINUING. When piece measures 15-17-19 (21-23) cm (all dec are now done), work diagrams M.2, M.3, and then M.4 1 time vertically. Then work rounds 1-3 in diagram M.5 (now piece measures approx. 26-28-30 (32-34) cm). On next round (= 4th round in diagram M.5), cast off 8 sts in each side (i.e. 4 sts on each side of every marker), now divide the piece and finish each part separately. BACK PIECE: = 52-58-64 (70-76) sts. The piece is worked back and forth in stocking st until finished measurements. Work next row (= RS) as follows: Work 4 sts in garter st (= edge sts), dec 1 st - Read DECREASE TIP 2 above, work 5th row in diagram M.5 until 6 sts remain, dec 1 st - Read DECREASE 2 above, finish with 4 sts in garter st. Repeat dec inside 4 sts in garter st in each side, on each row from RS like this a total of 2-1-4 (3-2) times = 48-56-56 (64-72) sts. After diagram M.5 has been worked 1 time vertically, work diagrams M.6 and M.3 1 time vertically (with 4 sts in garter st in each side). P next row from WS, and then work diagram M.7 with 4 sts in garter st in each side until finished measurements. When piece measures 33-36-39 (42-45) cm, cast off the middle 18-20-20 (22-24) sts for neck and finish each part separately. Cast off 2 sts on next row from neck = 13-16-16 (19-22) sts. When piece measures 35-38-41 (44-47) cm, cast off on right shoulder, work as follows on left shoulder: K 1 row from WS (= folding edge), then work in stocking st for another 2.5 cm. Cast off all sts. FRONT PIECE: = 52-58-64 (70-76) sts. The piece is worked back and forth in stocking st until finished measurements. Then continue with charts as on back piece with 4 sts in garter st in each side and cast off for armhole as on back piece. When piece measures 29-32-35 (37-40) cm, cast off the middle 12-12-14 (14-16) sts for neck and finish each part separately. Then cast off on next row from neck as follows: Cast off 2 sts 1 time, 1 st 3-4-3 (4-4) times = 13-16-16 (19-22) sts remain on shoulder. When piece measures 35-38-41 (44-47) cm, cast off on right shoulder, and work a folding edge on left shoulder as on back piece: ASSEMBLY: Sew right shoulder seam. Make 1 strap as follows: Twine 2 strands of 20 cm with cerise and fold them double so that they twine. Make another strap the same way. On left back shoulder fold the edge inwards at the P round, and fasten the straps in the outer edge by folding them double and then pulling the ends through the folding edge, fasten the ends and then sew the edge to the back. Fold and sew the edge to the back of left front shoulder. Knit up from RS approx. 60-80 sts along the entire neck edge (through both layers of the folding edge in each side), then P 1 row from WS while at the same time adjusting no of sts to 66-70-74 (78-82). Continue to work rib as follows: * K 2, P 2 *, repeat from *-* the entire row. Loosely cast off all sts when rib measures approx. 1 cm. Sew the buttons on to left front shoulder. Fold the bottom edge on the dress at the P round and fasten on the back. |
|||||||
Diagram explanations |
|||||||
|
|||||||
 |
|||||||
 |
|||||||
Have you finished this pattern?Tag your pictures with #dropspattern #princessdreamdress or submit them to the #dropsfan gallery. Do you need help with this pattern?You'll find 11 tutorial videos, a Comments/Questions area and more by visiting the pattern on garnstudio.com. © 1982-2026 DROPS Design A/S. We reserve all rights. This document, including all its sub-sections, has copyrights. Read more about what you can do with our patterns at the bottom of each pattern on our site. |
|||||||


With over 40 years in knitting and crochet design, DROPS Design offers one of the most extensive collections of free patterns on the internet - translated to 17 languages. As of today we count 324 catalogues and 12291 patterns translated into English (UK/cm). 12291
We work hard to bring you the best knitting and crochet have to offer, inspiration and advice as well as great quality yarns at incredible prices! Would you like to use our patterns for other than personal use? You can read what you are allowed to do in the Copyright text at the bottom of all our patterns. Happy crafting!
Post a comment to pattern DROPS Baby 21-17
We would love to hear what you have to say about this pattern!
If you want to leave a question, please make sure you select the correct category in the form below, to speed up the answering process. Required fields are marked *.