
Popular categories
Looking for a yarn?


Comments / Questions (59)
![]() Carina wrote:
Carina wrote:
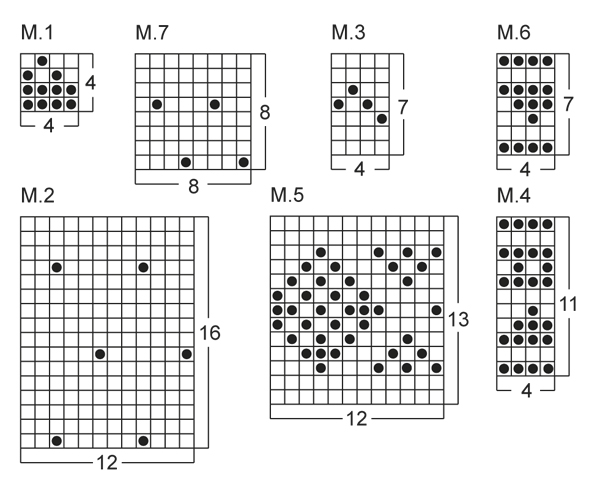
Hej! I beskrivningen av FRAMSTYCKET står det INTE att mönster M.6, M.3 och M.7 ska stickas. Det är väl fel? Visst ska även dessa mönster stickas i framstycket - om man tittar på bilden? Hälsningar Carina
15.01.2015 - 22:18DROPS Design answered:
Hej Carina, Jo följ diagrammen enligt beskrivningen, då blir det som på bilden. Lycka till!
04.02.2015 - 13:04
![]() Ulrike wrote:
Ulrike wrote:
Werden die Maschen für den Halsauschnitt in Runden aufgenommen und gestrickt oder nur vom hinterer linken Rückenteil bis li Vorderteil ( Schulterverschluß durch Ösen offen) Vielen Dank für ihre Hilfe
13.11.2014 - 13:20DROPS Design answered:
Liebe Ulrike, genau, Sie stricken die Halsblende in Hin- und Rück-R, damit sich die Schulter öffnen lässt.
16.11.2014 - 11:40
![]() Claudia wrote:
Claudia wrote:
Bim bei M5 angelangt.. muss ich auf der vorder- und rückseite die abnahmen für den armausschnitt machen?? die rückseite wird links mit muster gestrickt oder? danke für die hilfe!
21.02.2014 - 20:56DROPS Design answered:
Liebe Claudia, die Abnahmen werden in Hin-R gearbeitet, die Anleitung wurde an dieser Stelle gerade aktualisiert. Die Muster werden alle glatt re gestrickt, d.h. in Rück-R stricken Sie immer links (mit Muster).
21.02.2014 - 22:22
![]() Frida wrote:
Frida wrote:
Hei! jeg strikker nå på bakstykket, og i oppskriften står det at neste pinne skal strikkes vrang fra vrangen. Gjelder dette også de 4 rillemaskene på hver side, eller skal de fortsatt strikkes rett?
02.02.2014 - 11:21DROPS Design answered:
Hei Frida. Det gaelder ikke for de 4 rillemaskene. Dem skal du strikke rett (riller) til ferdig maal.
04.02.2014 - 14:51
![]() Anne wrote:
Anne wrote:
Hallo Auf dem Bild sieht es doch so aus, als würde nach Muster 6 noch mal Muster 3 gestrickt werden und erst im Anschluss daran mit Muster 7 weiter gemacht werden.?
16.01.2014 - 22:08DROPS Design answered:
Lieen Anne, Sie haben völlig Recht, da hat unsere damalige Übersetzerin etwas übersehen. Wir haben eine Korrektur vorgenommen und entschuldigen uns für die Umstände.
17.01.2014 - 14:58
![]() Hanna wrote:
Hanna wrote:
Nyt ymmärsinkin, työn pituus piti olla 41cm ennen taitereunan tekoa, olin tehnyt väärin! Pahoittelut! Nyt työ näyttää oikealta.
18.12.2013 - 15:39
![]() Hanna wrote:
Hanna wrote:
Hei, Mihin kohtaan tarkalleen napit kiinnitetään? Siihen etupuolen kappaleen taitereunaanko?vai taitetaanko etukappalekin taitereunasta nurjalle?
18.12.2013 - 09:46
![]() Hanna wrote:
Hanna wrote:
2,5cm taitetaan nurjalle mutta ohjeessa on että kiinnitä taitereuna etukappaleen takaosaan?mihin kohtaan tarkalleen?Mihin kohtaan napit tulee?
18.12.2013 - 09:22
![]() Andrea wrote:
Andrea wrote:
Hallo! Ich habe gerade die 5. Reihe in M5 gestreckt. Wie oft soll denn jetzt am Rand die Krausrippe gestreckt werden? Vielen Dank für die Hilfe!
27.11.2013 - 21:26DROPS Design answered:
Liebe Andrea, es werden 4 M in Krausrippe gestrickt.
28.11.2013 - 07:56
![]() Hanna wrote:
Hanna wrote:
En millään ymmärrä tuota vasemman olkasauman tekoa eli sitä miten taka- ja etukappaleet tulee yhdistä nappeineen ja napinläpisilmuineen? Pitääkö takakappaleen taitereunan kohdalta taittaa se koko 2,5cm nurjalle vai vain se taitereunakierros?ja mihin kohtaan se kiinnitetään sitten oikealle kappaleelle? Ja jos sitä joustinneuletta neuolotaan koko päänympärykseen niin eihän napinlävet auta kun jousinneule pitää kaula-aukon tiukkana?
21.11.2013 - 15:33DROPS Design answered:
Olkapään reunukset taitetaan aina taitereunasta, eli 2,5 cm taitetaan työn nurjalle puolelle. Pääntien reunus neulotaan tasona, joten se jää olan kohdalla auki.
26.11.2013 - 16:16
|
|||||||
Princess Dream#princessdreamdress |
|||||||
|
|
|||||||
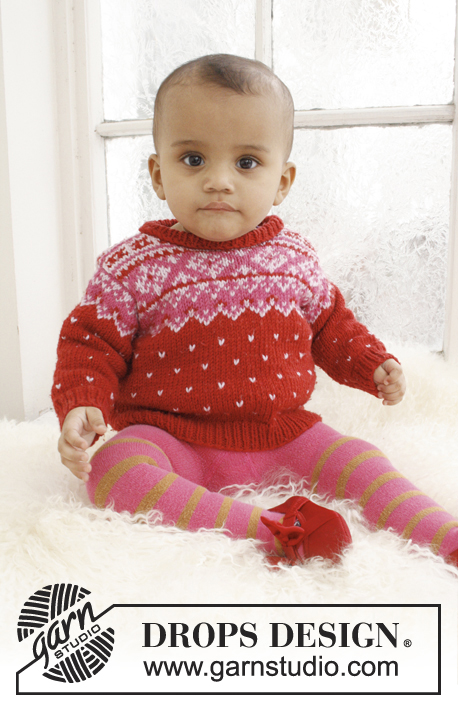
Knitted dress with Nordic pattern for baby and children in DROPS BabyMerino
DROPS Baby 21-17 |
|||||||
|
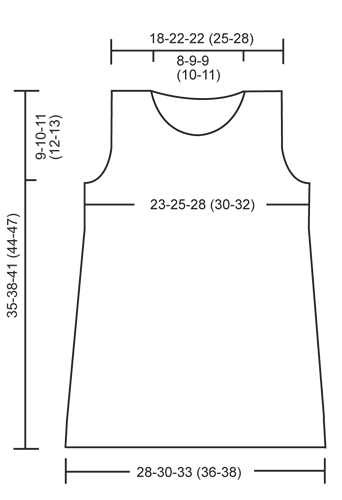
PATTERN: See diagrams M.1 - M.7. DECREASE TIP 1 (applies to body): Dec 1 st on each side of marker as follows: Work until 2 sts remain before marker, slip 1 st as if to K, K 1, psso, (marker), K tog the next 2 sts. DECREASE TIP 2 (applies to armholes): Dec 1 st in each side as follows: Work 4 sts in garter st, slip 1 st as if to K, K 1, psso, work until 6 sts remain, K the next 2 sts tog, work 4 sts in garter st. GARTER ST (back and forth on needle): K all rows. ---------------------------------------------------------- BODY: Worked in the round on circular needle. Cast on 144-156-172 (188-200) sts with cerise on circular needle size 2.5 mm. K for approx. 2.5 cm, then P 1 round = folding edge, measure piece from here and work in stocking st until finished measurements. REMEMBER THE KNITTING TENSION! K 1 more round and insert a marker in each side (= 72-78-86 (94-100) sts between markers on front and back piece). Then work diagram M.1 1 time vertically. Continue in stocking st with cerise until piece measures 3 cm. Now dec 1 st on each side of every marker - Read DECREASE TIP 1 above = 4 sts dec on round. Repeat dec like this every 2-2½-2½ (2-2½) cm a total of 6-6-7 (8-8) times = 120-132-144 (156-168) sts. READ ALL OF THE FOLLOWING SECTION BEFORE CONTINUING. When piece measures 15-17-19 (21-23) cm (all dec are now done), work diagrams M.2, M.3, and then M.4 1 time vertically. Then work rounds 1-3 in diagram M.5 (now piece measures approx. 26-28-30 (32-34) cm). On next round (= 4th round in diagram M.5), cast off 8 sts in each side (i.e. 4 sts on each side of every marker), now divide the piece and finish each part separately. BACK PIECE: = 52-58-64 (70-76) sts. The piece is worked back and forth in stocking st until finished measurements. Work next row (= RS) as follows: Work 4 sts in garter st (= edge sts), dec 1 st - Read DECREASE TIP 2 above, work 5th row in diagram M.5 until 6 sts remain, dec 1 st - Read DECREASE 2 above, finish with 4 sts in garter st. Repeat dec inside 4 sts in garter st in each side, on each row from RS like this a total of 2-1-4 (3-2) times = 48-56-56 (64-72) sts. After diagram M.5 has been worked 1 time vertically, work diagrams M.6 and M.3 1 time vertically (with 4 sts in garter st in each side). P next row from WS, and then work diagram M.7 with 4 sts in garter st in each side until finished measurements. When piece measures 33-36-39 (42-45) cm, cast off the middle 18-20-20 (22-24) sts for neck and finish each part separately. Cast off 2 sts on next row from neck = 13-16-16 (19-22) sts. When piece measures 35-38-41 (44-47) cm, cast off on right shoulder, work as follows on left shoulder: K 1 row from WS (= folding edge), then work in stocking st for another 2.5 cm. Cast off all sts. FRONT PIECE: = 52-58-64 (70-76) sts. The piece is worked back and forth in stocking st until finished measurements. Then continue with charts as on back piece with 4 sts in garter st in each side and cast off for armhole as on back piece. When piece measures 29-32-35 (37-40) cm, cast off the middle 12-12-14 (14-16) sts for neck and finish each part separately. Then cast off on next row from neck as follows: Cast off 2 sts 1 time, 1 st 3-4-3 (4-4) times = 13-16-16 (19-22) sts remain on shoulder. When piece measures 35-38-41 (44-47) cm, cast off on right shoulder, and work a folding edge on left shoulder as on back piece: ASSEMBLY: Sew right shoulder seam. Make 1 strap as follows: Twine 2 strands of 20 cm with cerise and fold them double so that they twine. Make another strap the same way. On left back shoulder fold the edge inwards at the P round, and fasten the straps in the outer edge by folding them double and then pulling the ends through the folding edge, fasten the ends and then sew the edge to the back. Fold and sew the edge to the back of left front shoulder. Knit up from RS approx. 60-80 sts along the entire neck edge (through both layers of the folding edge in each side), then P 1 row from WS while at the same time adjusting no of sts to 66-70-74 (78-82). Continue to work rib as follows: * K 2, P 2 *, repeat from *-* the entire row. Loosely cast off all sts when rib measures approx. 1 cm. Sew the buttons on to left front shoulder. Fold the bottom edge on the dress at the P round and fasten on the back. |
|||||||
Diagram explanations |
|||||||
|
|||||||
 |
|||||||
 |
|||||||
Have you finished this pattern?Tag your pictures with #dropspattern #princessdreamdress or submit them to the #dropsfan gallery. Do you need help with this pattern?You'll find 11 tutorial videos, a Comments/Questions area and more by visiting the pattern on garnstudio.com. © 1982-2026 DROPS Design A/S. We reserve all rights. This document, including all its sub-sections, has copyrights. Read more about what you can do with our patterns at the bottom of each pattern on our site. |
|||||||


With over 40 years in knitting and crochet design, DROPS Design offers one of the most extensive collections of free patterns on the internet - translated to 17 languages. As of today we count 324 catalogues and 12291 patterns translated into English (UK/cm). 12291
We work hard to bring you the best knitting and crochet have to offer, inspiration and advice as well as great quality yarns at incredible prices! Would you like to use our patterns for other than personal use? You can read what you are allowed to do in the Copyright text at the bottom of all our patterns. Happy crafting!
Post a comment to pattern DROPS Baby 21-17
We would love to hear what you have to say about this pattern!
If you want to leave a question, please make sure you select the correct category in the form below, to speed up the answering process. Required fields are marked *.