
Popular categories
Looking for a yarn?


Comments / Questions (59)
![]() JEANNIN wrote:
JEANNIN wrote:
Bonjour, Pourriez-vous m'expliquer comment on attache les boutons sur l'épaule gauche ? Je ne comprend pas les explications suivantes : "Plier l'ourlet de l'épaule gauche du dos sur l'envers au niveau du rang de cassure et fixer les cordons dans le bord extérieur en les pliant en double et en passant les extrémités à travers la bordure. Faire un nœud avec les extrémités et coudre la bordure sur l'envers " Les cordons servent ils de boutonnière ? Merci pour votre réponse.
15.09.2016 - 23:05DROPS Design answered:
Bonjour Mme Jeannin, les petits cordons que vous avez réalisés auparavant sont les boutonnières qui vont être passées dans l'ourlet de l'épaule du dos: plier les cordons en double et faites un noeud pour former une boucle. Passez ces boucles entre les m du rang de cassure de l'épaule (le noeud va les maintenir) et fermez l'ourlet. Vous avez maintenant 2 arceaux de boutonnières sur l'épaule du dos. Bon assemblage!
16.09.2016 - 09:14
![]() May - Britt wrote:
May - Britt wrote:
Hallo, obwohl ich die Maschenprobe mit Nadel Nr. 3 statt 2 1/2 gestrickt habe, fehlen mir in der Breite 2 cm und in der Höhe 2 1/2 cm. Wie kann das sein? Ich verwende das angegebe drops Garn Baby Merino. Kann ich einfach die nächste Größe stricken? Ich wollte für 6-9 Monate stricken. Vielen Dank für Ihre Hilfe!
30.05.2016 - 16:37DROPS Design answered:
Liebe May-Britt, bitte passen Sie die Nadelstärke so lange an, bis Sie die richtige Maschenprobe erreichen. Es kann sein, dass Sie sehr fest stricken und eine noch dickere Nadel nehmen müssen.
01.06.2016 - 08:35
![]() Stephanie wrote:
Stephanie wrote:
Beste, In de beschrijving staat dat je in naald 4 van telpatroon M.5 aan elke kant van elke markeerder 4 steken moet afkanten. Moet ik dan de eerste 4 steken al afkanten in de 3e naald? Het is mijn eerste grote breiproject en ik kijk er heel erg naar uit om het af te werken :) alvast bedankt voor het antwoord!!
21.04.2016 - 17:38
![]() Gunn Ragnhild Acobsen wrote:
Gunn Ragnhild Acobsen wrote:
Når man deler arbeidet stemmer ikke antall rader med når man bytter farge. Eks: M7, første rad er rødt/hvitt (rettsiden), når man kommer til rad 5 skal man strikke på vrangen. Dette innebærer veldig mye festing av tråd.
16.02.2016 - 14:02Knut wrote:
Die Übersetzung ist falsch, es sollte heissen: 6 mal wiederholen.
28.12.2015 - 20:14DROPS Design answered:
Die Übersetzung ist nicht falsch, Antwort siehe unten!
29.12.2015 - 11:06
![]() Roehse wrote:
Roehse wrote:
Habe mit 156 Maschen angefangen und bin jetzt bei den Abnahmen. Abnahme 1 = -4 Maschen und das beidseitig = -8 Dann die Totalabnahme 6 x je 1 M = 2 Maschen = 12 M Insgesamt wurden dann 20 Maschen abgenommen. Wenn ich von 156 M 20 M abziehe komme ich auf 136 Maschen. Aber sie sind bei 132 M. Somit habe ich 4 Maschen noch zuviel. Wo ist da mein Denkfehler?
28.12.2015 - 19:45DROPS Design answered:
Sie nehmen in 6 Abnahme-Rd jeweils 4 M ab, d.h. an jedem der beiden Markierer je 2 M. 6 x 4 M = 24 M, die Sie abnehmen, also 156 M - 24 M = 132 M.
29.12.2015 - 11:05
![]() Nuria wrote:
Nuria wrote:
Hola. No consigo entender lo de los cordones en la terminación del hombro izquierdo. No sé cómo colocarlos. ¿Uno a continuación del otro hasta completar el largo del hombro? Y no se dice nada de ojales, ¿los botones son sólo de adorno? Gracias
24.06.2015 - 13:17DROPS Design answered:
Hola Nuria, los botones son de adorno. Los cordones también son de adorno y van dentro de un tubo que se forma al doblar hacia dentro el borde superior (orilla de doblez)
06.03.2016 - 11:21
![]() Natalia wrote:
Natalia wrote:
No entiendo donde poner los marca puntos. Tejo 39 pongo un marca punto luego tejo 78 y otro marca punto quedando 39 al final? La parte trasera esta partida en dos verdad? Que al final coseremos.
16.04.2015 - 09:49DROPS Design answered:
Hola Natalia, esta prenda no tiene abertura y se trabaja en redondo. Los MP se colocan para marcar los lados. Trabajamos desde el primer pt de la vta hasta el 39, insertamos un MP que marca un lateral, se trabajan 78 pts que corresponderían al delantero y se coloca otro MP para marcar el otro lado, luego ya se teje el resto de la vta que son otros 39 pts.
20.04.2015 - 10:09
![]() Maren wrote:
Maren wrote:
Jeg forstår ikke helt hvordan stropperne skal syes på? Og når man samler masker op til halsen, skal man gennem begge lag i bukkekanten, hvordan? Skal den lades åben i venstre skulder, eller skal det hele vejen rundt? Skal knapperne syes på 2,5 cm retstrik efter vrangen eller før vrangen? På forhånd tak.
09.04.2015 - 13:56DROPS Design answered:
Hej, du finder svar på alle dine spørgsmål neders under monteringen. Knapperne syes i så de passer med knaphullerne. God fornøjelse!
13.05.2015 - 15:52
![]() Ranveig Holtedahl wrote:
Ranveig Holtedahl wrote:
Har dere denne modellen i str. 8 og 10 år også? Veldig fin modell
16.03.2015 - 22:43DROPS Design answered:
Hei Ranveig. Nei, desvaerre har vi ikke det.
18.03.2015 - 15:39
|
|||||||
Princess Dream#princessdreamdress |
|||||||
|
|
|||||||
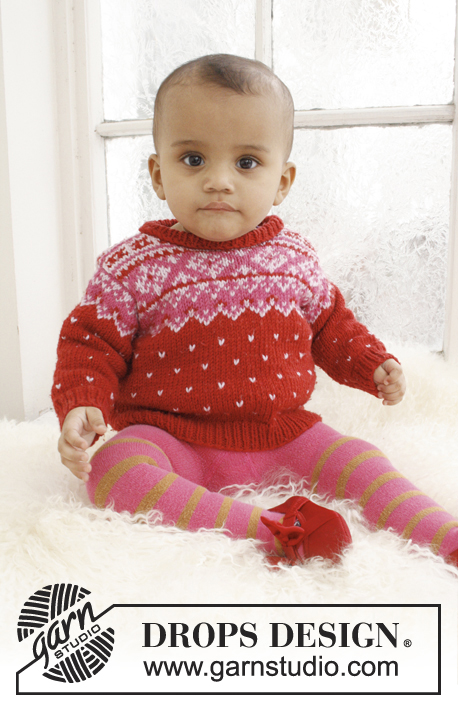
Knitted dress with Nordic pattern for baby and children in DROPS BabyMerino
DROPS Baby 21-17 |
|||||||
|
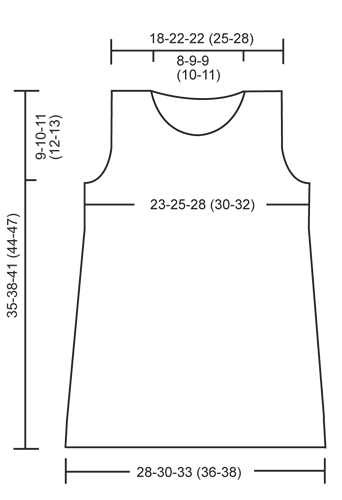
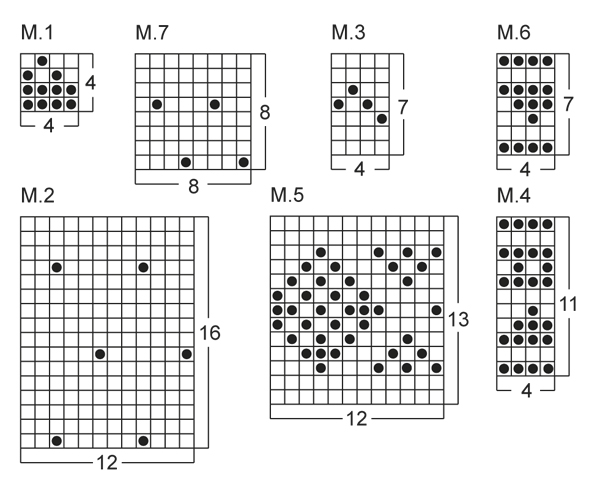
PATTERN: See diagrams M.1 - M.7. DECREASE TIP 1 (applies to body): Dec 1 st on each side of marker as follows: Work until 2 sts remain before marker, slip 1 st as if to K, K 1, psso, (marker), K tog the next 2 sts. DECREASE TIP 2 (applies to armholes): Dec 1 st in each side as follows: Work 4 sts in garter st, slip 1 st as if to K, K 1, psso, work until 6 sts remain, K the next 2 sts tog, work 4 sts in garter st. GARTER ST (back and forth on needle): K all rows. ---------------------------------------------------------- BODY: Worked in the round on circular needle. Cast on 144-156-172 (188-200) sts with cerise on circular needle size 2.5 mm. K for approx. 2.5 cm, then P 1 round = folding edge, measure piece from here and work in stocking st until finished measurements. REMEMBER THE KNITTING TENSION! K 1 more round and insert a marker in each side (= 72-78-86 (94-100) sts between markers on front and back piece). Then work diagram M.1 1 time vertically. Continue in stocking st with cerise until piece measures 3 cm. Now dec 1 st on each side of every marker - Read DECREASE TIP 1 above = 4 sts dec on round. Repeat dec like this every 2-2½-2½ (2-2½) cm a total of 6-6-7 (8-8) times = 120-132-144 (156-168) sts. READ ALL OF THE FOLLOWING SECTION BEFORE CONTINUING. When piece measures 15-17-19 (21-23) cm (all dec are now done), work diagrams M.2, M.3, and then M.4 1 time vertically. Then work rounds 1-3 in diagram M.5 (now piece measures approx. 26-28-30 (32-34) cm). On next round (= 4th round in diagram M.5), cast off 8 sts in each side (i.e. 4 sts on each side of every marker), now divide the piece and finish each part separately. BACK PIECE: = 52-58-64 (70-76) sts. The piece is worked back and forth in stocking st until finished measurements. Work next row (= RS) as follows: Work 4 sts in garter st (= edge sts), dec 1 st - Read DECREASE TIP 2 above, work 5th row in diagram M.5 until 6 sts remain, dec 1 st - Read DECREASE 2 above, finish with 4 sts in garter st. Repeat dec inside 4 sts in garter st in each side, on each row from RS like this a total of 2-1-4 (3-2) times = 48-56-56 (64-72) sts. After diagram M.5 has been worked 1 time vertically, work diagrams M.6 and M.3 1 time vertically (with 4 sts in garter st in each side). P next row from WS, and then work diagram M.7 with 4 sts in garter st in each side until finished measurements. When piece measures 33-36-39 (42-45) cm, cast off the middle 18-20-20 (22-24) sts for neck and finish each part separately. Cast off 2 sts on next row from neck = 13-16-16 (19-22) sts. When piece measures 35-38-41 (44-47) cm, cast off on right shoulder, work as follows on left shoulder: K 1 row from WS (= folding edge), then work in stocking st for another 2.5 cm. Cast off all sts. FRONT PIECE: = 52-58-64 (70-76) sts. The piece is worked back and forth in stocking st until finished measurements. Then continue with charts as on back piece with 4 sts in garter st in each side and cast off for armhole as on back piece. When piece measures 29-32-35 (37-40) cm, cast off the middle 12-12-14 (14-16) sts for neck and finish each part separately. Then cast off on next row from neck as follows: Cast off 2 sts 1 time, 1 st 3-4-3 (4-4) times = 13-16-16 (19-22) sts remain on shoulder. When piece measures 35-38-41 (44-47) cm, cast off on right shoulder, and work a folding edge on left shoulder as on back piece: ASSEMBLY: Sew right shoulder seam. Make 1 strap as follows: Twine 2 strands of 20 cm with cerise and fold them double so that they twine. Make another strap the same way. On left back shoulder fold the edge inwards at the P round, and fasten the straps in the outer edge by folding them double and then pulling the ends through the folding edge, fasten the ends and then sew the edge to the back. Fold and sew the edge to the back of left front shoulder. Knit up from RS approx. 60-80 sts along the entire neck edge (through both layers of the folding edge in each side), then P 1 row from WS while at the same time adjusting no of sts to 66-70-74 (78-82). Continue to work rib as follows: * K 2, P 2 *, repeat from *-* the entire row. Loosely cast off all sts when rib measures approx. 1 cm. Sew the buttons on to left front shoulder. Fold the bottom edge on the dress at the P round and fasten on the back. |
|||||||
Diagram explanations |
|||||||
|
|||||||
 |
|||||||
 |
|||||||
Have you finished this pattern?Tag your pictures with #dropspattern #princessdreamdress or submit them to the #dropsfan gallery. Do you need help with this pattern?You'll find 11 tutorial videos, a Comments/Questions area and more by visiting the pattern on garnstudio.com. © 1982-2026 DROPS Design A/S. We reserve all rights. This document, including all its sub-sections, has copyrights. Read more about what you can do with our patterns at the bottom of each pattern on our site. |
|||||||


With over 40 years in knitting and crochet design, DROPS Design offers one of the most extensive collections of free patterns on the internet - translated to 17 languages. As of today we count 324 catalogues and 12291 patterns translated into English (UK/cm). 12291
We work hard to bring you the best knitting and crochet have to offer, inspiration and advice as well as great quality yarns at incredible prices! Would you like to use our patterns for other than personal use? You can read what you are allowed to do in the Copyright text at the bottom of all our patterns. Happy crafting!
Post a comment to pattern DROPS Baby 21-17
We would love to hear what you have to say about this pattern!
If you want to leave a question, please make sure you select the correct category in the form below, to speed up the answering process. Required fields are marked *.