
Popular categories
Looking for a yarn?


Comments / Questions (59)
![]() Robyn wrote:
Robyn wrote:
I'm knitting the largest size of this dress in a New Zealand merino/possum blend. The tension is exactly as required but I'm worried that I don't have enough yarn. 50 grams of my yarn gives 170 metres, which is less that yours (175 g). I have 150 g of the main colour and 50 of the second. Do you think it will be enough?
22.10.2019 - 11:00DROPS Design answered:
Dear Robyn, We are able to provide free patterns thanks to our yarns sold throughout the world. You will therefore understand that we can only recomand you to contact your DROPS Store for any further help & assistance. Thank you for your comprehension.
22.10.2019 - 13:03
![]() Kylie wrote:
Kylie wrote:
Hi there, please can you answer my question when you get a chance?. I'm really excited to finish the dress and need clarification to finish it. Thanks again for helping. You guys are awesome!. Kylie
11.02.2019 - 05:36
![]() Kylie wrote:
Kylie wrote:
Does the rib of the neck also go over the left shoulder on both front and back please?. Are the left shoulder flaps meant to overlap slightly to add the buttons? or meet exactly at the shoulders, I can't tell from the photo. I'm sure you've already answered this question sorry, but I only speak English. Thanks for being so amazing with your internet support.
09.02.2019 - 07:28DROPS Design answered:
Dear Kylie, the edges on shoulder will not overlap on the shoulders, just meet on shoulder (on folding row), the buttons will be added on the shoulder on front piece and the straps to the folded row on back piece - the rib on neck edge are pick up along the neck (pick up into the 2 layers on the edges on each band on both shoulders). Happy knitting!
11.02.2019 - 08:16
![]() Kylie wrote:
Kylie wrote:
Hi there. Please can you explain how the cording works on the arm hole?. I can't see on the photo. Is it encased (hidden) the whole way including under the arm pit or sitting on top?. Thank you
18.01.2019 - 04:08DROPS Design answered:
Dear Kylie, the 2 twisted string are for button straps, you sew them along the left shoulder on back piece and they will attach the buttons sewn on left shoulder on frontn piece. Happy knitting!
18.01.2019 - 10:10
![]() Diane wrote:
Diane wrote:
Pourquoi en 2 aiguilles on totalise les maille de la plus grande grandeur soit 152 mailles et sur aiguille circulaire donne 400 mailles. Je suis prête à débuter en circulaire. Merci pour votre réponse !
07.08.2018 - 23:41DROPS Design answered:
Bonjour Diane, je ne suis pas sûre de bien comprendre votre question. La robe se tricote de bas en haut, d'abord en rond puis on termine le dos et le devant séparément en allers et retours. Dans la plus grande taille, on monte seulement 200 m et on tricote en rond avec 100 m pour le devant et 100 m pour le dos. Bon tricot!
08.08.2018 - 08:36
![]() Laila Sandaas wrote:
Laila Sandaas wrote:
Gunn Ragnhild Acobsen har et spørsmål, jeg finner ikke svaret
26.03.2018 - 19:02
![]() Malene Wiborg wrote:
Malene Wiborg wrote:
Jeg kan simpelthen ikke tyde ud fra monterings afsnittet om ribben I halsen skal strikkes rundt eller frem og tilbage? Kan jeg få et klart svar? Det står ikke direkte i opskriften.
16.10.2017 - 21:13DROPS Design answered:
Hei Malene. Ribben skal strikkes frem og tilbake. Man syr høyre skulder sammen, mens på venstre skulder har man 2 knapper og 2 hemper. God Fornøyelse!
17.10.2017 - 07:51
![]() Régine wrote:
Régine wrote:
J'ai tricoté ce modèle pour ma petite fille. Cette merveilleuse petite robe lui va à ravir. Pourquoi n'y a-t-il pas plus de modèles jacquard proposés dans cette laine et pour cet âge ? Je trouve cela dommage !
13.11.2016 - 12:39
![]() Willemien wrote:
Willemien wrote:
Ik ben met veel plezier dit jurkje aan het maken, maar als ik het patroon goed lees, moet ik bij het stukje voorpand alleen telpatroon M5 breien, terwijl op de foto op het voorpand toch ook telpatroon M6, M3 en M7 zichtbaar zijn...mist dit in de beschrijving of klopt de foto niet (helemaal)? alvast bedankt!
03.10.2016 - 12:47DROPS Design answered:
Hoi Willemien. Je breit het voorpand verder zoals het achterpand (dus na M.5 ga je door volgens M.6, M.3 enzovoort). Ik pas het een beetje aan in de tekst, zodat het duidelijker is.
04.10.2016 - 15:19
![]() Françoise JEANNIN wrote:
Françoise JEANNIN wrote:
Merci pour vos explications.
19.09.2016 - 15:10
|
|||||||
Princess Dream#princessdreamdress |
|||||||
|
|
|||||||
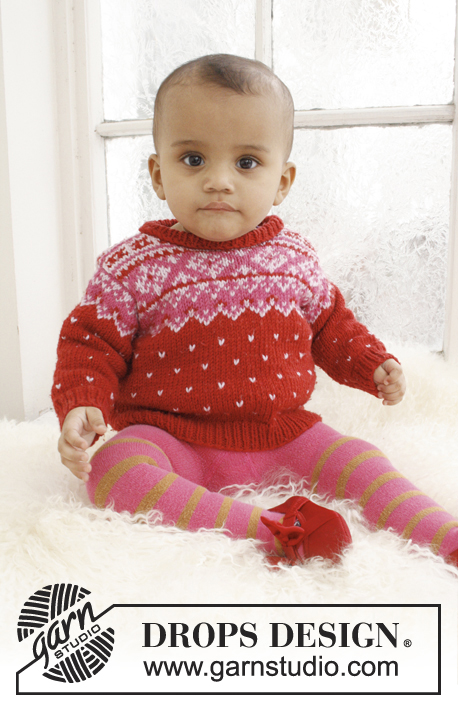
Knitted dress with Nordic pattern for baby and children in DROPS BabyMerino
DROPS Baby 21-17 |
|||||||
|
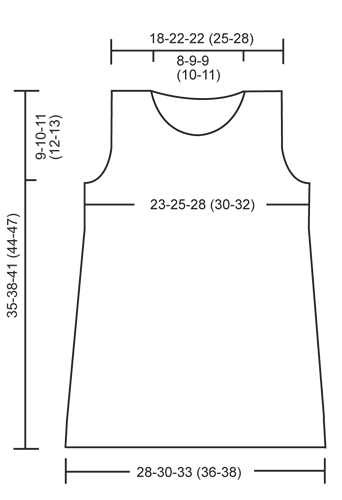
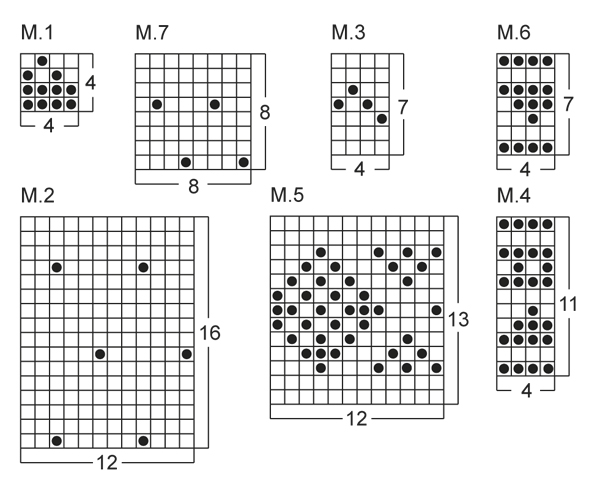
PATTERN: See diagrams M.1 - M.7. DECREASE TIP 1 (applies to body): Dec 1 st on each side of marker as follows: Work until 2 sts remain before marker, slip 1 st as if to K, K 1, psso, (marker), K tog the next 2 sts. DECREASE TIP 2 (applies to armholes): Dec 1 st in each side as follows: Work 4 sts in garter st, slip 1 st as if to K, K 1, psso, work until 6 sts remain, K the next 2 sts tog, work 4 sts in garter st. GARTER ST (back and forth on needle): K all rows. ---------------------------------------------------------- BODY: Worked in the round on circular needle. Cast on 144-156-172 (188-200) sts with cerise on circular needle size 2.5 mm. K for approx. 2.5 cm, then P 1 round = folding edge, measure piece from here and work in stocking st until finished measurements. REMEMBER THE KNITTING TENSION! K 1 more round and insert a marker in each side (= 72-78-86 (94-100) sts between markers on front and back piece). Then work diagram M.1 1 time vertically. Continue in stocking st with cerise until piece measures 3 cm. Now dec 1 st on each side of every marker - Read DECREASE TIP 1 above = 4 sts dec on round. Repeat dec like this every 2-2½-2½ (2-2½) cm a total of 6-6-7 (8-8) times = 120-132-144 (156-168) sts. READ ALL OF THE FOLLOWING SECTION BEFORE CONTINUING. When piece measures 15-17-19 (21-23) cm (all dec are now done), work diagrams M.2, M.3, and then M.4 1 time vertically. Then work rounds 1-3 in diagram M.5 (now piece measures approx. 26-28-30 (32-34) cm). On next round (= 4th round in diagram M.5), cast off 8 sts in each side (i.e. 4 sts on each side of every marker), now divide the piece and finish each part separately. BACK PIECE: = 52-58-64 (70-76) sts. The piece is worked back and forth in stocking st until finished measurements. Work next row (= RS) as follows: Work 4 sts in garter st (= edge sts), dec 1 st - Read DECREASE TIP 2 above, work 5th row in diagram M.5 until 6 sts remain, dec 1 st - Read DECREASE 2 above, finish with 4 sts in garter st. Repeat dec inside 4 sts in garter st in each side, on each row from RS like this a total of 2-1-4 (3-2) times = 48-56-56 (64-72) sts. After diagram M.5 has been worked 1 time vertically, work diagrams M.6 and M.3 1 time vertically (with 4 sts in garter st in each side). P next row from WS, and then work diagram M.7 with 4 sts in garter st in each side until finished measurements. When piece measures 33-36-39 (42-45) cm, cast off the middle 18-20-20 (22-24) sts for neck and finish each part separately. Cast off 2 sts on next row from neck = 13-16-16 (19-22) sts. When piece measures 35-38-41 (44-47) cm, cast off on right shoulder, work as follows on left shoulder: K 1 row from WS (= folding edge), then work in stocking st for another 2.5 cm. Cast off all sts. FRONT PIECE: = 52-58-64 (70-76) sts. The piece is worked back and forth in stocking st until finished measurements. Then continue with charts as on back piece with 4 sts in garter st in each side and cast off for armhole as on back piece. When piece measures 29-32-35 (37-40) cm, cast off the middle 12-12-14 (14-16) sts for neck and finish each part separately. Then cast off on next row from neck as follows: Cast off 2 sts 1 time, 1 st 3-4-3 (4-4) times = 13-16-16 (19-22) sts remain on shoulder. When piece measures 35-38-41 (44-47) cm, cast off on right shoulder, and work a folding edge on left shoulder as on back piece: ASSEMBLY: Sew right shoulder seam. Make 1 strap as follows: Twine 2 strands of 20 cm with cerise and fold them double so that they twine. Make another strap the same way. On left back shoulder fold the edge inwards at the P round, and fasten the straps in the outer edge by folding them double and then pulling the ends through the folding edge, fasten the ends and then sew the edge to the back. Fold and sew the edge to the back of left front shoulder. Knit up from RS approx. 60-80 sts along the entire neck edge (through both layers of the folding edge in each side), then P 1 row from WS while at the same time adjusting no of sts to 66-70-74 (78-82). Continue to work rib as follows: * K 2, P 2 *, repeat from *-* the entire row. Loosely cast off all sts when rib measures approx. 1 cm. Sew the buttons on to left front shoulder. Fold the bottom edge on the dress at the P round and fasten on the back. |
|||||||
Diagram explanations |
|||||||
|
|||||||
 |
|||||||
 |
|||||||
Have you finished this pattern?Tag your pictures with #dropspattern #princessdreamdress or submit them to the #dropsfan gallery. Do you need help with this pattern?You'll find 11 tutorial videos, a Comments/Questions area and more by visiting the pattern on garnstudio.com. © 1982-2026 DROPS Design A/S. We reserve all rights. This document, including all its sub-sections, has copyrights. Read more about what you can do with our patterns at the bottom of each pattern on our site. |
|||||||


With over 40 years in knitting and crochet design, DROPS Design offers one of the most extensive collections of free patterns on the internet - translated to 17 languages. As of today we count 324 catalogues and 12291 patterns translated into English (UK/cm). 12291
We work hard to bring you the best knitting and crochet have to offer, inspiration and advice as well as great quality yarns at incredible prices! Would you like to use our patterns for other than personal use? You can read what you are allowed to do in the Copyright text at the bottom of all our patterns. Happy crafting!
Post a comment to pattern DROPS Baby 21-17
We would love to hear what you have to say about this pattern!
If you want to leave a question, please make sure you select the correct category in the form below, to speed up the answering process. Required fields are marked *.