
Popular categories
Looking for a yarn?


Comments / Questions (63)
![]() Elina Vinrot wrote:
Elina Vinrot wrote:
Hej, har kommit 4 cm in i arbetet och skall göra förkortade varv. Men förstår inte hur det ska gå till om första varvet räknas från avigan, då är det väl bara att färdigställa hela varvet och sedan göra en vändning efter de yttersta 24 kantm? Förstår helt enkelt inte hur det ska gå ihop.. Mvh
07.09.2017 - 18:31DROPS Design answered:
Hej, ja det stämmer de förkortade varven skall vara ut mot kantm mitt fram. Lycka till!
13.09.2017 - 12:02
![]() Viki wrote:
Viki wrote:
Hallo, ich hätte eine Frage zur Beschreibung des Kragens. SCHALKRAGEN: Die 24-24-26 (28-28) M. vom linken Vorderteil auf die Nadel legen und mit den Krausrippen und den verkürzten Reihen alle 2 cm wiederholen bis die Arbeit 7-7-8-9-9 cm misst (an der kurzen Seite). Danach abk. und auf der rechten Seite wiederholen. Muss der Kragen nicht ringsum gehen. Wenn ich nur die Maschen vom linken Vorderteil nehmen soll, was in mit Maschen hinterm Hals (Rückenteil)???
07.09.2017 - 12:08DROPS Design answered:
Liebe Viki, der Schalkragen wird wie im diesem Video gestrickt, nur hier werden Sie dazu verkürzten Reihen stricken. Die beiden Seiten des Kragens werden separat gestrickt, dann zusammengenäht, dann am Hals (Rückenteil) angenäht. Viel Spaß beim stricken!
07.09.2017 - 13:17
![]() Schmitt wrote:
Schmitt wrote:
Bonjour, où se trouve en nombre de mailles le marqueur = milieu de l'épaule en partant de la bordure?
15.03.2016 - 13:17DROPS Design answered:
Bonjour Mme Schmitt, ce marqueur sert de repère pour mesurer la hauteur, placez-le au niveau des mailles de l'épaule, vous plierez ensuite l'ouvrage au marqueur pour vérifier la hauteur du dos et pour les coutures. Bon tricot!
14.04.2016 - 11:30
![]() Kerstin wrote:
Kerstin wrote:
Hallo, die Abstände zwischen den verkürzten Reihen (also erst 4 cm und dann 2 cm) werden die immer auf der glattgestrickten Seite gemessen?
23.02.2016 - 10:10DROPS Design answered:
Liebe Kerstin, ja es wird an der glatt rechts gestricken Seite gemessen.
02.03.2016 - 15:11
![]() Lisa wrote:
Lisa wrote:
Hallo, ich verstehe folgendes beim linken Vorderteil nicht: Nach 27-29-33 (37-40) cm markieren = oben auf der Schulter. Jetzt die 24-24-26 (28-28) Blendenm auf einen Hilfsfaden legen. Weiter am Schluss der R., gegen Vorderseite 2 neue M. anschlagen (gegen den Hals). Bei der nächsten R. wiederholen = 64-69-77 (91-103) M. 1 R. auf der Rückseite stricken und die Maschen stilllegen. Wo muss die Markierung hin? Wo genau müssen die 2 Maschen hin? Liebe Grüße, Lisa
12.08.2015 - 16:05DROPS Design answered:
Antwort siehe unten! :-)
20.08.2015 - 09:40
![]() Lisa wrote:
Lisa wrote:
Hallo, ich verstehe folgendes beim linken Vorderteil nicht: Nach 27-29-33 (37-40) cm markieren = oben auf der Schulter. Jetzt die 24-24-26 (28-28) Blendenm auf einen Hilfsfaden legen. Weiter am Schluss der R., gegen Vorderseite 2 neue M. anschlagen (gegen den Hals). Bei der nächsten R. wiederholen = 64-69-77 (91-103) M. 1 R. auf der Rückseite stricken und die Maschen stilllegen. Wo muss die Markierung hin? Wo genau müssen die 2 Maschen hin? Liebe Grüße, Lisa
12.08.2015 - 15:58DROPS Design answered:
Den Markierer können Sie an den Anfang der R setzen, es geht hier nur darum, die Höhe zu markieren, Sie befinden sich nun genau oben an der Schulter, also quasi an der höchsten Stelle des Vorderteils. Die Blenden-M legen still. Die neuen M schlagen Sie am Ende der Hin-R an, also in Richtung der M, die Sie stillgelegt haben. Das sind Maschen, die Sie für den rückwärtigen Halsausschnitt anschlagen, das Rückenteil stricken Sie ja direkt an. Wie Sie Maschen am Ende einer R anschlagen, können Sie sich im Video "Seitlich neue M anschlagen" im Kopf neben dem Foto anschauen.
20.08.2015 - 09:40
![]() Olivia Rossi wrote:
Olivia Rossi wrote:
Ich verstehe das mit den verkürzten Reihen nicht. Da steht: 1 Krausrippe über die Blendenmaschen und 1 Krausrippe über den äussersten... Maschen. Auf den Bildern ist ausser an der Blende aber immer glatt rechts gestrickt, ich sehe da keine Krausrippe. Ich habe nun auch die verkürzten Reihen dort glatt gestrickt, habe aber immer ein Loch. Was mache ich falsch?
21.05.2015 - 11:25DROPS Design answered:
Es bezieht sich insgesamt nur auf die Blenden-Maschen. Innerhalb der hier ja sehr breiten Blende werden zur Formgebung die verkürzten R gestrickt. Es soll also heißen, dass Sie 1 Rück-R kraus re über ALLE Blenden-M stricken, nach den Blenden-M wenden Sie und stricken die Blenden-M zurück. Dann stricken Sie 1 R NUR über die Hälfte der Blenden-M (= die äußersten M), wenden also mitten in den Blenden-M und stricken wieder kraus re zurück. Dann sind Sie wieder am Ende der R angelangt und stricken wie zuvor über komplett alle Maschen. Zur Grundlage und Lochvermeidung können Sie sich das Video zu verkürzten R oben im Kopf neben dem Foto anschauen.
22.05.2015 - 12:50
![]() Susan Jensen wrote:
Susan Jensen wrote:
I ordered 2 of the Fable Drops. Is that enough? Seems like it should be more.
28.03.2015 - 17:04DROPS Design answered:
Dear Mrs Jensen, in the first 3 sizes you need 200 g / 50 g a ball DROPS Fabel = 4 balls are required in the first 3 sizes, and 5 balls Fabel in the 2 largest sizes. Happy knitting!
30.03.2015 - 15:00
![]() Marianne Beemer wrote:
Marianne Beemer wrote:
Beim linken Vorderteil steht mit fabel nadel 2,5 anschlagen, soll das eine Rundnadel sein?
18.02.2015 - 16:24DROPS Design answered:
Sie können eine Rundnadel oder gerade Nadeln nehmen, das bleibt Ihnen und Ihrer persönlichen Vorliebe überlassen, Sie stricken ja in Hin- und Rück-R. Später, beim Wechsel zur größeren Nadel, bietet sich eine Rundnadel an, da bei zunehmendem Gewicht des Strickstücks ein Stricken auf einer Rundnadel normalerweise angenehmer ist und sich die M dort besser verteilen lassen.
20.02.2015 - 15:55
![]() Kristine wrote:
Kristine wrote:
Hej. Jeg er i tvivl om hvor jeg skal måle. Fra det glatstrikkede stykke eller det retstrikkede? Det retstrikkede stykker er nogle cm kortere?
12.02.2015 - 13:24DROPS Design answered:
Hej Kristine. Maal paa det glatstrikkede stykke
12.02.2015 - 16:58
|
|
DROPS Baby 20-11 |
|
 |
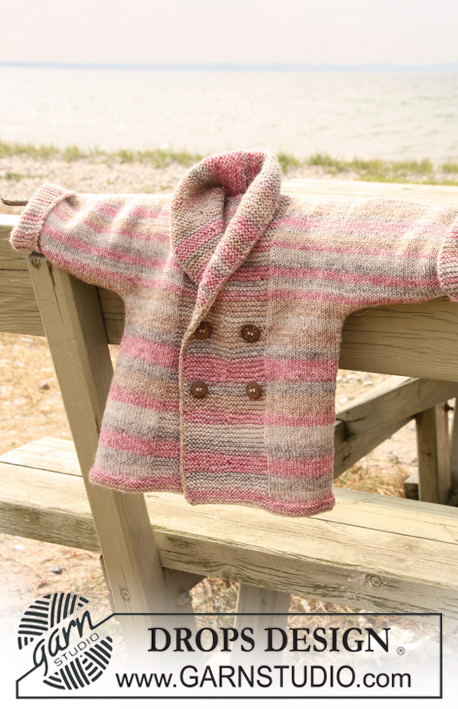 |
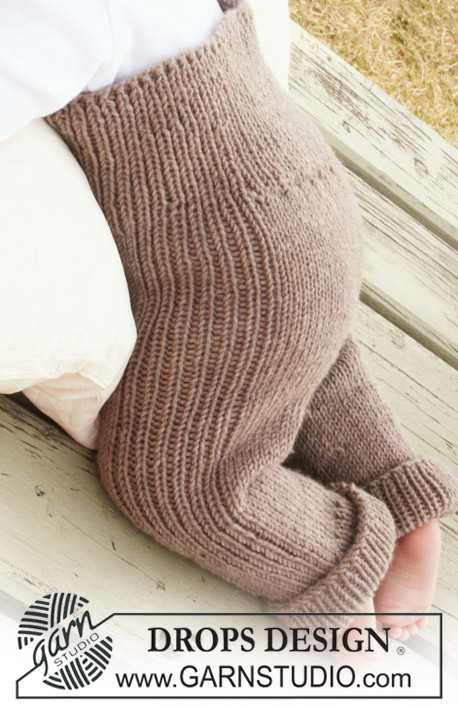
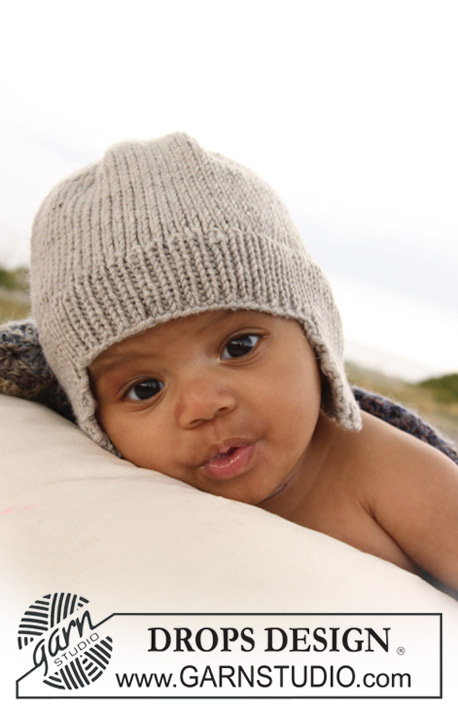
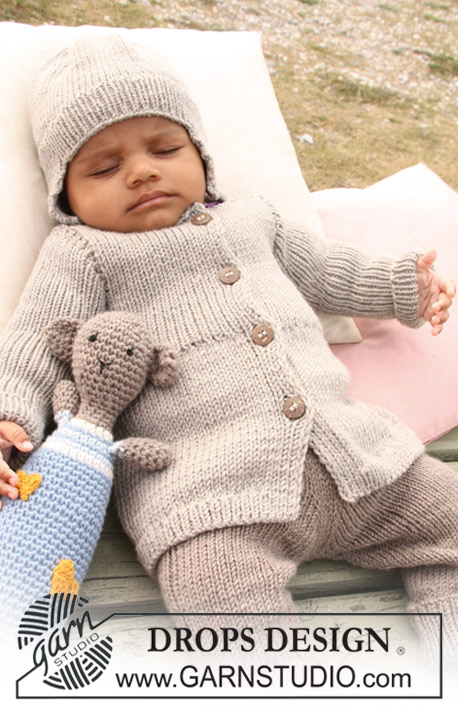
Knitted double breasted jacket with shawl collar for baby and children in DROPS Fabel
DROPS Baby 20-11 |
|
|
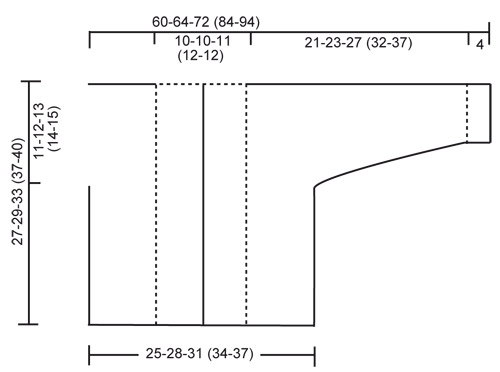
GARTER ST (back and forth on needle): K all rows. SHORTENED ROWS: * Work 2 rows back and forth over 24-24-26 (28-28) front band sts, work 2 rows over the first 12-12-13 (14-14) sts only*. NOTE: When turning in the middle of the work, - slip the first st , tighten the thread and knit back. This is done to avoid a hole in the transition. BUTTONHOLES: The Jacket is double breasted with 4 buttonholes on right front band. 1 BUTTONHOLE = K tog fourth and fifth sts from the edge and make 1 YO. On same row also K tog fourth and fifth LAST sts on front band and make 1 YO. Make 2 buttonholes when piece measures: SIZE 1/3 months: 10 and 14 cm. SIZE 6/9 months: 11 and 15 cm. SIZE 12/18 months: 14 and 18 cm. SIZE 2 years: 17 and 21 cm. SIZE 3/4 years: 19 and 23 cm. -------------------------------------------------------- JACKET: Worked back and forth on circular needle. Start with front piece, inc sts for sleeve and knit up to shoulder. Work the second front piece, put the 2 front pieces tog and knit down the back piece. LEFT FRONT PIECE: READ ALL OF THIS SECTION BEFORE CONTINUING! Cast on 43-47-51 (56-59) sts (includes 1 edge st at the side and 24-24-26 (28-28) front band sts towards front edge) on needle size 2.5 mm with Fabel. Work 6 rows garter st - see explanation above. Change to circular needle size 3 mm and work stocking st, but garter st 24-24-26 (28-28) front band sts towards front edge. When the piece measures 4 cm work SHORTENED ROWS - see above (Row 1 = from WS). Repeat from *-* 1 time every 4 cm until the piece measures 19-21-24 (27-30) cm, then repeat from *-* 1 time every 2 cm to finished measurement. AT THE SAME TIME when piece measures 16-17-20 (23-25) cm cast on new sts at the end of every rows from WS (towards the side for sleeve): 6 sts 2-2-3 (3-3) times, 8 sts 1-1-1 (2-3) times and 21-22-22 (25-26) sts 1 time = 84-89-99 (115-127) sts for shoulder/sleeve. Inc sts are worked in stocking st. When all sts are cast on continue with stocking st and garter sts as before AT THE SAME TIME as the last 10 sts on sleeve also are worked in garter sts. When the piece measures 27-29-33 (37-40) cm insert 1 marker = middle of shoulder. Now slip the 24-24-26 (28-28) front band sts onto a stitch holder. Next cast on 2 new sts at the end of the row from RS (towards neck), repeat the inc on next row towards neck = 64-69-77 (91-103) sts on needle. Work 1 row from WS. Put work aside. RIGHT FRONT PIECE: Cast on and work as left front piece but mirrored. In addition dec for BUTTONHOLES on front band - see above. NOTE! Slip sts onto a thread after the last inc row (i.e. last row = from WS). BACK PIECE: Work left front piece onto the circular needle, cast on 16-16-18 (20-20) new sts (= back of neck) and work right front piece onto circular needle = 144-154-172 (202-226) sts. NOW MEASURE PIECE FROM MARKERS ON SHOULDERS! Continue with stocking st and garter st at end of each sleeve back and forth on needle. When piece measures 8½-9½-10 (10-11) cm beg cast off sleeve sts. Cast off at beg of every row at each side as follows: 21-22-22 (25-26) sts 1 time, 8 sts 1-1-1 (2-3) times and 6 sts 2-2-3 (3-3) times = 62-70-76 (84-90) sts on needle. Work stocking st with 1 edge st each side. When piece measures approx 26-28-32 (36-39) cm – fold piece double at markers on shoulders and see if back piece is the same length as front piece down to garter sts. Change to needle size 2.5 mm and work 6 rows garter sts. Cast off. SHAWL COLLAR: Slip 24-24-26 (28-28) sts from thread on left front piece back on needle. Work garter sts and continue with shortened rows every 2 cm until collar measures 7-7-8 (9-9) cm (measured where shortest). Cast off. Repeat with sts on thread on right front piece. ASSEMBLY: Sew sleeve and side seams inside 1 edge st. Sew on buttons of left front piece. Sew collar tog at back and sew collar to neckline. CROCHET BORDER: Crochet an edge along front band, along the edge of collar and down along front band on other side. Start at bottom of right front piece and crochet with crochet hook size 2 mm as follows: crochet 1 dc, * 1 ch, skip over approx ½ cm, 1 dc in next sts *, repeat from *-*. |
|
 |
|
Have you finished this pattern?Tag your pictures with #dropspattern or submit them to the #dropsfan gallery. Do you need help with this pattern?You'll find 11 tutorial videos, a Comments/Questions area and more by visiting the pattern on garnstudio.com. © 1982-2026 DROPS Design A/S. We reserve all rights. This document, including all its sub-sections, has copyrights. Read more about what you can do with our patterns at the bottom of each pattern on our site. |
|


With over 40 years in knitting and crochet design, DROPS Design offers one of the most extensive collections of free patterns on the internet - translated to 17 languages. As of today we count 324 catalogues and 12290 patterns translated into English (UK/cm). 12290
We work hard to bring you the best knitting and crochet have to offer, inspiration and advice as well as great quality yarns at incredible prices! Would you like to use our patterns for other than personal use? You can read what you are allowed to do in the Copyright text at the bottom of all our patterns. Happy crafting!
Post a comment to pattern DROPS Baby 20-11
We would love to hear what you have to say about this pattern!
If you want to leave a question, please make sure you select the correct category in the form below, to speed up the answering process. Required fields are marked *.