
Popular categories
Looking for a yarn?


Comments / Questions (63)
![]() Thea wrote:
Thea wrote:
Weet iemand antwoord op mijn vraag? Bij het voorpand, als de voorbies op de hulpvraag staat, beginnen met meerderen voor de hals. Er staat tot 64 steken. Zijn dit alleen de steken van het meerderen? Er staan toch veel meer steken op de naald, ook van de mouwen. Ik begrijp niet wat ik moet tellen. Graag hulp!
03.05.2022 - 20:18DROPS Design answered:
Dag Thea,
Na het meerderen voor de mouw heb je 84 steken op de naald in totaal. Je zet bij een hoogte van 27 cm de 24 voorbiessteken op een hulpdraad, dus dan heb je nog 60 steken op de naald staan om mee te breien. Je meerdert in totaal 4 steken, dus heb je daarna 64 steken op de naald staan.
10.05.2022 - 09:20
![]() Mindy wrote:
Mindy wrote:
How do I "mirror" the right front? Do I knit backwards, or do I exchange purl for knit stitches (and vice versa)?
26.02.2022 - 01:13DROPS Design answered:
Dear Mindy, for example, if the first row of the shortened rows is worked on the wrong side in the left front, you need to work the first row on the right side in the right front. When you cast on new stitches for the sleeve, in the left front you cast on at the end of every row on the wrong side, while on the right front you cast on at the end of every row on the right side. Happy knitting!
27.02.2022 - 17:46
![]() Lena wrote:
Lena wrote:
Hallo, ich habe eine Frage zum Rückenteil. „Das li Vorderteil auf eine Nadel legen und … M anschlagen“, also nach den 2x2 neuen Maschen am Ende der Seitenteile die neuen M anschlagen? Was bedeutet „Glatt mit den Krausrippen unten an den Ärmeln…“? Ist hiermit das Ende d. Ärmels, also das Bündchen gemeint? Ich kann mir glaube ich das fertige Rückenteil nicht vorstellen. Stricke ich quasi ab der Schultermarkierung „umgeklappt“ einfach das Rückenteil herunter? Vielen Dank!
21.02.2022 - 15:57DROPS Design answered:
Bonjour Lena, Sie sind gerade beim Rückenteil, richtig? Jezt stricken Sie die Maschen vom linken Vorderteil, schlagen Sie neue Maschen für den Halsausschnitt an (siehe hier und stricken die Maschen vom rechten Vorderteil; jezt stricken Sie das Rückenteil von oben nach unten, mit den 10 krausrechten Maschen beidseitig wie zuvor und glatt rechts inzwischen. Nach 8,5-11 cm beginnen Sie, die Maschen der Ärmel beidseitig abzuketten. Viel Spaß beim stricken!
22.02.2022 - 09:59
![]() Grace wrote:
Grace wrote:
Hi, just wondered if you could tell me about leaving a marker in middle of shoulder, where exactly is the middle of the shoulder, could you tell me how many stitches in the marker would be, thanks grace
19.08.2021 - 12:52DROPS Design answered:
Dear Grace, the marker should be in the middle of the row, this marker will be used later to measure from, ie this row should be on the top of shoulder, the number of stitches doesn't matter, it just will be used to measure from. Happy knitting!
19.08.2021 - 14:40
![]() Helen McInnes wrote:
Helen McInnes wrote:
I am needing help with the short rows. (i have just started the leftside) Are they worked on the garter stitch section or the bit that is at the side with the stocking stitch? Do I start the short row from the wrong side or the right side?
23.05.2021 - 19:55DROPS Design answered:
Dear Helen, the hsort rows are only knitted on the collar stitches knitted with GARTER stitch, They always start from the outside (the front edge), please read the desciption in the pattern as well. Happy Knitting!
24.05.2021 - 03:25
![]() Ulla Lindblad wrote:
Ulla Lindblad wrote:
Jag antar att ni egentligen menar att man lägger upp 51 maskor och 26 av dem stickas i rätstickning . Dvs 77 maskor totalt. Om man lägger upp 51 + 26 stämmer inte maskantalet när det är dax att lägga arbetet åt sidan och koftan blir väldigt bred.
07.03.2021 - 07:06
![]() Véronique Kuyle wrote:
Véronique Kuyle wrote:
Bonjour , Je me permets de vous demander comment avoir 89 mailles ( pour la taille 6/9 mois ) car 24 de point mousse +47 de jersey +2 fois 6+8+22 : j'arrive à un total de 113 mailles !!!!! j'ai beau essayer de comprendre , je reviens toujours à mes 113 mailles ! En vous remerciant par avance , cordialement . Véronique .
22.02.2021 - 21:26DROPS Design answered:
Bonjour Mme Kuyle, les 24 m point mousse de la bordure devant sont comprises dans les 47 m à monter et ne doivent pas être montées en plus, autrement dit, vous montez 47 m (et tricotez ensuite avec 24 m point mousse pour la bordure du devant, 22 m jersey et 1 m lis au point mousse); puis vous monterez 2 x 6 m + 1 x 8 m + 1 x 22 m = 47+12+8+22=89 mailles. Bon tricot!
23.02.2021 - 08:44
![]() Lancerotto Sylvie wrote:
Lancerotto Sylvie wrote:
Bonsoir ! J’ai mis les 28 mailles en attente mais je ne comprends pas où je monte 2 mailles à la fin du rang ???? Merci de votre réponse
10.01.2021 - 20:42DROPS Design answered:
Bonjour Mme Lancerotto, ces 2 mailles sont pour l'encolure dos, pour le devant gauche, vous tricotez les 28 mailles de la bordure devant sur l'envers, et vous les glissez en attente, vous terminez votre rang sur l'envers comme avant, tournez et à la fin du rang suivant (= sur l'endroit), vous montez 2 mailles, tournez, tricotez toutes les mailles, tournez et montez 2 mailles à la fin du rang suivant (= sur l'endroit de nouveau). Bon tricot!
11.01.2021 - 10:11
![]() Liliana wrote:
Liliana wrote:
Quisiera saber si cuando describes las vueltas cortas te refieres a 2 idas y 2 vueltas en 26 puntos y 2 idas y 2 vueltas en los 13 puntos, o simplemente ida y vuelta en 26 y luego ida y vuelta en 13.
05.10.2020 - 21:41DROPS Design answered:
Hola Liliana, las vueltas acortadas se trabajan de la siguiente manera: 1 ida y vuelta con 26 puntos y 1 ida y vuelta con 13.
20.11.2020 - 23:11
![]() Julie Adams wrote:
Julie Adams wrote:
How do you knit the shortened rows on the collar if you are doing 2 rows of 26 stitches and 2 rows of 13 stitches but the band is only 26 stitches, do I knit the 2 rows of 13 stitches and skip the other shortened row or make that one 13 stitches as well?
18.09.2020 - 06:33DROPS Design answered:
Dear Mrs Adams, on the collar work: 2 rows over the 26 sts = over all stitches, then 2 rows over the first 13 sts (starting from RS on right collar/from WS on left collar, ie the short rows should be worked from the beg of row towards mid front).Happy knitting!
18.09.2020 - 08:49
|
|
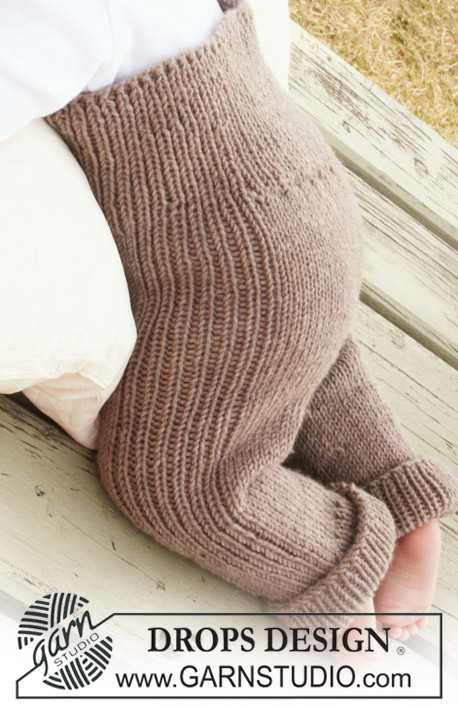
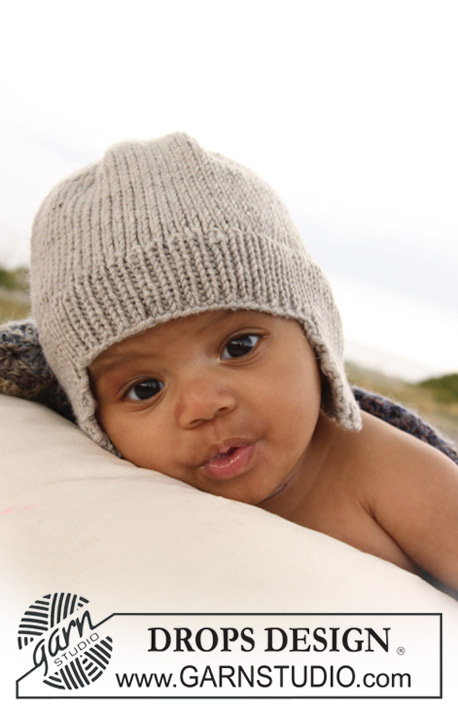
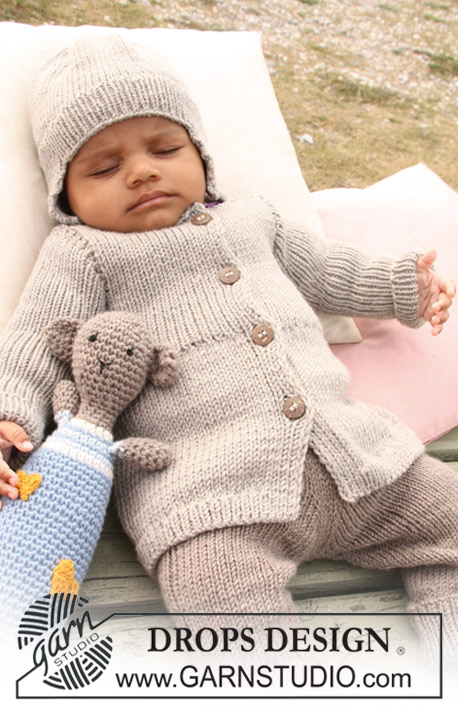
DROPS Baby 20-11 |
|
 |
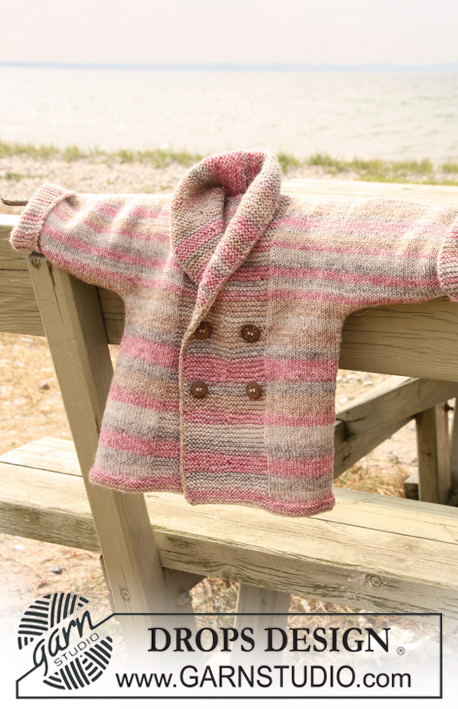 |
Knitted double breasted jacket with shawl collar for baby and children in DROPS Fabel
DROPS Baby 20-11 |
|
|
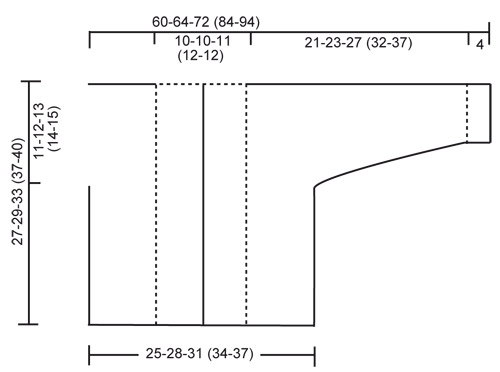
GARTER ST (back and forth on needle): K all rows. SHORTENED ROWS: * Work 2 rows back and forth over 24-24-26 (28-28) front band sts, work 2 rows over the first 12-12-13 (14-14) sts only*. NOTE: When turning in the middle of the work, - slip the first st , tighten the thread and knit back. This is done to avoid a hole in the transition. BUTTONHOLES: The Jacket is double breasted with 4 buttonholes on right front band. 1 BUTTONHOLE = K tog fourth and fifth sts from the edge and make 1 YO. On same row also K tog fourth and fifth LAST sts on front band and make 1 YO. Make 2 buttonholes when piece measures: SIZE 1/3 months: 10 and 14 cm. SIZE 6/9 months: 11 and 15 cm. SIZE 12/18 months: 14 and 18 cm. SIZE 2 years: 17 and 21 cm. SIZE 3/4 years: 19 and 23 cm. -------------------------------------------------------- JACKET: Worked back and forth on circular needle. Start with front piece, inc sts for sleeve and knit up to shoulder. Work the second front piece, put the 2 front pieces tog and knit down the back piece. LEFT FRONT PIECE: READ ALL OF THIS SECTION BEFORE CONTINUING! Cast on 43-47-51 (56-59) sts (includes 1 edge st at the side and 24-24-26 (28-28) front band sts towards front edge) on needle size 2.5 mm with Fabel. Work 6 rows garter st - see explanation above. Change to circular needle size 3 mm and work stocking st, but garter st 24-24-26 (28-28) front band sts towards front edge. When the piece measures 4 cm work SHORTENED ROWS - see above (Row 1 = from WS). Repeat from *-* 1 time every 4 cm until the piece measures 19-21-24 (27-30) cm, then repeat from *-* 1 time every 2 cm to finished measurement. AT THE SAME TIME when piece measures 16-17-20 (23-25) cm cast on new sts at the end of every rows from WS (towards the side for sleeve): 6 sts 2-2-3 (3-3) times, 8 sts 1-1-1 (2-3) times and 21-22-22 (25-26) sts 1 time = 84-89-99 (115-127) sts for shoulder/sleeve. Inc sts are worked in stocking st. When all sts are cast on continue with stocking st and garter sts as before AT THE SAME TIME as the last 10 sts on sleeve also are worked in garter sts. When the piece measures 27-29-33 (37-40) cm insert 1 marker = middle of shoulder. Now slip the 24-24-26 (28-28) front band sts onto a stitch holder. Next cast on 2 new sts at the end of the row from RS (towards neck), repeat the inc on next row towards neck = 64-69-77 (91-103) sts on needle. Work 1 row from WS. Put work aside. RIGHT FRONT PIECE: Cast on and work as left front piece but mirrored. In addition dec for BUTTONHOLES on front band - see above. NOTE! Slip sts onto a thread after the last inc row (i.e. last row = from WS). BACK PIECE: Work left front piece onto the circular needle, cast on 16-16-18 (20-20) new sts (= back of neck) and work right front piece onto circular needle = 144-154-172 (202-226) sts. NOW MEASURE PIECE FROM MARKERS ON SHOULDERS! Continue with stocking st and garter st at end of each sleeve back and forth on needle. When piece measures 8½-9½-10 (10-11) cm beg cast off sleeve sts. Cast off at beg of every row at each side as follows: 21-22-22 (25-26) sts 1 time, 8 sts 1-1-1 (2-3) times and 6 sts 2-2-3 (3-3) times = 62-70-76 (84-90) sts on needle. Work stocking st with 1 edge st each side. When piece measures approx 26-28-32 (36-39) cm – fold piece double at markers on shoulders and see if back piece is the same length as front piece down to garter sts. Change to needle size 2.5 mm and work 6 rows garter sts. Cast off. SHAWL COLLAR: Slip 24-24-26 (28-28) sts from thread on left front piece back on needle. Work garter sts and continue with shortened rows every 2 cm until collar measures 7-7-8 (9-9) cm (measured where shortest). Cast off. Repeat with sts on thread on right front piece. ASSEMBLY: Sew sleeve and side seams inside 1 edge st. Sew on buttons of left front piece. Sew collar tog at back and sew collar to neckline. CROCHET BORDER: Crochet an edge along front band, along the edge of collar and down along front band on other side. Start at bottom of right front piece and crochet with crochet hook size 2 mm as follows: crochet 1 dc, * 1 ch, skip over approx ½ cm, 1 dc in next sts *, repeat from *-*. |
|
 |
|
Have you finished this pattern?Tag your pictures with #dropspattern or submit them to the #dropsfan gallery. Do you need help with this pattern?You'll find 11 tutorial videos, a Comments/Questions area and more by visiting the pattern on garnstudio.com. © 1982-2026 DROPS Design A/S. We reserve all rights. This document, including all its sub-sections, has copyrights. Read more about what you can do with our patterns at the bottom of each pattern on our site. |
|


With over 40 years in knitting and crochet design, DROPS Design offers one of the most extensive collections of free patterns on the internet - translated to 17 languages. As of today we count 324 catalogues and 12290 patterns translated into English (UK/cm). 12290
We work hard to bring you the best knitting and crochet have to offer, inspiration and advice as well as great quality yarns at incredible prices! Would you like to use our patterns for other than personal use? You can read what you are allowed to do in the Copyright text at the bottom of all our patterns. Happy crafting!
Post a comment to pattern DROPS Baby 20-11
We would love to hear what you have to say about this pattern!
If you want to leave a question, please make sure you select the correct category in the form below, to speed up the answering process. Required fields are marked *.