
Popular categories
Looking for a yarn?


Comments / Questions (57)
![]() Chantelle wrote:
Chantelle wrote:
Hello..love the sweater, I am having a problem understanding the neck when it increase 1st in each of the 24 P-sections along back piece (do not inc in the first and last 5 P-sections) Please explain it more detailed, thank you so very much!:)
12.02.2013 - 16:38
![]() Chantelle wrote:
Chantelle wrote:
Hello..love the sweater, I am having a problem understanding the neck when it increase 1st in each of the 24 P-sections along back piece (do not inc in the first and last 5 P-sections) Please explain it more detailed, thank you so very much!:)
12.02.2013 - 16:18
![]() DROPS Design wrote:
DROPS Design wrote:
Marisa, muchas gracias por la observación!
09.06.2012 - 04:54Marisa Díaz wrote:
En la explicación de la espalda, han omitido en el primer párrafo "tejer la muestra A" entre los dos paños de resorte
09.06.2012 - 01:26DROPS Design answered:
Muchas gracias por la observación!
09.06.2012 - 04:44
![]() DROPS Design NL wrote:
DROPS Design NL wrote:
Hoi. U meerdert aan de goede kant. Meerder afwisselend aan het begin en aan het eind van elk av-deel. Op deze manier wordt de meerderingen meer gelijk.
16.01.2012 - 12:20
![]() Tine wrote:
Tine wrote:
Vraag voor het meerderen aan de kraag: Meerder je altijd aan de goede kant in de av-delen? Of wissel je af: eerste keer aan de goede kant(resultaat: 2r - 5 av), tweede keer aan de verkeerde kant(resultaat: 3r - 4 av)?
14.01.2012 - 17:23
![]() DROPS Deutsch wrote:
DROPS Deutsch wrote:
Stimmt. Das habe ich gleich geändert.
03.03.2011 - 09:15
![]() Melanie wrote:
Melanie wrote:
Hallo, ich glaube einen Fehler entdeckt zu haben. Bei der Erklärung zum Diagramm: 3M. auf eine Hilfsnadel hinter die Arbeit legen, steht zweimal. Müsste doch eigentlich einmal hinter und ein mal vor der Arbeit legen sein. Gruß Melanie
02.03.2011 - 21:27
![]() DROPS Design NL wrote:
DROPS Design NL wrote:
Hallo. U breit de kraag met 2 r, 2 av. U meerdert dan 1 st in de middelste 24 av-gedeelten. Dwz, de 2 av worden 3 av. U meerdert door 1 omsl te maken. Lees ook TIP VOOR HET MEERDEREN aan het begin van het patroon. Ik hoop dat u hiermee verder kunt. Succes. Gr. Tine
20.12.2010 - 09:57
![]() Annie wrote:
Annie wrote:
Kunt u me zeggen wat meerderen in de middelste 24 av-delen zijn? Ben met de kraag bezig maar weet niet hoe ik moet meerderen.
20.12.2010 - 09:54
|
|||||||||||||||||||
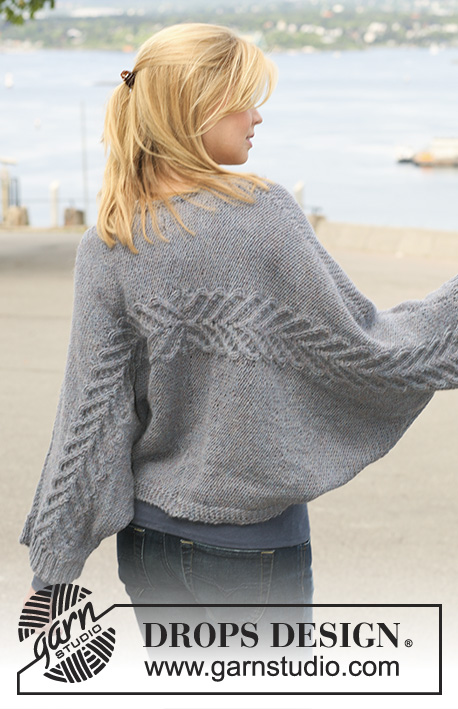
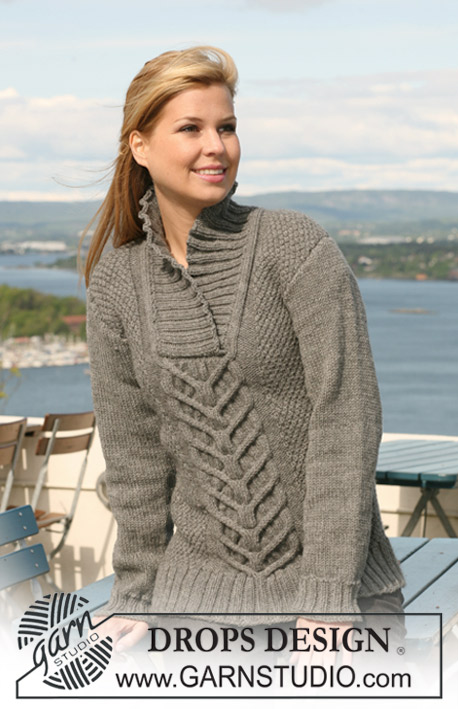
Fishtail Vest |
|||||||||||||||||||
 |
 |
||||||||||||||||||
Knitted DROPS jumper with short or long sleeves with cables and moss st in ”Nepal”. Size S - XXXL.
DROPS 125-23 |
|||||||||||||||||||
|
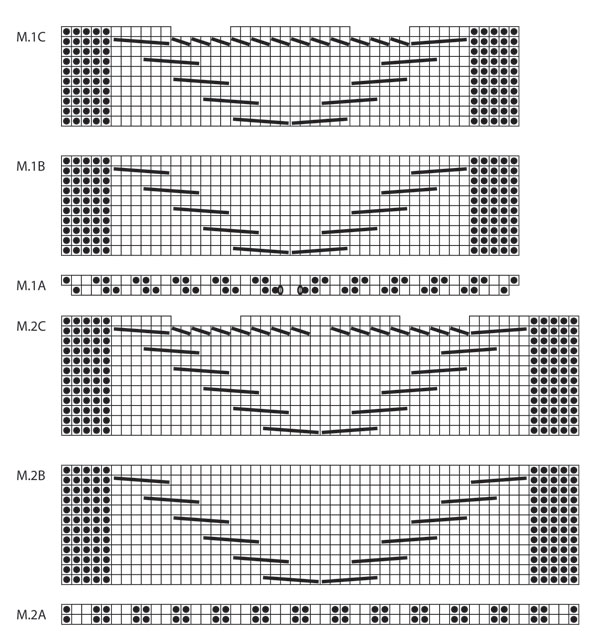
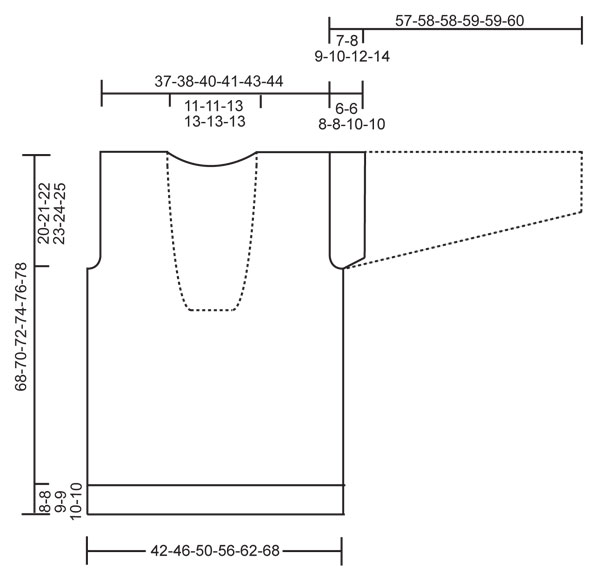
PATTERN: See diagram M.1 and M.2. See diagram for your size. Diagram shows the pattern from RS. Size S + M: M.1A, M.1B and M.1C. Size L + XL + XXL + XXXL: M.2A, M.2B and M.2C. GARTER ST (back and forth on needle): K all rows. INCREASING TIP: Inc 1 st by making 1 YO. Inc alternately before and after P-section. On next row K YO into back of loop to avoid a hole. MOSS ST (double): Row 1: * K1, P1 *, repeat from *-*. Row 2: K over K and P over P. Row 3: P over K and K over P. Repeat row 2 and 3. -------------------------------------------------------- BACK PIECE: Cast on 94-102-110-118-126-142 sts (includes 1 edge st each side) on needle size 4.5 mm with Nepal. P 1 row from WS and continue in rib as follows (from RS): 1 edge st, P1, * K2, P2 *, repeat from *-* and finish with K2, P1 and 1 edge st. When rib measures 8-8-9-9-10-10 cm work next row as follows (from RS): 1 edge st, 24-28-28-32-36-44 sts in rib as before, M.A (work diagram for your size - see above), 24-28-28-32-36-44 sts in rib as before and 1 edge st. After 1 vertical repeat of M.A there are 96-104-110-118-126-142 sts on needle. Change to needle size 5 mm and work next row as follows: 1 edge st, 24-28-28-32-36-44 MOSS STS - see above - AT THE SAME TIME dec 4-4-4-3-2-5 sts evenly, M.B (work diagram for your size), 24-28-28-32-36-44 moss sts AT THE SAME TIME dec 4-4-4-3-2-5 sts evenly and work 1 edge st. There are now 88-96-102-112-122-132 sts on needle. Continue in moss st and M.B. When piece measures 48-49-50-51-52-53 cm cast off 3 sts each side for armhole and cast off to shape the armhole at the beg of every row each side: 2 sts 1-2-3-5-6-8 times and 1 st 0-1-1-1-2-2 times = 78-80-82-84-88-90 sts. Continue as before until piece measures approx 61-63-65-67-69-71 cm (adjust to a full repeat). Now worked M.C over M.B. After 1 vertical repeat of M.C there are 66-68-68-70-74-76 sts on needle. On next row from RS cast off the middle 18-18-22-22-22-22 sts for neck= 24-25-23-24-26-27 sts left on each shoulder. Continue in moss st and P5 + K3 towards neck. AT THE SAME TIME on first row cast on 1 new st towards neck (= edge st) = 25-26-24-25-27-28 sts on shoulder. Continue until piece measures approx 68-70-72-74-76-78 cm, cast off. FRONT PIECE: Cast on and work like back piece until piece measures approx 38-39-40-41-42-43 cm (adjust to a full repeat). Now worked M.C over M.B. After 1 vertical repeat of M.C there are 76-84-88-98-108-118 sts on needle. On next row cast off the middle 18-18-22-22-22-22 sts for neck and complete each side separately. RIGHT FRONT PIECE: = 29-33-33-38-43-48 sts. Continue in moss st and P5 + K3 towards neck. AT THE SAME TIME on first row cast on 1 new st towards neck (= edge st). AT THE SAME TIME when piece measures 48-49-50-51-52-53 cm cast off for armhole at the side as described for back piece = 25-26-24-25-27-28 sts. Continue in moss st and P5 + K3 + 1 edge st towards neck until piece measures approx 68-70-72-74-76-78 cm (adjust to back piece). Cast off. LEFT FRONT PIECE: Like right front piece, but mirrored. ASSEMBLY: Sew shoulder seams. Sew side seams inside 1 edge st. SHORT SLEEVE: Pick up 80 to 120 sts on circular needle size 4.5 mm with Nepal round armhole. P 1 round, AT THE SAME TIME adjust no of sts to 88-92-100-108-112-116. K 1 round and continue in rib, K2/P2. When rib measures approx 6-6-8-8-10-10 cm cast off loosely with K over K and P over P. LONG SLEEVE: Worked back and forth on needle. Cast on 46-46-50-50-50-54 sts (includes 1 edge st each side) on needle size 4.5 mm with Nepal. P 1 row from WS and continue in rib K2/P2 with 1 edge st each side. When rib measures approx 6 cm K 1 row from RS, AT THE SAME TIME dec 5-3-5-4-4-6 sts evenly = 41-43-45-46-46-48 sts. P 1 row from WS. Change to needle size 5 mm and continue in stocking st with 1 edge st each side. When piece measures 7-8-8-8-8-8 cm inc 1 st each side and repeat the inc on every 4-3.5-3-2.5-2-2 cm a total of 11-12-13-15-16-18 times = 63-67-71-76-78-84 sts. Continue until piece measures 50-50-49-49-47-46 cm (NOTE! less for the larger sizes because of longer sleeve cap and wider shoulder). Now cast off 4 sts each side and cast off to shape the sleeve cap at the beg of every row each side: 2 sts 3-3-4-4-4-4 times and 1 st 0-0-0-1-3-5 times, then 2 sts at the beg of every row until piece measures approx 56-57-57-58-58-59 cm. Now cast off 4 sts 1 time each side and cast off remaining sts. Piece measures approx 57-58-58-59-59-60 cm. Sew sleeve seams inside 1 edge st and set in sleeves. NECK: Beg at bottom of neck on right front piece. Pick up 130 to 180 sts inside edge st on circular needle size 4.5 mm with Nepal up along neckline on right front piece, along back piece, and down along neckline on left front piece. NOTE! Do not pick up on the 18-18-22-22-22-22 sts cast off on front piece. K 1 row from WS, AT THE SAME TIME adjust no of sts to 138-142-154-162-170-178. K 1 row from RS and work next row from WS as follows: 2 GARTER STS - see above - P2, * K2, P2 *, repeat from *-* and finish with 2 garter sts. Continue in rib like this for approx 4 cm. On next row from RS inc 1 st in each of the 23-24-27-29-31-33- P-sections along back piece (i.e. do not inc in the first and last 5 P-sections) - See INCREASING TIP = 161-166-181-191-201-211 sts. Continue with K over K and P over P. When piece measures approx 7 cm inc 1 st in each of the 19-20-23-25-27-29 P-sections along back piece (i.e. do not inc in the first and last 7 P-sections) = 180-186-204-216-228-240 sts. Continue with K over K and P over P. When piece measures approx 9 cm inc 1 st in each of the 15-16-19-21-23-25 P-sections along back piece (i.e. do not inc in the first and last 9 P-sections) = 195-202-223-237-251-265 sts. Continue with K over K and P over P until piece measures approx 11-11-13-13-13-13 cm. Now cast off loosely with K over K and P over P. ASSEMBLY: Place the right rib over the left at bottom of front piece and fasten through both layers. |
|||||||||||||||||||
Diagram explanations |
|||||||||||||||||||
|
|||||||||||||||||||
 |
|||||||||||||||||||
 |
|||||||||||||||||||
Have you finished this pattern?Tag your pictures with #dropspattern or submit them to the #dropsfan gallery. Do you need help with this pattern?You'll find 20 tutorial videos, a Comments/Questions area and more by visiting the pattern on garnstudio.com. © 1982-2026 DROPS Design A/S. We reserve all rights. This document, including all its sub-sections, has copyrights. Read more about what you can do with our patterns at the bottom of each pattern on our site. |
|||||||||||||||||||


With over 40 years in knitting and crochet design, DROPS Design offers one of the most extensive collections of free patterns on the internet - translated to 17 languages. As of today we count 325 catalogues and 12298 patterns translated into English (UK/cm). 12298
We work hard to bring you the best knitting and crochet have to offer, inspiration and advice as well as great quality yarns at incredible prices! Would you like to use our patterns for other than personal use? You can read what you are allowed to do in the Copyright text at the bottom of all our patterns. Happy crafting!
Post a comment to pattern DROPS 125-23
We would love to hear what you have to say about this pattern!
If you want to leave a question, please make sure you select the correct category in the form below, to speed up the answering process. Required fields are marked *.