
Popular categories
Looking for a yarn?


Comments / Questions (57)
![]() Em Redondo wrote:
Em Redondo wrote:
Buenos dias, por favor, cuando se hacen los aumentos del cuello, en la vuelta siguiente al tejer derecho sobre dcho y reves sobre reves, el punto aumentado ¿como se teje?, si toca derecho se hacen tres puntos al derecho o se hacen dos y dos y se modifica la serie? Muchas Gracias
10.03.2015 - 14:26DROPS Design answered:
Hola Em, los aumentos se hacen siempre en las secciones de revés en el cuello, es decir q la lazada en la fila sig se trabaja de derecho retorcido de modo que por el LD queda un pt de revés. Visto por el LD las secciones de derecho quedan constantes y las secciones de revés aumentan.
15.03.2015 - 17:03
![]() Martha wrote:
Martha wrote:
Come faccio l'aumento, solo al rovescio? invece de 2, saranno 3?
27.03.2014 - 19:11DROPS Design answered:
Buongiorno Martha, a quale punto delle spiegazioni fa riferimento? Se ci spiega in modo più dettagliato il suo problema la potremo aiutare, ma con delle indicazioni così generiche non possiamo esserle d'aiuto. Buon lavoro!!
28.03.2014 - 15:21
![]() Martha wrote:
Martha wrote:
Non ho capito come se fa il collo? avete una foto.
26.03.2014 - 14:12DROPS Design answered:
Buongiorno Martha, le foto disponibili sono quelle del modello, ma se ci dice qual è esattamente il suo problema cercheremo di aiutarla. Buon lavoro!!
26.03.2014 - 14:15
![]() Martha Elizabeth wrote:
Martha Elizabeth wrote:
Hola, tu diseno es lindo, pero no entiendo como debo hacer en la figura M1c en la carrera 9 que dice 2m juntas al der si es asi estoy disminuyendo, en que momento aumento? y como?
27.01.2014 - 20:05
![]() Hendrikje wrote:
Hendrikje wrote:
Hallo Wat bedoelt u met 1verticale herhaling van M.C.? Moet ik dan M.C. één keer helemaal breien en dan nog een toer van M.C.? Met vriendelijke groet Hendrikje
25.10.2013 - 12:25DROPS Design answered:
Met 1 keer bedoelen we 1 keer helemaal. Dus u breit alle naalden vanaf de 1e tot en met de laatste naald 1 keer.
25.10.2013 - 18:53Chantal Stuart wrote:
So do I increase on the 2 times 7 sts = 14 sts to get the total of 132 sts agen? M.2C
05.08.2013 - 14:03DROPS Design answered:
Between the 2 cables in M.2C, you work : K2 tog 7 times, K2, K2 tog 7 times. Happy knitting!
05.08.2013 - 15:13Chantal Stuart wrote:
Good Day, I am busy knitting Drops pattern 125-23. I am using M.2A-C.The second last row of M.2C it says K2 tog. The last row does not indicate if i must Increase anywere to get agen 132 sts. Can someone just explain the last row with the gaps, please Regards Chantal Stuart
05.08.2013 - 13:30DROPS Design answered:
Dear Mrs Stuart, on 2nd last row in M.2C, you will work 14 times K2 tog, so that you'll dec a total of 14 sts. On last row in M.2C, you then get 14 sts less : 2 times 7 sts = the gaps are the decreased sts on row below. Happy knitting!
05.08.2013 - 13:32
![]() Ines wrote:
Ines wrote:
Después de hacer la primera parte como se sigue con la cenefa siguiente?
08.06.2013 - 10:08DROPS Design answered:
Hola Inés, ¿puedes concretar un poco más la pregunta.?
09.06.2013 - 11:25
![]() Liane wrote:
Liane wrote:
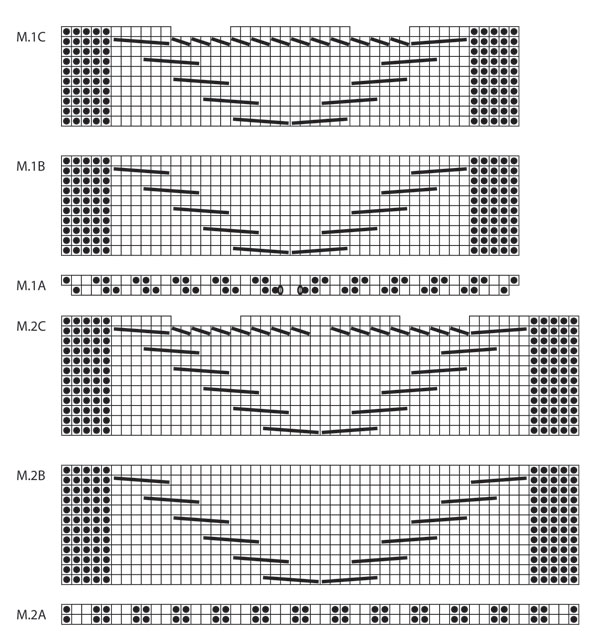
Ist bei den Diagrammen immer die hin und die Rückreihe abgebildet oder nur die Hinreihe?
03.03.2013 - 14:31DROPS Design answered:
Liebe Liane, das Diagramm zeigt Hin-und Rückreihen.
04.03.2013 - 08:18
![]() Chantelle wrote:
Chantelle wrote:
Hello..love the sweater, I am having a problem understanding the neck when it increase 1st in each of the 24 P-sections along back piece (do not inc in the first and last 5 P-sections) Please explain it more detailed, thank you so very much!:)
12.02.2013 - 16:39DROPS Design answered:
Dear Chantelle, you continue P2 in each of the 5 first P2 each side and inc P1 in each of the other P sections (= 24 P sections). Happy knitting!
13.02.2013 - 17:28
|
|||||||||||||||||||
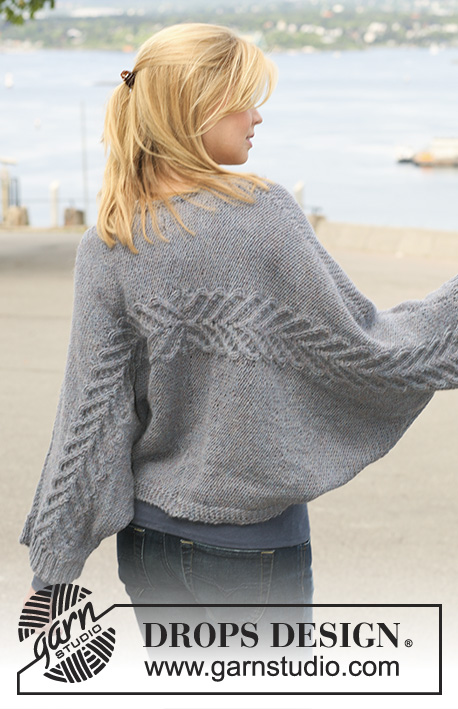
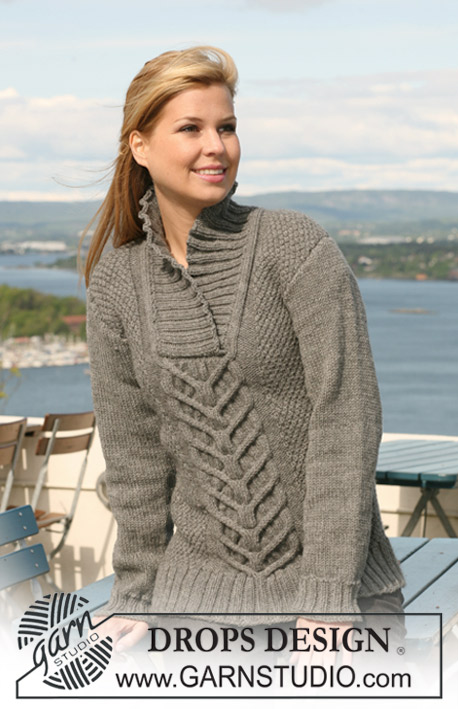
Fishtail Vest |
|||||||||||||||||||
 |
 |
||||||||||||||||||
Knitted DROPS jumper with short or long sleeves with cables and moss st in ”Nepal”. Size S - XXXL.
DROPS 125-23 |
|||||||||||||||||||
|
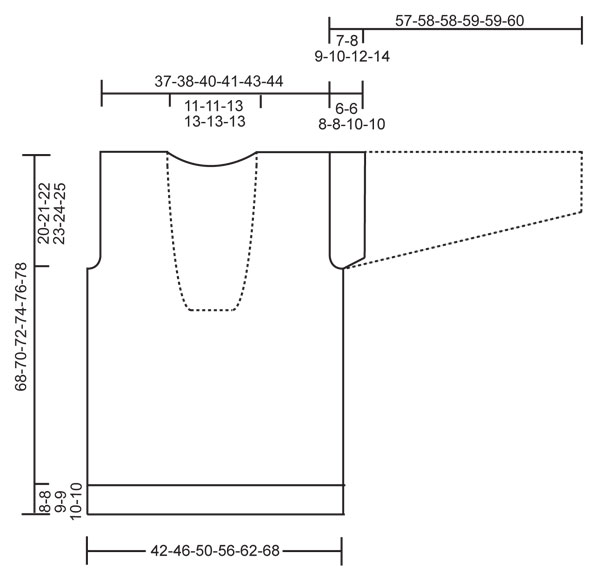
PATTERN: See diagram M.1 and M.2. See diagram for your size. Diagram shows the pattern from RS. Size S + M: M.1A, M.1B and M.1C. Size L + XL + XXL + XXXL: M.2A, M.2B and M.2C. GARTER ST (back and forth on needle): K all rows. INCREASING TIP: Inc 1 st by making 1 YO. Inc alternately before and after P-section. On next row K YO into back of loop to avoid a hole. MOSS ST (double): Row 1: * K1, P1 *, repeat from *-*. Row 2: K over K and P over P. Row 3: P over K and K over P. Repeat row 2 and 3. -------------------------------------------------------- BACK PIECE: Cast on 94-102-110-118-126-142 sts (includes 1 edge st each side) on needle size 4.5 mm with Nepal. P 1 row from WS and continue in rib as follows (from RS): 1 edge st, P1, * K2, P2 *, repeat from *-* and finish with K2, P1 and 1 edge st. When rib measures 8-8-9-9-10-10 cm work next row as follows (from RS): 1 edge st, 24-28-28-32-36-44 sts in rib as before, M.A (work diagram for your size - see above), 24-28-28-32-36-44 sts in rib as before and 1 edge st. After 1 vertical repeat of M.A there are 96-104-110-118-126-142 sts on needle. Change to needle size 5 mm and work next row as follows: 1 edge st, 24-28-28-32-36-44 MOSS STS - see above - AT THE SAME TIME dec 4-4-4-3-2-5 sts evenly, M.B (work diagram for your size), 24-28-28-32-36-44 moss sts AT THE SAME TIME dec 4-4-4-3-2-5 sts evenly and work 1 edge st. There are now 88-96-102-112-122-132 sts on needle. Continue in moss st and M.B. When piece measures 48-49-50-51-52-53 cm cast off 3 sts each side for armhole and cast off to shape the armhole at the beg of every row each side: 2 sts 1-2-3-5-6-8 times and 1 st 0-1-1-1-2-2 times = 78-80-82-84-88-90 sts. Continue as before until piece measures approx 61-63-65-67-69-71 cm (adjust to a full repeat). Now worked M.C over M.B. After 1 vertical repeat of M.C there are 66-68-68-70-74-76 sts on needle. On next row from RS cast off the middle 18-18-22-22-22-22 sts for neck= 24-25-23-24-26-27 sts left on each shoulder. Continue in moss st and P5 + K3 towards neck. AT THE SAME TIME on first row cast on 1 new st towards neck (= edge st) = 25-26-24-25-27-28 sts on shoulder. Continue until piece measures approx 68-70-72-74-76-78 cm, cast off. FRONT PIECE: Cast on and work like back piece until piece measures approx 38-39-40-41-42-43 cm (adjust to a full repeat). Now worked M.C over M.B. After 1 vertical repeat of M.C there are 76-84-88-98-108-118 sts on needle. On next row cast off the middle 18-18-22-22-22-22 sts for neck and complete each side separately. RIGHT FRONT PIECE: = 29-33-33-38-43-48 sts. Continue in moss st and P5 + K3 towards neck. AT THE SAME TIME on first row cast on 1 new st towards neck (= edge st). AT THE SAME TIME when piece measures 48-49-50-51-52-53 cm cast off for armhole at the side as described for back piece = 25-26-24-25-27-28 sts. Continue in moss st and P5 + K3 + 1 edge st towards neck until piece measures approx 68-70-72-74-76-78 cm (adjust to back piece). Cast off. LEFT FRONT PIECE: Like right front piece, but mirrored. ASSEMBLY: Sew shoulder seams. Sew side seams inside 1 edge st. SHORT SLEEVE: Pick up 80 to 120 sts on circular needle size 4.5 mm with Nepal round armhole. P 1 round, AT THE SAME TIME adjust no of sts to 88-92-100-108-112-116. K 1 round and continue in rib, K2/P2. When rib measures approx 6-6-8-8-10-10 cm cast off loosely with K over K and P over P. LONG SLEEVE: Worked back and forth on needle. Cast on 46-46-50-50-50-54 sts (includes 1 edge st each side) on needle size 4.5 mm with Nepal. P 1 row from WS and continue in rib K2/P2 with 1 edge st each side. When rib measures approx 6 cm K 1 row from RS, AT THE SAME TIME dec 5-3-5-4-4-6 sts evenly = 41-43-45-46-46-48 sts. P 1 row from WS. Change to needle size 5 mm and continue in stocking st with 1 edge st each side. When piece measures 7-8-8-8-8-8 cm inc 1 st each side and repeat the inc on every 4-3.5-3-2.5-2-2 cm a total of 11-12-13-15-16-18 times = 63-67-71-76-78-84 sts. Continue until piece measures 50-50-49-49-47-46 cm (NOTE! less for the larger sizes because of longer sleeve cap and wider shoulder). Now cast off 4 sts each side and cast off to shape the sleeve cap at the beg of every row each side: 2 sts 3-3-4-4-4-4 times and 1 st 0-0-0-1-3-5 times, then 2 sts at the beg of every row until piece measures approx 56-57-57-58-58-59 cm. Now cast off 4 sts 1 time each side and cast off remaining sts. Piece measures approx 57-58-58-59-59-60 cm. Sew sleeve seams inside 1 edge st and set in sleeves. NECK: Beg at bottom of neck on right front piece. Pick up 130 to 180 sts inside edge st on circular needle size 4.5 mm with Nepal up along neckline on right front piece, along back piece, and down along neckline on left front piece. NOTE! Do not pick up on the 18-18-22-22-22-22 sts cast off on front piece. K 1 row from WS, AT THE SAME TIME adjust no of sts to 138-142-154-162-170-178. K 1 row from RS and work next row from WS as follows: 2 GARTER STS - see above - P2, * K2, P2 *, repeat from *-* and finish with 2 garter sts. Continue in rib like this for approx 4 cm. On next row from RS inc 1 st in each of the 23-24-27-29-31-33- P-sections along back piece (i.e. do not inc in the first and last 5 P-sections) - See INCREASING TIP = 161-166-181-191-201-211 sts. Continue with K over K and P over P. When piece measures approx 7 cm inc 1 st in each of the 19-20-23-25-27-29 P-sections along back piece (i.e. do not inc in the first and last 7 P-sections) = 180-186-204-216-228-240 sts. Continue with K over K and P over P. When piece measures approx 9 cm inc 1 st in each of the 15-16-19-21-23-25 P-sections along back piece (i.e. do not inc in the first and last 9 P-sections) = 195-202-223-237-251-265 sts. Continue with K over K and P over P until piece measures approx 11-11-13-13-13-13 cm. Now cast off loosely with K over K and P over P. ASSEMBLY: Place the right rib over the left at bottom of front piece and fasten through both layers. |
|||||||||||||||||||
Diagram explanations |
|||||||||||||||||||
|
|||||||||||||||||||
 |
|||||||||||||||||||
 |
|||||||||||||||||||
Have you finished this pattern?Tag your pictures with #dropspattern or submit them to the #dropsfan gallery. Do you need help with this pattern?You'll find 20 tutorial videos, a Comments/Questions area and more by visiting the pattern on garnstudio.com. © 1982-2026 DROPS Design A/S. We reserve all rights. This document, including all its sub-sections, has copyrights. Read more about what you can do with our patterns at the bottom of each pattern on our site. |
|||||||||||||||||||


With over 40 years in knitting and crochet design, DROPS Design offers one of the most extensive collections of free patterns on the internet - translated to 17 languages. As of today we count 325 catalogues and 12298 patterns translated into English (UK/cm). 12298
We work hard to bring you the best knitting and crochet have to offer, inspiration and advice as well as great quality yarns at incredible prices! Would you like to use our patterns for other than personal use? You can read what you are allowed to do in the Copyright text at the bottom of all our patterns. Happy crafting!
Post a comment to pattern DROPS 125-23
We would love to hear what you have to say about this pattern!
If you want to leave a question, please make sure you select the correct category in the form below, to speed up the answering process. Required fields are marked *.