
Popular categories
Looking for a yarn?


Comments / Questions (83)
Anteide wrote:
Fortsetzung: Auf der Rückseite (das ist die glatte Seite) beginnend 1 R.re, 2.R (das ist die krause Vorderseite) re, 3.R.li 4.Reihe (wir sind wieder auf der Voderseite) 5 M li (Blende) 10 M li *in den nächsten 2 M je 1M re aufnehmen (sind 4 M) , 20 M li*...Mal, in jede ner 2 nächssten M 2 M re stricken (ist 4 M)....=274-298-322-346.370-394M. Und jetzt sind wir auf der Rückseite:Mit den Blendenm in Krausrippe und M1 über die restleigne M weiterfahren.
14.04.2013 - 21:32
![]() Anteide wrote:
Anteide wrote:
Oder noch besser: PASSE: Die Ärmelkante und das Vorder- und Pückenteil auf eine Rundnadel Nr.5(!Korrektur) legen und zwar beginnend mit rechtem Vorderteil, 1 Ärmelkante, Rückenteil, 2.Ärmelkante und linkes Vorderteil. Fortsetzung folgt.
14.04.2013 - 21:31
![]() Hanna wrote:
Hanna wrote:
Tehdäänkö resorin jälkeiset "kavennukset" (2s oikein yhteen) todellakin oikean puolen kerroksella? Tällöinhän resorin ja sileän nurjan väliin jää yksi kerros oikeita silmukoita. Vai näyttäisikö paremmalta, jos "kavennukset" tekisikin 2s nurin yhteen?
04.01.2013 - 09:11DROPS Design answered:
Hei! Kyllä, kavennukset tehdään aivan kuten ohjeessa sanotaan.
08.01.2013 - 12:51
![]() Hanna wrote:
Hanna wrote:
Tehdäänkö resorin jälkeiset "kavennukset" (2s oikein yhteen) todellakin oikean puolen kerroksella? Tällöinhän resorin ja sileän nurjan väliin jää yksi kerros oikeita silmukoita. Vai näyttäisikö paremmalta, jos "kavennukset" tekisikin 2s nurin yhteen?
03.01.2013 - 09:37
![]() Libellule wrote:
Libellule wrote:
J'hésite à me lancer dans ce superbe ouvrage car je ne comprends pas le diagramme. Au deuxième rang, la torsade est-elle bien réalisée sur l'envers ? Je ne saisis pas bien comment faire les rangs en retour. Merci pour votre aide
23.11.2012 - 22:29DROPS Design answered:
Bonjour Libellule, 1 case du diagramme = 1 m x 1 rang. Le 1er rang du diagramme se tricote sur l'envers, donc les torsades se feront bien sur l'endroit. Bon tricot !
24.11.2012 - 11:22
![]() Amatxi wrote:
Amatxi wrote:
Modèle superbe! on m'a fait beaucoup de compliments. Finalement très simple à faire
06.11.2012 - 15:27
![]() Elisabet wrote:
Elisabet wrote:
Onko silmukkaluku todella S-koossa 240? Tuntuu todella suurelta, vaikka puikot ja lanka on ohjeen mukaiset.
31.10.2012 - 13:10DROPS Design answered:
Silmukkaluku on oikea. Joustinneuleen jälkeen silmukoita kavennetaan ja kokoon S jää 164 s.
06.11.2012 - 13:20
![]() Jeanette Seitzberg wrote:
Jeanette Seitzberg wrote:
Hejsa, Jeg har strikket denne op i Nepal, og den er bare så fin. Men jeg mener, at der måske er en fejl ved instruktion i knaphul. Jeg kom i hvert fald frem til at strikke 2. og 3. maske sammen for at knaphullet kommer i midten af kantmaskerne. Det kan selvfølgelig skyldes manglende erfaring, for jeg kan godt se at knapperne vil trække den over til den ene side, men indtil videre er det fint nok.
04.10.2012 - 17:04
![]() Anonym wrote:
Anonym wrote:
Ich habe berücksichtigt, dass die 240 Maschen für Vorderteile und Rückenteil sind. Trotzdem passe ich fast zweimal in die Jacke hinein...
26.09.2012 - 13:10DROPS Design answered:
Es wird ja nach dem Bündchen ziemlich stark abgenommen. Wenn Sie das lockere Bündchen stört, können Sie natürlich auch gleich mit der reduzierten Maschenzahl beginnen, dann wird sich das Bündchen evtl. etwas spannen.
27.09.2012 - 09:29
![]() Anonym wrote:
Anonym wrote:
Leider fällt die Jacke viel (!) zu groß aus, wenn ich in Größe S 240 Maschen anschlage. Ist die Angabe eventuell falsch?
20.09.2012 - 20:30DROPS Design answered:
Die 240 Maschen sind für beide Vorderteile und das Rückenteil, habe Sie das berücksichtigt?
24.09.2012 - 16:31
|
|||||||||||||||||||||||||
Celtic Winter#celticwintercardigan |
|||||||||||||||||||||||||
|
|
|||||||||||||||||||||||||
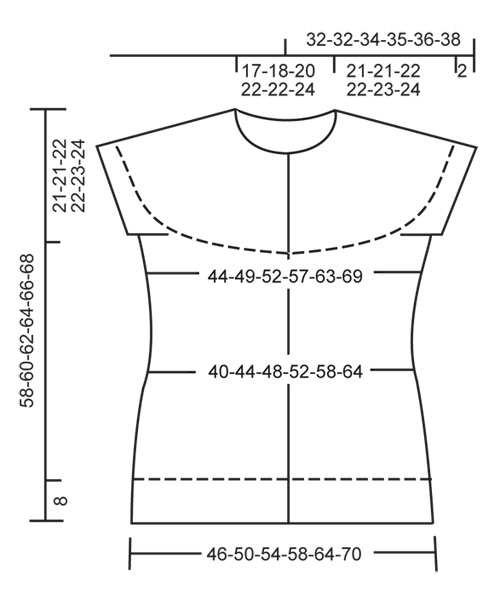
DROPS waistcoat in ”Alaska” with raglan and cables on yoke. Size S to XXXL.
DROPS 121-27 |
|||||||||||||||||||||||||
|
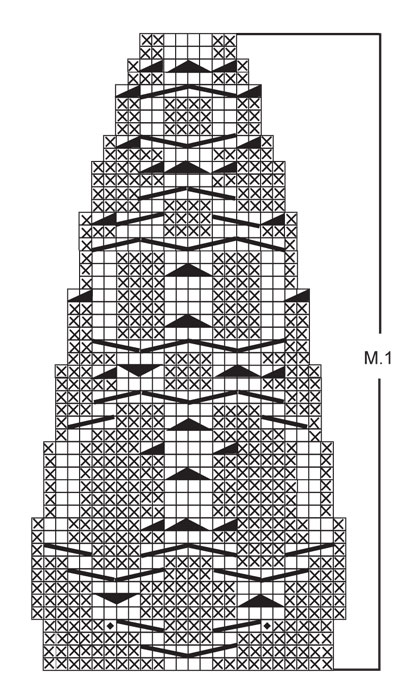
GARTER ST (back and forth on needle): K all rows. PATTERN: See diagrams M.1 – pattern in diagram is seen from RS. BUTTONHOLES: Make buttonholes on right front band. 1 buttonhole = K tog 3rd and 4th st from mid front and make 1 YO. Make buttonholes when piece measures: SIZE S: 12, 19, 26, 34, 41, 49 and 56 cm. SIZE M: 12, 20, 28, 36, 43, 51 and 58 cm. SIZE L: 12, 20, 28, 36, 44, 52, 60 cm. SIZE XL: 12, 21, 29, 37, 45, 54 and 62 cm. SIZE XXL: 12, 21, 30, 39, 47, 56 and 64 cm. SIZE XXXL: 12, 21, 30, 39, 48, 57 and 66 cm. -------------------------------------------------------- -------------------------------------------------------- BODY PIECE: Worked back and forth on circular needle from mid front. Cast on 240-264-282-306-336-366 sts (includes 5 front band sts each side towards mid front) on circular needle size 4 mm with Alaska. Continue as follows from RS: 5 front band sts in GARTER ST – see above, K2, * P4/ K2 *, repeat from *-* and finish with 5 front band sts in garter st. When rib measures 8 cm work (make sure next row is from RS) change to needle size 5 mm. Work next row as follows from RS: 5 front band sts in garter st, K2, * K2 tog, K2 tog, K2 *, repeat from *-* and finish with 5 front band sts in garter st = 164-180-192-208-228-248. Continue in reverse stocking st and front bands in garter st as before. Insert a marker 43-47-50-54-59-64 sts in from each side (= 78-86-92-100-110-120 sts between markers on back piece). REMEMBER THE KNITTING TENSION! When piece measures 10-10-11-11-12-12 cm dec 1 st each side of both markers, and repeat the dec on every 2 cm a total of 5 times = 144-160-172-188-208-228 sts. AT THE SAME TIME when piece measures 12 cm make BUTTONHOLES on right front band – see above! When piece measures 22-22-23-23-24-24 cm inc 1 st each side of both markers, and repeat the inc on every 3 cm a total of 4 times = 160-176-188-204-224-244 sts. When piece measures 37-39-40-42-43-44 cm cast off 6-6-8-8-10-10 sts each side for armhole on next row from RS (= 3-3-4-4-5-5 sts each side of marker) = 148-164-172-188-204-224 sts left on needle. Put piece aside. SLEEVE EDGES: Worked back and forth on circular needle. Cast on 58-61-70-73-78-79 sts on circular needle size 4 mm. K 3 rows and work next row as follows: Cast off the first 3-3-4-4-5-5 sts, K sts on row until 3-3-4-4-5-5 sts remain, cast off theses sts, cut the thread = 52-55-62-65-68-69 sts remain on needle. Put piece aside and knit the other sleeve edge. YOKE: Slip sts from sleeve edges on the same circular needle size 5 mm as body piece where cast off for armholes = 252-274-296-318-340-362 sts. K 1 row from WS and work 0-0-2-2-4-6 rows in reverse stocking st with front bands in garter st. Work next row as follows from RS: 5 front band sts in garter st, P10, * inc 1 st in each of the next 2 sts and K these 4 sts, P20 *, repeat from *-* a total of 10-11-12-13-14-15 times, inc 1 st in each of the next 2 sts and K these 4 sts, P10, and 5 front band sts in garter st = 274-298-322-346-370-394 sts. Now continue in M.1 with front bands in garter st as before (first row = WS). On row 4 in M.1 inc 2 sts in each repeat as per the diagram = 296-322-348-374-400-426 sts. Now complete M.1. After M.1 there are 98-106-114-122-130-138 sts on needle. Work 1 row from WS. Change to circular needle size 4 mm. K 1 row from RS, at the same time dec 16-18-22-24-30-30 sts evenly (do not dec on front bands) = 82-88-92-98-100-108 sts. K 1 row. Insert a marker mid back. Continue in garter st on all sts, at the same time work shortened rows mid back as follows (first row = RS): K 7 sts past marker mid back, turn, K 7 sts past marker on the other side, turn, K 14 sts past marker, turn, K 14 sts past marker on the other side, turn, and continue like this with 7 more sts before each turn until you have work a total of 35-35-35-42-42-42 sts each side of marker. Turn, K all sts on row and then work 3 rows on all sts. Cast off with K sts from RS. ASSEMBLY: Sew sleeve edges tog, edge to edge and sew openings under sleeves. Sew on buttons. |
|||||||||||||||||||||||||
Diagram explanations |
|||||||||||||||||||||||||
|
|||||||||||||||||||||||||
 |
|||||||||||||||||||||||||
 |
|||||||||||||||||||||||||
Have you finished this pattern?Tag your pictures with #dropspattern #celticwintercardigan or submit them to the #dropsfan gallery. Do you need help with this pattern?You'll find 19 tutorial videos, a Comments/Questions area and more by visiting the pattern on garnstudio.com. © 1982-2026 DROPS Design A/S. We reserve all rights. This document, including all its sub-sections, has copyrights. Read more about what you can do with our patterns at the bottom of each pattern on our site. |
|||||||||||||||||||||||||


With over 40 years in knitting and crochet design, DROPS Design offers one of the most extensive collections of free patterns on the internet - translated to 17 languages. As of today we count 324 catalogues and 12290 patterns translated into English (UK/cm). 12290
We work hard to bring you the best knitting and crochet have to offer, inspiration and advice as well as great quality yarns at incredible prices! Would you like to use our patterns for other than personal use? You can read what you are allowed to do in the Copyright text at the bottom of all our patterns. Happy crafting!
Post a comment to pattern DROPS 121-27
We would love to hear what you have to say about this pattern!
If you want to leave a question, please make sure you select the correct category in the form below, to speed up the answering process. Required fields are marked *.