
Popular categories
Looking for a yarn?


Comments / Questions (20)
![]() Hernandez wrote:
Hernandez wrote:
Bonjour!je ne comprends pas pourquoi il faut tricoter avec des aiguilles circulaires cordialement
25.05.2013 - 17:38DROPS Design answered:
Bonjour Mme Hernandez, on tricote ici en allers et retours sur aiguille circulaire pour avoir suffisamment de place pour y loger toutes les mailles (102 à 120 m cf taille). Bon tricot!
27.05.2013 - 08:57
![]() Renée wrote:
Renée wrote:
Ouvrage terminé. Merci pour votre éclairage, malgré des décennies de pratique en tricot, les explications les plus simples peuvent plonger dans le brouillard, merci encore de votre gentillesse.
21.03.2013 - 09:59
![]() Renée wrote:
Renée wrote:
Bonsoir Je ne comprends pas du tout le fait des 4 rgs mousse et 8 mailles coté encolure merci de bien vouloir m'aider :-) encolure devant : À 56-61-67 cm de hauteur totale, tricoter 4 rangs au point mousse sur les 8-9-10 m côté encolure puis rabattre pour l'encolure tous les 2 rangs : 1 fois 6-7-8 m puis 4 fois 1 m.
24.01.2013 - 19:42DROPS Design answered:
Bonjour Renée, à 56-61 cm (cf taille), vous tricotez les 8 m côté encolure au point mousse pendant 4 rangs, et les autres mailles comme avant. Vous rabattez ensuite côté encolure tous les 2 rangs (= tous les rangs qui commencent côté encolure): 1 fois 6-7-8 m (cf taille) et 4 fois 1 m. Bon tricot !
24.01.2013 - 21:02
![]() Kine wrote:
Kine wrote:
Hvordan øker jeg de 20 maskene på slutten av pinnen?
17.11.2012 - 15:47DROPS Design answered:
Naar du har strikket pinden, saa vender du og saetter de 20 m op.
19.11.2012 - 15:32
![]() Cindy Le Gleuher wrote:
Cindy Le Gleuher wrote:
Bonsoir, dans les indications pour le dos, après l'augmentation pour les manches vous donnez: "continuer en point mousse avec 14m au point mousse", ne serait ce pas plutôt "continuer en M1 avec 14m au point mousse"?
24.06.2012 - 22:36DROPS Design answered:
Bonjour Cindy, tout à fait, on continue en point fantaisie avec les 14 m point mousse. Merci, bon tricot !
25.06.2012 - 09:07
![]() Cindy Le Gleuher wrote:
Cindy Le Gleuher wrote:
Bonjour, sur la confection des boutonnières en taille 12/18 mois, il faut rabattre la 4ème, la 30ème, la 35ème maille, je penserais plutôt à la 20ème au lieu de 30.
24.06.2012 - 21:56
![]() Drops Design France wrote:
Drops Design France wrote:
Oui Sylvie, il faut tricoter en allers retours chaque pièce, comme indiqué.
26.01.2009 - 09:48Sylvie wrote:
Quand vous dites...se tricote en allers retours sur l'aiguille circulaire, je ne dois pas tricoter tout en rond mais en aller-retour?
25.01.2009 - 17:20
![]() Todamer wrote:
Todamer wrote:
Det gjør du enkelt. Forstykket strikkes som vanlig til arbeidet måler ca 27(29)31 cm. Fell så av de midterste 8 masker, og legg disse opp igjen på neste omg. Lag tilsvarende hull på bakstykket. Plukk opp masker i overkant av hullet når du er ferdig (2+8+2)og strikkpå 5-6cm på 5-6 cm. Lag eventuelt et knappehull slik at den kan lukkes. Håper dette var forståelig. Lykke til
08.10.2008 - 19:05
![]() Heidi wrote:
Heidi wrote:
Nydelig kjørepose! Kunne tenke meg at oppskriften var tilrettelagt for bruk av seler i bilstol - dvs. et lite hull foran og bak med en liten lommeflik for til isolasjon/foring. Jeg har nemlig lett internett rundt etter varme babyplagg som er forenelige med bilstol, og det er så og si umulig å finne - iallfall til de aller minste.
01.10.2008 - 03:29
|
|||||||
DROPS Baby 10-10 |
|||||||
 |
 |
||||||
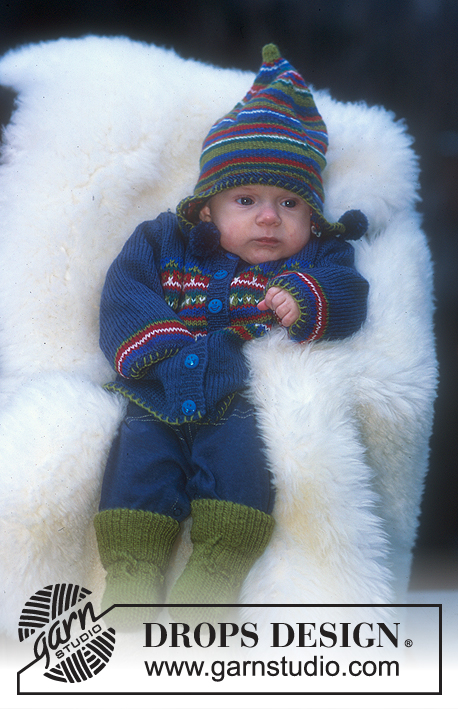
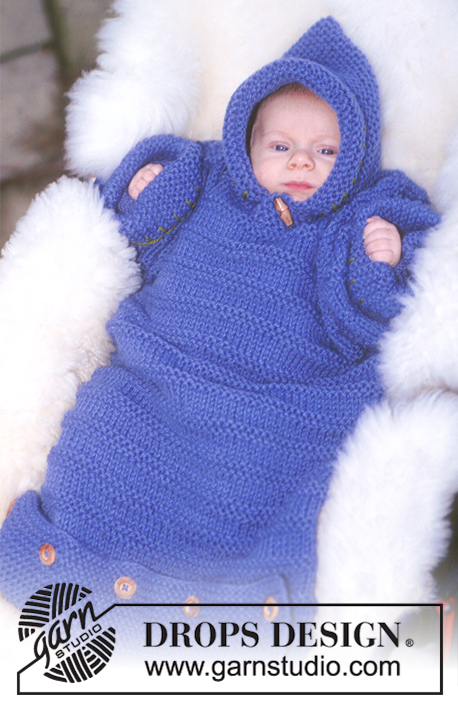
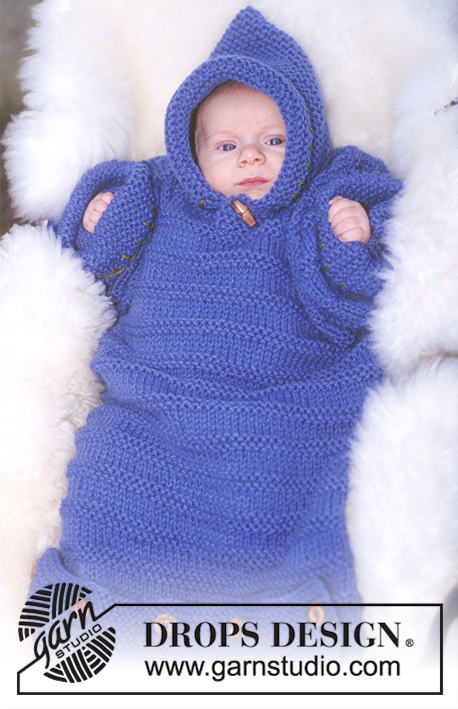
Bunting bag in Alaska
DROPS Baby 10-10 |
|||||||
|
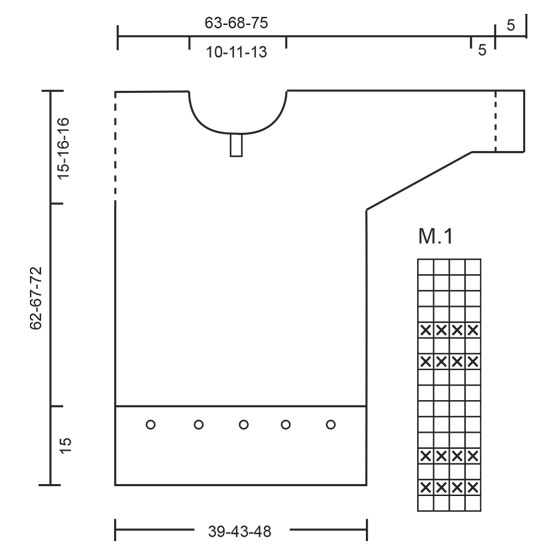
Knitting tension: 14 sts x 17 rows on needle size 7 mm in stocking sts = 10 x 10 cm. Garter sts: Knit all rows Pattern: See diagram M.1. The diagram shows the pattern from the right side. Buttonhole, bottom edge back piece: Make 5 buttonholes from the RS as follows: Size 1/3 months: cast off st no 4, 16, 28, 40 and 52 Size 6/9 months: cast off st no 4, 18, 31, 45 and 58 Size 12/18 months: cast off st no 4, 20, 35, 51 and 66 and cast on 1 new st in the same place on the return row. The bunting bag is knitted in two pieces, front and back, from bottom up and sewn tog at the sides and shoulders afterwards. The hood is knitted separately and sewn on afterwards. Front piece: Knitted back and forth on circular needle. Cast on 56-62-70 sts on circular needle size 7 mm. Knit 2 rows garter sts and continue in M.1. Remember the knitting tension! When piece measures 42-45-50 cm inc 1 st each side for sleeves on every other row: 3-4-5 times and then 20 sts 1 time = 102-110-120 sts. Continue in M.1 with 14 sts each side in garter sts. When piece measures 52-57-62 cm put half the sts on a thread and finish each side separately. Left front: = 51-55-60 sts. Cast on 3 new sts towards mid front = 54-58-63 sts. Continue in M.1 with 6 sts towards mid front in garter sts (= front edge). When piece measures 56-61-67 cm knit 4 rows garter sts over 8-9-10 sts towards mid front. Now cast off 6-7-8 sts towards mid front for neck and dec to shape the neckline on every other row: 1 st 4-4-4 times. Cast of remaining sts when piece measures 62-67-72 cm. Right front: Put sts from thread back on needle and knit as left front, but mirrored. At the same time when piece measures approx 55-60-65 cm make a buttonhole on front edge as follows: cast off the 4th st from the edge and cast on a new st in the same place on the return row. Back piece: Knitted back and forth on circular needle. There’s a 15 cm bottom edge to be folded over front piece and buttoned on. Cast on 56-62-70 sts on circular needle size 7 mm and knit 6 rows garter sts. On the next row make 5 buttonholes – see above – and continue in garter sts until piece measures 15 cm. Insert a marking thread and measure piece from this point onwards. Continue in M.1 over all sts. When piece measures 42-45-50 cm inc for sleeves as described for front piece = 102-110-120 sts Continue in M.1 with 14 sts each side in garter sts. When piece measures 59-64-69 knit 4 rows garter sts over the middle 18-20-22 sts. Now cast off the middle 14-16-18 sts for neck and continue with 2 sts towards neckline in garter sts. Cast of remaining sts when piece measures 62-67-72 cm. Hood: Knitted from front edge towards the back. Cast on 46-50-54 sts on needle size 7 mm and knit 21-22-23 cm garter sts. Cast off. Assembly: Sew shoulder, sleeve and side seams. Place the front edges over each other and sew at the bottom. Sew hood tog mid back, fold approx 4 cm at the front towards RS before sewing hood on to bag – sew along neckline and beg and finish half way in on the front edges. Sew on the Duffel button at the top of left front edge and the other 5 buttons approx 5 cm from bottom edge on front piece. Sew buttonhole stitches – for instructions please see School of Handcraft, technique pages – with light olive around sleeve edges and hood front edge. Sew over 2 sts (width) and 4 rows of garter sts (height). |
|||||||
Diagram explanations |
|||||||
|
|||||||
 |
|||||||
Have you finished this pattern?Tag your pictures with #dropspattern or submit them to the #dropsfan gallery. Do you need help with this pattern?You'll find 16 tutorial videos, a Comments/Questions area and more by visiting the pattern on garnstudio.com. © 1982-2026 DROPS Design A/S. We reserve all rights. This document, including all its sub-sections, has copyrights. Read more about what you can do with our patterns at the bottom of each pattern on our site. |
|||||||


With over 40 years in knitting and crochet design, DROPS Design offers one of the most extensive collections of free patterns on the internet - translated to 17 languages. As of today we count 324 catalogues and 12290 patterns translated into English (UK/cm). 12290
We work hard to bring you the best knitting and crochet have to offer, inspiration and advice as well as great quality yarns at incredible prices! Would you like to use our patterns for other than personal use? You can read what you are allowed to do in the Copyright text at the bottom of all our patterns. Happy crafting!
Post a comment to pattern DROPS Baby 10-10
We would love to hear what you have to say about this pattern!
If you want to leave a question, please make sure you select the correct category in the form below, to speed up the answering process. Required fields are marked *.