
Popular categories
Looking for a yarn?


Comments / Questions (207)
![]() Anne Maach Schrøder wrote:
Anne Maach Schrøder wrote:
Forstår ikke det store garnforbrug på ialt 900 gr., når jeg sammenligner med model 141-16, som jeg lige har strikket og som også er i dobbelt alpaca og endog med p 5. Er det korrekt?
30.04.2014 - 17:32DROPS Design answered:
Vi har ikke hört at garnforbruget ikke stemmer og det er en populär model. Men sig endelig til om hvor meget du bruger i din störrelse!
07.05.2014 - 11:25
![]() PAYET wrote:
PAYET wrote:
Bonjour, Pour le col il faut augmenter de chaque côté des marqueurs, je n'ai pas compris si il fallait faire cela a chaque rang Merci de me renseigner, cordialement Mme PAYET
12.04.2014 - 22:31DROPS Design answered:
Bonjour Mme Payet, on fait les augmentations pour le col 1 seule fois (6 augmentations au total). Bon tricot!
14.04.2014 - 09:44
![]() Nicoletta wrote:
Nicoletta wrote:
Manca la spiegazione per le maniche, dove la posso trovare?
27.03.2014 - 00:44DROPS Design answered:
Buongiorno Nicoletta. La ringraziamo per la segnalazione. Abbiamo inserito il testo mancante. Buon lavoro!
27.03.2014 - 09:41
![]() Anette wrote:
Anette wrote:
Mein erste Teil von Drops. Bin absolut begeistert. hat viel Spaß gemacht, Vorder- und Rückseite sowie Ärmel jeweils in einem Stück zu stricken. Jacke ist ein super Teil und brenzelt jede Jeans auf.
01.03.2014 - 19:33
![]() Annamaria wrote:
Annamaria wrote:
Lo trovo molto bello e completo per ogni occasione con il colletto è proprio chic.
01.03.2014 - 10:37
![]() Birgit Weigand wrote:
Birgit Weigand wrote:
Vielen Dank für die schnelle Antwort. Dann geht's jetzt in den Endspurt.
04.12.2013 - 13:26
![]() Birgit Weigand wrote:
Birgit Weigand wrote:
Bin jetzt beim Kragen. Wird der kpl. mit 4 Fäden gestrickt? Und werden die Zunahmen bei den 3 Markierungen nur einmal ausgeführt?
03.12.2013 - 22:45DROPS Design answered:
Liebe Birgit, ja der Kragen wird komplett mit 4 Fäden gestrickt, damit er etwas fester wird. Und die Aufnahme wird 1 x beidseitig aller Markierungen durchgeführt.
04.12.2013 - 07:57
![]() Diane Daviknes wrote:
Diane Daviknes wrote:
Det kommer en påminnelse i avsnittet om høyre forstk om å huske knapphull. Det burde heller komme i avsnittet om jakke. Hvis du har glemt det innen du kommer til høyre forstykke, er det allerede for sent!
30.10.2013 - 08:40
![]() Benedetta wrote:
Benedetta wrote:
Grazie per l'aiuto! Il modello è bellissimo .la vostra disponibilita' e l'immediatezza delle vostre risposte sono eccellenti . Buona giornata
23.09.2013 - 12:56
![]() Benedetta wrote:
Benedetta wrote:
Ho seguito tutte le spiegazioni senza problemi.Adesso sto lavorando il davanti sx e devo aumentare per il bavero ma voi dite di aumentare dopo la m. Di vivagno,ma il lavoro comincia con 2 m.a grana di riso a 4 fili e non c'e vivagno.quindi dove si crea l'aumento?grazie
22.09.2013 - 21:55DROPS Design answered:
Buonasera Benedetta, le 2 m. a grana di riso lavorate a 4 fili rappresentano il vivagno, quindi gli aumenti vanno fatti dopo queste 2 m. e incorporati nella grana di riso nel f. successivo. Buon lavoro!!
22.09.2013 - 23:09
|
|
Pearl of the Fall#pearlofthefallcardigan |
|
|
|
|
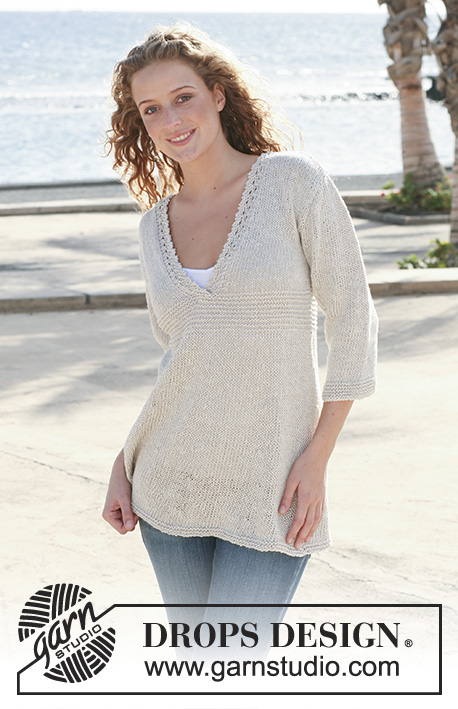
DROPS jacket in moss st in ”Alpaca” with collar. Size S - XXXL.
DROPS 112-4 |
|
|
GARTER ST (back and forth on needle): K all rows. GARTER ST (in the round): K 1 round, P 1 round. MOSS ST: Row 1: * K1, P1 *, repeat from *-*. Row 2: K over P and P over K. Repeat row 2. INCREASING TIP: Inc 1 st by making 1 YO. On return row work YO into back of loop to avoid a hole. BUTTONHOLES: Make buttonholes on right front band. 1 buttonhole = cast off 3rd and 4th st from mid front and cast on 2 new sts on return row. Make buttonholes when piece measures: SIZE S: 24 and 32 cm. SIZE M: 26 and 34 cm. SIZE L: 28 and 36 cm. SIZE XL: 30 and 38 cm. SIZE XXL: 32 and 40 cm. SIZE XXXL: 34 and 42 cm. -------------------------------------------------------- JACKET: Worked back and forth on circular needle from mid front. Cast on 136-148-160-176-196-216 sts on circular needle size 5.5 mm with 1 thread in each color. Work 6 rows garter st – SEE ABOVE - AT THE SAME TIME work 2 sts each side in 2 threads of each color(= 4 threads) for a firmer edge. Insert 2 markers in piece, 37-40-43-47-52-57 sts in from each side (back piece = 62-68-74-82-92-102 sts). Continue in moss st – SEE ABOVE – on all sts (continue to work 2 sts each side in 4 threads until finished measurements). REMEMBER THE KNITTING TENSION! When piece measures 8 cm dec 1 st on each side of both markers and repeat the dec when piece measures 15 cm = 128-140-152-168-188-208 sts. Continue in moss st. When piece measures 22 cm inc 1 st on each side of both markers and repeat the inc on every 4-4-4.5-5-5.5-6 cm a total of 3 times = 140-152-164-180-200-220 sts. When piece measures 35-36-37-38-39-40 cm cast off 6 sts each side for armhole (= 3 sts on each side of both markers) and now complete each piece separately. BACK PIECE: = 58-64-70-78-88-98 sts. Cast off to shape the armhole each side at the beg of every row: 2 sts 0-1-2-3-5-7 times and 1 st 0-0-1-2-2-2 times = 58-60-60-62-64-66 sts. When piece measures 54-56-58-60-62-64 cm cast off the middle 12-14-16-18-18-20 sts for neck and cast off 1 st on neckline on next row = 22-22-21-21-22-22 sts left on each shoulder. Cast off when piece measures 56-58-60-62-64-66 cm. LEFT FRONT PIECE: = 35-38-41-45-50-55 sts. READ ALL OF THE FOLLOWING SECTION BEFORE CONTINUING! Cast off for armhole at the side as described for back piece. AT THE SAME TIME when piece measures 37-38-39-40-41-42 cm, inc 1 st for lapel inside 2 edge sts towards mid front on every 4th row – SEE INCREASING TIP – a total of 8-8-9-9-10-10 times (incorporate the inc sts in moss st as you go along) = 43-44-45-46-48-49 sts. When piece measures 47-49-51-53-55-57 cm work 2 rows garter st on 16-17-18-19-20-21 sts towards mid front with 4 threads and then cast off the same 16-17-18-19-20-21 sts on next row from RS = 27-27-27-27-28-28 sts left on row. Insert a marker. Continue in moss st, AT THE SAME TIME cast off to shape the neckline on every other row: 1 st 5-5-6-6-6-6 times = 22-22-21-21-22-22 sts left on shoulder. Cast off when piece measures 56-58-60-62-64-66 cm. RIGHT FRONT PIECE: Like left front piece, but mirrored. Remember BUTTONHOLES – see above. SLEEVE: Worked in the round on double pointed needles. Cast on 34-36-36-38-40-42 sts on double pointed needles size 5.5 mm with 1 thread of each color. Insert a marker at beg of round (= mid under sleeve). Work 6 rounds garter st – SEE ABOVE – and continue in moss st. When piece measures 5 cm inc 1 st on each side of marker and repeat the inc on every 3-3-2.5-2.5-2-2 cm a total of 13-14-16-16-17-18 times = 60-64-68-70-74-78 sts. Work inc sts in moss st. When piece measures 49-48-48-46-45-43 cm (less on the larger sizes because of longer sleeve cap and wider shoulder) cast off 6 sts mid under arm (= 3 sts on each side of marker) and complete piece back and forth on needle. AT THE SAME TIME cast off to shape the sleeve cap each side at the beg of every row: 2 sts 3-3-3-2-1-0 times, 1 st 2-3-4-9-14-20 times, then 2 sts each side until piece measures 55-55-56-56-57-57 cm, now cast off 3 sts each side 1 time and cast off remaining sts on next row. Piece measures approx 56-56-57-57-58-58 cm. ASSEMBLY: Sew shoulder seams. Set in sleeves. COLLAR: Pick up between 46 and 56 sts (an even number) on needle size 5.5 mm with 2 threads of each color(= 4 threads) from RS. Beg by marker on left front piece, continue round neckline on back piece and finish by marker on right front piece. Work moss st until collar measures 3 cm. Now insert a marker on each shoulder and a marker mid back and inc 1 st on each side of all 3 markers on next row, work inc sts in moss st. Continue until collar measures 14-14-15-16-16-17 cm and cast off. Sew collar to lapel each side. Sew on buttons. |
|
 |
|
Have you finished this pattern?Tag your pictures with #dropspattern #pearlofthefallcardigan or submit them to the #dropsfan gallery. Do you need help with this pattern?You'll find 23 tutorial videos, a Comments/Questions area and more by visiting the pattern on garnstudio.com. © 1982-2026 DROPS Design A/S. We reserve all rights. This document, including all its sub-sections, has copyrights. Read more about what you can do with our patterns at the bottom of each pattern on our site. |


With over 40 years in knitting and crochet design, DROPS Design offers one of the most extensive collections of free patterns on the internet - translated to 17 languages. As of today we count 324 catalogues and 12290 patterns translated into English (UK/cm). 12290
We work hard to bring you the best knitting and crochet have to offer, inspiration and advice as well as great quality yarns at incredible prices! Would you like to use our patterns for other than personal use? You can read what you are allowed to do in the Copyright text at the bottom of all our patterns. Happy crafting!
Post a comment to pattern DROPS 112-4
We would love to hear what you have to say about this pattern!
If you want to leave a question, please make sure you select the correct category in the form below, to speed up the answering process. Required fields are marked *.