DROPS Super Sale - SAVE 30% on 5 wonderful yarns!
Product image DROPS Fabel yarn
DROPS Fabel
75% Wool, 25% Polyamide
from 2.50 € /50g
Product image DROPS Alpaca yarn
DROPS Alpaca
100% Alpaca
from 3.65 € /50g
Get the yarn to make this pattern from 51.50€.

The yarn cost is calculated from the pattern’s smallest size and the yarn’s cheapest product type. Looking for an even better price? You might find it on the DROPS Deals!

DROPS Super Sale

Megan

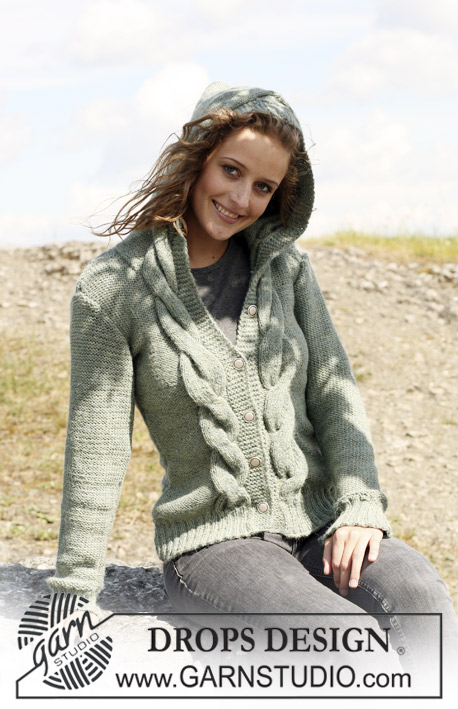
Knitted DROPS jumper in ”Fabel” and ”Alpaca” with stripes and raglan sleeve. Size S - XXXL.

DROPS 109-53
Size: S - M - L - XL - XXL - XXXL
Materials: DROPS Fabel
300-350-400-450-450-500 g colour no 905, black/white mix
and use: DROPS Alpaca
150-150-200-200-200-250 g colour no 517, grey
100-150-150-150-150-150 g colour no 100, off-white
100 g for all sizes colour no 501, light grey
50 g for all sizes colour no 8309, black
50 g for all sizes colour no 506, dark grey

DROPS double pointed needles and circular needle (40 and 80 cm) size 5 mm– or size needed to get 17 sts x 22 rows in stocking st with 1 thread of each quality = 10 x 10 cm.
DROPS double pointed needles and circular needle (80 cm) size 4.5 mm – or size needed to get 17 sts x 33 rows in garter st with 1 thread of each quality = 10 x 10 cm.

-------------------------------------------------------

Alternative Yarn – See how to change yarns here
Yarn Groups A to F – Use the same pattern and change the yarn here
Yarn usage using an alternative yarn – Use our yarn converter here

-------------------------------------------------------

You might also like...

Product image DROPS Fabel
DROPS Fabel
75% Wool, 25% Polyamide
from 2.50 € /50g
Product image DROPS Alpaca yarn
DROPS Alpaca
100% Alpaca
from 3.65 € /50g
Get the yarn to make this pattern from 51.50€.

The yarn cost is calculated from the pattern’s smallest size and the yarn’s cheapest product type. Looking for an even better price? You might find it on the DROPS Deals!

Pattern instructions

NOTE: This pattern is written in British English. All measurements in charts are in cm. Convert from cm to inches here. There are different terms for crocheting in British and American English. If this pattern includes crochet, convert "crochet terms" here. See this pattern in American English here..
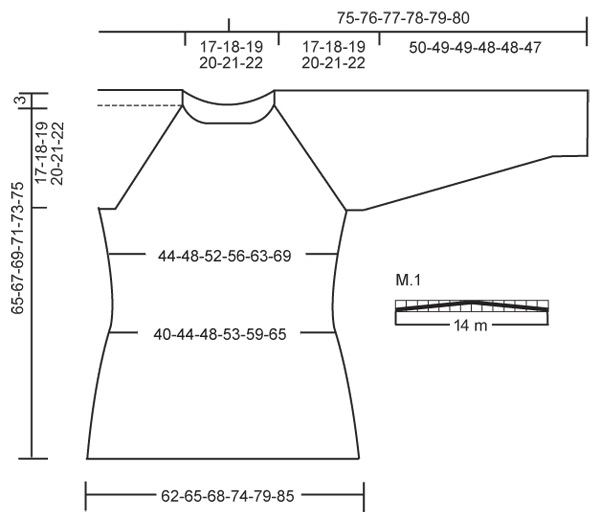
Garter st, in the round): K 1 round, P 1 round.
Garter st, back and forth on needle:
K all rows.
Stripes:
Body piece:
Fabel 905 + Alpaca 517:
From cast on row to 32 cm.
Fabel 905 + Alpaca 501:
From 32 cm to 50-51-52-53-54-55 cm.
Fabel 905 + Alpaca 100:
From 50-51-52-53-54-55 cm to finished measurements.
Sleeve (same measurements for all sizes):
Fabel 905 + Alpaca 8309:
From casting on row to 13 cm.
Fabel 905 + Alpaca 506
From 13 cm to 26 cm.
Fabel 905 + Alpaca 517:
From 26 cm to 39 cm.
Fabel 905 + Alpaca 501:
From 39 cm to finished measurements.
Pattern: See diagram M.1.
Knitting tip: If your knitting tension doesn’t fit, i.e. is too tight, the raglan will be too short and the armhole to small. You may compensate for this by working 1 extra row without dec at regular intervals in between dec.
Decreasing tip (applies to raglan):
Make all dec from RS:
Beg 2 sts before Marking Thread (MT): K2 tog, MT, slip 1 st as if to K, K1, psso.

Body piece: Worked in the round on circular needle. Cast on 210-220-230-250-270-290 sts on circular needle size 4.5 mm with 1 thread Fabel 905 + 1 thread Alpaca 517. Work 6 rounds garter st – see above. Change to circular needle size 5 mm and continue ion reverse stocking st. Remember the knitting tension! When piece measures 28 cm continue as follows: * 7-8-9-11-13-15 sts in reverse stocking st, M.1 *, repeat from *-* a total of 10 times = 140-150-160-180-200-220 sts. Work 6 rounds garter st, at the same time on first round adjust no of sts to 136-150-164-180-202-222. Insert 2 Marking Threads (MT) in piece, 1 at the beg of round and 1 after 68-75-82-90-101-111 sts (to mark the sides). Continue in stripes – see above. When piece measures 32 cm inc 1 st on each side of both MT (= 4 inc per round) on every 5.5-5.5-6-6-7-7 cm a total of 3 times = 148-162-176-192-214-234 sts. When piece measures 48-49-50-51-52-53 cm cast off 8 sts each side (i.e. 4 sts on each side of both MT) for armhole = 132-146-160-176-198-218 sts. Put piece aside and knit the sleeves.

Sleeve: Worked in the round on double pointed needles. Cast on 40-40-42-44-46-46 sts on double pointed needles size 4.5 mm with 1 thread Fabel 905 + 1 thread Alpaca 8309. Work 6 rounds garter st. Insert 1 MT at beg of round. Change to needle size 5 mm and continue in reverse stocking st and stripes – see above. When piece measures 8 cm inc 1 st on both sides of MT on every 4.5-3.5-3-3-2.5-2.5 cm a total of 10-11-12-13-14-15 times = 60-62-66-70-74-76 sts. When piece measures 50-49-49-48-48-47 cm cast off 4 sts on both sides of MT for armhole = 52-54-58-62-66-68 sts. Put piece aside and knit the other sleeve.

Yoke: See Knitting tip! Slip sleeves in on the same circular needle as body piece where cast off for armholes = 236-254-276-300-330-354 sts. Insert a MT in each transition between sleeves and body piece = 4 MT. Change to circular needle size 4.5 mm and continue in garter st, at the same time dec for raglan – see Decreasing tip.
Dec on every 4th round 9-9-9-9-8-8 times and then on every other round 12-13-15-17-20-21 times. At the same time when piece measures 59-61-63-65-67-69 cm slip the middle 6-9-10-12-15-17 sts on front piece on a stitch holder and complete piece back and forth on needle. Cast off to shape the neckline at the beg of every row: 2 sts 2-2-2-2-3-4 times and 1 st 1-2-3-4-4-5 times. After all dec are complete there are 52-57-60-64-71-79 sts on row. K 1 row, at the same time dec 4-7-8-10-13-19 sts evenly = 48-50-52-54-58-60 sts.
Neckline: Pick up 32-34-36-38-38-40 sts along neckline on front piece (includes sts on stitch holder) on small circular needle size 5 mm with 1 thread Fabel 905 + 1 thread Alpaca 100 = 80-84-88-92-96-100 sts. Work 4 rounds garter st and continue in reverse stocking st. When piece measures 10 cm inc 10 sts evenly and repeat the inc when piece measures 20 cm = 100-104-108-112-116-120 sts. When piece measures 25 cm inc 20 sts evenly = 120-124-128-132-136-140 sts. Work 6 rounds garter st and cast off. Assembly: Sew openings under arms.

Diagram

slip 7 sts on cable needle in front of piece, work first st on cable needle tog with first st on needle a total of 7 times. = slip 7 sts on cable needle in front of piece, work first st on cable needle tog with first st on needle a total of 7 times.
Diagram for DROPS 109-53

Each of our patterns has specific tutorial videos to help you.

Do you have a question? See a list of frequently asked questions (FAQ)

Knitting tension is what determines the final measurements of your work, and is usually measured per 10 x 10 cm. It is provided like so: number of stitches in width x number of rows in height - eg: 19 stitches x 26 rows = 10 x 10 cm.

The knitting tension is very individual; some people knit/crochet loosely while others work tightly. You adjust the knitting tension with the needle size, which is why the suggested needle size is only meant as a guide! You need to adjust this (up or down) to ensure that YOUR knitting tension matches the knitting tension provided in the pattern. If you work with a different knitting tension than provided you will have a different yarn consumption, and your work will have different measurements than what the pattern suggests.

The knitting tension also determines which yarns can replace each other. As long as you achieve the same knitting tension you can replace one yarn with another.

See DROPS lesson: How to measure your tension/gauge

See DROPS video: How to make a gauge tension swatch

The required amount of yarn is provided in grams, eg: 450 g. To calculate how many balls you’ll need you first need to know how many grams are in 1 ball (25g, 50g or 100g). This information is available if you click on the individual yarn quality on our pages. Divide the amount required with the amount of each ball. For example, if each ball is 50g (the most common amount), the calculation will be as follows: 450 / 50 = 9 balls.

The important thing when changing from one yarn to another is that the knitting/crochet tension remains the same. This is so that the measurements of the finished piece will be the same as on the sketch provided. It is easier to achieve the same knitting tension using yarns from the same yarn group. It is also possible to work with multiple strands of a thinner yarn to achieve the knitting tension of a thicker one. Please try our yarn converter. We recommend you to always work a test swatch.

Please NOTE: when changing yarn the garment might have a different look and feel to the garment in the photo, due to individual properties and qualities of each yarn.

See DROPS lesson: Can I use a different yarn than the one mentioned in the pattern?

All our yarns are categorised into yarn groups (from A to F) according to thickness and knitting tension – group A contains the thinnest yarns and group F the thickest. This makes it easier for you to find alternative yarns to our patterns, should you wish to switch yarn. All yarns within the same group have a similar knitting tension and can easily replace each other. However, different yarn qualities have different structures and properties which will give the finished work a unique look and feel.

Click here for an overview of the yarns in each yarn group

At the top of all our patterns you’ll find a link to our yarn calculator, which is a helpful tool should you wish to use a different yarn than suggested. By filling in the yarn quality you wish to replace, the amount (in your size) and number of strands, the calculator will present good alternative yarns with the same knitting tension. Additionally it will tell you how much you’ll require in the new qualities and whether you’ll need to work with multiple strands. Most skeins are 50g (some are 25g or 100g).

If the pattern is worked with multiple colours, every colour will have to be calculated separately. Similarly, if the pattern is worked with several strands of different yarns (for example 1 strand Alpaca and 1 strand Kid-Silk) you will have to find alternatives for each, individually.

Click here to see our yarn calculator

Since different yarns have different qualities and textures we have chosen to keep the original yarn in our patterns. However, you can easily find options among our available qualities by using our yarn calculator, or simply pick a yarn from the same yarn group.

It is possible that some retailers still have discontinued yarns in stock, or that someone has a few skeins at home that they would like to find patterns for.

The yarn calculator will provide both alternative yarn as well as required amount in the new quality.

If you think it's hard to decide what size to make, it can be a good idea to measure a garment you own already and like the size of. Then you can pick the size by comparing those measures with the ones available in the pattern's size chart.

You'll find the size chart at the bottom of the pattern.

See DROPS lesson: How to read size chart

The needle size provided in the pattern serves only as a guide, the important thing is to follow the knitting tension. And since knitting tension is very individual, you will have to adjust the needle size to ensure that YOUR tension is the same as in the pattern – maybe you’ll have to adjust 1, or even 2 needle sizes, up or down to achieve the correct tension. For this, we recommend that you work test swatches.

Should you work with a different knitting tension than the one provided, the measurements of the finished garment might deviate from the measurement sketch.

See DROPS lesson: How to measure your tension/gauge

See DROPS video: How to make a tension/gauge swatch

Working a garment top-down provides more flexibility and room for personal adjustment. For example it is easier to try the garment on while working, as well as making adjustments to length of yoke and shoulder caps.

The instructions are carefully explaining every step, in the correct order. Diagrams are adjusted to the knitting direction and are worked as usual.

The diagram depicts all rows/rounds, and every stitch seen from the right side. It is read from bottom to top, from right to left. 1 square = 1 stitch.

When working back and forth, every other row is worked from the right side and every other row is worked from the wrong side. When working from the wrong side, the diagram will have to be worked reversed: from left to right, knit stitches are purled, purl stitches are knit etc.

When working in the round every round is worked from the right side and the diagram are worked from right to left on all rounds.

See DROPS lesson: How to read knitting diagrams

The diagram depicts all rows/rounds, and every stitch seen from the right side. It is worked from bottom to top, from right to left.

When working back and forth every other row is worked from the right side: from right to left and every other row is worked from the wrong side: from left to right.

When working in the round, every row in the diagram are worked from the right side, from right to left.

When working a circular diagram you start in the middle and work your way outwards, counter clockwise, row by row.

The rows usually start with a given number of chain stitches (equivalent to the height of the following stitch), this will either be depicted in the diagram or explained in the pattern.

See DROPS lesson: How to read crochet diagrams

Instructions for working several diagrams after each other on the same row/round, will often be written like so: “work A.1, A.2, A.3 a total of 0-0-2-3-4 times". This means you work A.1 once, then A.2 is worked once, and A.3 is repeated (in width) the number of times provided for your size – in this case like so: S = 0 times, M = 0 times, L=2 times, XL= 3 times and XXL = 4 times.

The diagrams are worked as usual: begin with the first row in A.1, then work the first row in A.2 etc.

See DROPS lesson: How to read knitting diagrams

See DROPS lesson: How to read crochet diagrams

The total width of the garment (from wrist-to-wrist) will be larger in the larger sizes, despite the actual sleeves being shorter. The larger sizes have longer sleeve caps and wider shoulders, so there will be a good fit in all sizes.

The measurement sketch/schematic drawing provides information regarding the full length of the garment. If it’s a jumper or a jacket the length is measured from the highest point on the shoulder closest to the neckline, and straight down to the bottom of the garment. It is NOT measured from the tip of shoulder. Similarly, the length of yoke is measured from the highest point on the shoulder and down to where yoke is split into body and sleeves.

On a jacket measures are never taken along bands, unless specifically stated. Always measure inside band stitches when measuring the length.

See DROPS lesson: How to read a schematic drawing

Diagrams are often repeated on the round or in height. 1 repeat is the diagram the way it appears in the pattern. If it says to work 5 repeats of A.1 in the round, then you work A.1 a total of 5 times after/next to each other in the round. If it says to work 2 repeats of A.1 vertically/in height you work the entire diagram once, then begin again at the start and work the entire diagram one more time.

Chain stitches are slightly narrower than other stitches and to avoid working the cast-on edge too tight, we simply chain more stitches to begin with. The stitch count will be adjusted on the following row to fit the pattern and measurement sketch.

The rib edge is more elastic and will contract slightly compared to, for example, stocking stitch. By increasing before the rib edge, you avoid a visible difference in width between the rib edge and the rest of the body.

It’s very easy to cast off too tightly, and by making yarn overs while casting off (and simultaneously casting these off) you avoid a too tight cast off edge.

See DROPS video: How to bind off with yarn overs (yo)

To achieve an even increase (or decrease) you can increase on, for example: every 3rd and 4th row alternately, like so: work 2 rows and increase on the 3rd row, work 3 rows and increase on the 4th. Repeat this until the increase is complete.

See DROPS lesson: Increase or decrease 1 st on every 3rd and 4th row alternately

Should you prefer to work in the round instead of back and forth, you may of course adjust the pattern. You’ll need to add steeks mid-front (usually 5 stitches), and follow the instructions. When you would normally turn and work from the wrong side, simply work across the steek and continue in the round. At the end you’ll cut the piece open, pick up stitches to work bands, and cover the cut edges.

See DROPS video: How to knit steeks and cut open

Should you prefer to work back and forth instead of in the round, you may of course adjust the pattern so you work the pieces separately and then assemble them at the end. Divide the stitches for the body in 2, add 1 edge stitch in each side (for sewing) and work the front and back pieces separately.

See DROPS lesson: Can I adapt a pattern for circular needles into straight needles?

Pattern repeats can vary slightly in the different sizes, in order to get the correct proportions. If you’re not working the exact same size as the garment in the photo, yours might deviate slightly. This has been carefully developed and adjusted so that the complete impression of the garment is the same in all sizes.

Make sure to follow instructions and diagrams for your size!

If you have found a pattern you like which is available in women’s size it’s not very difficult to convert it to men’s size. The biggest difference will be the length of sleeves and body. Start working on the women size that you think would fit across the chest. The additional length will be worked right before you cast off for the armhole/sleeve cap. If the pattern is worked top-down you can add the length right after the armhole or before the first decrease on sleeve.

Regarding additional yarn amount, this will depend on how much length you add, but it is better with a skein too many than too few.

All yarns will have excess fibres (from production) that might come off as lint or shedding. Brushed yarns (ie hairier yarns) have more of these loose, excess fibres, causing more shedding.

Shedding also depends on what is worn under or over the garment, and whether this pulls at the yarn fibres. It’s therefore not possible to guarantee that there will be no shedding

Below are some tips on how to get the best result when working with hairier yarns:

1. When the garment is finished (before you wash it) shake it vigorously so the looser hairs come off. NOTE: do NOT use a lint roller, brush or any method that pulls at the yarn.

2. Place the garment in a plastic bag and put it in your freezer - the temperature will cause the fibres to become less attached to each other, and excess fibres will come off easier.

3. Leave in the freezer for a few hours before taking it out and shaking it again.

4. Wash the garment according to the instructions on the yarn label.

Pilling is a natural process that happens to even the most exclusive of fibers. It's a natural sign of wear and tear that is hard to avoid, and that is most visible in high friction areas of your garment like a sweater's arms and cuffs.

You can make your garment look as new by removing the pilling, using a fabric comb or a pill/lint remover.

Still can't find the answer you need? Then scroll down and leave your question so one of our experts can try to help you. This will be done normally within 5 to 10 working days.
In the meantime, you can read the questions and answers that others have left to this pattern or join the DROPS Workshop on Facebook to get help from fellow knitters/crocheters!
Have you finished this pattern?
Tag your pictures with #dropspattern or submit them to the #dropsfan gallery.

Post a comment to pattern DROPS 109-53

We would love to hear what you have to say about this pattern!

If you want to leave a question, please make sure you select the correct category in the form below, to speed up the answering process. Required fields are marked *.

Comments / Questions (35)

country flag Barbara Westergård wrote:

Hej Garnstudio: jag behöver lite hjälp, har nu kommit till M1 där jag laggt 7m på en hjälpsticka men får inte ihop resten (sticka första m från hj.st tills med första m från st totalt 7 ggr) Kan ni hjälpa mig med en mer utförlig förklaring? jag klassar mig fortfarande som nybörjare (har hunnit sticka 5 tröjor till mig) och älskar era utmaningar, men nu tog det stopp!! Tack på förhand och tack för en fantastisk hemsida!

06.10.2009 - 19:36

country flag Drops Design wrote:

Ja efter de 6 pinde retstrik fortsætter du i glat med vrangen ud igen. Bærestykket skal strikkes i retstrik

01.10.2009 - 09:21

country flag Lotte Andersen wrote:

Hej Garnstudio Jeg er i tvivl om det med retstrik og omvendt glat. Jeg starter med 6 p ret, skifter til omvendt glat, men efter mønster 1 skal jeg igen strikke 6 p ret. Hvad skal jeg efter de 6 p, skal jeg så igen strikke omvendt glat, eller skal jeg fortsætte i ret. Hvad med bærestykket efter ærmerne er sat på, skal det være i retstrik? Det forstår jeg ikke helt med, ser det ikke ligedan ud som omvendt glat?

30.09.2009 - 23:10

country flag DROPS Design wrote:

Hej Britta, Om du läser minskninstips: Minskningstips (gäller raglan): Alla minskningar görs från rätsidan: Börja 2 m före märktråden: 2 rm tills, märktråd, lyft 1 m som om den skulle stickas rät, 1 rm, drag den lyfta m över så innebär det minskning med 8 maskor avm per varv. Lycka till!

17.09.2009 - 13:29

country flag Britta Vesterlund wrote:

Hej Garnstudio! Skulle behöva få ett förtydligande av raglanminskningen. Ska man bara minska 4 maskor /avm.varv? borde man inte minska en maska på varje sida om märktråden? Hoppas på hjälp, tack på förhand

16.09.2009 - 21:33

country flag Drops Design wrote:

Når du strikker rundt på rundp strikkes retstrik således: 1.omg ret og 2.omg vrang. Og Glatstrik strikkes ret på alle pinde. Når du strikker frem og tilbage på p strikkes retstrik såledet: Ret både frem og tilbage på p. Og glatstrik strikkes ret på retsiden og vrang på vrangen. God fornøjelse

22.10.2008 - 09:51

country flag Henriette Villhelmsen wrote:

Hej Garnstudio, Kunne godt tænke mig at få denne "pasus" i opskriften forklaret. "Strik 6 omg retstrik – se forkl over. Nu skiftes der til rundp 5 og der strikkes videre i glatstrik med vr ud. Husk på Strikkefastheden! Når arb måler 28 cm fortsættes der således: * 7-8-9-11-13-15 m glatstrik med vr ud, M.1" Og hvad er forskellen på retstrik og glatstrik? På forhånd tak og på genhør Med venlig hilsen Henriette Vilhelmsen

20.10.2008 - 14:40

country flag Lisbeth wrote:

Super flot trøje.Jeg har strikket den på rekorttid. Havde kun problemer med maskeantal i halsen ellers passer alt perfekt!

20.08.2008 - 09:02

country flag Coleen Glen wrote:

Fa-048 is to die for

15.07.2008 - 03:08

country flag Hilde wrote:

Vedig fin og anvendelig. Den vil både jeg og min datter ha. Håper inderlig det kommer mømster på denne :-

28.06.2008 - 01:38