
Popular categories
Looking for a yarn?


Comments / Questions (142)
![]() Corinne wrote:
Corinne wrote:
Bonjour, je suis totalement bloquée au niveau du point de riz. Comment réaliser des augmentations sans casser le point de riz? est ce que je dois bien faire mes augmentations juste avant les marqueurs ou je peux les faire en bout de rang d'un coté et juste avant le point mousse de l'autre? Merci d'avance pour votre aide
06.08.2018 - 08:43DROPS Design answered:
Bonjour Corinne, les augmentations doivent bien se faire à chacun des marqueurs, le temps de 2 rangs d'augmentations et le point de riz tombera de nouveau juste au niveau des marqueurs, mais veillez à bien augmenter 1 m de chaque côté de chacun des 2 marqueurs pour augmenter sur les côtés (sous les bras). Bon tricot!
06.08.2018 - 09:42
![]() Corinne wrote:
Corinne wrote:
Bonjour, J'aimerais beaucoup faire ce modèle en taille S et en qualité Bomull-Lin, pouvez vous m'indiquer le nombre de pelote que je dois prévoir SVP. D'avance merci pour votre aide.
14.06.2018 - 13:29DROPS Design answered:
Bonjour Corinne, vous trouverez ici toutes les informations nécessaires sur les alternatives et comment calculer la nouvelle quantité. Bon tricot!
14.06.2018 - 16:40
![]() Adele wrote:
Adele wrote:
Bonjour, J'aimerais savoir quel fil utiliser et quelle quantité pour faire ce gilet en taille S, à manches longues? De préférence en coton. Merci beaucoup!
17.02.2018 - 19:04Pamela wrote:
Thank you very much. 👍
05.10.2016 - 12:07Pamela wrote:
My apologies if this question has already been asked... I am up to the stage where I need to decline to start the neckline shaping. It says to decrease at beginning of row from neck every cm a total of 19 times. 4 rows = 1cm for me so this means I would be always declining on one side of the neck only. Should I be declining one stitch at beginning AND end of the row every cm? Kind regards, Pam
04.10.2016 - 15:24DROPS Design answered:
Dear Pamela, as long as you are still working both front pieces and back piece tog (before dividing for armholes), you will have to dec for neckline at the beg of row from RS (= after the 7 band sts on right front piece) + at the end of row from RS (= before the 7 band sts on left front piece). See also "Increase tip". Happy knitting!
04.10.2016 - 15:52Sarah-Anne wrote:
An amendment needs to be made to the buttonhole directions. The directions specify: "Make buttonholes on right front piece. 1 buttonhole = bind off 4th st from mid front and cast on 1 new st on return row." Binding off 4 stitches is far more than you would normally use for a buttonhole, 2 or 3 stitches is normally enough. Also if you want the front band to still have 7 stitches, however many you bind off you need to add on again on the return row.
06.08.2016 - 12:40DROPS Design answered:
Dear Sarah-Anne, you have to cast off only 1 st for the buttonhole: ie the 4th st from mid front (not 4 sts), then cast on 1 new st on next row over the cast off st. Happy knitting!
08.08.2016 - 10:26
![]() Ruth Epperson wrote:
Ruth Epperson wrote:
I have knitted the pleats 5 times and they don't come out right! I have marked each stitch on a piece of paper and I end up with zero stitches after making last pleat. What is wrong with this pattern?
19.10.2014 - 18:29DROPS Design answered:
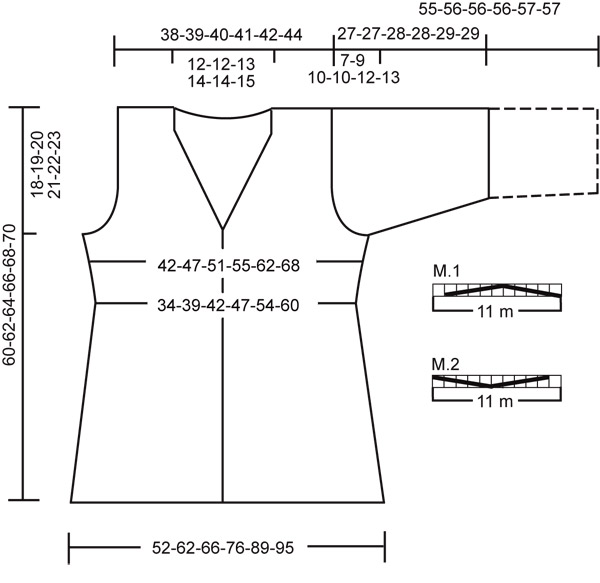
Dear Mrs Epperson, Each pleat (M1 & M2) is worked above 11 sts, after the pleat these 11 sts become 6 sts. When you work 5 times the pleat (ie 5 x 11 sts) you work above a total of 55 sts and get then 30 sts after 5 pleats are done. Happy knitting!
20.10.2014 - 10:28
![]() Minger wrote:
Minger wrote:
C'est un très jolie modèle ...mais très décevant quand on le réalise. En effet il est difficile de choisir la bonne taille. De plus le fait de passer à des aiguilles plus petites pour le haut du vêtement n'arrange rien. IL faut une laine fluide sinon les plis sont épais et n'affinent pas la silhouette. Bref j'ai redéfait mon tricot et ai choisi un autre modèle. Pourtant c'est le 4eme tricot que je fais avec vos explications et cela c'est toujours bien passé.Cordialement. FM
17.10.2014 - 15:07
![]() Katja Möller wrote:
Katja Möller wrote:
Was heißt beim Ärmel alle M 2 und 2 zusammen stricken
03.02.2014 - 21:10DROPS Design answered:
Liene Katja, das ist in den alten Anleitungen teils noch so formuliert und bedeutet, dass über alle Maschen je 2 Maschen zusammengestrickt werden.
04.02.2014 - 08:44
![]() Sue Glover wrote:
Sue Glover wrote:
Can you give me a guide regarding sizing? What measurements (bust) are S, M, L XL, XXL etc? It is difficult to know what size to knit, until you are actually knitting the garment.
15.11.2013 - 14:25DROPS Design answered:
Dear Sue, you will find at the bottom of the pattern the measurement chart with all measures taken side to side, this should help you to choose your size, if necessary, compare to a similar garment you have and like the shape. Happy knitting!
15.11.2013 - 15:32
|
|||||||
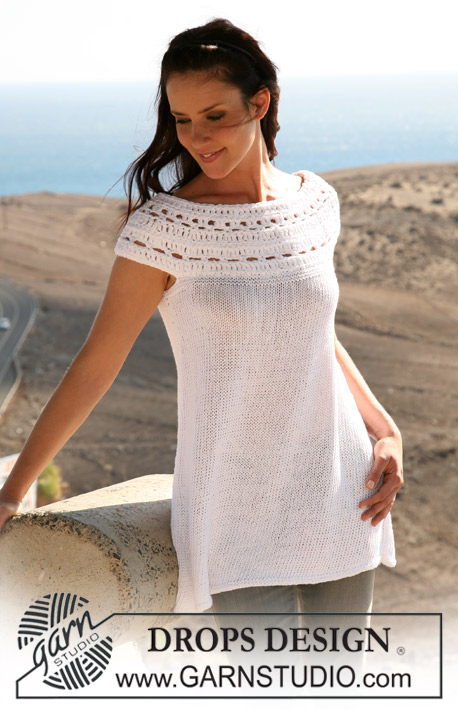
Empire Cardigan |
|||||||
|
|
|||||||
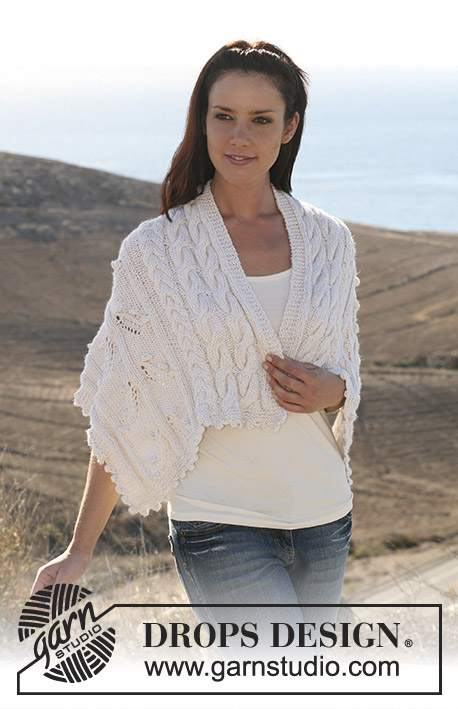
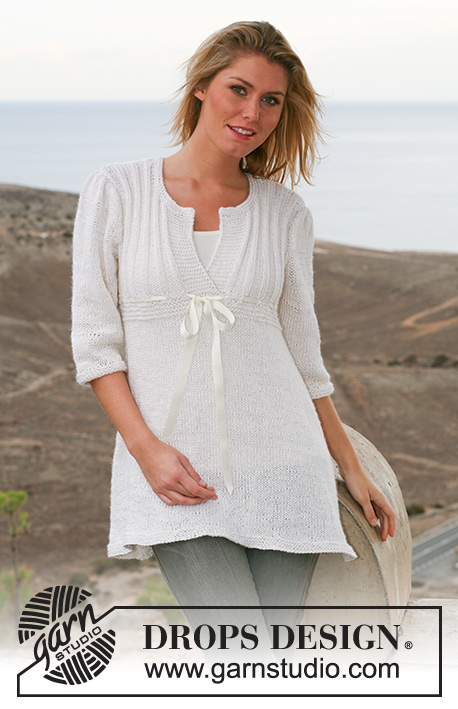
DROPS jacket with pleats and ¾ sleeves/long sleeves in “Silke-Alpaca”. Size S-XXXL.
DROPS 105-1 |
|||||||
|
Measurement tip: Because of the weight of the yarn, all measurements should be made whilst garment is hanging, otherwise it will be too long when worn. Garter st, back and forth on needle: K all rows. Moss st: First row: *K1/P1*, repeat from *-*. Second row: K over P, P over K. Repeat second row. Pleats: See diagram M.1 and M.2. The diagram shows the pattern from the RS. Buttonhole: Make buttonholes on right front piece. 1 buttonhole = cast off 4th st from mid front and cast on 1 new st on return row. Make buttonholes when piece measures: Size S: 19, 23, 28, 32 and 37 cm. Size M: 20, 24, 29, 33 and 38 cm. Size L: 21, 25, 30, 34 and 39 cm. Size XL: 21, 26, 31, 36 and 40 cm. Size XXL: 21, 26, 31, 36 and 41 cm Size XXXL: 22, 27, 32, 37 and 42 cm. Decreasing tip, applies to neckline: Make all dec from RS inside 7 front band sts. Dec as follows after 7 sts: slip 1 st as if to K, K1, psso. Dec as follows before 7 sts: K2 tog. ______________________________ Front and back piece: Knitted back and forth on circular needle from mid front. Cast on 194-230-242-278-322-342 sts (includes 7 front band sts each side towards mid front) on circular needle size 4.5 mm. Work 2 rows stocking st, 6 rows garter st and continue in stocking st with 7 front band sts each side in garter st until finished measurements. Remember the knitting tension! When piece measures 19-20-21-21-21-22 cm – see Measurement tip – make buttonholes on right front piece – see above. When piece measures 28 cm for all sizes work next row as follows from RS: K 14 sts, M.2 a total of 3-4-4-5-6-6 times (= 33-44-44-55-66-66 sts which are dec to 18-24-24-30-36-36 sts), K 12-8-14-10-10-20 sts, M.1 a total of 3-4-4-5-6-6 times, K 10 sts, M.2 a total of 3-4-4-5-6-6 times, K 12-8-14-10-10-20 sts, M.1 a total of 3-4-4-5-6-6 times and finish with K 14 sts = 134-150-162-178-202-222 sts. Insert 2 Marking Threads (MT) in piece, 1 after 38-42-45-49-55-60 sts and 1 after 96-108-117-129-147-162 sts (back piece = 58-66-72-80-92-102 sts). Change to needle size 4 mm, work 10 rows garter st, then 2 rows stocking st with front bands in garter st as before, and now continue in moss st – see above. When piece measures 32 cm for all sizes inc 1 st on each side of both MT on every 1-1-1.5-1.5-1.5-2 cm a total of 7 times. At the same time when piece measures 38-39-40-41-42-43 cm dec towards mid front to shape the neckline – see Decreasing tip: dec 1 st in beg of row from neck on every cm a total of 19-19-20-21-21-22 times. At the same time when piece measures 42-43-44-45-46-47 cm cast off 3 sts on each side of both MT for armhole and now complete front and back pieces separately. Back piece: = 66-74-80-88-100-110 sts. Dec to shape the armhole each side on every other row: 2 sts 0-1-2-3-5-6 times and 1 st 1-2-2-3-4-6 times = 64-66-68-70-72-74 sts. When piece measures 57-59-61-63-65-67 cm work 2 rows garter st on the middle 34-34-36-38-38-40 sts with remaining sts as before. Now cast off the middle 18-18-20-22-22-24 sts for neck and continue with 8 garter sts towards neckline. Dec 1 st on neckline on next row = 22-23-23-23-24-24 sts left on each shoulder. Work moss st with 7 garter sts towards neckline and cast off when piece measures 60-62-64-66-68-70 cm. Left front piece: Continue dec for neckline and dec to shape the armhole as described for back piece. After all dec are complete there are 22-23-23-23-24-24 sts left on shoulder. Cast off when piece measures 60-62-64-66-68-70 cm. Right front piece: Like left front piece, but mirrored. Remember buttonholes! See above. ¾ sleeve: Knitted back and forth on pointed needles. Cast on 50-52-54-56-60-62 sts (includes 1 edge st each side) on needle size 4.5 mm. Work 2 rows stocking st, 6 rows garter st and continue in stocking st. At the same time when piece measures 5-5-5-6-6-7 cm inc inc 1 st each side on every 2-1.5-1.5-1-1-0.5 cm a total of 7-7-8-9-9-11 times = 64-66-70-74-78-84 sts. When piece measures 20-18-18-18-17-16 cm (less on the larger sizes because of larger sleeve cap) dec to shape the sleeve cap – see below. Long sleeves: Knitted back and forth on pointed needles. Cast on 52-54-56-60-62-64 sts (includes 1 edge st each side) on needle size 4.5 mm. Work 2 rows stocking st, 6 rows garter st and continue in stocking st. At the same time when piece measures 10 cm for all sizes inc 1 st each side on every 7-6.5-5.5-5.5-4.5-3.5 cm a total of 6-6-7-7-8-10 times = 64-66-70-74-78-84 sts. When piece measures 48-46-46-46-45-44 cm (less on the larger sizes because of larger sleeve cap) dec to shape the sleeve cap – see below. Sleeve cap: Dec to shape the sleeve cap each side on every other row: 3 sts 1 time, 1 st each side until piece measures approx 26-26-27-27-28-28 cm for ¾ sleeve and 54-55-55-55-56-56 cm for long sleeve. Now K tog all sts 2 by 2 and cast off remaining sts on next row. Piece measures approx 27-27-28-28-29-29 cm for ¾ sleeve, and 55-56-56-56-57-57 cm for long sleeve. Assembly: Sew shoulder seam. Sew sleeve seam inside 1 edge st and set in sleeves. Sew on buttons. |
|||||||
Diagram explanations |
|||||||
|
|||||||
 |
|||||||
Have you finished this pattern?Tag your pictures with #dropspattern or submit them to the #dropsfan gallery. Do you need help with this pattern?You'll find 20 tutorial videos, a Comments/Questions area and more by visiting the pattern on garnstudio.com. © 1982-2026 DROPS Design A/S. We reserve all rights. This document, including all its sub-sections, has copyrights. Read more about what you can do with our patterns at the bottom of each pattern on our site. |
|||||||


With over 40 years in knitting and crochet design, DROPS Design offers one of the most extensive collections of free patterns on the internet - translated to 17 languages. As of today we count 324 catalogues and 12291 patterns translated into English (UK/cm). 12291
We work hard to bring you the best knitting and crochet have to offer, inspiration and advice as well as great quality yarns at incredible prices! Would you like to use our patterns for other than personal use? You can read what you are allowed to do in the Copyright text at the bottom of all our patterns. Happy crafting!
Post a comment to pattern DROPS 105-1
We would love to hear what you have to say about this pattern!
If you want to leave a question, please make sure you select the correct category in the form below, to speed up the answering process. Required fields are marked *.