
Popular categories
Looking for a yarn?


Comments / Questions (43)
![]() Despy wrote:
Despy wrote:
I feel like my questions must be common but they weren't listed in FAQ and all the questions/comments are in other languages, so sorry. Cast on x stitches (incl. 1 edge stitch each side) - what does this mean? Is it just cast on 2 additional stitches or are they being cast on differently?
17.12.2019 - 04:25DROPS Design answered:
Dear Despy, the edge stitches are included in the number of stitches to cast on, this mean when it says to cast on 48 sts and work (garter stitch) then pattern M.1, you will work as follows: 1 edge st in garter st, M.1 over the next 46 sts, 1 edge st in garter st. Happy knitting!
17.12.2019 - 09:37
![]() Marian Doedens wrote:
Marian Doedens wrote:
Vraag over de kraag. De steken van de voorpanden die over blijven, moeten op een hulpnaald gezet. Moeten die steken van beide panden (voor de kraag) aan elkaar gezet worden? Hoe? Het is me niet duidelijk.
12.03.2019 - 08:24DROPS Design answered:
Dag Marian,
Bij de voorpanden brei je op een gegeven moment alleen over de steken van de kraag, dus die brei je een stukje langer. De schouders van het voorpand worden aan de schouders van het achterpand genaaid. De uiteinden van de kraag worden aan elkaar genaaid en daarna wordt de kraag aan de ronding van de hals genaaid.
12.03.2019 - 15:14
![]() VU wrote:
VU wrote:
Bonjour Madame, J'aime beaucoup ce modèle pour lequel j'ai acheté la laine nécessaire. Cependant je n'arrive pas à tricoter le point fantaisie M1. Pourriez-vous m'aider ou m'indiquer le tutoriel vidéo. Merci infiniment.
01.03.2018 - 10:13DROPS Design answered:
Bonjour Mme Vu, tricotez M.1 ainsi: rang 1 (sur l'endroit): *1 jeté (= passez le fil devant l'ouvrage), glissez la m suivante à l'end (laissez le fil devant, en tricotant la m suiv à l'end, il va se positionner juste au-dessus de la m glissée), 2 m end*, répétez de *-* et vous terminez par la 1ère m de M.1. Rang 2 (sur l'envers - et non sur l'endroit comme indiqué correction faite)): tricotez ensemble à l'envers le jeté et la maille glissée, *2 m end, tricotez ensemble à l'envers le jeté et la m glissée*, répétez de *-*. Bon tricot!
01.03.2018 - 11:32
![]() Emily wrote:
Emily wrote:
Vielen Dank😊
07.02.2016 - 14:39
![]() Emily wrote:
Emily wrote:
Emily Hallo ihr Lieben😊 Puddel gibt es anscheinend nicht mehr? Welche Wolle kann ich stattdessen für den Kragen nehmen? Dass es einbißchen so wie ein Fell aussieht? Das finde ich bei der Jacke das Beste! Vielen Dank im voraus! Eine schöne Woche wünscht euch Emily
01.02.2016 - 20:45DROPS Design answered:
Sie können stattdessen Alpaca Bouclé verwenden, das hat einen ähnlichen Charakter. Sie nehmen es dann 2-fädig statt einfädig. 1 Knäuel Alpaca Bouclé reicht, auch wenn Sie es doppelfädig verwenden, denn es hat eine größere Lauflänge als Puddel.
03.02.2016 - 14:55
![]() Emliermann wrote:
Emliermann wrote:
Hallo ihr Lieben😊 Puddel gibt es anscheinend nicht mehr? Welche Wolle kann ich stattdessen für den Kragen nehmen? Dass es einbißchen so wie ein Fell aussieht? Das finde ich bei der Jacke das Beste! Vielen Dank im voraus! Einen schönen Sonntag wünscht euch Emily
31.01.2016 - 10:46DROPS Design answered:
Antwort siehe oben! :-)
03.02.2016 - 15:11
![]() M. Wicht wrote:
M. Wicht wrote:
Hallo, wie kommen Sie auf 14,75 €uro? bei Gröe XS/S sind es schon ca. 40.- €uro. Gruß M. Wicht
04.03.2014 - 11:48DROPS Design answered:
Liebe Frau Wicht,entschuldigen Sie den Fehler, wir haben das gleich korrigiert.
11.03.2014 - 07:56
![]() Jajja wrote:
Jajja wrote:
Hej, jag förstår inte virkbeskrivningen längs kragen. "1 fm i första m, 3 lm, sedan virkas det 1 st i varje v." .Vad står "V":et för? Kan jag få en tydligare förklaring? mvh Jajja
03.09.2007 - 14:51
![]() Connie wrote:
Connie wrote:
Tak for alle de flotte opskrifter. Her i England er alle strikkeopskrifter uforstaelige og det er umuligt at kobe smart garn. Denne opkrift er en af mine favoritter.
30.12.2006 - 13:49Mona wrote:
*Älskar* den...snygga färger ni har valt dessutom!
08.10.2006 - 22:20
|
||||||||||
Black Vanilla |
||||||||||
|
|
||||||||||
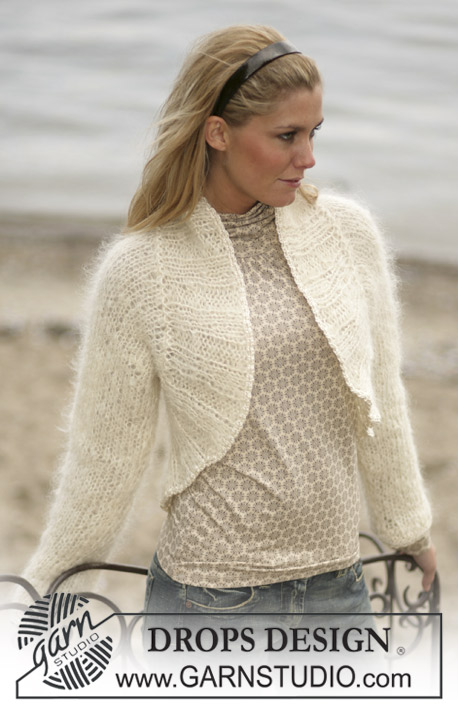
Knitted cardigan with false English rib variation in DROPS Snow, with a crochet edge in DROPS Puddel. size: S-XXL
DROPS 97-23 |
||||||||||
|
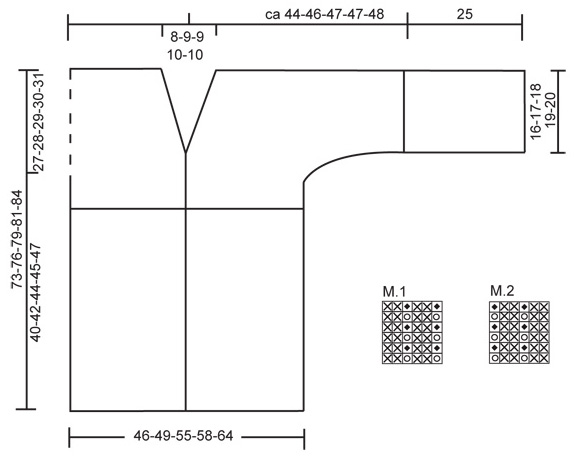
Knitting tension: 10 sts x 14 rows on needles size 9 mm in stocking sts = 10 x 10 cm and 10 sts x 20 rows in garter sts = 10 x 10 cm Garter sts (back and forth on needle): Knit all rows. Pattern: See diagrams M.1 and M.2 The diagrams are seen from the right side. English Translations for the wording in the diagrams are given at the bottom of this pattern, and they are given in the vertical order in which they appear in the diagram. Increasing tips: Inc inside 1 edge st at the centre front edge as follows: Make a yo, on returning row twist and knit the yo (knit into the back of yo instead of the front). Button hole: Cast off for button holes at the right front edge as follows: Cast off the 4th st from the edge at the centre front and knit 2 sts in the following st. Cast off for buttonholes when the piece measures: Size XS/S: 21, 30, 39 and 48 cm Size S/M: 20, 30, 40 and 50 cm Size L: 22, 32, 42 and 52 cm Size L/XL: 20, 31, 42 and 53 cm Size XXL: 21, 32, 43 and 54 cm Back piece: Cast on 48-51-57-60-66 sts (incl.1 edge st each side) sts on needles size 9 mm in Snow. Knit 4 rows of garter sts and continue with M.1 with 1 edge st each side – NB: The pattern starts and finishes the same each side. When the piece measures 40-42-44-45-47 cm continue in garter sts until finished. When the piece measures 46-48-50-51-53 cm loosely cast on each side for sleeves on every other row (i.e. at the end of each row): 1 st 3-3-5-6-9 times, 2 sts 7-7-6-5-2 times and 4-4-2-2-3 sts 1 time = 90-93-95-96-98 sts. When the piece measures 71-74-77-79-82 cm cast off the centre 6-7-7-8-8 sts for the neck. Cast off 1 st on the following row each side towards the neck = 41-42-43-43-44 sts left on each shoulder/sleeve. Cast off remaining sts when the piece measures 73-76-79-81-84 cm Left front: Cast on 31-34-37-40-43 sts (incl. of 1 edge st at the side and 6 front band sts at the centre front) on needles size 9 mm in Snow. Knit 4 rows of garter sts. Knit the next row as follows from the side (= RS): 1 edge st, M.2 over the following 24-27-30-33-36 sts and finish with 6 sts of garter sts for the front edge (= front band). Continue until the pattern measures 40-42-44-45-47 cm and then finish the piece in garter sts. When the piece measures 46-48-50-51-53 cm loosely cast on for sleeves as done for the back piece = 52-55-56-58-59 sts. At the same time when the piece measures 49-51-53-54-55 cm inc 1 st inside the 1st front band st for the collar – read increasing tips! On the following row knit 2 extra rows of garter sts over the 7 front band sts (do not knit the other sts). Continue in garter sts over all sts at the same time inc at the centre front on every other row: 1 st 6 times. Then inc on every 4th row 1 st 5 times = 64-67-68-70-71 sts. Knit in garter sts until the piece measures 73-76-79-81-84 cm. Cast off the outermost 41-42-43-43-44 shoulder/sleeve sts = 23-25-25-27-27 collar sts left on needle. Continue to knit the collar (to be sewn to back piece afterwards). Knit in garter sts as follows: *2 rows of garter sts over all sts, 2 rows of garter sts but only over the outermost 15-17-17-19-19 sts towards the centre front*, repeat from *-* until the collar measure 4-4.5-4.5-5-5 cm inside towards the nape of the neck – the collar will then measure approx 8-9-9-10-10 cm on the outside. Put remaining sts on a thread. Right front: Cast on and knit as left front but reverse. Remember to cast off for buttonholes – see explanation above. Assembly: Sew the shoulder and the sleeve seams with invisible mattress sts – see the School of Handcraft on the main pattern front page. Instructions on how to assemble using mattress sts can be found under Knitting Techniques by clicking on Assembly. Cuff: Pick up 32-35-35-38-38 sts (incl. of 1 edge st each side) at the bottom of the sleeve on needles size 9 mm in Snow. Knit M.1 with an edge st each side for approx 25 cm. Continue to K 1 row from the RS before casting off loosely. Repeat for the bottom of the other sleeve. Sew the collar sts from threads tog at the centre back from the RS with invisible mattress sts - to avoid a chunky seam. Sew the collar to the neckline at the nape of the neck- Sew in the edge so the seam doesn’t become too chunky. Sew sleeve and side seams inside 1 edge st. Crochet edge: Crochet an edge where the garter sts begins, around the collar and down the other side on hook size 8 in Puddel as follows: 1 dc in the first st, 3 ch, continue to crochet 1 tr into each row. |
||||||||||
Diagram explanations |
||||||||||
|
||||||||||
 |
||||||||||
Have you finished this pattern?Tag your pictures with #dropspattern or submit them to the #dropsfan gallery. Do you need help with this pattern?You'll find 22 tutorial videos, a Comments/Questions area and more by visiting the pattern on garnstudio.com. © 1982-2026 DROPS Design A/S. We reserve all rights. This document, including all its sub-sections, has copyrights. Read more about what you can do with our patterns at the bottom of each pattern on our site. |
||||||||||


With over 40 years in knitting and crochet design, DROPS Design offers one of the most extensive collections of free patterns on the internet - translated to 17 languages. As of today we count 324 catalogues and 12290 patterns translated into English (UK/cm). 12290
We work hard to bring you the best knitting and crochet have to offer, inspiration and advice as well as great quality yarns at incredible prices! Would you like to use our patterns for other than personal use? You can read what you are allowed to do in the Copyright text at the bottom of all our patterns. Happy crafting!
Post a comment to pattern DROPS 97-23
We would love to hear what you have to say about this pattern!
If you want to leave a question, please make sure you select the correct category in the form below, to speed up the answering process. Required fields are marked *.