
Popular categories
Looking for a yarn?


Comments / Questions (12)
![]() Gaby wrote:
Gaby wrote:
Ich möchte diesen Pullover gerne mit Alpaca hellseegrün 9037 und Brushed Alpaca Silk 15 stricken. Sind das die gleichen Farbtöne?. Sind leider nicht als Matchfarben aufgelistet.
17.05.2026 - 21:14DROPS Design answered:
Liebe Gaby, gern wird Ihnen Ihr DROPS Händler damit - auch per Telefon oder E-Mail helfen, die besten passenden Farben zu finden. Viel Spaß beim Stricken!
18.05.2026 - 12:10
![]() Amanda wrote:
Amanda wrote:
Should the pattern have k2tog on one side and ssk so that it’s evened out direction wise
06.05.2026 - 09:08DROPS Design answered:
Hi Amanda, In this pattern we have only suggested K2 together throughout. You can of course adjust this to ssk on one side if you wish. Regards, Drops Team.
08.05.2026 - 06:04
![]() Teri wrote:
Teri wrote:
Hello, If I only use one strand of alpaca for this pattern, how would that change the gauge and size? Also noted that the amount of each yarn needed is different. Thank you.
06.03.2026 - 02:53DROPS Design answered:
Hi Teri, If you only use 1 strand, the sweater will be smaller. You will therefore either need to add stitches to the pattern or use larger needles. The amounts of the 2 yarns differ as the yardage on each skein is different: Alpaca is sold in 1.8 oz skeins with a yardage of 183 yards. Brushed Alpaca Silk is sold in 0.9 oz skeins, with a yardage of 153 yards. Regards, Drops Team.
06.03.2026 - 06:31
![]() Concha wrote:
Concha wrote:
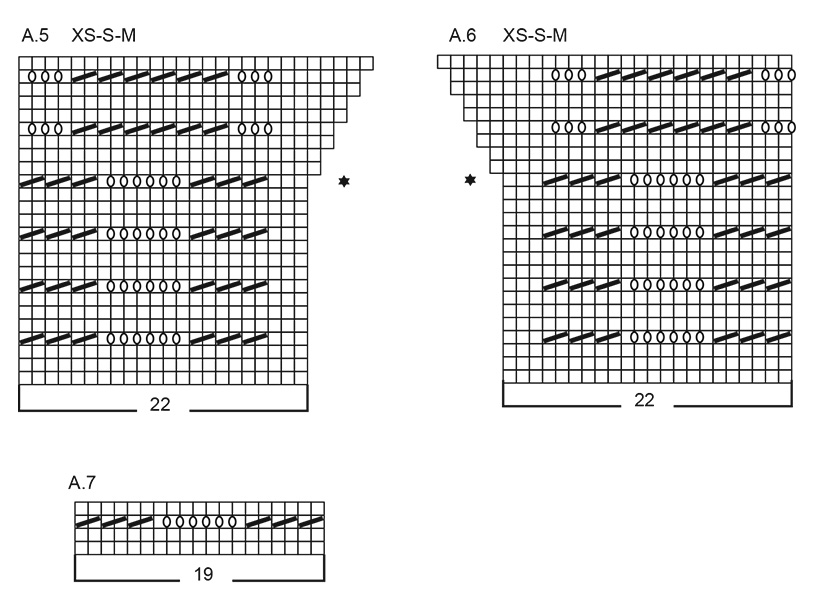
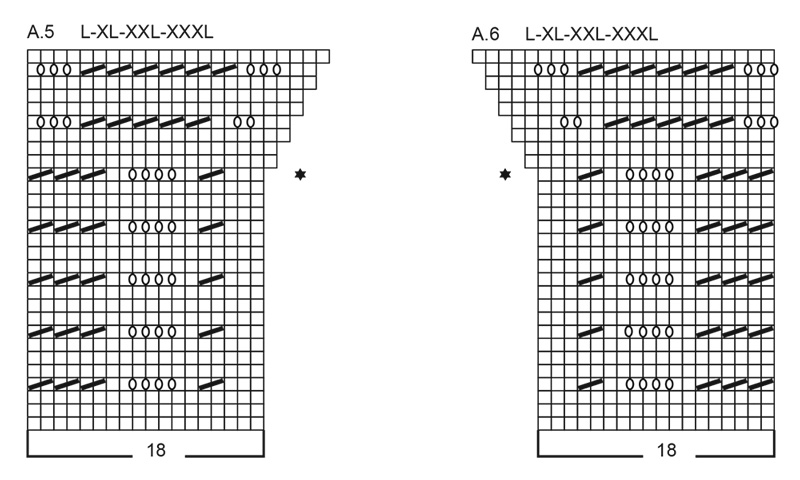
En el FRENTE IZQDO, a partir de la hilera con estrella, no coincide el texto con el gráfico A.5. Los 7 puntos del derecho , están al inicio o al final de la vuelta? Si los pongo al final, como dice el texto, el dibujo no queda alinado con las vueltas anteriores. Gracias
03.03.2026 - 22:20DROPS Design answered:
Hi Concha, ROW 1 (= right side): work the first 3 stitches in A.5 (knit 3), increase 1 towards the left (INCREASE TIP-1), continue A.5 (from the st no 4 it means 'knit 2 together'), knit 7 and the end of row. Happy knitting!
14.04.2026 - 10:50
![]() Nicole wrote:
Nicole wrote:
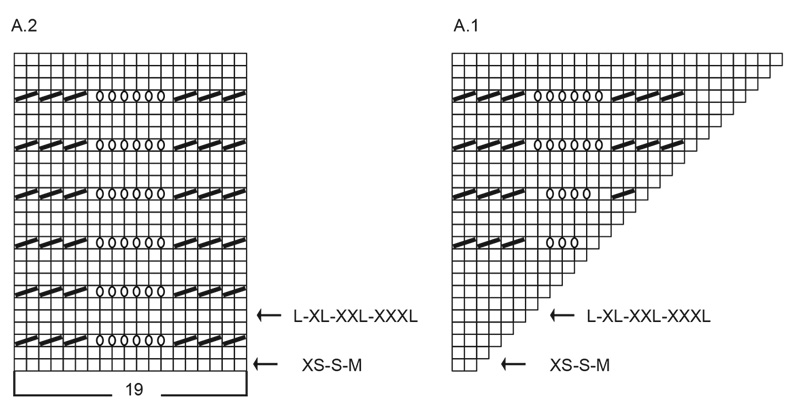
Comment placer ces 3 diagrammes A1 A2 A3 sur les 30 mailles montées pour le dos ? Svp Merci beaucoup.
23.02.2026 - 12:04DROPS Design answered:
Bonjour Nicole, avez-vous vu les réponses ci-dessous? On y explique comment tricoter le 1er rang et les diagrammes A.1, A.2 et A.3. Bon tricot!
24.02.2026 - 09:26
![]() Nicole wrote:
Nicole wrote:
Comment placer ces 3 diagrammes A1 A2 A3 sur les 30 mailles montées pour le dos ? Svp Merci beaucoup.
23.02.2026 - 03:43DROPS Design answered:
Bonjour Nicole, en taille XS, S et M, tricotez ces 30 m ainsi: 3 m end, (vous augmenterez 1 m ici, après ces 3 m), puis tricotez les 2 mailles de A.1, tricotez ensuite les 19 m de A.2, les 3 mailles de A.3 (vous augmenterez 1 m ici) et terminez par 3 m endroit = 3+2+19+3+3=30 m (+ 2 m augmentées au 1er rang à 3 m des bords). Bon tricot!
23.02.2026 - 09:21
![]() Nicole wrote:
Nicole wrote:
Bonjour. Je n'arrive pas à me repérer lorsqu'il est écrit de tricoter A1 A2 A3. Partie du dos au 2 ème rang. Pourriez vous m'expliquer svp? Merci d'avance pour votre aide.
23.02.2026 - 03:33DROPS Design answered:
Bonjour Nicole, au 2ème rang, vous tricotez sur l'endroit: 3 m end, (1 augmentation), puis vous tricotez le diagramme A.1, puis A.2 et enfin A.3, (1 augmentation) et 3 m end. Sur l'envers, tricotez: 3 m env, (lisez maintenant les diagrammes sur l'envers de gauche à droite): A.3, A.2 et A.1,et 3 m env. Bon tricot!
23.02.2026 - 09:18
![]() Nicole wrote:
Nicole wrote:
Au vu de tous les commentaires précédents pensez vous rectifier les informations svp? Cordialement
19.02.2026 - 18:36DROPS Design answered:
Bonjour Nicole, la correction a été faite, notez toutefois que la tension est similaire à une tension du groupe de fils C, même si on tricote ici avec 1 laine du groupe A et 1 laine du groupe C. Bon tricot!
23.02.2026 - 09:35
![]() Iris wrote:
Iris wrote:
Der Pullover ist Garngruppe C Alpaca =A Brushed Alpaca Silk A . Ist Silk nicht Garngruppe C ? Stimmt die Anleitung?
19.02.2026 - 07:36
![]() Elisa wrote:
Elisa wrote:
It says in the pattern that brushed alpaca silk is in yarn group A and that in this pattern you should use A+A to get yarn group C. But in your website is said that brushed alpaca silk is in yarn group C.
18.02.2026 - 12:50DROPS Design answered:
Hi, this is now corrected.
05.03.2026 - 18:45
|
||||||||||
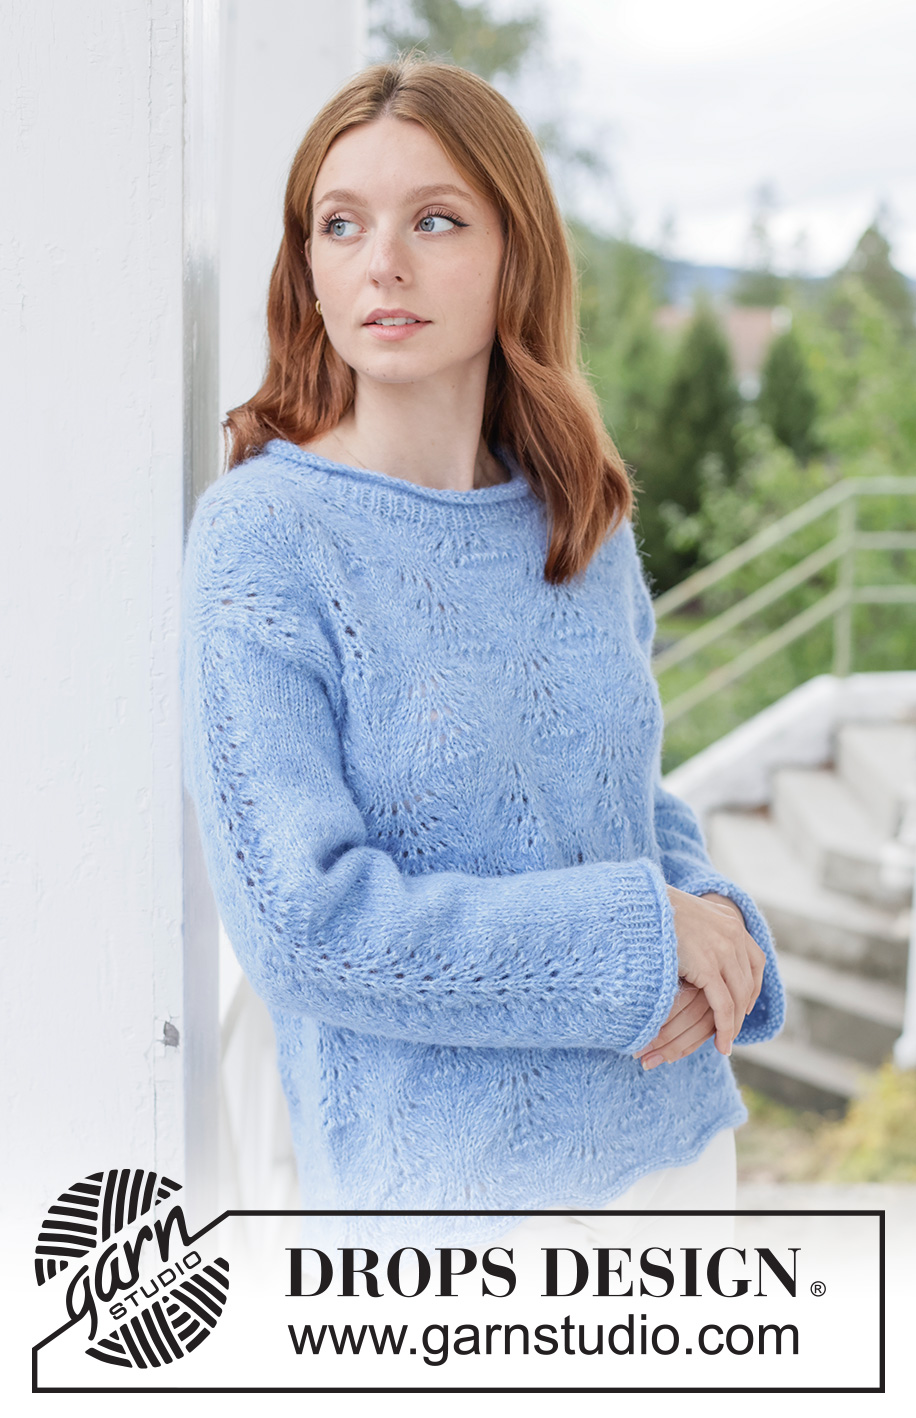
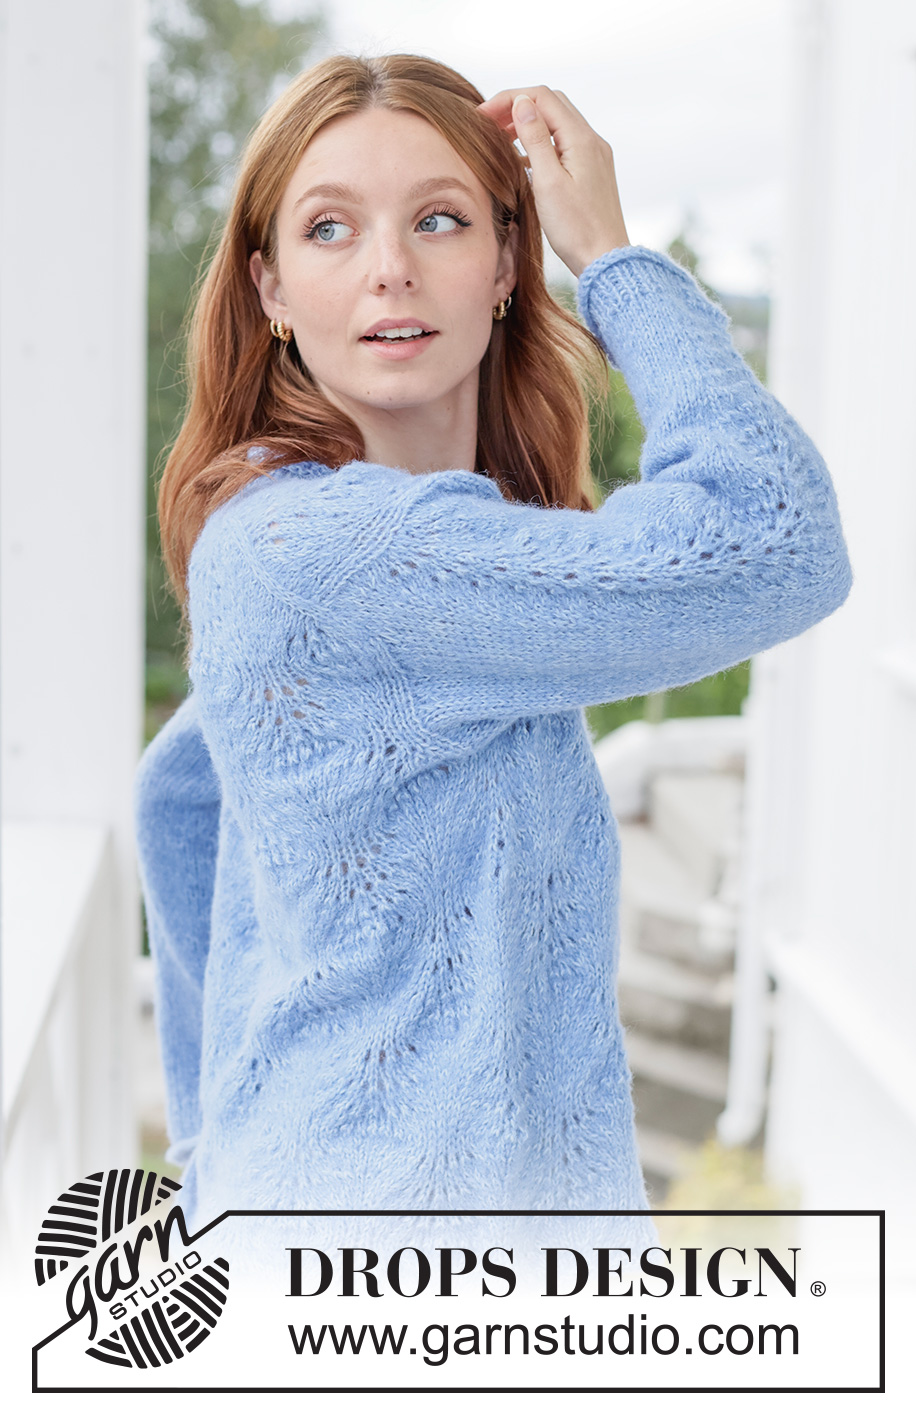
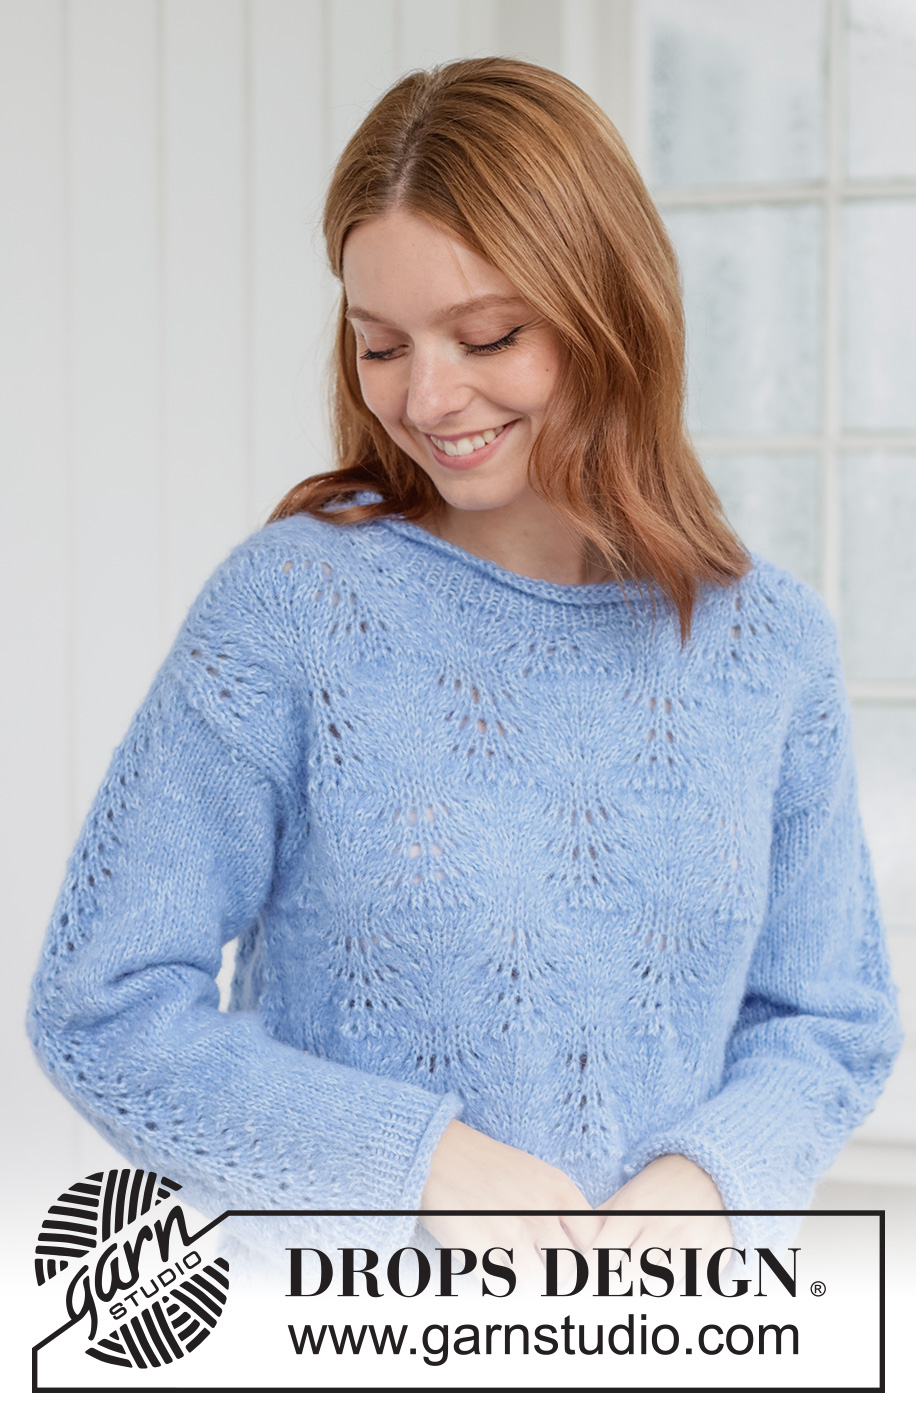
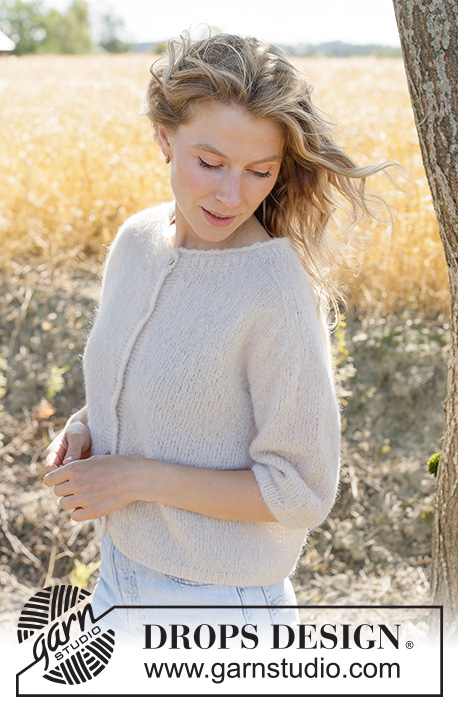
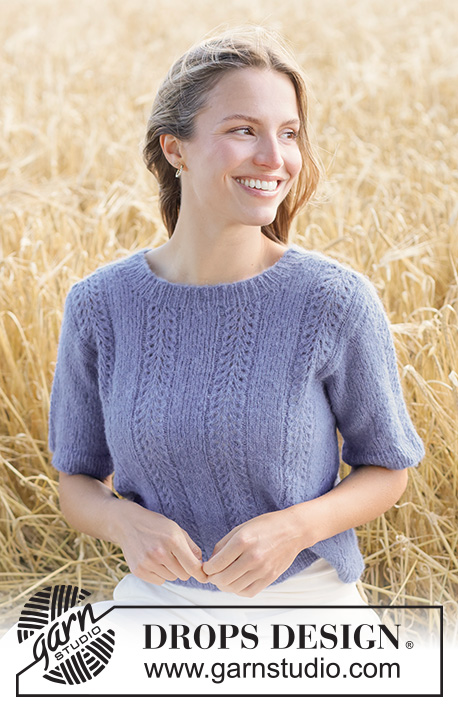
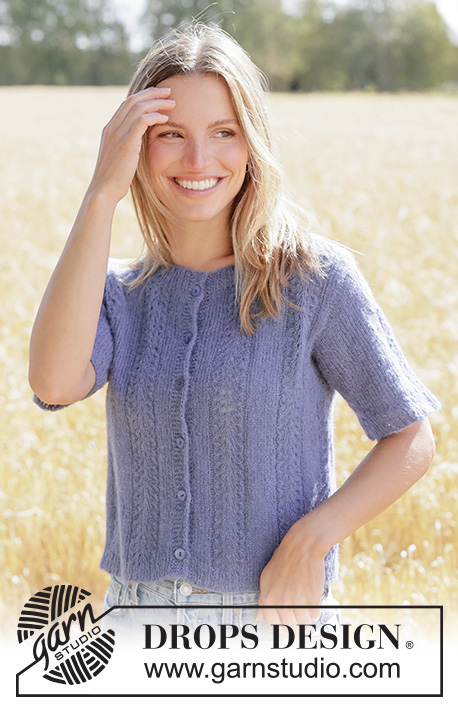
Blue Plume Sweater#blueplumesweater |
||||||||||
 |
 |
|||||||||
Knitted jumper in DROPS Alpaca and DROPS Brushed Alpaca Silk. Piece is knitted top down with European shoulders / diagonal shoulders, rolling edges and wave pattern. Size XS – XXXL.
DROPS 266-20 |
||||||||||
|
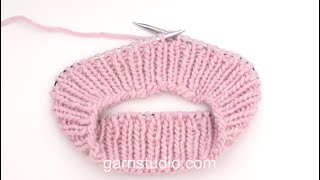
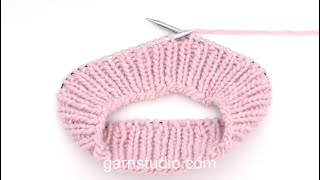
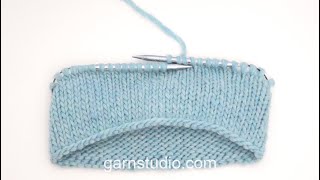
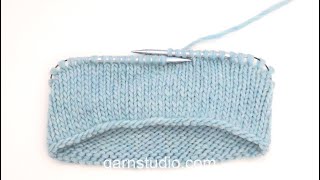
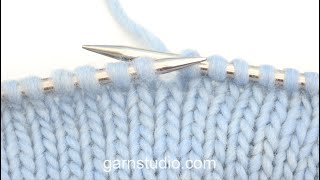
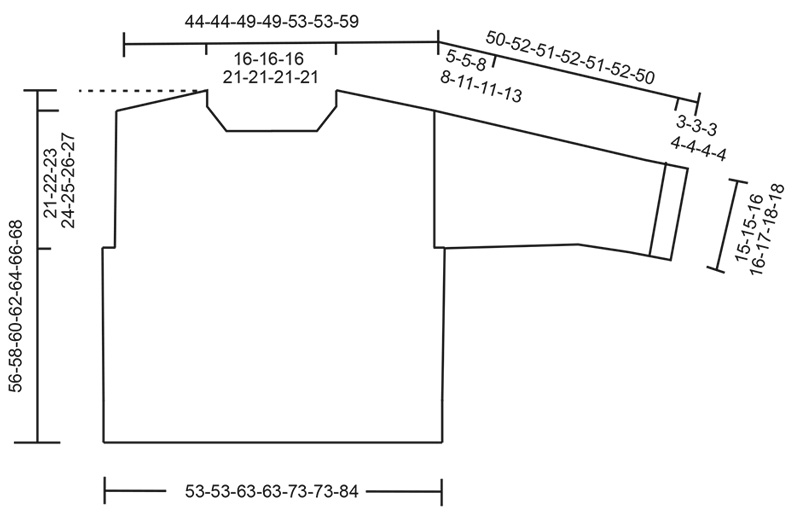
---------------------------------------------------------- EXPLANATION FOR THE PATTERN: ---------------------------------------------------------- INCREASE TIP-1: INCREASE 1 STITCH TOWARDS LEFT - from RIGHT SIDE: Use left needle to pick up yarn between 2 stitches from row below, pick up yarn from the front and knit stitch in stitch loop behind the needle. INCREASE 1 STITCH TOWARDS THE RIGHT - from RIGHT SIDE: Use left needle to pick up yarn between 2 stitches from row below, pick up yarn from the back and knit stitch in stitch loop in front of needle. INCREASE TIP-2: INCREASE 1 STITCH TOWARDS THE LEFT - from WRONG SIDE: Use left needle to pick up yarn between 2 stitches from row below, pick up yarn from the back and purl stitch in stitch loop in front of needle. INCREASE 1 STITCH TOWARDS THE RIGHT - from WRONG SIDE: Use left needle to pick up yarn between 2 stitches from row below, pick up yarn from the front and purl stitch in stitch loop behind the needle. KNITTING TIP: When working short rows, there will be a small hole after each turn. This hole can be closed by tightening the strand or using the technique German Short Rows as follows: Slip the first stitch purl-wise, take the strand over the right needle and tighten well from the back (2 loops on the needle). These loops are worked together on the next row. DECREASE TIP: Decrease 1 stitch on each side of marker thread as follows: Work until 3 stitches remain before marker thread, knit 2 together, knit 2 (marker thread is in the middle of these 2 stitches), slip 1 stitch knitwise, knit 1, pass slipped stitch over stitch worked (= 2 stitches decreased). ---------------------------------------------------------- START THE PIECE HERE: ---------------------------------------------------------- JUMPER - SHORT OVERVIEW OF THE PIECE: In this pattern needles of different length have been used, begin with fitting length for number of stitches and switch as needed. First work piece back and forth on circular needle. Begin by casting on stitches in the back of neck. Then work back piece downwards while AT THE SAME TIME increasing in each side of piece until number of stitches for shoulder width is reached. Back piece has a slight diagonal shoulder. Then work down to armholes. Now put back piece a side and work the front piece. Front piece is first worked in 2 parts. Begin by picking up stitches along one shoulder from back piece, work and increase towards the neck. Repeat on the other shoulder. Put right and left front piece together when increases for neck are done. Then work front piece down to armholes. Now slip front piece and back piece on to same circular needle and work body downwards in the round on circular needle. Pick up stitches for sleeves around the armholes and work sleeves downwards. First work back and forth with short rows to form a sleeve cap, then work sleeves downwards in the round on needle. Finish by picking up stitches around the neck and work a neck edge. If 0 is given for the chosen size, it means that you skip the information until next information. BACK PIECE: Work piece back and forth on circular needle. Cast on 30-30-30-38-38-38-38 stitches on circular needle size 4.5 mm with 1 strand DROPS Alpaca and 1 strand DROPS Brushed Alpaca Silk (= 2 strands). ROW 1 (= wrong side): Purl all stitches. ROW 2 (= right side): Read INCREASE TIP-1 and knit 3, increase 1 stitch towards the left, work A.1, A.2, A.3, increase 1 stitch towards the right, knit 3. ROW 3 (= wrong side): Read INCREASE TIP-2 and purl 3, increase 1 stitch towards the left, work A.3, A.2, A.1, increase 1 stitch towards the right, purl 3. AFTER 3RD ROW: Work 2nd and 3rd ROW 13-13-13-11-11-11-11 times in total (= 26-26-26-22-22-22-22 rows worked), after last increase there are 82 stitches on needle in all sizes. A.1, A.2 and A.3 are now finished vertically. The increases are done in XS and S (continue from ALL SIZES). Continue increases in size M-L-XL-XXL-XXXL on every row as before inside 3 stitches in stocking stitch in each side, AT THE SAME TIME work pattern as follows: 3 stitches in stocking stitch, work A.4 4 times in total, work 3 stitches in stocking stitch. Work the new stitches in stocking stitch. Increase 0-0-4-4-8-8-13 times in each side (= 0-0-4-4-8-8-13 rows worked), 26-26-30-26-30-30-35 increases have been done in total in each side = 82-82-90-90-98-98-108 stitches on needle. Continue to work from ALL SIZES. ALL SIZES: Insert 1 marker at the edge in the side. Now measure piece from here! Now work pattern as follows: Work 3-3-7-7-11-11-16 stitches in stocking stitch, work A.4 4 times in total (continue on correct row in size M- L-XL-XXL-XXXL), work 3-3-7-7-11-11-16 stitches in stocking stitch. Remember to follow the knitting tension! When piece measures 11-12-11-12-10-11-7 cm from marker, begin increase for armholes. Note which row is next row in pattern. It is important that the increases for armholes on front piece begin on the same row so that the pattern continue from the same row when the patterns are put together. INCREASE FOR ARMHOLES: ROW 1 (= right side): Read INCREASE TIP-1 and knit 3, increase 1 stitch towards the left, work 0-0-4-4-8-8-13 stitches in stocking stitch, work A.4 4 times in total, work 0-0-4-4-8-8-13 stitches in stocking stitch, increase 1 stitch towards the right, knit 3. ROW 2 (= wrong side): Purl without increasing. Work 1st and 2nd ROW 4-4-6-6-8-8-12 times in total = 90-90-102-102-114-114-132 stitches on needle. Piece should measure approx. 15-16-16-17-17-18-18 cm from marker in the side, finish with a row from wrong side. Cut the yarn, slip stitches on a thread or stitch holder, now work left front piece along the left shoulder as explained below. LEFT FRONT PIECE: Find left shoulder on back piece as follows: Place back piece flat with right side up, place back piece so that stitches on thread/stitch holder is towards you, left side of piece = left shoulder. Now pick up stitches along left diagonal shoulder on back piece - begin from right side at the neck and pick up stitches out towards the shoulder as follows: Pick up 1 stitch in every worked row inside outermost stitch, do not pick up in last stitch towards the shoulder = 25-25-29-25-29-29-34 stitches. All length measurements on front piece are done from pick up edge. Work as follows from wrong side: Purl 3-3-7-7-11-11-16 stitches, work A.5. On row with star, increase stitches towards the neck as follows: ROW 1 (= right side): Remember INCREASE TIP-1 and work the first 3 stitches in A.5, increase 1 towards the left, continue A.5, knit 3-3-7-7-11-11-16. ROW 2 (= wrong side): Purl all stitches. Work 1st and 2nd ROW 5 times in total (= 10 rows worked) = 30-30-34-30-34-34-39 stitches (next row is worked from right side). Cut the yarn, slip stitches on a thread or stitch holder, now work right front piece along the shoulder – read explanation below. RIGHT FRONT PIECE: Now pick up stitches along left diagonal shoulder on back piece - begin from right side at the shoulder and pick up stitches out towards the neck as follows: Begin 1 stitch in from outermost worked row, pick up 1 stitch in every worked row inside outermost stitch = 25-25-29-25-29-29-34 stitches. All length measurements on front piece are done from pick up edge. Work as follows from wrong side: Work A.6, purl 3-3-7-7-11-11-16. On row with star, increase stitches towards the neck as follows: ROW 1 (= right side): Knit 3-3-7-7-11-11-16, work A.6 until 3 stitches remain, increase towards the right, knit 3 (= the last 3 stitches in A.6) - remember INCREASE TIP-1. ROW 2 (= wrong side): Purl all stitches. Work 1st and 2nd ROW 5 times in total (= 10 rows worked) = 30-30-34-30-34-34-39 stitches (next row is worked from right side). Then place the front pieces together as explained below. FRONT PIECE (right and left part together): Work first row as follows from right side: Knit the 30-30-34-30-34-34-39 stitches from right front piece, cast on 22-22-22-30-30-30-30 new stitches for neck, knit the 30-30-34-30-34-34-39 stitches from left front piece = 82-82-90-90-98-98-108 stitches on needle. Purl 1 row over all stitches. Then work pattern as follows: Work 3-3-7-7-11-11-16 stitches in stocking stitch, work A.4 4 times in total, work 3-3-7-7-11-11-16 stitches in stocking stitch. Work until piece measures approx. 23-24-25-26-26-27-25 cm from pick-up edge, and next row is the same rows noted on back piece - now begin increases for armholes. INCREASE FOR ARMHOLES: ROW 1 (= right side): Read INCREASE TIP-1 and knit 3, increase 1 stitch towards the left, work 0-0-4-4-7-7-12 stitches in stocking stitch, work A.4 4 times in total, work 0-0-4-4-7-7-12 stitches in stocking stitch, increase 1 stitch towards the right, knit 3. ROW 2 (= wrong side): Purl all stitches. Work 1st and 2nd ROW 4-4-6-6-8-8-12 times in total = 90-90-102-102-114-114-132 stitches on needle. Piece should measure approx. 27-28-30-31-33-34-36 cm from pick-up edge. Now put front piece and back piece together for body as explained below. BODY: Work as before over the 90-90-102-102-114-114-132 stitches from front piece, cast on 5-5-12-12-19-19-20 new stitches at the end of this row, work as before over the 90-90-102-102-114-114-132 stitches from back piece, and cast on 5-5-12-12-19-19-20 new stitches at end of row = 190-190-228-228-266-266-304 stitches on needle. Continue established pattern, i.e. work as shown in A.4. There is room for 10-10-12-12-14-14-16 repetitions of A.4, make sure that pattern continues correctly over stitches from front piece and back piece. Continue until piece measures 56-58-60-62-64-66-68 cm from cast-on edge mid back. Knit 1 round and purl 1 round before loosely casting off by knitting. SLEEVES: Sleeve is worked from the armhole and down. Place piece flat and insert 1 marker at the top of armhole = mid on top shoulder – NOTE: Mid on top shoulder is not the same place as stitches were picked up for front piece but a few cm down on front piece. Use circular needle size 5 mm and tightly pick up stitches (use a thinner needle if needed). PICK UP STITCHES AS FOLLOWS: Begin in the middle of the new stitches cast on under sleeve - pick up 71-75-85-89-99-101-107 stitches – adjust to pick up same number of stitches on each side of marker. SLEEVE CAP: Work pattern as follows: Work 26-28-33-35-40-41-44 stitches in stocking stitch, A.7, 26-28-33-35-40-41-44 stitches in stocking stitch. First work stocking stitch and pattern back and forth with short rows over sleeve cap to get a better shape on sleeve, begin round mid under sleeve and work as follows: ROW 1 (= right side): Work 4 stitches past A.7 on top of shoulder, turn piece – read KNITTING TIP. ROW 2 (= wrong side): Work 4 stitches past A.7, turn piece. ROW 3 (= right side): Work 3-3-3-3-2-2-2 stitches past previous turn, turn piece. ROW 4 (= wrong side): Work 3-3-3-3-2-2-2 stitches past previous turn, turn piece. Repeat ROWS 3 and 4. Work until 12-12-18-18-24-24-28 turns have been done in total (= 6-6-9-9-12-12-14 times in each side and last row is worked from wrong side). AFTER LAST TURN: The last time 4th row is worked finish row by turning piece, then work from right side until beginning of round (mid under sleeve). Insert 1 marker thread mid under sleeve, this is used when decreasing stitches under sleeve. Move marker thread upwards when working. THE SLEEVE ONWARDS: Now work in the round in stocking stitch and A.7 while AT THE SAME TIME decreasing under sleeve, read DECREASE TIP and decrease like this: When 1 round has been worked, decrease 2 stitches 2-2-3-3-4-4-4 times on every other round, then decrease 2 stitches 8-9-12-13-16-16-18 times every 3½-3-3-3-2-2-1½ cm = 51-53-55-57-59-61-63 stitches on row. Work until sleeve measures 47-49-48-48-47-48-46 cm from mid on top shoulder. Switch to double pointed needles size 3.5 mm and work rib (= knit 1/purl 1) while AT THE SAME TIME increasing 9-11-9-11-9-11-13 stitches evenly on 1st round = 60-64-64-68-68-72-76 stitches. When rib measures 3-3-3-4-4-4-4 cm, work 3 rounds in stocking stitch with double pointed needles size 5 mm before casting off somewhat loosely by knitting (= rolling edge). Sleeve measures approx. 50-52-51-52-51-52-50 cm from mid on top of shoulder. NECK EDGE: Use circular needle size 3.5 mm. Begin from right side at one shoulder line and pick up approx. 88 to 108 stitches inside 1 stitch - number of stitches must be divisible by 2. Work rib in the round = knit 1/purl 1 for 2 cm. Switch to circular needle size 5 mm. Work 3 rounds in stocking stitch and loosely cast off by knitting (= rolling edge). |
||||||||||
Diagram explanations |
||||||||||
|
||||||||||
 |
||||||||||
 |
||||||||||
 |
||||||||||
 |
||||||||||
 |
||||||||||
Have you finished this pattern?Tag your pictures with #dropspattern #blueplumesweater or submit them to the #dropsfan gallery. Do you need help with this pattern?You'll find 44 tutorial videos, a Comments/Questions area and more by visiting the pattern on garnstudio.com. © 1982-2026 DROPS Design A/S. We reserve all rights. This document, including all its sub-sections, has copyrights. Read more about what you can do with our patterns at the bottom of each pattern on our site. |
||||||||||


With over 40 years in knitting and crochet design, DROPS Design offers one of the most extensive collections of free patterns on the internet - translated to 17 languages. As of today we count 325 catalogues and 12298 patterns translated into English (UK/cm). 12298
We work hard to bring you the best knitting and crochet have to offer, inspiration and advice as well as great quality yarns at incredible prices! Would you like to use our patterns for other than personal use? You can read what you are allowed to do in the Copyright text at the bottom of all our patterns. Happy crafting!
Post a comment to pattern DROPS 266-20
We would love to hear what you have to say about this pattern!
If you want to leave a question, please make sure you select the correct category in the form below, to speed up the answering process. Required fields are marked *.