
Popular categories
Looking for a yarn?


Comments / Questions (52)
![]() Francesca Klein wrote:
Francesca Klein wrote:
Hallo leider verstehe ich nicht, wie man die mütze oben absetzen soll. Können sie das detailliert beschreiben?
27.12.2024 - 16:14DROPS Design answered:
Liebe Frau Klein, oben wird man wie bei einer Kapuze zusammennähen - siehe dieses Video. Viel Spaß beim Fertigstellen!
02.01.2025 - 12:27
![]() Magda wrote:
Magda wrote:
I would love to make it with drops air and brushed alpaca silk. Is 2skeins each enough?
17.12.2024 - 13:52DROPS Design answered:
Witaj Magdo, mam nadzieję, ale dla pewności wzięłabym 3 motki Air. Pozdrawiam!
18.12.2024 - 08:13
![]() Betb wrote:
Betb wrote:
Mine came out nice but very small around the face hole, any ideas to make it more loose like the picture? It's not right on the head just the face bit
29.11.2024 - 00:16DROPS Design answered:
Hi Betb, maybe your rib edge is too tight. Unfortunately, the only help in this case is to rip out the edge and knit it looser again - either on larger needles or add stitches so that the pattern doesn't stretch as much. Happy knitting!
30.11.2024 - 13:55
![]() Sophie DUPIRE wrote:
Sophie DUPIRE wrote:
Bonjour, Peut-on tricoter une cagoule avec des aiguilles droites. Si oui où peut-on trouver les explications. Merci d'avance pour votre réponse
24.11.2024 - 15:04
![]() Christina Axelsson wrote:
Christina Axelsson wrote:
Hej. Sitter o stickar balakavla o kommer inte vidare nu när jag har satt 17 maskor på tråd. Hur ska jag fortsätta.
22.11.2024 - 10:45
![]() Rhina Misha Rusbjerg wrote:
Rhina Misha Rusbjerg wrote:
Tak for svaret. Men hvorfor når jeg nu bestiller garnet via det I skriver i opskriften - skriver I så ikke det med dobbelt tråd? Mener den er misvisende specielt fordi jeg jo anvender de foreslået garner.
19.11.2024 - 11:56DROPS Design answered:
Hej Rhina, hjælp os gerne, Vi har strikket den i 1 tråd DROPS Air, men hvor skriver vi at vi anbefaler 1 tråd DROPS Nord?
22.11.2024 - 13:57
![]() Anne wrote:
Anne wrote:
Je suis en train de le faire et c est très simple Très économique aussi en laine. Merci pour avoir partagé votre expérience.
17.11.2024 - 14:03
![]() Rhina Misha Rusbjerg wrote:
Rhina Misha Rusbjerg wrote:
Hej, Er i gang med denne. Synes den er lidt tynd i det - men kan ikke se at der står noget med to tråde. Har købt 3 nøgler Drops Nord uni Color som er bestilt her vis opskriften. Men kan se jeg ikke engang når at bruge 2. Hvad har jeg gjort galt? Hilsner Rhina
15.11.2024 - 13:05DROPS Design answered:
Hej Rhina, den her balaclava er strikket i DROPS Air. DROPS Nord er tyndere, så hvis du vil bruge den skal du strikke med dobbelt tråd - og det går fint :)
19.11.2024 - 11:14
![]() Gosia wrote:
Gosia wrote:
Chciałabym zamienić włóczkę na brushed alpaca silk, czy będzie to dobry wybór? A może dodać jeszcze włóczkę merino? Jeśli tak to ile zakupić poszczególnych włóczek?
09.11.2024 - 21:26DROPS Design answered:
Witaj Gosiu, z samej brushed alpaki komin może być zbyt przewiewny. Ja połączyłabym DROPS Brushed Alpaca Silk z DROPS Baby Merino, zobacz TUTAJ. Pamiętaj o próbce, w razie czego weź nieco mniejsze druty. Ile dokładnie każdej włóczki potrzebujesz trudno mi oszacować. Pomocy w tej sprawie może udzielić Ci pracownik sklepu, w którym kupujesz nasze włóczki. Pozdrawiamy!
12.11.2024 - 09:20
![]() Marna wrote:
Marna wrote:
This was very easy and it was fairly easy to understand! This was my first ever knit project and it turned out really well. A coworker of mine helped me alot with thos too and actually had me knit the two sides of the hood together instead of sowing them together which helped it stay elastic! I made this as a gift for my mom, but I do wanna make one for myself too 😂
02.11.2024 - 19:36
|
|
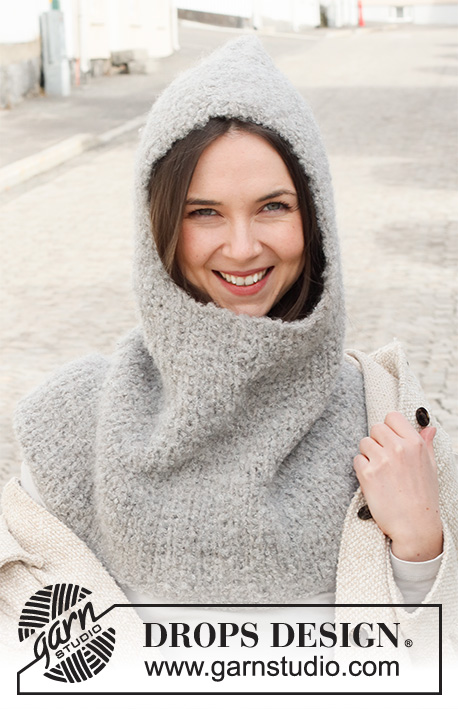
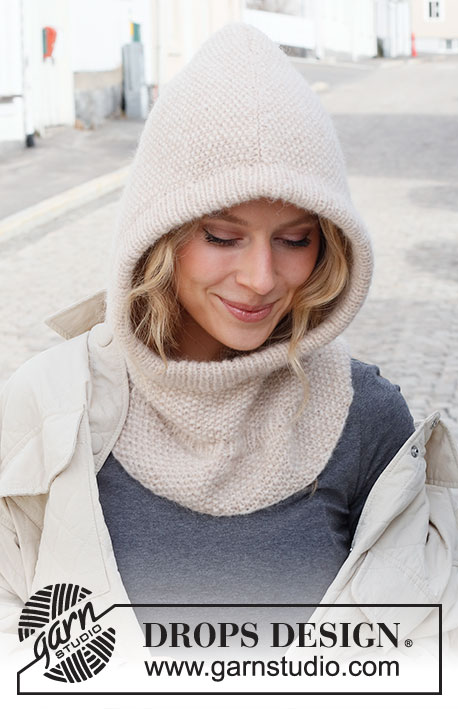
Frost Buster Balaclava#frostbusterbalaclava |
|
 |
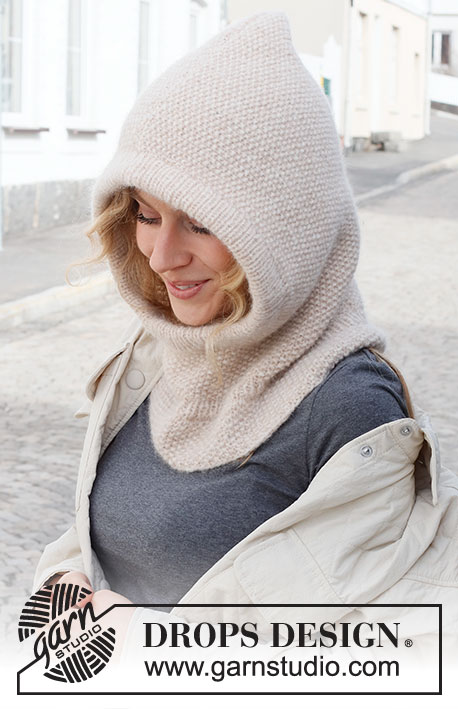 |
Knitted hat / balaclava in DROPS Air. The piece is worked with moss stitch and ribbed edges.
DROPS 225-7 |
|
|
------------------------------------------------------- EXPLANATIONS FOR THE PATTERN: ------------------------------------------------------- RIDGE/GARTER STITCH (worked back and forth): Knit all rows. 1 ridge = knit 2 rows. MOSS STITCH: Round/row 1: * Knit 1, purl 1 *, work from *-* to end of round/row. Round/row 2: Purl over knit and knit over purl. Repeat round/row 2 onwards. DECREASE TIP (evenly spaced): To work out how to decrease evenly, count the total number of stitches on needle (e.g. 115 stitches) and divide by the number of decreases to be made (e.g. 23) = 5. In this example decrease by knitting together each 4th and 5th stitch. CASTING-OFF TIP: To avoid the cast-off edge being tight you can cast off with a larger size needle. If the edge is still tight, make 1 yarn over after approx. each 4th stitch at the same time as casting off; the yarn overs are cast off as normal stitches. ------------------------------------------------------- START THE PIECE HERE: ------------------------------------------------------- BALACLAVA – SHORT OVERVIEW OF THE PIECE: The piece is worked in the round with circular needle, bottom up. Stitches are slipped on a thread for the face-opening and the piece finished back and forth. The hood is sewn together at the top. A ribbed double edge is worked around the face-opening. BALACLAVA: Cast on, slightly loosely, 115-127 stitches with circular needle size 4.5 mm and DROPS Air. Work 1 round of stocking stitch, then work MOSS STITCH – read description above. Remember the KNITTING TENSION! When the piece measures 6 cm, work 2 rounds of stocking stitch – AT THE SAME TIME on the first round decrease 23-25 stitches evenly spaced – read DECREASE TIP = 92-102 stitches. Change to circular needle size 3.5 mm. Work 4 rounds of rib (knit 1, purl 1). After this rib, change back to circular needle size 4.5 mm and knit 1 round where you decrease 5-5 stitches evenly spaced – remember DECREASE TIP = 87-97 stitches. Continue with moss stitch in the round until the piece measures 14 cm from the cast-on edge in both sizes. On the next round place the middle 17-19 stitches mid-front on a thread, leaving an opening mid front = 70-78 stitches on the needle. Insert 1 marker in the middle of the row (= mid-back). Allow the marker to follow your work onwards – it will be used when dividing the piece at the top. Now work the hood as described below. HOOD: Continue back and forth with moss stitch over all stitches. Continue working until the piece measures 40-42 cm from the cast-on edge (the piece measures approx. 26-28 cm from the division mid-front). There is approx. 3 cm left to finished length; try the balaclava on and continue to desired length. Now cast off stitches mid-back. Divide the piece at the marker and complete each section separately as described below. SECTION 1: = 35-39 stitches. Continue with moss stitch back and forth and cast off at the beginning of each row from mid-back as follows: Cast off 1 stitch 1 time, 2 stitches 2 times and 3 stitches 1 time = 27-31 stitches left. Knit 1 row from the right side. Cast off with knit from the right side. The piece measures approx. 43-45 cm from the top down. SECTION 2: Work in the same way as Section 1. ASSEMBLY: Sew the balaclava together at the top, inside the cast-off edge. EDGE AROUND FACE-OPENING: Place the stitches from the thread mid-font on circular needle size 3.5 mm. Purl over knit and knit over purl over these 17-19 stitches, then knit up 111 to 125 stitches inside 1 stitch around the whole opening = 128 to 144 stitches. The number of stitches should be divisible by 2. Work rib in the round (knit 1, purl 1) for 6-7 cm. Loosely cast off with knit over knit and purl over purl – read CASTING-OFF TIP. Fold the ribbed edge double to the inside and sew down. To avoid the edge being tight and rolling outwards, it is important that the seam is elastic. |
|
Have you finished this pattern?Tag your pictures with #dropspattern #frostbusterbalaclava or submit them to the #dropsfan gallery. Do you need help with this pattern?You'll find 23 tutorial videos, a Comments/Questions area and more by visiting the pattern on garnstudio.com. © 1982-2026 DROPS Design A/S. We reserve all rights. This document, including all its sub-sections, has copyrights. Read more about what you can do with our patterns at the bottom of each pattern on our site. |
|


With over 40 years in knitting and crochet design, DROPS Design offers one of the most extensive collections of free patterns on the internet - translated to 17 languages. As of today we count 324 catalogues and 12290 patterns translated into English (UK/cm). 12290
We work hard to bring you the best knitting and crochet have to offer, inspiration and advice as well as great quality yarns at incredible prices! Would you like to use our patterns for other than personal use? You can read what you are allowed to do in the Copyright text at the bottom of all our patterns. Happy crafting!
Post a comment to pattern DROPS 225-7
We would love to hear what you have to say about this pattern!
If you want to leave a question, please make sure you select the correct category in the form below, to speed up the answering process. Required fields are marked *.