
Popular categories
Looking for a yarn?


Comments / Questions (141)
![]() Marianne Sørensen wrote:
Marianne Sørensen wrote:
Der er fejl i mønstret når der skal strikkes på rundpind. Hvis jeg strikker efter jeres beskrivelse kommer der ikke mønster, så jeg har taget efter videoen på "falsk patent på rundpind" hilsen marianne
04.07.2014 - 09:43
![]() Shelia wrote:
Shelia wrote:
Love this pattern!!!!
27.06.2014 - 21:28
![]() Grethe wrote:
Grethe wrote:
Tusen takk for rask oppskrift :) Dere gjør en kjempejobb!
25.06.2014 - 22:46
![]() Grethe wrote:
Grethe wrote:
Når kommer oppskriften? Flott til skolestart! Forslag til navn: Hedda.
24.06.2014 - 18:03
![]() DULHOSTE wrote:
DULHOSTE wrote:
J'aime beaucoup ce pull simple pour les week-end
19.06.2014 - 19:31
![]() Isa wrote:
Isa wrote:
Der Pullover besticht durch seine Schlichtheit, traumschön - den MUSS ich stricken!!!
10.06.2014 - 18:06C Darmanin wrote:
Sweet and simple. Great!
05.06.2014 - 10:01
![]() José wrote:
José wrote:
Lijkt me een heerlijke comportabele trui. Die wil ik zeker maken.
03.06.2014 - 19:30Danielle wrote:
Je le ferai, c'est certain.
03.06.2014 - 17:25
![]() Marina Camogliano wrote:
Marina Camogliano wrote:
Mi piace
02.06.2014 - 18:40
|
|
Lazy Afternoon#lazyafternoonsweater |
|
|
|
|
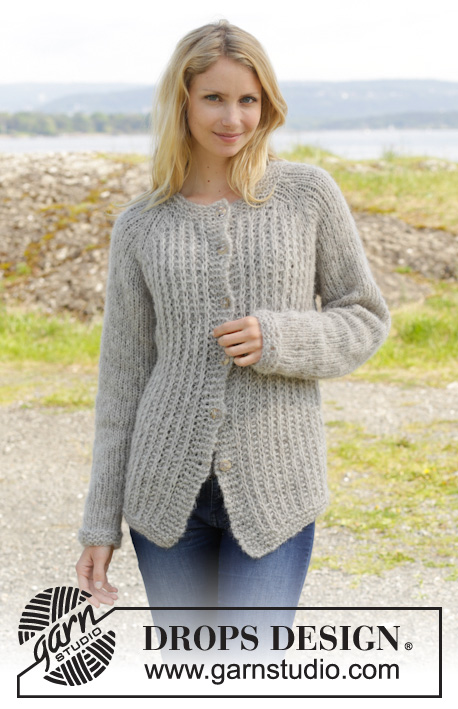
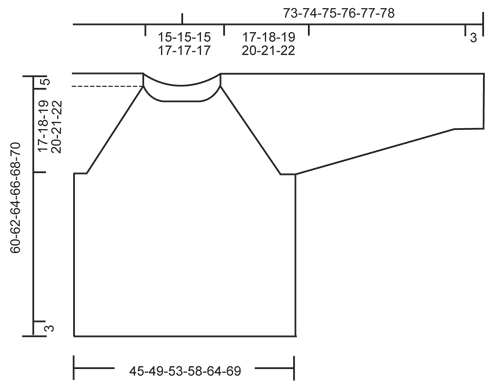
Knitted DROPS jumper with raglan and false English rib, worked top down in 2 strands ”Brushed Alpaca Silk”. Size S-XXXL
DROPS 157-20 |
|
|
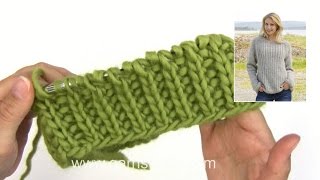
GARTER ST (in the round on circular needle): 1 ridge = 2 rounds. * K 1 round and P 1 round *, repeat from *-*. FALSE ENGLISH RIB (in the round on circular needle): ROUND 1: * K1 st, 1 YO, slip 1 st as if to P *, repeat from *-* until 1 st remains, finish with K1 st. ROUND 2: * P1 st, K tog YO and slipped st from previous round *, repeat from *-* until 1 st remains, finish with P1 st. Repeat rounds 1 to 2. RAGLAN: Inc on each side of every marker as follows: Work until 1 st remains before marker, 1 YO, work 2 sts in stockinette st and 1 YO. Repeat at the remaining markers on round. On next round K YOs twisted (i.e. work in back loop of st instead of front) to avoid holes. DECREASE TIP (applies to sleeve): Dec as follows BEFORE st with marker in: Slip 1 st as if to K, K 1, psso. Dec as follows AFTER st with marker in: K 2 tog. ---------------------------------------------------------- JUMPER: Worked top down in the round on circular needle/double pointed needles. At the end, pick up sts around the neck and work an edge in garter st. YOKE: Cast on 55-55-55-59-59-59 sts with 2 strands Brushed Alpaca Silk on circular needle size 9 mm / US 13. Work 1 ridge in GARTER ST - see explanation above AT THE SAME TIME on last round in ridge inc 9 sts evenly in all sizes = 64-64-64-68-68-68 sts. On next round work as follows from right raglan at the back: 1 st in stockinette st, insert 1st marker here, 9 sts in stockinette st, insert 2nd marker here, 1 st in stockinette st, 21-21-21-23-23-23 sts in FALSE ENGLISH RIB – see explanation above (= front piece), 1 st in stockinette st, insert 3rd marker here, 9 sts in stockinette st, insert 4th marker here, 1 st in stockinette st, 21-21-21-23-23-23 sts in false English rib (= back piece). Continue like this AT THE SAME TIME on next round beg inc for RAGLAN – see explanation above! Repeat this inc every other round 5-7-10-13-18-22 more times, and every 4th round 5-5-4-3-1-0 times = 152-168-184-204-228-252 sts. NOTE: Work the new inc sts on front and back piece in false English rib and work the new inc sts on sleeves in stockinette st. REMEMBER THE GAUGE! Piece measures 22-23-24-25-26-27 cm / 8¾"-9"-9½"-9¾"-10¼"-10⅝" from shoulder. Work 1 round more with pattern as before but now stop 1 st before 1st marker (i.e. 1 st before round is done). Slip the next 33-37-41-45-51-57 sts on a stitch holder (= sleeve), cast on 7 new sts under sleeve, work the next 43-47-51-57-63-69 sts (= front piece), slip the next 33-37-41-45-51-57 sts on a stitch holder (= sleeve), cast on 7 new sts under sleeve, work the next 43-47-51-57-63-69 sts (= back piece). BODY: There are now 100-108-116-128-140-152 sts. Continue false English rib as before. P the middle of the 7 new sts under each sleeve, work the remaining new sts in false English rib. Continue like this until piece measures 35-36-37-38-39-40 cm / 13¾"-14¼"-14½"-15"-14¼"-15¾" from the new sts under sleeve. Now work 3 ridges before loosely binding off. SLEEVE: Slip the 33-37-41-45-51-57 sts back on double pointed needles. Work 1 row in stockinette st over all sts. Then cast on 7 sts at the end of row = 40-44-48-52-58-64 sts. Insert a marker in the middle of the new sts under the sleeve. NOW MEASURE THE PIECE FROM HERE. Then work the sleeve in stockinette st in the round. When piece measures 4 cm / 1½", beg dec for sleeve – READ DECREASE TIP. Repeat the same dec every 5½-5-4-3½-2½-2½ cm / 2¼"-2"-1½"-1¼"-⅞"-⅞" 6-7-9-10-13-15 more times = 26-28-28-30-30-32 sts. When piece measures 41-41-41-40-40-40 cm / 16"-16"-16"-15¾"-15¾"-15¾", work 3 ridges and loosely bind off. ASSEMBLY: Sew the holes under the sleeves. NECK EDGE: Pick up 1 st in every st in ridge in the neck with 2 strands Brushed Alpaca Silk = 55-55-55-59-59-59 sts. Work 2 ridges and loosely bind off. |
|
 |
|
Have you finished this pattern?Tag your pictures with #dropspattern #lazyafternoonsweater or submit them to the #dropsfan gallery. Do you need help with this pattern?You'll find 22 tutorial videos, a Comments/Questions area and more by visiting the pattern on garnstudio.com. © 1982-2026 DROPS Design A/S. We reserve all rights. This document, including all its sub-sections, has copyrights. Read more about what you can do with our patterns at the bottom of each pattern on our site. |


With over 40 years in knitting and crochet design, DROPS Design offers one of the most extensive collections of free patterns on the internet - translated to 17 languages. As of today we count 324 catalogs and 12290 patterns - 12280 of which are translated into English (US/in).
We work hard to bring you the best knitting and crochet have to offer, inspiration and advice as well as great quality yarns at incredible prices! Would you like to use our patterns for other than personal use? You can read what you are allowed to do in the Copyright text at the bottom of all our patterns. Happy crafting!
Post a comment to pattern DROPS 157-20
We would love to hear what you have to say about this pattern!
If you want to leave a question, please make sure you select the correct category in the form below, to speed up the answering process. Required fields are marked *.