
Popular categories
Looking for a yarn?


Comments / Questions (47)
Maike Keil wrote:
Guten morgen. Vielen vielen Dank! Das heisst ich brauche nicht zu trennen♥
12.06.2018 - 11:14
![]() Maike Keil wrote:
Maike Keil wrote:
Guten morgen aus Namibia! Ich komme einfach bei dem 3. Viereck nicht hin. Bein mir wird es ein Dreieck. Ich stricke die Verkürzten Reihen genau so wie beschrieben, habe 2x getrennt und wieder gestrickt.... es bleibt ein Dreieck. Ich brauche da wirklich Hilfe, Gibt es ein Photo mit der Rückenansicht vielleicht? Lieben Gruss Maike
07.06.2018 - 09:27DROPS Design answered:
Liebe Frau Keil, es ist so richtig, das 3. Teil wird kein Viereck sein sondern ein Dreieck (wegen verkürtzten Reihen und hier kein Dominoquadrat stricken) . Die dominoquadraten werden nur beim 1., 2. und 4. Teil gestrickt. Viel Spaß beim stricken!
07.06.2018 - 09:52
![]() Bibi wrote:
Bibi wrote:
Hello I like this Design, I bought the wool from the suggested place, Is there a clearer direction? I am not sure if I have downloaded the whole pattern. How many dominos squares are there?
10.04.2018 - 16:30DROPS Design answered:
Dear Bibi, pattern is complete and neckwarmer is worked from 5 domino square as explained under NECK WARMER. Happy knitting!
11.04.2018 - 09:06
![]() Margit Binzer wrote:
Margit Binzer wrote:
Jeg forstår ikke, hvordan og hvor jeg skal strikke 3. Dominorude. Forkortede pinde... jeg vil rigtig gerne se et billede fra ryggen. Det er vanskeligt at gennemskue denne opskrift. Ligger ruderne i en række? Drops 151-40
20.12.2017 - 10:15DROPS Design answered:
Hej Margit, Vi har desværre ikke et billede af ryggen. Den 3. rude er ikke på lige række med de 2 andre, den strikkes op mod den anden skulder og former stykket som en kile. Det bliver altså ikke en lang remse men mere en bøjet remse og den er ikke symmetrisk. Held og lykke!
20.12.2017 - 11:07
![]() Regina wrote:
Regina wrote:
Hallo! gibt es zu diesem tollen Schultertuch auch eine Zeichnung wie die Vierecke zueinander / aneinander liegen? Ich möchte das schöne Stück gern nachstricken aber ohne Knöpfe zum über die Schulter werfen. Danke!
02.04.2015 - 08:16DROPS Design answered:
Die Vierecke liegen alle in Reihe aneinander. Die Reihe besteht aus 2 Dominovierecken, 1 Viereck aus verkürzten R und 1 Dominoviereck. Das erste Viereck ist das auf dem Foto links zu sehende (also das ohne Knopflöcher), der Anschlag besteht aus der rechten und unteren Kante. Dadurch, dass ja in der Mitte Abnahmen gestrickt werden, ergeben sich die nach links oben verlaufenden und immer kürzer werdenden Reihen mit 90-Grad-Winkel. Für das 2. Viereck schlagen Sie zuerst neue M an und fassen dann aus dem oberen Rand des 1. Vierecks von rechts nach links M auf, das Viereck erhält damit die gleiche "Laufrichtung".
02.04.2015 - 10:25
![]() Catherine wrote:
Catherine wrote:
Bonjour, je viens de commencer ce modèle en taille L/XL. Je doute de pouvoir le confectionner avec seulement 200g soit 4 pelotes. Est-ce vraiment suffisant?
09.03.2015 - 09:40DROPS Design answered:
Bonjour Catherine, pensez à bien vérifier et conserver la bonne tension pour un résultat optimal, soit 23 m x 46 rangs au point mousse = 10 x 10 cm. Bon tricot!
09.03.2015 - 10:11Helene wrote:
Thank you for the answer. Just want to ask how do I change my colours on block 3 please?
17.02.2015 - 08:52DROPS Design answered:
Dear Helene, the neck warmer is worked with only 1 "colour" (ie print colour grey/brown), there is no color change, you continue with the yarn as before. Happy knitting!
17.02.2015 - 15:14Helene wrote:
Please can you help? Square 3 I am not sure if I must pick up the stitches from the bottom of 2 to the top or from the top of square to the bottom Thank you
16.02.2015 - 13:36DROPS Design answered:
Dear Helene, for 3rd square, pick up sts along the right side of the 2nd domino starting at the edge (in cast on row) along ridges and ending at the last st worked on 2nd square - seen from RS. Happy knitting!
16.02.2015 - 13:59
![]() Hanne wrote:
Hanne wrote:
Jeg ved simpel hen ikke hvordan den kile skal strikkes
01.09.2014 - 14:32
|
|
Bernardita#bernarditaneckwarmer |
|
|
|
|
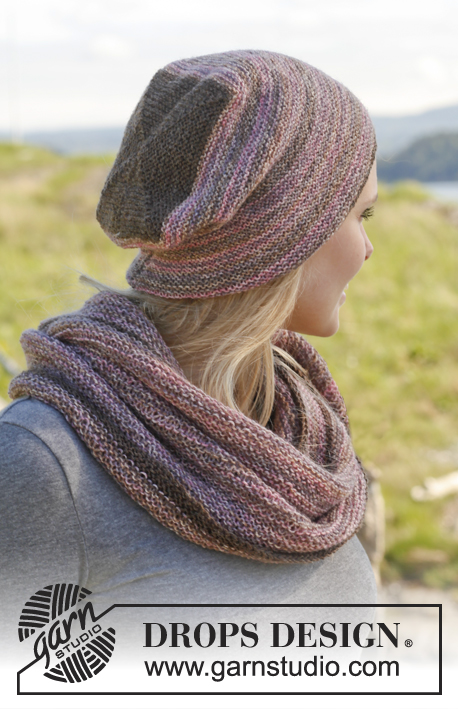
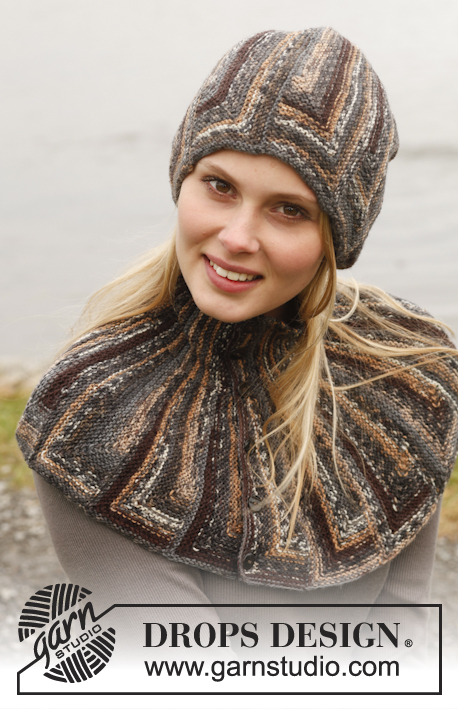
Knitted DROPS neck warmer with domino squares and short rows in ”Fabel”. Size: S - XXXL.
DROPS 151-40 |
|
|
DOMINO SQUARE: Insert 1 marker in the middle st. Row 1 (= WS): K all sts. Row 2 (= RS): K until 1 st remains before st with marker, slip 1 st as if to K, K 2 tog, psso, K the rest of row. Repeat 1st and 2nd row, i.e. dec 2 sts in the middle of the square on every other row until 1 st remains, cut the yarn and pull it through remaining st. SHORT ROWS: Work short rows as follows - first row is worked from WS: Work 3 sts, turn and work back. Work 6 sts, turn and work back. Continue like this (work 3 sts more on every turn) until 2 rows have been worked over all sts. Work 66-78-93 sts, turn and work back. Work 63-75-90 sts, turn and work back. Continue like this (work 3 sts less on every turn) until 2 rows have been worked over only the first 3 sts on needle. Work 1 row over all sts. Work 91-107-127 rows in total at the widest. BUTTONHOLES: Dec for buttonholes on a row from RS. Work a row until 7 sts remain on needle, K the next 2 sts tog, 1 YO, K 5. Dec for buttonholes when domino square measures (measured along the side, not in the middle of square): SIZE S/M: 16, 22 and 28 cm / 6¼", 8¾" and 11" SIZE L/XL: 20, 28 and 34 cm / 8", 11" and 13½" SIZE XL/XXL: 24, 32 and 40 cm / 9½", 12½" and 15¾" ---------------------------------------------------------- NECK WARMER: 1ST SQUARE: Cast on 139-163-193 sts on circular needle size 3.5 mm / US 4 with Fabel. Work DOMINO SQUARE back and forth on needle - see explanation above. 2ND SQUARE: Cast on 70-82-97 new sts on needle, from RS pick up 69-81-96 sts along right side on the first domino square = 139-163-193 sts. Work DOMINO SQUARE back and forth on needle. 3RD "SQUARE": Pick up 69-81-96 sts from RS along upper right side on the second domino square. Then work SHORT ROWS - see explanation above. 4TH SQUARE: Work the 69-81-96 sts on needle (from RS), cast on 70-82-97 new sts at the end of row = 139-163-193 sts. Work Domino square AT THE SAME TIME dec for BUTTONHOLES - see explanation above: ASSEMBLY: Sew buttons on to first Domino square, place them approx. 12 – 17 cm / 4¾"-6¾" in from the side, see picture. |
|
Have you finished this pattern?Tag your pictures with #dropspattern #bernarditaneckwarmer or submit them to the #dropsfan gallery. Do you need help with this pattern?You'll find 11 tutorial videos, a Comments/Questions area and more by visiting the pattern on garnstudio.com. © 1982-2026 DROPS Design A/S. We reserve all rights. This document, including all its sub-sections, has copyrights. Read more about what you can do with our patterns at the bottom of each pattern on our site. |


With over 40 years in knitting and crochet design, DROPS Design offers one of the most extensive collections of free patterns on the internet - translated to 17 languages. As of today we count 324 catalogs and 12290 patterns - 12280 of which are translated into English (US/in).
We work hard to bring you the best knitting and crochet have to offer, inspiration and advice as well as great quality yarns at incredible prices! Would you like to use our patterns for other than personal use? You can read what you are allowed to do in the Copyright text at the bottom of all our patterns. Happy crafting!
Post a comment to pattern DROPS 151-40
We would love to hear what you have to say about this pattern!
If you want to leave a question, please make sure you select the correct category in the form below, to speed up the answering process. Required fields are marked *.