
Popular categories
Looking for a yarn?


Comments / Questions (135)
![]() Lis Jensen wrote:
Lis Jensen wrote:
Jeg kan ikke forstå arbejdet med ærmerne det er ikke tydeligt nok for mig
21.09.2018 - 16:48
![]() Gwladys wrote:
Gwladys wrote:
Bonjour, Taille 6/8, tour 14, j'aurai voulu savoir s'il fallait crocheter les 23 brides dans les mailles chaînettes ou autour des mailles chaînettes? Merci
19.09.2018 - 06:56DROPS Design answered:
Bonjour Gwladys, je crochèterai dans les mailles en l'air des emmanchures pour que les coutures des manches soient plus simples à faire par la suite. Bon crochet!
19.09.2018 - 10:09
![]() Christine Levant wrote:
Christine Levant wrote:
Bonsoir!oui mes emmanchures sont faites!
02.09.2018 - 22:55
![]() Angela wrote:
Angela wrote:
Hallo.Ich möchte nun die Vorderteile häkeln,habe oben aber mehr als 30 Maschen bei der Grösse 3-5 Jahre. Es sind zwar insgesamt in der letzten Runde 180 Maschen,aber wenn ich in den Reihen 14-17 gleichmäßig 10 M zunehme,sind am Kragen mehr Maschen. Hätte ich erst nach den 30 Maschen mit den Zunahmen beginnen müssen? Mit dem Diagramm komme ich überhaupt nicht klar. Danke .Angela
31.08.2018 - 15:17DROPS Design answered:
Liebe Angela, die Anleitung is so kalkuliert mit 180 bei der letzten Runde im Kreis, dann haben Sie oben am Neck 30 M + unten 30 M und je 60 M für jeden Vorderteil = 180 M. Kragen gehört zu den 30 M vom Kreis oben. Dann häkeln Sie die beiden Vorderteile separat mit den Zunnahmen. Damit können Sie dann nach Ihrer Maschenprobe anpassen. Viel Spaß beim häkeln!
04.09.2018 - 11:47
![]() Christine Levant wrote:
Christine Levant wrote:
Bonjour.pouvez vous m'aider ?
24.08.2018 - 10:37
![]() Christine Levant wrote:
Christine Levant wrote:
Bonsoir.vous allez dire que je suis bête mais bon!je fais le gilet en taille 3/5 ans.j'ai terminé mon cercle et je dois faire le côté droit ou gauche peu importe.Je ne comprend 'pas où je dois reprendre pour faire ces devants!merci de maider
19.08.2018 - 22:52DROPS Design answered:
Bonjour Christine! Ditez-moi si vous avez deja fait des trous pour les emmanchures et je vais vous repondre tout de suite.
24.08.2018 - 16:05
![]() Christine Levant wrote:
Christine Levant wrote:
Merci
17.08.2018 - 11:01
![]() Christine Levant wrote:
Christine Levant wrote:
Bonsoir.Je suis au tour 14 du devant et je ne comprend pas où je dois faire les dix augmentations!merci de bien vouloir m\'aider !
15.08.2018 - 21:50DROPS Design answered:
Bonjour Mme Levant, vous trouverez ici comment augmenter à intervalles réguliers. Bon crochet!
16.08.2018 - 10:05
![]() Yvonne wrote:
Yvonne wrote:
Liebes Team! Ich möchte dieses Stück gerne für meine Tochter häkeln und werde einen Bobbel kaufen. Könnt ihr mir bitte sagen, wieviel Meter ich für den Korpus und wieviel für je einen Ärmel brauche? Gramm helfen mir in diesem Fall nicht! Brauche wirklich die Laufmeter des Garns! Danke im Voraus! Liebe Grüße Yvonne
19.05.2018 - 00:06DROPS Design answered:
Liebe Yvonne, wir bitten um Verständnis, dass wir nicht Produkte unserer Konkurrenz empfehlen können und dass der Kauf des Materials uns hilft, weiterhin kostenlose Anleitungen zur Verfügung stellen zu können.
22.05.2018 - 08:19
![]() Lidia wrote:
Lidia wrote:
Witam, nadal nie bardzo rozumiem, robiąc przekrój rękawa omijam 21 słupków i wykonuję łańcuszek a w następnym rzędzie wrabiam na łańcuszku 23 słupki co daje 44 słupki w przekrój rękawa. wykonując rękaw natomiast otrzymam (po zszyciu) "tubę" której obwód na początku to 25 słupków (wrobionych w łańcuszek początkowy). Jak mam przeszyć rękaw (25 słupków) do przekroju rękawa (44 słupki)?
12.01.2018 - 16:38DROPS Design answered:
Witaj Lidio, rękaw jest przerabiany od góry do dołu. Zaczynamy od góry rękawa (wyśrodkować), następnie dodajemy oczka z każdej strony aż do dolnej części podkroju rękawa (pacha) (37 o. w rozmiarze 6/8 lat), dalej zamykamy oczka co 6 rzędów, jak w opisie. Na koniec rękaw jest zszywany. Miłej robótki!
15.01.2018 - 18:27
|
|
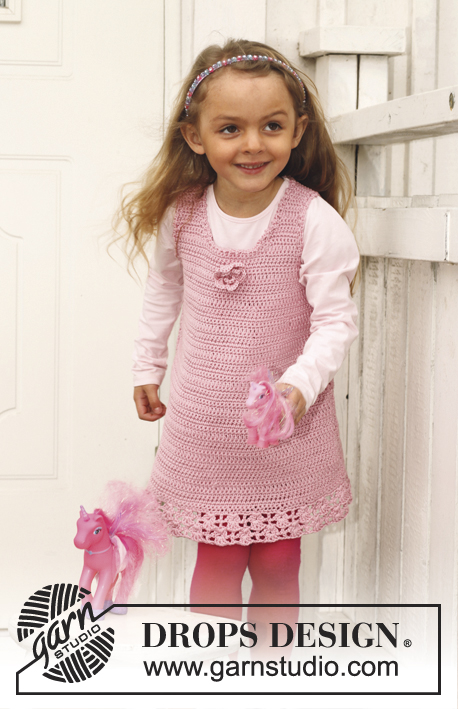
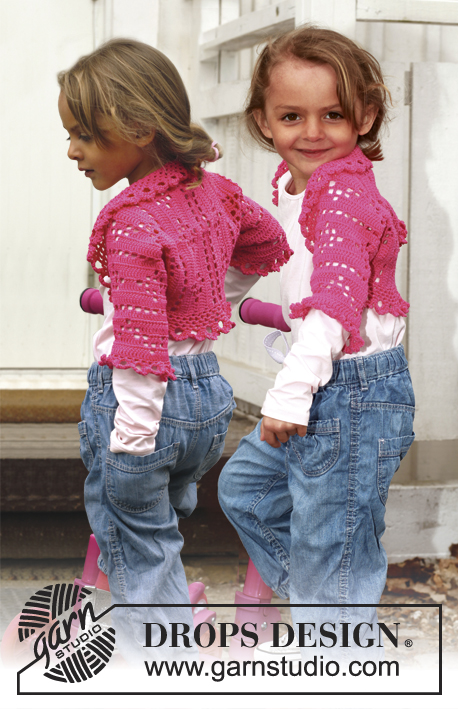
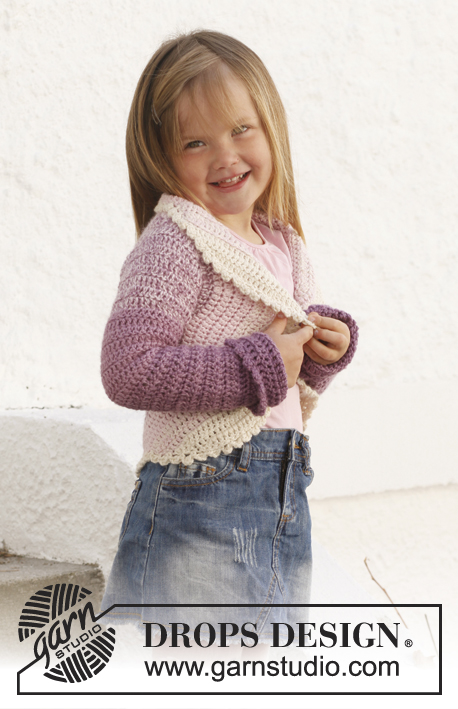
Princess Petal#princesspetalcardigan |
|
 |
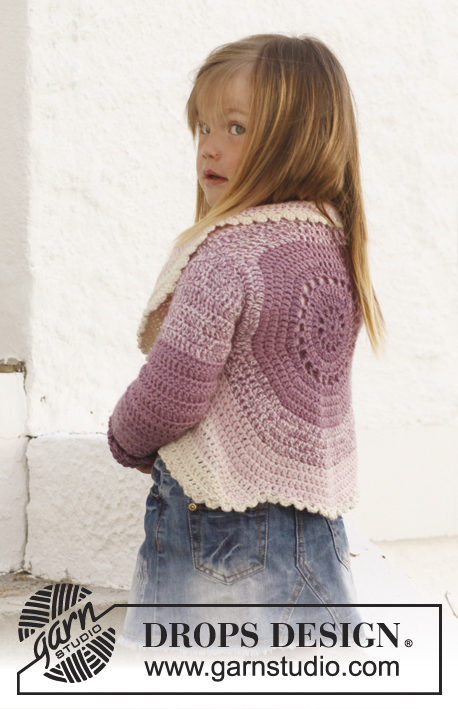 |
Circle jacket crocheted in 2 strands DROPS BabyAlpaca Silk. Size children 3 - 12 years.
DROPS Children 24-1 |
|
|
STRIPES - BODY: Worked in a circle from mid back. Beg with 2 strands of color 4088. Continue as follows: 3-3-4-4 rounds with 2 strands of color 4088. 3-3-4-4 rounds with 1 strand of color 4088 + 1 strand of color 3250. 3-4-4-4 rounds with 2 strands of color 3250. 4-4-4-5 rounds with 1 strand of color 3250 + 1 strand of color 3125. 4-4-4-5 rounds with 2 strands of color 3125. 3-4-4-4 rounds/rows with 1 strand of color 3125 + 1 strand of color 0100. 3-3-5-5 rows with 2 strands of color 0100. STRIPES - SLEEVE: Worked from sleeve cap and down in stripes as follows: Beg with 1 strand of color 3250 + 1 strand of color 3125. Work 9-10-11-12 cm / 3½"-4"-4½"-4 3/4" with this color combination. Continue with 9-10-11-12 cm / 3½"-4"-4½"-4 3/4" with 2 strands of color 3250 and then 10-10-11-12 cm / 4"-4"-4½"-4 3/4" with 1 strand of color 4088 + 1 strand of color 3250. Then finish the sleeve with 2 strands of color 4088 = approx. 10-11-12-12 cm / 4"-4½"-4 3/4"-4 3/4". CROCHET INFO: Replace first dc on every round/row with 3 ch. Finish every round with 1 sl st in 3rd ch from beg of round. DECREASE TIP 1 (applies to body): Dec as follows: Work dc until 3 dc remain, * in the first of these work 1 hdc, in the next 1 sc and in the last 1 sl st, turn with ch 1, skip sl st, work 1 sl st in sc, 1 sc in hdc, 1 hdc in first dc, continue with dc until 3 dc remain at the end of row *, repeat from *-* until 6-7-7-7 rows have been worked in total. DECREASE TIP 2 (applies to sleeves): Dec 1 dc at beg and end of row by working the second and third dc tog and the 2 next to last dc tog, this is done as follows: Work 1 dc in first dc but wait with last pull through, work 1 dc in next dc but on last pull through, pull yarn through all 3 loops on hook. -------------------------------------------------------- BODY: Worked in the round in a circle from mid back with 2 strands and STRIPES – see explanation above. Ch 5 on hook size 5 mm / H/8 and form a ring with 1 sl st in first ch. READ CROCHET INFO! ROUND 1: 12 dc in ch-ring. ROUND 2: 1 dc, * ch 2, 1 dc in next dc *, repeat from *-* the entire round, finish with 2 ch and 1 sl st in 1st dc = 12 dc with 2 ch between each. ROUND 3: 1 dc in every dc and 2 dc in every ch-space the entire round = 36 dc. ROUND 4: * 1 dc in each of the first 2 dc, 2 dc in next dc *, repeat from *-* the entire round = 48 dc. ROUND 5: 1 dc, * ch 2, skip 1 dc, 1 dc in next dc *, repeat from *-* the entire round, finish with 2 ch and 1 sl st in 1st dc = 24 dc with 2 ch between each. ROUND 6: 1 dc in every dc and 2 dc in every ch-space the entire round = 72 dc. ROUND 7: Work 1 dc in every dc but in every 6th dc work 2 dc = 84 dc. ROUND 8: Work 1 dc in every dc but in every 7th dc work 2 dc = 96 dc. ROUND 9: Work 1 dc in every dc but in every 8th dc work 2 dc = 108 dc. ROUND 10: Work 1 dc in every dc but in every 9th dc work 2 dc = 120 dc. ROUND 11: Work 1 dc in every dc but in every 10th dc work 2 dc = 132 dc. Piece measures approx. 14 cm / 5½'' from the middle to edge. SIZE 3/5 YEARS: ROUND 12: Work 1 dc in each of the first 30 dc (= up towards neck), ch 22 loosely, skip the next 20 dc (= armhole), then work 1 dc in each of the next 62 dc (= down towards back), ch 22 loosely, skip the next 20 dc (= armhole) and fasten with 1 sl st in first dc at beg of round. ROUND 13: Work 1 dc in each of the first 30 dc but inc 2 dc evenly (= 32 dc), then work 22 dc in ch-row over armhole, work 1 dc in each of the next 62 dc but inc 2 dc evenly (= 64 dc), work 22 dc in ch-row over armhole, and fasten with 1 sl st in first dc at beg of round = 140 dc. ROUND 14 to 17: Continue with dc – at the same time inc 10 dc evenly on every round. After 17th round there are 180 dc on round and piece measures approx. 21 cm / 8 1/4'' from the middle to edge. Fasten off. Then work only over 60 dc in each side - i.e. the 30 dc at the top by neck and the 30 dc at the bottom of back are no longer worked. Continue with explanation below front piece. SIZE 6/8 YEARS: ROUND 12: Work 1 dc in every dc but in every 11th dc work 2 dc = 144 dc. ROUND 13: Work 1 dc in each of the first 35 dc (= up towards neck), ch 23 loosely, skip the next 21 dc (= armhole), then work 1 dc in each of the next 67 dc (= down towards back), ch 23 loosely, skip the next 21 dc (= armhole) and fasten with 1 sl st in first dc at beg of round. ROUND 14: Work 1 dc in each of the first 35 dc but inc 3 dc evenly (= 38 dc), then work 23 dc in ch-row over armhole, work 1 dc in each of the next 67 dc but inc 3 dc evenly (= 70 dc), work 23 dc in ch-row over armhole, and fasten with 1 sl st in first dc at beg of round = 154 dc. ROUND 15 to 19: Continue with dc – at the same time inc 10 dc evenly on every round. After 19th round there are 204 dc on round and piece measures approx. 23 cm / 9'' from the middle to edge. Fasten off. Then work only over 68 dc in each side - i.e. the 34 dc at the top by neck and the 34 dc at the bottom of back are no longer worked. Continue with explanation below front piece. SIZE 9/10 YEARS: ROUND 12: Work 1 dc in every dc but in every 11th dc work 2 dc = 144 dc. ROUND 13: Work 1 dc in every dc but in every 12th dc work 2 dc = 156 dc. ROUND 14: Work 1 dc in each of the first 38 dc (= up towards neck), ch 25 loosely, skip the next 23 dc (= armhole), then work 1 dc in each of the next 72 dc (= down towards back), ch 25 loosely, skip the next 23 dc (= armhole) and fasten with 1 sl st in first dc at beg of round. ROUND 15: Work 1 dc in each of the first 38 dc but inc 3 dc evenly (= 41 dc), then work 25 dc in ch-row over armhole, work 1 dc in each of the next 72 dc but inc 3 dc evenly (= 75 dc), work 25 dc in ch-row over armhole, and fasten with 1 sl st in first dc at beg of round = 166 dc. ROUND 16 to 21: Continue with dc – at the same time inc 10 dc evenly on every round. After 21st round there are 226 dc on round and piece measures approx. 26 cm / 10 1/4'' from the middle to edge. Fasten off. Then work only over 74 dc in each side - i.e. the 39 dc at the top by neck and the 39 dc at the bottom of back are no longer worked. Continue with explanation below front piece. SIZE 11/12 YEARS: ROUND 12: Work 1 dc in every dc but in every 11th dc work 2 dc = 144 dc. ROUND 13: Work 1 dc in every dc but in every 12th dc work 2 dc = 156 dc. ROUND 14: Work 1 dc in every dc but in every 13th dc work 2 dc = 168 dc. ROUND 15: Work 1 dc in each of the first 42 dc (= up towards neck), ch 27 loosely, skip the next 25 dc (= armhole), then work 1 dc in each of the next 76 dc (= down towards back), ch 27 loosely, skip the next 25 dc (= armhole) and fasten with 1 sl st in first dc at beg of round. ROUND 16: Work 1 dc in each of the first 42 dc but inc 4 dc evenly (= 46 dc), then work 27 dc in ch-row over armhole, work 1 dc in each of the next 76 dc but inc 4 dc evenly (= 80 dc), work 27 dc in ch-row over armhole, and fasten with 1 sl st in first dc at beg of round = 180 dc. ROUND 17 to 23: Continue with dc – at the same time inc 10 dc evenly on every round. After 23rd round there are 250 dc on round and piece measures approx. 28 cm / 11'' from the middle to edge. Fasten off. Then work only over 83 dc in each side - i.e. the 42 dc at the top by neck and the 42 dc at the bottom of back are no longer worked. Continue with explanation below front piece. LEFT FRONT PIECE - ALL SIZES: = 60-68-74-83 dc. Insert 1 marker after 18-20-22-24 sts in from each side (= 24-28-30-35 sts between markers). Then work stripes and dc back and forth while AT THE SAME TIME inc 1 st at each marker on every row (i.e. inc 2 dc on row - inc alternately before and after each marker outwards) until a total of 6-6-8-8 rows have been worked back and forth and AT THE SAME TIME work according to DECREASE TIP 1 Fasten off. RIGHT FRONT PIECE: Work same way as on left front piece over 60-68-74-83 dc in right side. SLEEVE: Worked back and forth from sleeve cap and down - see STRIPES - SLEEVE above. Ch 24-27-28-34 LOOSELY with 1 strand of color 3250 + 1 strand of color 3125. ROW 1: Turn and work 1 dc in 4th ch from hook (the first 3 ch = 1 dc), then work 1 dc in every ch the entire row = 22-25-26-32 dc. Turn piece. ROW 2: ch 3 + 2 dc in first dc, 1 dc in every dc until last dc and 3 dc in last dc = 26-29-30-36 dc. Turn piece. ROW 3: ch 3 + 1 dc in first dc, 1 dc in every dc until 1 dc remains and 2 dc in last dc. Turn piece. Work 1-1-2-2 more rows as 3rd row = 30-33-36-42 dc. NEXT ROW: ch 3 + 2 dc in first dc, 1 dc in every dc until last dc and 3 dc in last dc = 34-37-40-46 dc. Turn piece. Now work 1 dc in every dc until piece measures 7-8-9-10 cm / 2 3/4"-3"-3½"-4". Continue with dc while AT THE SAME TIME dec 1 dc in each side - SEE DECREASE TIP! Repeat dec every 8th-6th-5th-4th row 2-3-4-6 more times = 28-29-30-32 dc. Continue with 1 dc in every dc until sleeve measures 38-41-45-48 cm / 15"-16"-17 3/4"-19". Fasten off. ASSEMBLY: Sew sleeve seams edge to edge to avoid a chunky seam. Work 1 round around the entire body as follows with 2 strands of color 0100: 1 sl st in first st, * ch 3, 1 dc in first ch (= 1 picot), skip 1 dc, fasten with 1 sc in next st *, repeat from *-* the entire round and finish with 1 sl st in first sl st. Sew sleeves in body - make sure that sleeve cap is sewn in at the top of armholes, i.e. where the distance is shortest. Work an edge around the sleeves the same way as around body but with 2 strands of color 4088. |
|
 |
|
Have you finished this pattern?Tag your pictures with #dropspattern #princesspetalcardigan or submit them to the #dropsfan gallery. Do you need help with this pattern?You'll find 8 tutorial videos, a Comments/Questions area and more by visiting the pattern on garnstudio.com. © 1982-2026 DROPS Design A/S. We reserve all rights. This document, including all its sub-sections, has copyrights. Read more about what you can do with our patterns at the bottom of each pattern on our site. |
|


With over 40 years in knitting and crochet design, DROPS Design offers one of the most extensive collections of free patterns on the internet - translated to 17 languages. As of today we count 324 catalogs and 12272 patterns - 12262 of which are translated into English (US/in).
We work hard to bring you the best knitting and crochet have to offer, inspiration and advice as well as great quality yarns at incredible prices! Would you like to use our patterns for other than personal use? You can read what you are allowed to do in the Copyright text at the bottom of all our patterns. Happy crafting!
Post a comment to pattern DROPS Children 24-1
We would love to hear what you have to say about this pattern!
If you want to leave a question, please make sure you select the correct category in the form below, to speed up the answering process. Required fields are marked *.