
Popular categories
Looking for a yarn?


Comments / Questions (427)
![]() Rachel wrote:
Rachel wrote:
I'm have problems trying to understand where and how to place the markers for the left and right front sections of the jacket, the numbers don't seem to add up right. Please could you be more specific as to where to count from in placing the markers and numbers of double trebles between. I am trying to make the L/XL size. I'd appreciate an answer as soon as possible as I'm travelling to Scotland in 2 weeks and was hoping to take the finished item with me. Thanks Rachel
31.08.2012 - 19:40DROPS Design answered:
Dear Rachel, you should have the front pieces each side from the neckline (above between armholes) and bottom of the back. You crochet separetely each part,back and forth with inc at markers and dec as stated under dec tips 1. Happy Crocheting!
29.11.2012 - 15:00Manisha Mahendra wrote:
Can you pls post a chart for the front piece.. it will be so much easier to follow
29.08.2012 - 18:27DROPS Design answered:
Dear Mrs Mahendra, just follow step by step the written explanation, should you need some personnal help with this pattern, please do not hesitate to contact your Drops shop. Happy Crocheting!
29.11.2012 - 15:13Manisha Mahendra wrote:
Can you pls post a chart for the front piece.. it will be so much easier to follow
08.08.2012 - 20:07
![]() Sommerhalder wrote:
Sommerhalder wrote:
Guten Tag Ich wollte bei der Jacke Drops 132-2 mit den Seitenteilen weiterfahren.Aber ich verstehe nicht, dass man über den 33 D-Stb.beids. immer bei den Markierungen 1M.aufn.muss,gleichzeitig aber am Anfang und am Schluss immer 3M. abk.muss??? Da komme ich nie auf 8Reihen mit 3M.ab Schluss. Gibt es eine Videoanleitung für dieses Häkelmodell?
06.08.2012 - 11:24DROPS Design answered:
Die deutsche Übersetzung war nicht exakt, wir haben jetzt korrigiert und entschuldigen uns dafür. Es sollen nicht 3 M übrig bleiben. Sie ketten über 8 R am Anfang und am Schluss jeder R je 3 M ab.
06.08.2012 - 20:47
![]() Linda wrote:
Linda wrote:
Once i tie off at row 19 where do I start counting to place the first marker? I love this sweater but need help understanding how to proceed. TIA
05.08.2012 - 22:18DROPS Design answered:
Dear Linda, you should have armholes on both sides and 35 sts at the top for neck and 35 sts at the bottom for back. Continue each front separately on the 79 sts in the middle of these both 35 sts. Happy knitting!
29.11.2012 - 15:50Manisha Mahendra wrote:
Hi i am making this jacket and got a little stuck at the front pieces.. i do crochet but this is the first time i am making a garment so pls bear with me.. how do i inc sts and decrease 3 at the same time... it has really baffled me to no end.. can you pls explain it to me? thanks so much
05.08.2012 - 11:42DROPS Design answered:
Dear Mrs Mahendra, for front pieces, you will inc at each marker working 2 sts in the stated st, and at the same time, you will dec each side following instructions under "dec tips 1". Happy crocheting!
29.11.2012 - 15:52
![]() Kitty wrote:
Kitty wrote:
Hoi, ben dit leuke vestje aan het maken, maar zit nu vast bij het begin van het linker voorpand. Ik snap de volgende zin niet: plaats een markeerder na de 23 st vanaf iedere kant middenvoor om de zijkanten aan te geven (33 st tussen de markeerders). Bij zitten er dan 46 st tussen. Waar lees ik het fout? Bedankt alvast voor je antwoord!
03.08.2012 - 21:18DROPS Design answered:
Hoi Kitty. Je hebt 79 dstk voor het voorpand. Je plaatst dan 1 st na 23 st aan elke zijde 79 - 23 - 23 = 33 st tussen de markeerders. Ik hoop dat je hiermee verder kan komen (of misschien ben je in de tussentijd er wel uit).
20.08.2012 - 15:32
![]() Anais wrote:
Anais wrote:
Bonjour, je bloque au 7ème rang : quand je remplace la DB par 4ml, je refait quand même une DB dans le premier arceau? un peu perdue...
21.07.2012 - 21:38DROPS Design answered:
Bonjour Anais, les 4 ml remplacent la 1ère DB elles doivent être au-dessus d'un arceau pour avoir 2 DB dans l'arceau suivant. Bon crochet !
24.07.2012 - 09:05Carol Coetzee wrote:
See comment below re 79 stitches. please help.
18.07.2012 - 14:08
![]() Carol Coetzee wrote:
Carol Coetzee wrote:
I have crocheted the main circle but am battling to figure out which 79 stitches form the left front. where do you start counting from? could you please advise urgently. thank you so much
18.07.2012 - 14:03DROPS Design answered:
Dear Mrs Coetzee, the 79 sts for each front piece should be each side from the 35 sts on the top = neckline and 35 sts on the bottom = back, with armholes matching one to the other. Happy crocheting!
30.11.2012 - 14:17
|
|
Wild Flower#wildflowercardigan |
|
 |
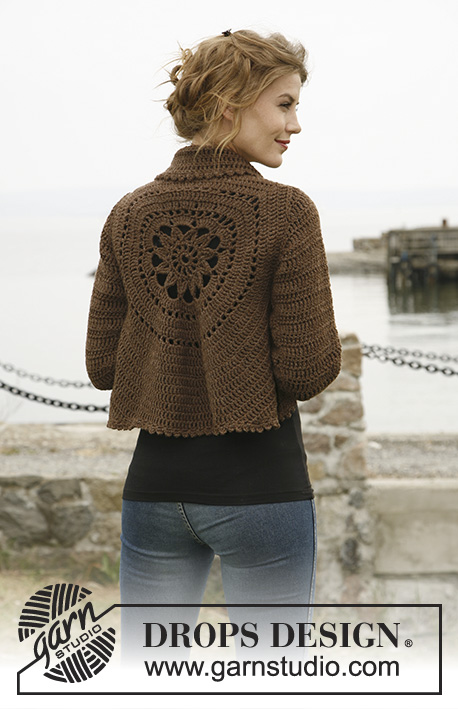 |
Crochet DROPS jacket worked in a circle in ”Nepal”. Size: S to XXXL
DROPS 132-2 |
|
|
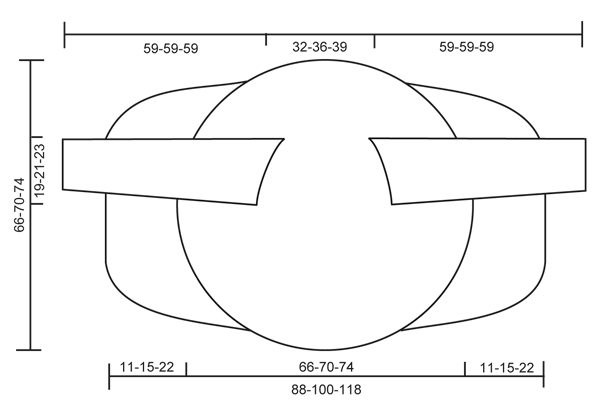
CROCHET TIP: Replace first tr on every round/row with ch 4. DECREASE TIP 1 (applies to the body): Dec as follows: Work tr until 3 tr remain, * in the first of these work 1 dc, in the next 1 hdc and in the last 1 sc, turn with ch 1, skip sc, work 1 sl st in hdc and 1 sl st in dc, then 1 sc in first tr, 1 hdc in next tr and 1 dc in next tr, work tr until 3 tr remain at end of row *, repeat from *-* until a total of 6-8-12 rows have been worked. DECREASE TIP 2 (applies to sleeve cap): Dec at beg of row by working sl st over the no of tr to be dec. Dec at end of row by working until same no of sts to be dec remains, turn piece. -------------------------------------------------------- -------------------------------------------------------- BODY: Worked in the round in a circle from mid back. Ch 8 on hook size 5 mm / H/8 with Nepal and form a ring with 1 sl st in first ch. ROUND 1: Work 12 sc in ch-ring, finish with 1 sl st in first sc. ROUND 2: ch 5 (= 1 dc + 2 ch), * 1 dc in next sc, ch 2 *, repeat from *-* the entire round and finish with 1 sl st in 3rd ch from beg of round = 12 dc with 2 ch between each. ROUND 3: 1 ch, continue to crochet as follows in every ch-space the entire round: 1 sc + ch 1 + 1 sc + ch 1, finish round with 1 sl st in first ch = 24 sc with 1 ch between each. ROUND 4: 1 sl st in first sc, 1 sl st in first ch, ch 5, 1 dtr in same ch, * ch 7, then work 4 dtr tog as follows: Work 2 dtr in same ch as last dtr but wait with last YO and pull through on both dtr, skip 1 sc + 1 ch + 1 sc, work 1 dtr in next ch but wait with last YO and pull through, then work last dtr in same ch and pull last YO through all 5 sts on hook *, repeat from *-* a total of 11 times, ch 7, work 2 dtr tog in same ch (but wait with last YO and pull through on both), work 1 sl st in 5th ch from beg of round and pull thread through all 3 sts on hook. ROUND 5: 1 sl st in first ch-space, ch 4 (= 1 tr), 7 tr in same ch-space, then work 8 tr in every ch-space, finish with 1 sl st in 4th ch from beg of round = a total of 96 tr. ROUND 6: ch 5 (= 1 dc + 2 ch), * skip 1 tr, 1 dc in next tr, ch 2 *, repeat from *-* the entire round and finish with 1 sl st in 3rd ch from beg of round = 48 ch-spaces. ROUND 7 – READ CROCHET TIP: Work 1 tr in every dc and work 1 and 2 tr alternately in every ch-space the entire round = 120 tr. ROUND 8: Work 1 tr in every tr but work 2 tr in every 10th tr = 132 tr. ROUND 9: ch 5 (= 1 dc + 2 ch), * skip 1 tr, 1 dc in next tr, ch 2 *, repeat from *-* the entire round and finish with 1 sl st in 3rd ch from beg of round = 66 ch-spaces. ROUND 10: Work 1 tr in every dc and work 1 and 2 tr alternately in every ch-space the entire round = 165 tr. ROUND 11: Work 1 tr in every tr but work 2 tr in every 15th tr = 176 tr. ROUND 12: Work 1 tr in every tr but work 2 tr in every 16th tr = 187 tr. Piece measures approx. 20 cm / 8" from center and outwards. SIZE S/M: ROUND 13: ch 1, then work 1 sc in each of the first 45 tr (= up towards neck), ch 30 loosely, skip the next 27 tr (= armhole), then work 1 sc in each of the next 88 tr (= down towards back), ch 30 loosely, skip the next 27 tr (= armhole) and fasten with 1 sl st in first sc on round. ROUND 14: Work 1 tr in every sc - but inc 2 tr evenly over the first 45 sc (= 47 tr), then work 30 tr in ch-row over armhole, work 1 tr in every sc – but inc 3 tr evenly over the bottom 88 sc (= 91 tr), and work 30 tr in ch-row over armhole = 198 tr. ROUND 15 to 19: Continue with tr – while at the same time inc 6 tr evenly on every round. After 19th round there are 228 tr on the round and piece measures approx. 33 cm / 13" from center and outwards. Continue working only over 79 tr in each side – i.e. do not work over 35 tr at top by neck or 35 tr at bottom of back. Continue with explanation under FRONT PIECE. SIZE L/XL: ROUND 13: Work 1 tr in every tr but work 2 tr in every 17th tr = 198 tr. ROUND 14: ch 1, then work 1 sc in each of the first 50 tr (= up towards neck), ch 32 loosely, skip the next 29 tr (= armhole), then work 1 sc in each of the next 90 tr (= down towards back), ch 32 loosely, skip the next 29 tr (= armhole) and fasten with 1 sl st in first sc on round. ROUND 15: Work 1 tr in every sc - but inc 3 tr evenly over the first 50 sc (= 53 tr), then work 32 tr in ch-row over armhole, work 1 tr in every sc – but inc 3 tr evenly over the bottom 90 sc (= 93 tr), and work 32 tr in ch-row over armhole = 210 tr. ROUND 16 to 20: Continue with tr – while at the same time inc 6 tr evenly on every round. After 20th round there are 240 tr on the round and piece measures approx. 35 cm / 13¾" from center and outwards. Continue working only over 81 tr in each side – i.e. do not work over 39 tr at top by neck or 39 tr at bottom of back. Continue with explanation under FRONT PIECE. SIZE XXL and XXXL: ROUND 13: Work 1 tr in every tr but work 2 tr in every 17th tr = 198 tr. ROUND 14: Work 1 tr in every tr but work 2 tr in every 18th tr = 209 tr. ROUND 15: ch 1, then work 1 sc in each of the first 54 tr (= up towards neck), ch 36 loosely, skip the next 32 tr (= armhole), then work 1 sc in each of the next 91 tr (= down towards back), ch 36 loosely, skip the next 32 tr (= armhole) and fasten with 1 sl st in first sc on round. ROUND 16: Work 1 tr in every sc - but inc 2 tr evenly over the first 54 sc (= 56 tr), then work 36 tr in ch-row over armhole, work 1 tr in every sc – but inc 3 tr evenly over the bottom 91 sc (= 94 tr), and work 36 tr in ch-row over armhole = 222 tr. ROUND 17 to 22: Continue with tr – while at the same time inc 6 tr evenly on every round. After 22nd round there are 258 tr on the round and piece measures approx. 37 cm / 14½" from center and outwards. Continue working only over 89 tr in each side – i.e. do not work over 40 tr at top by neck or 40 tr at bottom of back. Continue with explanation under FRONT PIECE. LEFT FRONT PIECE - ALL SIZES: = 79-81-89 tr. Insert a marker after 23-24-27 sts in from each side (= 33-33-35 sts between markers). Then work tr back and forth over these sts while at the same time inc 1 st at every marker on every row (i.e. inc 2 sts on row, inc alternately before and after marker) and dec 3 sts at beg and end of every row in each side – SEE DECREASE TIP 1 until a total of 6-8-12 rows back and forth have been worked. RIGHT FRONT PIECE: Work same way as on left piece over 79-81-89 tr in right side. SLEEVE (worked back and forth): Ch 46-48-53 loosely (includes 4 ch to turn with) on hook size 5 mm / H/8 with Nepal. ROW 1: 1 tr in 5th ch from hook, 1 tr in each of the next 2-4-2 ch, * skip ch 1, 1 tr in each of the next 6 ch *, repeat from *-* until 4 ch remain, skip 1 ch and work 1 tr in each of the last 3 ch = 37-39-43 tr. ROW 2: 1 tr in every tr – READ CROCHET TIP! ROW 3: ch 6 (= 1 tr + 2 ch), skip 1 tr, 1 tr in next tr, * ch 2, skip 1 tr, 1 tr in next tr *, repeat from *-* the entire row = 18-19-21 ch-spaces. ROW 4: Work 1 tr in every tr and 1 tr in every ch-space = 37-39-43 tr. Repeat row 2-4 a total of 3 times. Piece measures approx. 18 cm / 7". Then work tr on all rows until finished measurements, while at the same time inc as follows: SIZE S/M: * Inc 1 tr in one side by working 2 tr in next to last tr. On next row inc 1 tr in the other side the same way. Inc 1 more time the same way in each side, then work 1 row without inc *, repeat from *-* a total of 3 times = 12 inc = 49 tr. SIZE L/XL + XXL/XXXL: * Inc 1 tr in one side by working 2 tr in next to last tr. On next row inc 1 tr in the other side the same way *, repeat from *-* a total of 8 times = 16 inc = 55-59 tr. ALL SIZES: Continue to work until piece measures 49 cm / 19¼" in all sizes. Now dec on every row in each side for sleeve cap – SEE DECREASE TIP 2: 3 tr 1 time, 2 tr 3 times and 3 tr 1 time = 25-31-35 tr remain at the top. Fasten off. ASSEMBLY: Sew sleeve seams tog edge to edge to avoid a chunky seam. Work 1 round around the entire body and at bottom of sleeves as follows: * ch 5, 1 dc in first ch, skip 1 st, fasten with 1 sc in next st *, repeat from *-* the entire round and finish with 1 sl st in first ch. Sew in the sleeves. If desired, close the jacket with a pin or sew on a button on to left front piece (try the jacket on to see where button should be) and button it in crochet edge. |
|
 |
|
Have you finished this pattern?Tag your pictures with #dropspattern #wildflowercardigan or submit them to the #dropsfan gallery. Do you need help with this pattern?You'll find 9 tutorial videos, a Comments/Questions area and more by visiting the pattern on garnstudio.com. © 1982-2026 DROPS Design A/S. We reserve all rights. This document, including all its sub-sections, has copyrights. Read more about what you can do with our patterns at the bottom of each pattern on our site. |
|


With over 40 years in knitting and crochet design, DROPS Design offers one of the most extensive collections of free patterns on the internet - translated to 17 languages. As of today we count 324 catalogs and 12290 patterns - 12280 of which are translated into English (US/in).
We work hard to bring you the best knitting and crochet have to offer, inspiration and advice as well as great quality yarns at incredible prices! Would you like to use our patterns for other than personal use? You can read what you are allowed to do in the Copyright text at the bottom of all our patterns. Happy crafting!
Post a comment to pattern DROPS 132-2
We would love to hear what you have to say about this pattern!
If you want to leave a question, please make sure you select the correct category in the form below, to speed up the answering process. Required fields are marked *.