
Popular categories
Looking for a yarn?


Comments / Questions (427)
![]() G Van Son wrote:
G Van Son wrote:
Hoe weet ik welke maat ik moeten gaan haken, mijn confectie maat is 42. bvd G v son
12.11.2012 - 19:58DROPS Design answered:
Normaal zou dit ongeveer maat L/XL zijn. Maar kijk onderaan het patroon. Hier vindt u een maattekening met de afmetingen in cm. U kunt hier vergelijken met uw eigen afmetingen en uw maat kiezen.
13.11.2012 - 11:50
![]() Catherine Raymont wrote:
Catherine Raymont wrote:
Same comment as Christine please help I don't get the increase for the body. Thanks
08.11.2012 - 15:20
![]() Christine wrote:
Christine wrote:
Please post a video to show how to do front pieces, I have tried and tried but I just don't get the increase and decrease at the same time. Thanks
28.10.2012 - 16:55DROPS Design answered:
Dear Christine, we forwarded this input to our video team.
29.11.2012 - 11:27
![]() Tina wrote:
Tina wrote:
Could you make a video on how to do the front parts. I've seen the explanation, but I understand better with visuals.
23.10.2012 - 22:26DROPS Design answered:
Dear Tina, you have just to work on the indicated sts each side separately for both fronts parts following dec 1 to shape fronts and at the same time inc at markers as stated. Happy crocheting!
29.11.2012 - 14:18
![]() Coralie wrote:
Coralie wrote:
Bonjour, je suis bloquée au 19ème tour.Je ne sais pas à partir d'où compter les 35 mailles du haut puis les 79 mailles du côté. Est-ce à partir du milieu de l'encolure? Merci pour votre aide.
24.09.2012 - 22:09DROPS Design answered:
Bonjour Coralie, pour situer les mailles du milieu encolure dos et du côté, basez-vous sur les emmanchures, en pliant votre ouvrage en 2 si nécessaire. Les 35 m du haut = encolure dos, les 35 m du bas = bas de la veste. Bon crochet !
25.09.2012 - 10:02
![]() Mrs. Fossati wrote:
Mrs. Fossati wrote:
Mi scuso ma ancora non capisco da che punto bisogna iniziare a contare le 79 maglie, in quanto se parto a contarle da dove ho terminato l'ultimo giro, la parte davanti mi risulta molto più in basso di quanto dovrebbe essere vedendo il diagramma e, di conseguenza, l'altra parte mi verrebbe spostata in alto. calcolare il centro del collo ad occhio è abbastanza facile, volendo, ma non preciso. attendo ulteriori precisazioni, grazie.
21.09.2012 - 12:25DROPS Design answered:
E' complicato questo passaggio, ma cercherò di spiegare: finito il giro 12, si creano poi gli scalfi al giro 13. Qui è importante che il giro inizia appena sopra lo scalfo destro (visto da dietro)=le prime m. che si lavorano formano la parte da spalla a spalla in alto, si fa uno scalfo, poi le m. seguenti sono la parte sotto le maniche. In questo modo le 79 m. dovrebbero trovarsi automaticamente ai lati. se vuole può scrivere una mail a italy@garnstudio.com
22.09.2012 - 09:42
![]() Giagia Poloni wrote:
Giagia Poloni wrote:
Grazie . . . sono sempre molto impaziente di iniziare un lavoro, ancora di più di finirlo! :-) Ciao, Giagia
18.09.2012 - 06:05
![]() Giagia Poloni wrote:
Giagia Poloni wrote:
Ma c'è qualcuno che risponde dietro a questo schermo??? Grazie, Giagia
16.09.2012 - 07:21DROPS Design answered:
Chiedo scusa, ma ora ho risposto. Cordiali saluti.
16.09.2012 - 16:09
![]() Giagia Poloni wrote:
Giagia Poloni wrote:
Sto lavorando i due davanti, ma mi viene voglia di disfare . . . forse sbaglio qualcosa!:-) Chiedo, da dove partire a contare? Perchè se parto da dove ho chiuso la riga precedente (come ho fatto), il lavoro mi viene storto rispetto alle maniche. :-/ Grazie, Giagia Ps. Ho già lavorato altri vostri modelli (guanti a ventagli e i cestini del Kal di Primavera/estate, per esempio, mi sono trovata bene, vorrei finire questo gilet per una nipote e la parte centrale è venuta BENISSIMO! :-)
12.09.2012 - 08:11DROPS Design answered:
Chiedo scusa per non aver risposto prima. se lavora la taglia s/m: Continuare a lavorare solo sulle 79 m.a.d. di ogni lato – cioè non lavorare sulle 35 m.a.d. in alto verso il collo e in basso dietro...deve inserire un segno dopo 23 m contando dall'alto. Se guarda il diag, ci sono più m sotto la manica che sopra.
16.09.2012 - 15:58
![]() Mrs. Fossati wrote:
Mrs. Fossati wrote:
Ho problemi nel capire come fare il davanti destro e sinistro, dove posizionare i segnapunti e se gli aumenti e diminuzioni devono essere fatti sulla stessa riga, grazie.
11.09.2012 - 20:01DROPS Design answered:
Buonasera, dopo aver finito il corpo (davanti e dietro) ci sono 79-81.89 m.a.d. Il segno va inserito dopo 23-24-27 m contando dall'alto verso il basso e dal basso verso l'alto, poi si lavora avanti e indietro sulle m successive (33-33-35 m tra i segnapunti). Gli aumenti vanno fatti 2 su ogni riga, sempre sopra il segnapunti (alternando 1 volta prima e 1 volta dopo il segno).
16.09.2012 - 18:53
|
|
Wild Flower#wildflowercardigan |
|
 |
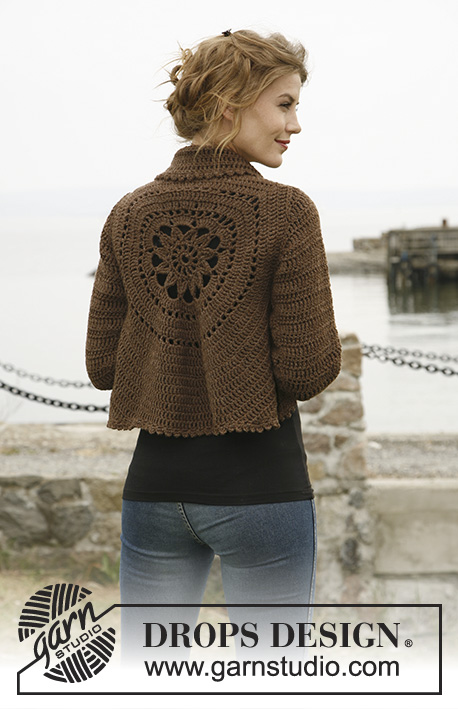 |
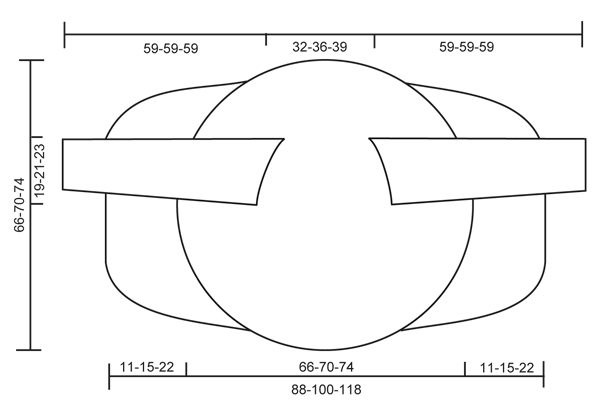
Crochet DROPS jacket worked in a circle in ”Nepal”. Size: S to XXXL
DROPS 132-2 |
|
|
CROCHET TIP: Replace first tr on every round/row with ch 4. DECREASE TIP 1 (applies to the body): Dec as follows: Work tr until 3 tr remain, * in the first of these work 1 dc, in the next 1 hdc and in the last 1 sc, turn with ch 1, skip sc, work 1 sl st in hdc and 1 sl st in dc, then 1 sc in first tr, 1 hdc in next tr and 1 dc in next tr, work tr until 3 tr remain at end of row *, repeat from *-* until a total of 6-8-12 rows have been worked. DECREASE TIP 2 (applies to sleeve cap): Dec at beg of row by working sl st over the no of tr to be dec. Dec at end of row by working until same no of sts to be dec remains, turn piece. -------------------------------------------------------- -------------------------------------------------------- BODY: Worked in the round in a circle from mid back. Ch 8 on hook size 5 mm / H/8 with Nepal and form a ring with 1 sl st in first ch. ROUND 1: Work 12 sc in ch-ring, finish with 1 sl st in first sc. ROUND 2: ch 5 (= 1 dc + 2 ch), * 1 dc in next sc, ch 2 *, repeat from *-* the entire round and finish with 1 sl st in 3rd ch from beg of round = 12 dc with 2 ch between each. ROUND 3: 1 ch, continue to crochet as follows in every ch-space the entire round: 1 sc + ch 1 + 1 sc + ch 1, finish round with 1 sl st in first ch = 24 sc with 1 ch between each. ROUND 4: 1 sl st in first sc, 1 sl st in first ch, ch 5, 1 dtr in same ch, * ch 7, then work 4 dtr tog as follows: Work 2 dtr in same ch as last dtr but wait with last YO and pull through on both dtr, skip 1 sc + 1 ch + 1 sc, work 1 dtr in next ch but wait with last YO and pull through, then work last dtr in same ch and pull last YO through all 5 sts on hook *, repeat from *-* a total of 11 times, ch 7, work 2 dtr tog in same ch (but wait with last YO and pull through on both), work 1 sl st in 5th ch from beg of round and pull thread through all 3 sts on hook. ROUND 5: 1 sl st in first ch-space, ch 4 (= 1 tr), 7 tr in same ch-space, then work 8 tr in every ch-space, finish with 1 sl st in 4th ch from beg of round = a total of 96 tr. ROUND 6: ch 5 (= 1 dc + 2 ch), * skip 1 tr, 1 dc in next tr, ch 2 *, repeat from *-* the entire round and finish with 1 sl st in 3rd ch from beg of round = 48 ch-spaces. ROUND 7 – READ CROCHET TIP: Work 1 tr in every dc and work 1 and 2 tr alternately in every ch-space the entire round = 120 tr. ROUND 8: Work 1 tr in every tr but work 2 tr in every 10th tr = 132 tr. ROUND 9: ch 5 (= 1 dc + 2 ch), * skip 1 tr, 1 dc in next tr, ch 2 *, repeat from *-* the entire round and finish with 1 sl st in 3rd ch from beg of round = 66 ch-spaces. ROUND 10: Work 1 tr in every dc and work 1 and 2 tr alternately in every ch-space the entire round = 165 tr. ROUND 11: Work 1 tr in every tr but work 2 tr in every 15th tr = 176 tr. ROUND 12: Work 1 tr in every tr but work 2 tr in every 16th tr = 187 tr. Piece measures approx. 20 cm / 8" from center and outwards. SIZE S/M: ROUND 13: ch 1, then work 1 sc in each of the first 45 tr (= up towards neck), ch 30 loosely, skip the next 27 tr (= armhole), then work 1 sc in each of the next 88 tr (= down towards back), ch 30 loosely, skip the next 27 tr (= armhole) and fasten with 1 sl st in first sc on round. ROUND 14: Work 1 tr in every sc - but inc 2 tr evenly over the first 45 sc (= 47 tr), then work 30 tr in ch-row over armhole, work 1 tr in every sc – but inc 3 tr evenly over the bottom 88 sc (= 91 tr), and work 30 tr in ch-row over armhole = 198 tr. ROUND 15 to 19: Continue with tr – while at the same time inc 6 tr evenly on every round. After 19th round there are 228 tr on the round and piece measures approx. 33 cm / 13" from center and outwards. Continue working only over 79 tr in each side – i.e. do not work over 35 tr at top by neck or 35 tr at bottom of back. Continue with explanation under FRONT PIECE. SIZE L/XL: ROUND 13: Work 1 tr in every tr but work 2 tr in every 17th tr = 198 tr. ROUND 14: ch 1, then work 1 sc in each of the first 50 tr (= up towards neck), ch 32 loosely, skip the next 29 tr (= armhole), then work 1 sc in each of the next 90 tr (= down towards back), ch 32 loosely, skip the next 29 tr (= armhole) and fasten with 1 sl st in first sc on round. ROUND 15: Work 1 tr in every sc - but inc 3 tr evenly over the first 50 sc (= 53 tr), then work 32 tr in ch-row over armhole, work 1 tr in every sc – but inc 3 tr evenly over the bottom 90 sc (= 93 tr), and work 32 tr in ch-row over armhole = 210 tr. ROUND 16 to 20: Continue with tr – while at the same time inc 6 tr evenly on every round. After 20th round there are 240 tr on the round and piece measures approx. 35 cm / 13¾" from center and outwards. Continue working only over 81 tr in each side – i.e. do not work over 39 tr at top by neck or 39 tr at bottom of back. Continue with explanation under FRONT PIECE. SIZE XXL and XXXL: ROUND 13: Work 1 tr in every tr but work 2 tr in every 17th tr = 198 tr. ROUND 14: Work 1 tr in every tr but work 2 tr in every 18th tr = 209 tr. ROUND 15: ch 1, then work 1 sc in each of the first 54 tr (= up towards neck), ch 36 loosely, skip the next 32 tr (= armhole), then work 1 sc in each of the next 91 tr (= down towards back), ch 36 loosely, skip the next 32 tr (= armhole) and fasten with 1 sl st in first sc on round. ROUND 16: Work 1 tr in every sc - but inc 2 tr evenly over the first 54 sc (= 56 tr), then work 36 tr in ch-row over armhole, work 1 tr in every sc – but inc 3 tr evenly over the bottom 91 sc (= 94 tr), and work 36 tr in ch-row over armhole = 222 tr. ROUND 17 to 22: Continue with tr – while at the same time inc 6 tr evenly on every round. After 22nd round there are 258 tr on the round and piece measures approx. 37 cm / 14½" from center and outwards. Continue working only over 89 tr in each side – i.e. do not work over 40 tr at top by neck or 40 tr at bottom of back. Continue with explanation under FRONT PIECE. LEFT FRONT PIECE - ALL SIZES: = 79-81-89 tr. Insert a marker after 23-24-27 sts in from each side (= 33-33-35 sts between markers). Then work tr back and forth over these sts while at the same time inc 1 st at every marker on every row (i.e. inc 2 sts on row, inc alternately before and after marker) and dec 3 sts at beg and end of every row in each side – SEE DECREASE TIP 1 until a total of 6-8-12 rows back and forth have been worked. RIGHT FRONT PIECE: Work same way as on left piece over 79-81-89 tr in right side. SLEEVE (worked back and forth): Ch 46-48-53 loosely (includes 4 ch to turn with) on hook size 5 mm / H/8 with Nepal. ROW 1: 1 tr in 5th ch from hook, 1 tr in each of the next 2-4-2 ch, * skip ch 1, 1 tr in each of the next 6 ch *, repeat from *-* until 4 ch remain, skip 1 ch and work 1 tr in each of the last 3 ch = 37-39-43 tr. ROW 2: 1 tr in every tr – READ CROCHET TIP! ROW 3: ch 6 (= 1 tr + 2 ch), skip 1 tr, 1 tr in next tr, * ch 2, skip 1 tr, 1 tr in next tr *, repeat from *-* the entire row = 18-19-21 ch-spaces. ROW 4: Work 1 tr in every tr and 1 tr in every ch-space = 37-39-43 tr. Repeat row 2-4 a total of 3 times. Piece measures approx. 18 cm / 7". Then work tr on all rows until finished measurements, while at the same time inc as follows: SIZE S/M: * Inc 1 tr in one side by working 2 tr in next to last tr. On next row inc 1 tr in the other side the same way. Inc 1 more time the same way in each side, then work 1 row without inc *, repeat from *-* a total of 3 times = 12 inc = 49 tr. SIZE L/XL + XXL/XXXL: * Inc 1 tr in one side by working 2 tr in next to last tr. On next row inc 1 tr in the other side the same way *, repeat from *-* a total of 8 times = 16 inc = 55-59 tr. ALL SIZES: Continue to work until piece measures 49 cm / 19¼" in all sizes. Now dec on every row in each side for sleeve cap – SEE DECREASE TIP 2: 3 tr 1 time, 2 tr 3 times and 3 tr 1 time = 25-31-35 tr remain at the top. Fasten off. ASSEMBLY: Sew sleeve seams tog edge to edge to avoid a chunky seam. Work 1 round around the entire body and at bottom of sleeves as follows: * ch 5, 1 dc in first ch, skip 1 st, fasten with 1 sc in next st *, repeat from *-* the entire round and finish with 1 sl st in first ch. Sew in the sleeves. If desired, close the jacket with a pin or sew on a button on to left front piece (try the jacket on to see where button should be) and button it in crochet edge. |
|
 |
|
Have you finished this pattern?Tag your pictures with #dropspattern #wildflowercardigan or submit them to the #dropsfan gallery. Do you need help with this pattern?You'll find 9 tutorial videos, a Comments/Questions area and more by visiting the pattern on garnstudio.com. © 1982-2026 DROPS Design A/S. We reserve all rights. This document, including all its sub-sections, has copyrights. Read more about what you can do with our patterns at the bottom of each pattern on our site. |
|


With over 40 years in knitting and crochet design, DROPS Design offers one of the most extensive collections of free patterns on the internet - translated to 17 languages. As of today we count 324 catalogs and 12290 patterns - 12280 of which are translated into English (US/in).
We work hard to bring you the best knitting and crochet have to offer, inspiration and advice as well as great quality yarns at incredible prices! Would you like to use our patterns for other than personal use? You can read what you are allowed to do in the Copyright text at the bottom of all our patterns. Happy crafting!
Post a comment to pattern DROPS 132-2
We would love to hear what you have to say about this pattern!
If you want to leave a question, please make sure you select the correct category in the form below, to speed up the answering process. Required fields are marked *.