
Popular categories
Looking for a yarn?


Comments / Questions (427)
![]() Sidhima wrote:
Sidhima wrote:
Hi, i have a question on the edging, the last step after crocheting the body and the sleeves... How do we go aboutit? For eg, i want to crochet the edge of the body, i start by chaining 5 through connecting the yarn anywhere at the edge of the body and then work the 1dc, skip 1 st of the chain and then 1sc on the 5 chain just crocheted and then ch5 again in the next stitch of the body and then continue accordingly?? Thanks
04.01.2013 - 23:27DROPS Design answered:
Dear Sidhima, you join the thread anwyhere in the circle (eg mid back of neck), then repeat *ch 5, dc 1 in 1st of the 5 ch, skip 1 st from the body/sleeve and sc 1 in next st from the body/sleeve*. Happy knitting!
05.01.2013 - 12:39
![]() Lucia wrote:
Lucia wrote:
Vorrei lavorare le maniche di questo giacchino riprendendo le maglie degli scalfi. Credo che vengano piu' rifinite senza cuciture:ho provato a farle come nella spiegazione e non mi piacciono.come devo regolarmi per le diminuzioni dato che dovro' lavorare a ritroso? Grazie.
02.12.2012 - 17:26DROPS Design answered:
Chiederemo ai designer DROPS.
04.12.2012 - 17:06
![]() Lucia wrote:
Lucia wrote:
Cosa vuol dire (per le maniche) lavorare 2 m.a.d.DALLA SUCCESSIVA ALL'ULTIMA M.A.D.- Devo fare nell'ultima maglia del giro 2 maglie? Grazie.
26.11.2012 - 12:19DROPS Design answered:
Non è chiarissimo. Ha ragione. L'ho cambiato: lavorare 2 m.a.d. nella penultima m.a.d.
28.11.2012 - 15:00
![]() Anita wrote:
Anita wrote:
Working on left front piece after 19th row. Do you start with a row of tr with 2 inc stitches and then do dec tip 1 in the last three stitches? Then continue to follow dec 1 tip so that the next row will have dec at both ends and inc in 2 spots?
26.11.2012 - 03:46DROPS Design answered:
Dear Anita, just continue in dc rows with 2 inc at markers and then dec tip 1 at the end of 1st row and begin of 2nd row, then end of 2nd row and begin of 3rd row etc... Happy Crocheting!
29.11.2012 - 14:04
![]() Debbie wrote:
Debbie wrote:
Having trouble understanding the directions for working the sides after round 20 for size large. I do nnot understand where the counting point begins to place the stitch markers. The joining point of the rounds appears to be on the shoulder.
24.11.2012 - 17:29DROPS Design answered:
Dear Debbie, after round 20 you will crochet each front piece separately on the 81 tr each side. On these sts, place 2 markers : 24 sts, marker, 33 sts, marker, 24 sts = 81 sts for front piece. Happy crocheting !
26.11.2012 - 09:43
![]() Lucia wrote:
Lucia wrote:
Si, ho fatto gli aumenti ma alla fine mi veniva un po' come la forma dei cappelli e cosi' ho scucito alcuni giri e ho fatto piu' aumenti.Va un po' meglio ma dovro' valutare quando avro' finito i due davanti.
24.11.2012 - 13:10
![]() Lucia wrote:
Lucia wrote:
Nel giacchino che io ho lavorato non si crea l'ondulazione dietro. Perche'?
22.11.2012 - 13:02DROPS Design answered:
Forse le ondulazioni nella foto dipendono un po' da come la modella lo indossi...cioè, aperta, senza tirarla davanti. Ha fatto tutti gli aumenti?
24.11.2012 - 07:45
![]() JOANNE wrote:
JOANNE wrote:
It seems as if I have the same problem as everyone else, but I do not see an answer as to how to proceed with the 79 stitches after row 19 is done??? Help please, got this far, hate to take it all apart. It says to work only over 79 on each side, huh? So where exactly do I start the left front piece. I see some are folding it in half, etc, can you please be more specific...thank you!
13.11.2012 - 22:51DROPS Design answered:
Dear Joanne, after round 19, when it says to continue only over 79 dtr in each side, you should then follow paragraph called "LEFT FRONT PIECE - ALL SIZES " below. Happy Crocheting!
14.11.2012 - 09:25
![]() Terri wrote:
Terri wrote:
Thank you so much!! That clarifies a lot for a beginner!!
13.11.2012 - 21:28
![]() Terri wrote:
Terri wrote:
I still have a couple of questions about the directions for the front of this jacket. 1)when you move to the next row, do you move the marker 24 stitches in again from the end of that row, or continue using the first row's marker placement? 2)for the 2 inc sts, do you place an inc st before the first marker and after the second? Or does one row have inc before each marker, next row has them after each marker? Even with other explanations, I'm a little unclear. Thanks for your help!!
13.11.2012 - 00:13DROPS Design answered:
Hi Terri, you don’t move the markers unless it is written in the pattern and the increases are made one row before each marker and in the next row after each marker.
13.11.2012 - 15:01
|
|
Wild Flower#wildflowercardigan |
|
 |
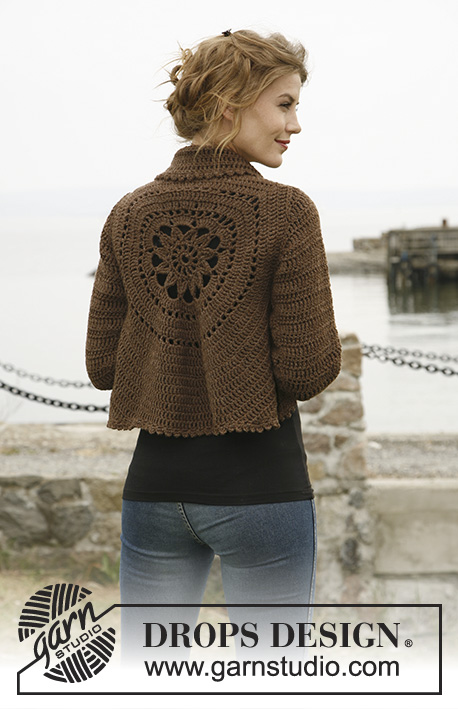 |
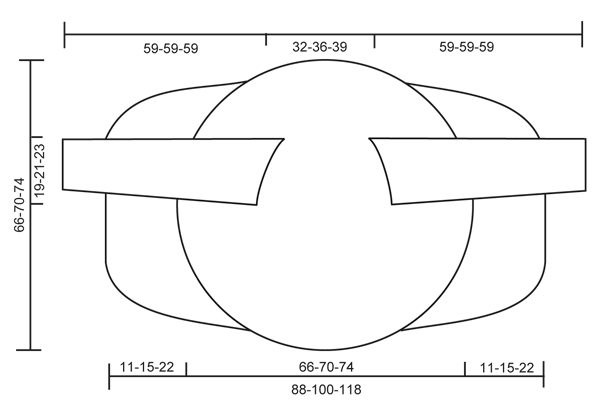
Crochet DROPS jacket worked in a circle in ”Nepal”. Size: S to XXXL
DROPS 132-2 |
|
|
CROCHET TIP: Replace first tr on every round/row with ch 4. DECREASE TIP 1 (applies to the body): Dec as follows: Work tr until 3 tr remain, * in the first of these work 1 dc, in the next 1 hdc and in the last 1 sc, turn with ch 1, skip sc, work 1 sl st in hdc and 1 sl st in dc, then 1 sc in first tr, 1 hdc in next tr and 1 dc in next tr, work tr until 3 tr remain at end of row *, repeat from *-* until a total of 6-8-12 rows have been worked. DECREASE TIP 2 (applies to sleeve cap): Dec at beg of row by working sl st over the no of tr to be dec. Dec at end of row by working until same no of sts to be dec remains, turn piece. -------------------------------------------------------- -------------------------------------------------------- BODY: Worked in the round in a circle from mid back. Ch 8 on hook size 5 mm / H/8 with Nepal and form a ring with 1 sl st in first ch. ROUND 1: Work 12 sc in ch-ring, finish with 1 sl st in first sc. ROUND 2: ch 5 (= 1 dc + 2 ch), * 1 dc in next sc, ch 2 *, repeat from *-* the entire round and finish with 1 sl st in 3rd ch from beg of round = 12 dc with 2 ch between each. ROUND 3: 1 ch, continue to crochet as follows in every ch-space the entire round: 1 sc + ch 1 + 1 sc + ch 1, finish round with 1 sl st in first ch = 24 sc with 1 ch between each. ROUND 4: 1 sl st in first sc, 1 sl st in first ch, ch 5, 1 dtr in same ch, * ch 7, then work 4 dtr tog as follows: Work 2 dtr in same ch as last dtr but wait with last YO and pull through on both dtr, skip 1 sc + 1 ch + 1 sc, work 1 dtr in next ch but wait with last YO and pull through, then work last dtr in same ch and pull last YO through all 5 sts on hook *, repeat from *-* a total of 11 times, ch 7, work 2 dtr tog in same ch (but wait with last YO and pull through on both), work 1 sl st in 5th ch from beg of round and pull thread through all 3 sts on hook. ROUND 5: 1 sl st in first ch-space, ch 4 (= 1 tr), 7 tr in same ch-space, then work 8 tr in every ch-space, finish with 1 sl st in 4th ch from beg of round = a total of 96 tr. ROUND 6: ch 5 (= 1 dc + 2 ch), * skip 1 tr, 1 dc in next tr, ch 2 *, repeat from *-* the entire round and finish with 1 sl st in 3rd ch from beg of round = 48 ch-spaces. ROUND 7 – READ CROCHET TIP: Work 1 tr in every dc and work 1 and 2 tr alternately in every ch-space the entire round = 120 tr. ROUND 8: Work 1 tr in every tr but work 2 tr in every 10th tr = 132 tr. ROUND 9: ch 5 (= 1 dc + 2 ch), * skip 1 tr, 1 dc in next tr, ch 2 *, repeat from *-* the entire round and finish with 1 sl st in 3rd ch from beg of round = 66 ch-spaces. ROUND 10: Work 1 tr in every dc and work 1 and 2 tr alternately in every ch-space the entire round = 165 tr. ROUND 11: Work 1 tr in every tr but work 2 tr in every 15th tr = 176 tr. ROUND 12: Work 1 tr in every tr but work 2 tr in every 16th tr = 187 tr. Piece measures approx. 20 cm / 8" from center and outwards. SIZE S/M: ROUND 13: ch 1, then work 1 sc in each of the first 45 tr (= up towards neck), ch 30 loosely, skip the next 27 tr (= armhole), then work 1 sc in each of the next 88 tr (= down towards back), ch 30 loosely, skip the next 27 tr (= armhole) and fasten with 1 sl st in first sc on round. ROUND 14: Work 1 tr in every sc - but inc 2 tr evenly over the first 45 sc (= 47 tr), then work 30 tr in ch-row over armhole, work 1 tr in every sc – but inc 3 tr evenly over the bottom 88 sc (= 91 tr), and work 30 tr in ch-row over armhole = 198 tr. ROUND 15 to 19: Continue with tr – while at the same time inc 6 tr evenly on every round. After 19th round there are 228 tr on the round and piece measures approx. 33 cm / 13" from center and outwards. Continue working only over 79 tr in each side – i.e. do not work over 35 tr at top by neck or 35 tr at bottom of back. Continue with explanation under FRONT PIECE. SIZE L/XL: ROUND 13: Work 1 tr in every tr but work 2 tr in every 17th tr = 198 tr. ROUND 14: ch 1, then work 1 sc in each of the first 50 tr (= up towards neck), ch 32 loosely, skip the next 29 tr (= armhole), then work 1 sc in each of the next 90 tr (= down towards back), ch 32 loosely, skip the next 29 tr (= armhole) and fasten with 1 sl st in first sc on round. ROUND 15: Work 1 tr in every sc - but inc 3 tr evenly over the first 50 sc (= 53 tr), then work 32 tr in ch-row over armhole, work 1 tr in every sc – but inc 3 tr evenly over the bottom 90 sc (= 93 tr), and work 32 tr in ch-row over armhole = 210 tr. ROUND 16 to 20: Continue with tr – while at the same time inc 6 tr evenly on every round. After 20th round there are 240 tr on the round and piece measures approx. 35 cm / 13¾" from center and outwards. Continue working only over 81 tr in each side – i.e. do not work over 39 tr at top by neck or 39 tr at bottom of back. Continue with explanation under FRONT PIECE. SIZE XXL and XXXL: ROUND 13: Work 1 tr in every tr but work 2 tr in every 17th tr = 198 tr. ROUND 14: Work 1 tr in every tr but work 2 tr in every 18th tr = 209 tr. ROUND 15: ch 1, then work 1 sc in each of the first 54 tr (= up towards neck), ch 36 loosely, skip the next 32 tr (= armhole), then work 1 sc in each of the next 91 tr (= down towards back), ch 36 loosely, skip the next 32 tr (= armhole) and fasten with 1 sl st in first sc on round. ROUND 16: Work 1 tr in every sc - but inc 2 tr evenly over the first 54 sc (= 56 tr), then work 36 tr in ch-row over armhole, work 1 tr in every sc – but inc 3 tr evenly over the bottom 91 sc (= 94 tr), and work 36 tr in ch-row over armhole = 222 tr. ROUND 17 to 22: Continue with tr – while at the same time inc 6 tr evenly on every round. After 22nd round there are 258 tr on the round and piece measures approx. 37 cm / 14½" from center and outwards. Continue working only over 89 tr in each side – i.e. do not work over 40 tr at top by neck or 40 tr at bottom of back. Continue with explanation under FRONT PIECE. LEFT FRONT PIECE - ALL SIZES: = 79-81-89 tr. Insert a marker after 23-24-27 sts in from each side (= 33-33-35 sts between markers). Then work tr back and forth over these sts while at the same time inc 1 st at every marker on every row (i.e. inc 2 sts on row, inc alternately before and after marker) and dec 3 sts at beg and end of every row in each side – SEE DECREASE TIP 1 until a total of 6-8-12 rows back and forth have been worked. RIGHT FRONT PIECE: Work same way as on left piece over 79-81-89 tr in right side. SLEEVE (worked back and forth): Ch 46-48-53 loosely (includes 4 ch to turn with) on hook size 5 mm / H/8 with Nepal. ROW 1: 1 tr in 5th ch from hook, 1 tr in each of the next 2-4-2 ch, * skip ch 1, 1 tr in each of the next 6 ch *, repeat from *-* until 4 ch remain, skip 1 ch and work 1 tr in each of the last 3 ch = 37-39-43 tr. ROW 2: 1 tr in every tr – READ CROCHET TIP! ROW 3: ch 6 (= 1 tr + 2 ch), skip 1 tr, 1 tr in next tr, * ch 2, skip 1 tr, 1 tr in next tr *, repeat from *-* the entire row = 18-19-21 ch-spaces. ROW 4: Work 1 tr in every tr and 1 tr in every ch-space = 37-39-43 tr. Repeat row 2-4 a total of 3 times. Piece measures approx. 18 cm / 7". Then work tr on all rows until finished measurements, while at the same time inc as follows: SIZE S/M: * Inc 1 tr in one side by working 2 tr in next to last tr. On next row inc 1 tr in the other side the same way. Inc 1 more time the same way in each side, then work 1 row without inc *, repeat from *-* a total of 3 times = 12 inc = 49 tr. SIZE L/XL + XXL/XXXL: * Inc 1 tr in one side by working 2 tr in next to last tr. On next row inc 1 tr in the other side the same way *, repeat from *-* a total of 8 times = 16 inc = 55-59 tr. ALL SIZES: Continue to work until piece measures 49 cm / 19¼" in all sizes. Now dec on every row in each side for sleeve cap – SEE DECREASE TIP 2: 3 tr 1 time, 2 tr 3 times and 3 tr 1 time = 25-31-35 tr remain at the top. Fasten off. ASSEMBLY: Sew sleeve seams tog edge to edge to avoid a chunky seam. Work 1 round around the entire body and at bottom of sleeves as follows: * ch 5, 1 dc in first ch, skip 1 st, fasten with 1 sc in next st *, repeat from *-* the entire round and finish with 1 sl st in first ch. Sew in the sleeves. If desired, close the jacket with a pin or sew on a button on to left front piece (try the jacket on to see where button should be) and button it in crochet edge. |
|
 |
|
Have you finished this pattern?Tag your pictures with #dropspattern #wildflowercardigan or submit them to the #dropsfan gallery. Do you need help with this pattern?You'll find 9 tutorial videos, a Comments/Questions area and more by visiting the pattern on garnstudio.com. © 1982-2026 DROPS Design A/S. We reserve all rights. This document, including all its sub-sections, has copyrights. Read more about what you can do with our patterns at the bottom of each pattern on our site. |
|


With over 40 years in knitting and crochet design, DROPS Design offers one of the most extensive collections of free patterns on the internet - translated to 17 languages. As of today we count 324 catalogs and 12290 patterns - 12280 of which are translated into English (US/in).
We work hard to bring you the best knitting and crochet have to offer, inspiration and advice as well as great quality yarns at incredible prices! Would you like to use our patterns for other than personal use? You can read what you are allowed to do in the Copyright text at the bottom of all our patterns. Happy crafting!
Post a comment to pattern DROPS 132-2
We would love to hear what you have to say about this pattern!
If you want to leave a question, please make sure you select the correct category in the form below, to speed up the answering process. Required fields are marked *.