
Popular categories
Looking for a yarn?


Comments / Questions (427)
![]() Ute wrote:
Ute wrote:
Hallo, sind 3-D-Stb nicht Dreifachstäbchen? Hanna hatte zuletzt danach gefragt und ich weiß noch, dass ich auch überlegt hatte, was es ist...
22.02.2013 - 07:55DROPS Design answered:
Liebe Ute, wir haben nun eine Korrketur vorgenommen, es sind Dreifach-Stb. Entschuldigung für die verwirrung.
22.02.2013 - 11:19
![]() Hanna Kiefer wrote:
Hanna Kiefer wrote:
Was ist ein 3-D-Stb von dem Sie in der 4. Runde des Vorder- und Rückenteils schreiben?
19.02.2013 - 23:36DROPS Design answered:
Liebe Hanna, siehe spätere Antwort, die Bezeichnung wurde angepasst.
20.02.2013 - 07:47
![]() Meier Sylvia wrote:
Meier Sylvia wrote:
Bonjour, je n'arrive pas à faire le tour 4 du modèle Wild Flower? je ne le comprends pas ainsi que comment lire le diagramme? Pouvez-vous m'aider?
04.02.2013 - 13:39DROPS Design answered:
Bonjour Madame Meier, il n'y a pas de diagramme pour la fleur de la veste Wild Flower, suivez bien maille après maille les indications du tour 4, n'hésitez pas à demander de l'aide à votre magasin Drops si nécessaire ou sur le forum. Bon crochet !
04.02.2013 - 14:09
![]() Elsa E wrote:
Elsa E wrote:
Jag vill bara upplysa om att garnmängden för denna modell inte verkar stämma riktigt. Jag har nu nästan virkat klart denna i storlek S/M och jag kommer nog behöva i alla fall 2 nystan till för att få den klar.
30.01.2013 - 17:44
![]() Ute wrote:
Ute wrote:
Hallo, ich habe eine Frage zur 4. Reihe des Rückenteils: werden zwischen den ersten und den letzten beiden Dreifachstäbchen eine fM UND eine Lm UND eine weiter fM übersprungen oder wird eine fM gehäkelt, eine Lm gehäkelt und dann eine fM übersprungen? Ich tippe mal auf die erste Variante... Vielen Dank!
28.01.2013 - 14:48DROPS Design answered:
Liebe Uta, ja die erste Variante, es werden , 1 fM + 1 Lm + 1 fM überprungen.
29.01.2013 - 09:03
![]() Christel wrote:
Christel wrote:
I rygstykket 15.OMG står der: videre hækles der 32 dbl-st om lm-rækken over ærmegabet, De 32 dbl-st kommer derved til at hænge på en snærende snor, som et gardin på en gardinstang, i retningen mod forstykket, mens ærmegabets bagside er fint elastisk. Er det virkelig meningen? Jeg er ved at sy ærmerne i og vil gerne være sikker først.
18.01.2013 - 19:26DROPS Design answered:
Det er vigtig at det er løse luftmasker. Men ellers er det sådan du skal gøre det.
23.01.2013 - 12:08Muna Saigol wrote:
What a Gorgeous, Fantabulous pattern. I am having some problems knowing how to fit the sleeves in.
15.01.2013 - 01:08
![]() Älvan wrote:
Älvan wrote:
Jag har nästan virkat den klar men garnmängden stämmer inte, har utgått från s/m och det beräknas 600 gram till detta. Jag har kvar avmaskning på en ärm, sömnad på båda ärmarna och uddkanten, så det tillkommer 100 gram till. Annars var det ett enkelt och bra mönster, fler sådana önskas!
07.01.2013 - 21:57
![]() Arum29 wrote:
Arum29 wrote:
Bonjour, Je suis à coudre les manches , j'ai fait différents essais et je n'aime pas le résulat que ce soir au crochet ou l'aiguille à coudre .C'est mon premier modèle au crochet.Comment faut-il faire? Merci
07.01.2013 - 13:17DROPS Design answered:
Bonjour Arum29, la vidéo "assemblage : chaussons au crochet" (cf index) pourra sans doute vous aider en attendant une nouvelle vidéo sur ce sujet. Pour toute aide complémentaire, n'hésitez pas à contacter le magasin où vous avez acheté votre laine, ils pourront vous aider, même par mail ou téléphone. Bon crochet !
07.01.2013 - 13:50
![]() Sidhima wrote:
Sidhima wrote:
Hi, i have a question on the edging, the last step after crocheting the body and the sleeves... How do we go aboutit? For eg, i want to crochet the edge of the body, i start by chaining 5 through connecting the yarn anywhere at the edge of the body and then work the 1dc, skip 1 st of the chain and then 1sc on the 5 chain just crocheted and then ch5 again in the next stitch of the body and then continue accordingly?? Thanks
04.01.2013 - 23:27
|
|
Wild Flower#wildflowercardigan |
|
 |
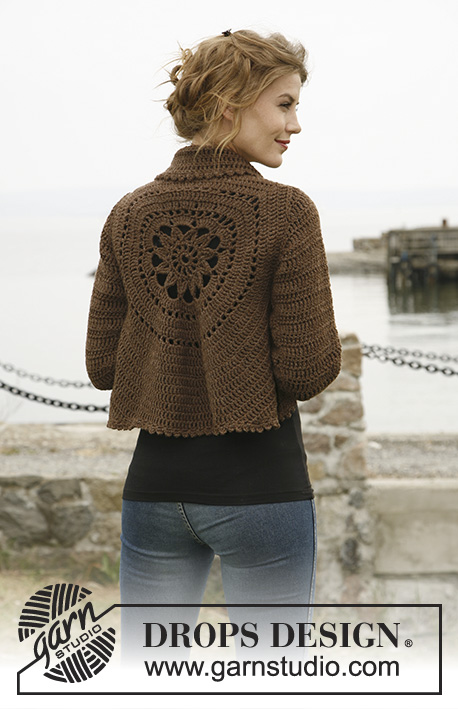 |
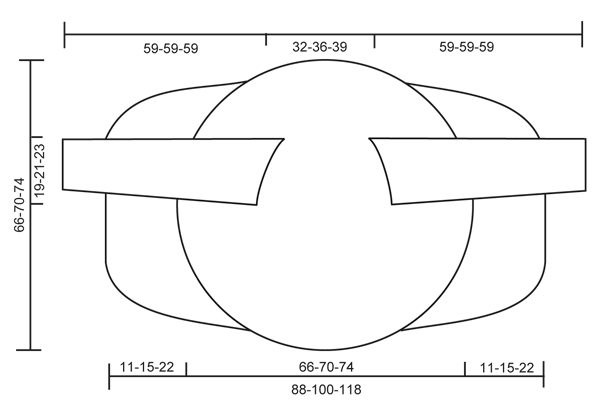
Crochet DROPS jacket worked in a circle in ”Nepal”. Size: S to XXXL
DROPS 132-2 |
|
|
CROCHET TIP: Replace first tr on every round/row with ch 4. DECREASE TIP 1 (applies to the body): Dec as follows: Work tr until 3 tr remain, * in the first of these work 1 dc, in the next 1 hdc and in the last 1 sc, turn with ch 1, skip sc, work 1 sl st in hdc and 1 sl st in dc, then 1 sc in first tr, 1 hdc in next tr and 1 dc in next tr, work tr until 3 tr remain at end of row *, repeat from *-* until a total of 6-8-12 rows have been worked. DECREASE TIP 2 (applies to sleeve cap): Dec at beg of row by working sl st over the no of tr to be dec. Dec at end of row by working until same no of sts to be dec remains, turn piece. -------------------------------------------------------- -------------------------------------------------------- BODY: Worked in the round in a circle from mid back. Ch 8 on hook size 5 mm / H/8 with Nepal and form a ring with 1 sl st in first ch. ROUND 1: Work 12 sc in ch-ring, finish with 1 sl st in first sc. ROUND 2: ch 5 (= 1 dc + 2 ch), * 1 dc in next sc, ch 2 *, repeat from *-* the entire round and finish with 1 sl st in 3rd ch from beg of round = 12 dc with 2 ch between each. ROUND 3: 1 ch, continue to crochet as follows in every ch-space the entire round: 1 sc + ch 1 + 1 sc + ch 1, finish round with 1 sl st in first ch = 24 sc with 1 ch between each. ROUND 4: 1 sl st in first sc, 1 sl st in first ch, ch 5, 1 dtr in same ch, * ch 7, then work 4 dtr tog as follows: Work 2 dtr in same ch as last dtr but wait with last YO and pull through on both dtr, skip 1 sc + 1 ch + 1 sc, work 1 dtr in next ch but wait with last YO and pull through, then work last dtr in same ch and pull last YO through all 5 sts on hook *, repeat from *-* a total of 11 times, ch 7, work 2 dtr tog in same ch (but wait with last YO and pull through on both), work 1 sl st in 5th ch from beg of round and pull thread through all 3 sts on hook. ROUND 5: 1 sl st in first ch-space, ch 4 (= 1 tr), 7 tr in same ch-space, then work 8 tr in every ch-space, finish with 1 sl st in 4th ch from beg of round = a total of 96 tr. ROUND 6: ch 5 (= 1 dc + 2 ch), * skip 1 tr, 1 dc in next tr, ch 2 *, repeat from *-* the entire round and finish with 1 sl st in 3rd ch from beg of round = 48 ch-spaces. ROUND 7 – READ CROCHET TIP: Work 1 tr in every dc and work 1 and 2 tr alternately in every ch-space the entire round = 120 tr. ROUND 8: Work 1 tr in every tr but work 2 tr in every 10th tr = 132 tr. ROUND 9: ch 5 (= 1 dc + 2 ch), * skip 1 tr, 1 dc in next tr, ch 2 *, repeat from *-* the entire round and finish with 1 sl st in 3rd ch from beg of round = 66 ch-spaces. ROUND 10: Work 1 tr in every dc and work 1 and 2 tr alternately in every ch-space the entire round = 165 tr. ROUND 11: Work 1 tr in every tr but work 2 tr in every 15th tr = 176 tr. ROUND 12: Work 1 tr in every tr but work 2 tr in every 16th tr = 187 tr. Piece measures approx. 20 cm / 8" from center and outwards. SIZE S/M: ROUND 13: ch 1, then work 1 sc in each of the first 45 tr (= up towards neck), ch 30 loosely, skip the next 27 tr (= armhole), then work 1 sc in each of the next 88 tr (= down towards back), ch 30 loosely, skip the next 27 tr (= armhole) and fasten with 1 sl st in first sc on round. ROUND 14: Work 1 tr in every sc - but inc 2 tr evenly over the first 45 sc (= 47 tr), then work 30 tr in ch-row over armhole, work 1 tr in every sc – but inc 3 tr evenly over the bottom 88 sc (= 91 tr), and work 30 tr in ch-row over armhole = 198 tr. ROUND 15 to 19: Continue with tr – while at the same time inc 6 tr evenly on every round. After 19th round there are 228 tr on the round and piece measures approx. 33 cm / 13" from center and outwards. Continue working only over 79 tr in each side – i.e. do not work over 35 tr at top by neck or 35 tr at bottom of back. Continue with explanation under FRONT PIECE. SIZE L/XL: ROUND 13: Work 1 tr in every tr but work 2 tr in every 17th tr = 198 tr. ROUND 14: ch 1, then work 1 sc in each of the first 50 tr (= up towards neck), ch 32 loosely, skip the next 29 tr (= armhole), then work 1 sc in each of the next 90 tr (= down towards back), ch 32 loosely, skip the next 29 tr (= armhole) and fasten with 1 sl st in first sc on round. ROUND 15: Work 1 tr in every sc - but inc 3 tr evenly over the first 50 sc (= 53 tr), then work 32 tr in ch-row over armhole, work 1 tr in every sc – but inc 3 tr evenly over the bottom 90 sc (= 93 tr), and work 32 tr in ch-row over armhole = 210 tr. ROUND 16 to 20: Continue with tr – while at the same time inc 6 tr evenly on every round. After 20th round there are 240 tr on the round and piece measures approx. 35 cm / 13¾" from center and outwards. Continue working only over 81 tr in each side – i.e. do not work over 39 tr at top by neck or 39 tr at bottom of back. Continue with explanation under FRONT PIECE. SIZE XXL and XXXL: ROUND 13: Work 1 tr in every tr but work 2 tr in every 17th tr = 198 tr. ROUND 14: Work 1 tr in every tr but work 2 tr in every 18th tr = 209 tr. ROUND 15: ch 1, then work 1 sc in each of the first 54 tr (= up towards neck), ch 36 loosely, skip the next 32 tr (= armhole), then work 1 sc in each of the next 91 tr (= down towards back), ch 36 loosely, skip the next 32 tr (= armhole) and fasten with 1 sl st in first sc on round. ROUND 16: Work 1 tr in every sc - but inc 2 tr evenly over the first 54 sc (= 56 tr), then work 36 tr in ch-row over armhole, work 1 tr in every sc – but inc 3 tr evenly over the bottom 91 sc (= 94 tr), and work 36 tr in ch-row over armhole = 222 tr. ROUND 17 to 22: Continue with tr – while at the same time inc 6 tr evenly on every round. After 22nd round there are 258 tr on the round and piece measures approx. 37 cm / 14½" from center and outwards. Continue working only over 89 tr in each side – i.e. do not work over 40 tr at top by neck or 40 tr at bottom of back. Continue with explanation under FRONT PIECE. LEFT FRONT PIECE - ALL SIZES: = 79-81-89 tr. Insert a marker after 23-24-27 sts in from each side (= 33-33-35 sts between markers). Then work tr back and forth over these sts while at the same time inc 1 st at every marker on every row (i.e. inc 2 sts on row, inc alternately before and after marker) and dec 3 sts at beg and end of every row in each side – SEE DECREASE TIP 1 until a total of 6-8-12 rows back and forth have been worked. RIGHT FRONT PIECE: Work same way as on left piece over 79-81-89 tr in right side. SLEEVE (worked back and forth): Ch 46-48-53 loosely (includes 4 ch to turn with) on hook size 5 mm / H/8 with Nepal. ROW 1: 1 tr in 5th ch from hook, 1 tr in each of the next 2-4-2 ch, * skip ch 1, 1 tr in each of the next 6 ch *, repeat from *-* until 4 ch remain, skip 1 ch and work 1 tr in each of the last 3 ch = 37-39-43 tr. ROW 2: 1 tr in every tr – READ CROCHET TIP! ROW 3: ch 6 (= 1 tr + 2 ch), skip 1 tr, 1 tr in next tr, * ch 2, skip 1 tr, 1 tr in next tr *, repeat from *-* the entire row = 18-19-21 ch-spaces. ROW 4: Work 1 tr in every tr and 1 tr in every ch-space = 37-39-43 tr. Repeat row 2-4 a total of 3 times. Piece measures approx. 18 cm / 7". Then work tr on all rows until finished measurements, while at the same time inc as follows: SIZE S/M: * Inc 1 tr in one side by working 2 tr in next to last tr. On next row inc 1 tr in the other side the same way. Inc 1 more time the same way in each side, then work 1 row without inc *, repeat from *-* a total of 3 times = 12 inc = 49 tr. SIZE L/XL + XXL/XXXL: * Inc 1 tr in one side by working 2 tr in next to last tr. On next row inc 1 tr in the other side the same way *, repeat from *-* a total of 8 times = 16 inc = 55-59 tr. ALL SIZES: Continue to work until piece measures 49 cm / 19¼" in all sizes. Now dec on every row in each side for sleeve cap – SEE DECREASE TIP 2: 3 tr 1 time, 2 tr 3 times and 3 tr 1 time = 25-31-35 tr remain at the top. Fasten off. ASSEMBLY: Sew sleeve seams tog edge to edge to avoid a chunky seam. Work 1 round around the entire body and at bottom of sleeves as follows: * ch 5, 1 dc in first ch, skip 1 st, fasten with 1 sc in next st *, repeat from *-* the entire round and finish with 1 sl st in first ch. Sew in the sleeves. If desired, close the jacket with a pin or sew on a button on to left front piece (try the jacket on to see where button should be) and button it in crochet edge. |
|
 |
|
Have you finished this pattern?Tag your pictures with #dropspattern #wildflowercardigan or submit them to the #dropsfan gallery. Do you need help with this pattern?You'll find 9 tutorial videos, a Comments/Questions area and more by visiting the pattern on garnstudio.com. © 1982-2026 DROPS Design A/S. We reserve all rights. This document, including all its sub-sections, has copyrights. Read more about what you can do with our patterns at the bottom of each pattern on our site. |
|


With over 40 years in knitting and crochet design, DROPS Design offers one of the most extensive collections of free patterns on the internet - translated to 17 languages. As of today we count 324 catalogs and 12290 patterns - 12280 of which are translated into English (US/in).
We work hard to bring you the best knitting and crochet have to offer, inspiration and advice as well as great quality yarns at incredible prices! Would you like to use our patterns for other than personal use? You can read what you are allowed to do in the Copyright text at the bottom of all our patterns. Happy crafting!
Post a comment to pattern DROPS 132-2
We would love to hear what you have to say about this pattern!
If you want to leave a question, please make sure you select the correct category in the form below, to speed up the answering process. Required fields are marked *.