
Popular categories
Looking for a yarn?


Comments / Questions (427)
![]() Miriam wrote:
Miriam wrote:
Die Jacke ist wirklich wunderschön. Etwas knifflig zwischendurch, aber das fördert nur die grauen Zellen :-)
30.03.2013 - 12:17
![]() Mel wrote:
Mel wrote:
Danke für die rasche Antwort. Soweit war mir das schon klar. Wie beginne ich aber die allererste Runde des Vorderteils? Laut Anleitung sollen bei jeder Runde zu Beginn 3 Maschen abgek. werden. Wie funktioniert das bei der ersten Runde? Oder beginne ich hier mit D-Stb.?
27.03.2013 - 20:12DROPS Design answered:
Liebe Mel, um am Anfang auch eine Stufe zu vermeiden, können Sie die ersten 3 abzunehmenden Maschen durch eine fM, 1 H-Stb und 1 Stb ersetzen, statt sie zu überspringen und direkt mit dem D-Stb zu beginnen. Beachten Sie bitte, dass die Vorderteile nicht mehr in Runden sondern in Reihen gehäkelt werden.
28.03.2013 - 08:25
![]() Mel wrote:
Mel wrote:
Wenn ich das Vorderteil häkle: wie beginne ich die 1. Runde? Mit D-Stb.? Oder nehme ich hier schon ab und wenn ja, wie?
26.03.2013 - 21:27DROPS Design answered:
Liebe Mel, arbeiten Sie die Vorderteile wie unter „LINKES VORDERTEIL“ beschrieben:“ D-Stb hin und zurück häkeln und bei jeden Markierungen je 1 M. aufnehmen (abwechslungsweise auf der rechten und auf der linken Seite der Markierung). Gleichzeitig bei jeder Runde am Anfang und am Schluss je 3 M. abk.“ Viel Spass beim Häkeln!
27.03.2013 - 18:08
![]() Ute wrote:
Ute wrote:
Ich glaube jetzt habe ich's verstanden...die Zahl in der Klammer ist der "Rest" nach der letzten Markierung bis zum Ende der 89 Maschen...
19.03.2013 - 13:39
![]() Ute wrote:
Ute wrote:
Hallo, ich verstehe nicht wie ich mit den Seitenteilen für L/XL anfange. Ich gucke wo die obere Mitte ist, zähle von dort 39/2 = 19 ? Maschen nach Links und beginne dort? Wo fange ich an für die Markierungen zu zählen und was bedeuten die Zahlen 33-33-35 in der Klammer? Komisch, zuletzt dachte ich noch ich hätte die Anleitung verstanden, aber jetzt wo ich bei den Seitenteilen angekommen bin verstehe ich es nicht mehr... danke!
19.03.2013 - 10:49
![]() Chiara wrote:
Chiara wrote:
Salve,ho qualche problems neo lavorare le maniche. Cosa vuol dire:, 1 m.a.d. in ognuna delle 2-4-2 catenelle successive? Lavoro la prima maglia a.d. e nella quinta catenella e poi 6 maglie a.d.? Ringrazio anticipatamente. Chiara
10.03.2013 - 22:05DROPS Design answered:
Buongiorno! Ad esempio, per la taglia S/M deve lavorare 1 m.a.d. in ognuna delle 2 cat. successive e poi continuare con le istruzioni tra gli *.*. Buon lavoro!!
11.03.2013 - 12:37
![]() Hanna Kiefer wrote:
Hanna Kiefer wrote:
Heißt 1 3-D-Stb dann, dass drei D-Stb gehakelt werden und 4 3-D-Stb, dass 12 D-Stb gehäkelt werden? Warum schreibt man nicht gleich 12 D-Stb? Werden bei 3-D-Stb immer drei D-Stb zusammen abgemascht?
04.03.2013 - 13:08DROPS Design answered:
Liebe Hanna, Sie haben völlig Recht, unsere damalige Übersetzerin hat das so genannt und wir haben nun eine Korrektur der Anleitung - und der Fragen Ihrer Vorgängerinnen - vorgenommen. Es sind Dreifach-Stb.
04.03.2013 - 21:29
![]() Elena wrote:
Elena wrote:
Salve, ho un problema con le maniche non riesco a capire come fare le diminuzioni per l'aletta.scrivete 3 m.a.d. 1 volta, 2 m.a.d. 3 volte e 3 m.a.d. 1 volta = 25-31-35 m.a.d. rimaste in alto. ma queste diminuzione vanno fatte ad ogni giro?
28.02.2013 - 01:07DROPS Design answered:
Buongiorno. Sì, le diminuzioni vengono fatte ad ogni riga, sia all'inizio che alla fine della riga. Abbiamo corretto il modello. Grazie della segnalazione. Buon lavoro!!
05.03.2013 - 00:30
![]() Emma wrote:
Emma wrote:
Wunderschoene Jacke, aber leider scheitere ich als Anfaenger schon an den ersten beiden Reihen. 8 Luftmaschen, und in diese dann 12 feste Maschen?
23.02.2013 - 02:03DROPS Design answered:
Liebe Emma, wenn Sie Anfängerin sind, würden wir Ihnen ein anders Modell zu starten empfehlen, diese Jacke ist eher geeignet, wenn man Häkelerfahrung hat.
25.02.2013 - 08:28
![]() Ute wrote:
Ute wrote:
Danke, liebe Drops-Designer, für die schnelle Antwort. Dann habe ich die vierte Runde auch nicht kapiert und falsch (oder anders :-)) gemacht. Das erklärt auch teilw.,warum meine Arbeit nach der 20. Runde größer war...ich habe jeweils vier Dreifachstäbchen gehäkelt, und nicht vier mal drei Doppestäbchen...dachte, das würde total knubbelig werden...
22.02.2013 - 12:18
|
|
Wild Flower#wildflowercardigan |
|
 |
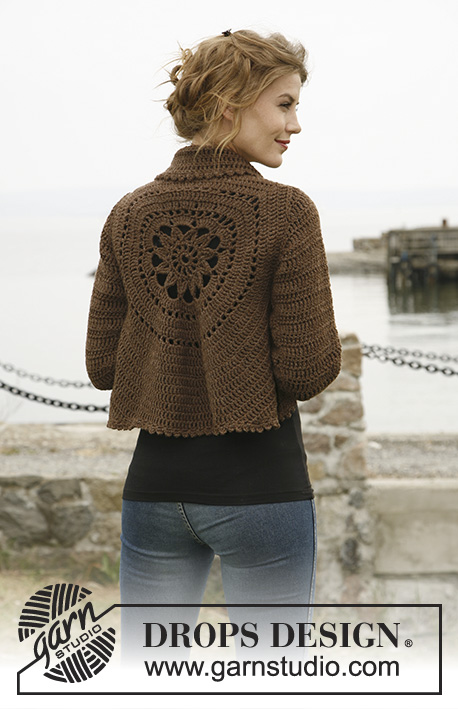 |
Crochet DROPS jacket worked in a circle in ”Nepal”. Size: S to XXXL
DROPS 132-2 |
|
|
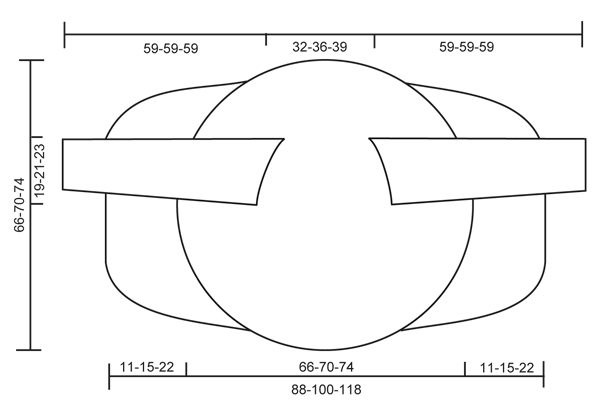
CROCHET TIP: Replace first tr on every round/row with ch 4. DECREASE TIP 1 (applies to the body): Dec as follows: Work tr until 3 tr remain, * in the first of these work 1 dc, in the next 1 hdc and in the last 1 sc, turn with ch 1, skip sc, work 1 sl st in hdc and 1 sl st in dc, then 1 sc in first tr, 1 hdc in next tr and 1 dc in next tr, work tr until 3 tr remain at end of row *, repeat from *-* until a total of 6-8-12 rows have been worked. DECREASE TIP 2 (applies to sleeve cap): Dec at beg of row by working sl st over the no of tr to be dec. Dec at end of row by working until same no of sts to be dec remains, turn piece. -------------------------------------------------------- -------------------------------------------------------- BODY: Worked in the round in a circle from mid back. Ch 8 on hook size 5 mm / H/8 with Nepal and form a ring with 1 sl st in first ch. ROUND 1: Work 12 sc in ch-ring, finish with 1 sl st in first sc. ROUND 2: ch 5 (= 1 dc + 2 ch), * 1 dc in next sc, ch 2 *, repeat from *-* the entire round and finish with 1 sl st in 3rd ch from beg of round = 12 dc with 2 ch between each. ROUND 3: 1 ch, continue to crochet as follows in every ch-space the entire round: 1 sc + ch 1 + 1 sc + ch 1, finish round with 1 sl st in first ch = 24 sc with 1 ch between each. ROUND 4: 1 sl st in first sc, 1 sl st in first ch, ch 5, 1 dtr in same ch, * ch 7, then work 4 dtr tog as follows: Work 2 dtr in same ch as last dtr but wait with last YO and pull through on both dtr, skip 1 sc + 1 ch + 1 sc, work 1 dtr in next ch but wait with last YO and pull through, then work last dtr in same ch and pull last YO through all 5 sts on hook *, repeat from *-* a total of 11 times, ch 7, work 2 dtr tog in same ch (but wait with last YO and pull through on both), work 1 sl st in 5th ch from beg of round and pull thread through all 3 sts on hook. ROUND 5: 1 sl st in first ch-space, ch 4 (= 1 tr), 7 tr in same ch-space, then work 8 tr in every ch-space, finish with 1 sl st in 4th ch from beg of round = a total of 96 tr. ROUND 6: ch 5 (= 1 dc + 2 ch), * skip 1 tr, 1 dc in next tr, ch 2 *, repeat from *-* the entire round and finish with 1 sl st in 3rd ch from beg of round = 48 ch-spaces. ROUND 7 – READ CROCHET TIP: Work 1 tr in every dc and work 1 and 2 tr alternately in every ch-space the entire round = 120 tr. ROUND 8: Work 1 tr in every tr but work 2 tr in every 10th tr = 132 tr. ROUND 9: ch 5 (= 1 dc + 2 ch), * skip 1 tr, 1 dc in next tr, ch 2 *, repeat from *-* the entire round and finish with 1 sl st in 3rd ch from beg of round = 66 ch-spaces. ROUND 10: Work 1 tr in every dc and work 1 and 2 tr alternately in every ch-space the entire round = 165 tr. ROUND 11: Work 1 tr in every tr but work 2 tr in every 15th tr = 176 tr. ROUND 12: Work 1 tr in every tr but work 2 tr in every 16th tr = 187 tr. Piece measures approx. 20 cm / 8" from center and outwards. SIZE S/M: ROUND 13: ch 1, then work 1 sc in each of the first 45 tr (= up towards neck), ch 30 loosely, skip the next 27 tr (= armhole), then work 1 sc in each of the next 88 tr (= down towards back), ch 30 loosely, skip the next 27 tr (= armhole) and fasten with 1 sl st in first sc on round. ROUND 14: Work 1 tr in every sc - but inc 2 tr evenly over the first 45 sc (= 47 tr), then work 30 tr in ch-row over armhole, work 1 tr in every sc – but inc 3 tr evenly over the bottom 88 sc (= 91 tr), and work 30 tr in ch-row over armhole = 198 tr. ROUND 15 to 19: Continue with tr – while at the same time inc 6 tr evenly on every round. After 19th round there are 228 tr on the round and piece measures approx. 33 cm / 13" from center and outwards. Continue working only over 79 tr in each side – i.e. do not work over 35 tr at top by neck or 35 tr at bottom of back. Continue with explanation under FRONT PIECE. SIZE L/XL: ROUND 13: Work 1 tr in every tr but work 2 tr in every 17th tr = 198 tr. ROUND 14: ch 1, then work 1 sc in each of the first 50 tr (= up towards neck), ch 32 loosely, skip the next 29 tr (= armhole), then work 1 sc in each of the next 90 tr (= down towards back), ch 32 loosely, skip the next 29 tr (= armhole) and fasten with 1 sl st in first sc on round. ROUND 15: Work 1 tr in every sc - but inc 3 tr evenly over the first 50 sc (= 53 tr), then work 32 tr in ch-row over armhole, work 1 tr in every sc – but inc 3 tr evenly over the bottom 90 sc (= 93 tr), and work 32 tr in ch-row over armhole = 210 tr. ROUND 16 to 20: Continue with tr – while at the same time inc 6 tr evenly on every round. After 20th round there are 240 tr on the round and piece measures approx. 35 cm / 13¾" from center and outwards. Continue working only over 81 tr in each side – i.e. do not work over 39 tr at top by neck or 39 tr at bottom of back. Continue with explanation under FRONT PIECE. SIZE XXL and XXXL: ROUND 13: Work 1 tr in every tr but work 2 tr in every 17th tr = 198 tr. ROUND 14: Work 1 tr in every tr but work 2 tr in every 18th tr = 209 tr. ROUND 15: ch 1, then work 1 sc in each of the first 54 tr (= up towards neck), ch 36 loosely, skip the next 32 tr (= armhole), then work 1 sc in each of the next 91 tr (= down towards back), ch 36 loosely, skip the next 32 tr (= armhole) and fasten with 1 sl st in first sc on round. ROUND 16: Work 1 tr in every sc - but inc 2 tr evenly over the first 54 sc (= 56 tr), then work 36 tr in ch-row over armhole, work 1 tr in every sc – but inc 3 tr evenly over the bottom 91 sc (= 94 tr), and work 36 tr in ch-row over armhole = 222 tr. ROUND 17 to 22: Continue with tr – while at the same time inc 6 tr evenly on every round. After 22nd round there are 258 tr on the round and piece measures approx. 37 cm / 14½" from center and outwards. Continue working only over 89 tr in each side – i.e. do not work over 40 tr at top by neck or 40 tr at bottom of back. Continue with explanation under FRONT PIECE. LEFT FRONT PIECE - ALL SIZES: = 79-81-89 tr. Insert a marker after 23-24-27 sts in from each side (= 33-33-35 sts between markers). Then work tr back and forth over these sts while at the same time inc 1 st at every marker on every row (i.e. inc 2 sts on row, inc alternately before and after marker) and dec 3 sts at beg and end of every row in each side – SEE DECREASE TIP 1 until a total of 6-8-12 rows back and forth have been worked. RIGHT FRONT PIECE: Work same way as on left piece over 79-81-89 tr in right side. SLEEVE (worked back and forth): Ch 46-48-53 loosely (includes 4 ch to turn with) on hook size 5 mm / H/8 with Nepal. ROW 1: 1 tr in 5th ch from hook, 1 tr in each of the next 2-4-2 ch, * skip ch 1, 1 tr in each of the next 6 ch *, repeat from *-* until 4 ch remain, skip 1 ch and work 1 tr in each of the last 3 ch = 37-39-43 tr. ROW 2: 1 tr in every tr – READ CROCHET TIP! ROW 3: ch 6 (= 1 tr + 2 ch), skip 1 tr, 1 tr in next tr, * ch 2, skip 1 tr, 1 tr in next tr *, repeat from *-* the entire row = 18-19-21 ch-spaces. ROW 4: Work 1 tr in every tr and 1 tr in every ch-space = 37-39-43 tr. Repeat row 2-4 a total of 3 times. Piece measures approx. 18 cm / 7". Then work tr on all rows until finished measurements, while at the same time inc as follows: SIZE S/M: * Inc 1 tr in one side by working 2 tr in next to last tr. On next row inc 1 tr in the other side the same way. Inc 1 more time the same way in each side, then work 1 row without inc *, repeat from *-* a total of 3 times = 12 inc = 49 tr. SIZE L/XL + XXL/XXXL: * Inc 1 tr in one side by working 2 tr in next to last tr. On next row inc 1 tr in the other side the same way *, repeat from *-* a total of 8 times = 16 inc = 55-59 tr. ALL SIZES: Continue to work until piece measures 49 cm / 19¼" in all sizes. Now dec on every row in each side for sleeve cap – SEE DECREASE TIP 2: 3 tr 1 time, 2 tr 3 times and 3 tr 1 time = 25-31-35 tr remain at the top. Fasten off. ASSEMBLY: Sew sleeve seams tog edge to edge to avoid a chunky seam. Work 1 round around the entire body and at bottom of sleeves as follows: * ch 5, 1 dc in first ch, skip 1 st, fasten with 1 sc in next st *, repeat from *-* the entire round and finish with 1 sl st in first ch. Sew in the sleeves. If desired, close the jacket with a pin or sew on a button on to left front piece (try the jacket on to see where button should be) and button it in crochet edge. |
|
 |
|
Have you finished this pattern?Tag your pictures with #dropspattern #wildflowercardigan or submit them to the #dropsfan gallery. Do you need help with this pattern?You'll find 9 tutorial videos, a Comments/Questions area and more by visiting the pattern on garnstudio.com. © 1982-2026 DROPS Design A/S. We reserve all rights. This document, including all its sub-sections, has copyrights. Read more about what you can do with our patterns at the bottom of each pattern on our site. |
|


With over 40 years in knitting and crochet design, DROPS Design offers one of the most extensive collections of free patterns on the internet - translated to 17 languages. As of today we count 324 catalogs and 12290 patterns - 12280 of which are translated into English (US/in).
We work hard to bring you the best knitting and crochet have to offer, inspiration and advice as well as great quality yarns at incredible prices! Would you like to use our patterns for other than personal use? You can read what you are allowed to do in the Copyright text at the bottom of all our patterns. Happy crafting!
Post a comment to pattern DROPS 132-2
We would love to hear what you have to say about this pattern!
If you want to leave a question, please make sure you select the correct category in the form below, to speed up the answering process. Required fields are marked *.