
Popular categories
Looking for a yarn?


Comments / Questions (427)
![]() Brenda wrote:
Brenda wrote:
Before I unpick everything. Please could you tell me if the front pieces should both be started from the top, bottom or one from the top and one from the bottom to keep the rows looking even. Thanks. The pattern does not make this clear at all.
25.07.2013 - 10:44
![]() Brenda wrote:
Brenda wrote:
I followed instructions carefully but the left side of the jacket turns over and lies flat whereas the rhs from top of neck just curls under and looks completely different. Should I have started the fronts both from the top, one side from the top and the other from the bottom? Where have I gone wrong. Thanks
16.07.2013 - 23:22
![]() Brenda wrote:
Brenda wrote:
Decreasing the front of this jacket seems problematic as the instructions are not very clear. The decrease tip states dtr until last 3dtr. One answer is different to this (ie you do a half decrease at the beginning of the first row) another answer given is the same as the decrease tip where you don’t decrease at the beginning of the first row just at the end etc. So do you do a half decrease at the beginning of the first row or not? Thanks.
01.07.2013 - 23:57DROPS Design answered:
Dear Brenda, you are correct, dec start as stated in dec tip, at the end of 1st row, then each side of row. Happy crocheting!
02.07.2013 - 09:11
![]() Yvonne wrote:
Yvonne wrote:
Ik heb het vestje nu twee keer gemaakt. Een keer voor mijn nicht en een keer voor mijzelf. Erg geslaagd.
20.06.2013 - 21:16
![]() Paula Plowman wrote:
Paula Plowman wrote:
I am having trouble with the front sides. After I finish round 20 do I chain 4 and tr 81? Then count back from the 81st stitch to put the markers? Then if i do it for the other side it won't be even because you start the round by the arm hole. Thanks for the help /
20.06.2013 - 18:09DROPS Design answered:
Dear Mrs Plowman, in size L/XL after round 20, body is finished and will continue with front pieces - see "Left front piece - all sizes" below : you will work on the 81 tr each side for front pieces. Happy crocheting!
21.06.2013 - 09:53
![]() Fernanda wrote:
Fernanda wrote:
Sinceramente creo que para nada esté bien explicado, cuando hay tantas preguntas y sobre todo las respuestas tampoco están nada claras, yo particularmente me tuve que romper la cabeza unas cuantas veces, y eso que aún no terminé, espero que lo consiga. En otros modelos de Drops las explicaciones eran claras y escuetas, pero no las de este patrón. Gracias y perdóname por ser tan dura pero llevé una semana sin hacer nada del patrón solo romperme la cabeza. GRACIAS
08.06.2013 - 15:49Fernanda answered:
Voy a intentar explicarlo, yo estoy haciendo la talla L, después de la ronda 20 se reparte los puntos de la siguiente manera o sea los 81 ptos: Se ganchilla cada delantero por separado en los 81 ptos de cada lado. Se reparten de la siguiente manera:colocar 2 marcadores a 24 pts, 1 marcador, a 33 pts, otro marcador,y nos quedan 24 ptos = 81 pts para el primer delantero.Despues de terminar con este delantero hacer el otro igual.Saludos a todos y espero haberos ayudado
09.06.2013 - 13:16
![]() Nadine wrote:
Nadine wrote:
Bonjour, je vais commencer le devant, mais comment est il délimité (79 doubles brides)? On doit placer des marqueurs à 23 mailles de chaque côtés. A partir d'où calculer ces 23 mailles? Merci d'avance, Nadine
09.05.2013 - 16:30DROPS Design answered:
Bonjour Nadine, pour être sûre de l'emplacement des devants, pliez votre ouvrage en 2 et places les emmanchures l'une en face de l'autre et comptez les 79 DB de chaque côté, les marqueurs se trouvent à 23 m de chaque côté : comptez 23 DB, placez un marqueur, comptez 33 DB, placez un marqueur, il reste 23 DB jusqu'à la fin du devant. Bon crochet !
10.05.2013 - 08:33Carmen wrote:
I'm starting on front of jacket(in my case over 81 stitches). After joining yarn at stitch marker say at neck side of jacket (rs facing), do you start off with dec row 1 by ch1,skip 1trb,1sc,1hdc,1dc then continue with trb until you reach 1st marker for inc?Then at end of row 1,with 3 trb remaining,you dec again.Starting row 2 dec again and so on?
04.05.2013 - 08:20DROPS Design answered:
Dear Carmen, correct, I did that way for my jacket, you dec at the beg and end of each row, so that you start with a dec as stated. Happy crocheting!
04.05.2013 - 08:30
![]() Corinne wrote:
Corinne wrote:
Je ne comprend vraiment pas comment entamer les cotés. Vous parler d'augmentations et de diminutions en meme temps. pouvez vous m'aider s'il vous plait? Merci
26.04.2013 - 17:11DROPS Design answered:
Bonjour Corinne, les côtés (devants)se crochètent sur les mailles indiquées de chaque côté, vous augmentez aux marqueurs que vous avez placé à 23-24-27 m de chaque côté (cf taille) et diminuez au début et à la fin de chaque rang comme indiqué sous "diminutions 1". Bon crochet!
27.04.2013 - 09:03
![]() Jill wrote:
Jill wrote:
Having problems with dec for sleeve cap. Is this correct? first row: dec 3 at each end. second to fourth row: dec 2 at each end, and fifth row dec 3 at each end. A total of only 5 rows and a total of 24 stitches decreased. Correct?? J. Thanks a bunch...
10.04.2013 - 20:44DROPS Design answered:
Dear Jill, it looks correct, see decrease tip 2 to dec each side (beg + end of row). Happy crocheting!
11.04.2013 - 09:19
|
|
Wild Flower#wildflowercardigan |
|
 |
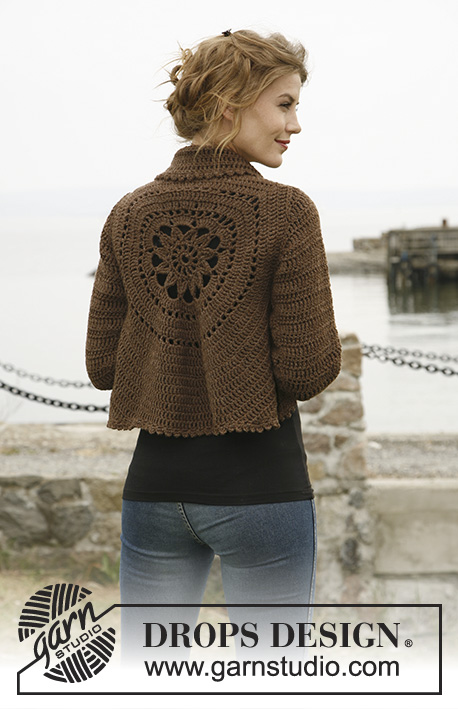 |
Crochet DROPS jacket worked in a circle in ”Nepal”. Size: S to XXXL
DROPS 132-2 |
|
|
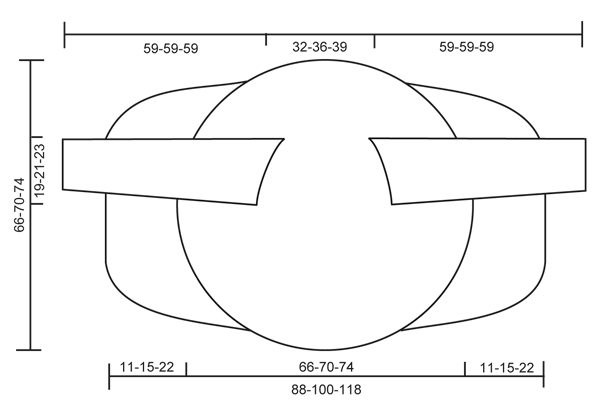
CROCHET TIP: Replace first tr on every round/row with ch 4. DECREASE TIP 1 (applies to the body): Dec as follows: Work tr until 3 tr remain, * in the first of these work 1 dc, in the next 1 hdc and in the last 1 sc, turn with ch 1, skip sc, work 1 sl st in hdc and 1 sl st in dc, then 1 sc in first tr, 1 hdc in next tr and 1 dc in next tr, work tr until 3 tr remain at end of row *, repeat from *-* until a total of 6-8-12 rows have been worked. DECREASE TIP 2 (applies to sleeve cap): Dec at beg of row by working sl st over the no of tr to be dec. Dec at end of row by working until same no of sts to be dec remains, turn piece. -------------------------------------------------------- -------------------------------------------------------- BODY: Worked in the round in a circle from mid back. Ch 8 on hook size 5 mm / H/8 with Nepal and form a ring with 1 sl st in first ch. ROUND 1: Work 12 sc in ch-ring, finish with 1 sl st in first sc. ROUND 2: ch 5 (= 1 dc + 2 ch), * 1 dc in next sc, ch 2 *, repeat from *-* the entire round and finish with 1 sl st in 3rd ch from beg of round = 12 dc with 2 ch between each. ROUND 3: 1 ch, continue to crochet as follows in every ch-space the entire round: 1 sc + ch 1 + 1 sc + ch 1, finish round with 1 sl st in first ch = 24 sc with 1 ch between each. ROUND 4: 1 sl st in first sc, 1 sl st in first ch, ch 5, 1 dtr in same ch, * ch 7, then work 4 dtr tog as follows: Work 2 dtr in same ch as last dtr but wait with last YO and pull through on both dtr, skip 1 sc + 1 ch + 1 sc, work 1 dtr in next ch but wait with last YO and pull through, then work last dtr in same ch and pull last YO through all 5 sts on hook *, repeat from *-* a total of 11 times, ch 7, work 2 dtr tog in same ch (but wait with last YO and pull through on both), work 1 sl st in 5th ch from beg of round and pull thread through all 3 sts on hook. ROUND 5: 1 sl st in first ch-space, ch 4 (= 1 tr), 7 tr in same ch-space, then work 8 tr in every ch-space, finish with 1 sl st in 4th ch from beg of round = a total of 96 tr. ROUND 6: ch 5 (= 1 dc + 2 ch), * skip 1 tr, 1 dc in next tr, ch 2 *, repeat from *-* the entire round and finish with 1 sl st in 3rd ch from beg of round = 48 ch-spaces. ROUND 7 – READ CROCHET TIP: Work 1 tr in every dc and work 1 and 2 tr alternately in every ch-space the entire round = 120 tr. ROUND 8: Work 1 tr in every tr but work 2 tr in every 10th tr = 132 tr. ROUND 9: ch 5 (= 1 dc + 2 ch), * skip 1 tr, 1 dc in next tr, ch 2 *, repeat from *-* the entire round and finish with 1 sl st in 3rd ch from beg of round = 66 ch-spaces. ROUND 10: Work 1 tr in every dc and work 1 and 2 tr alternately in every ch-space the entire round = 165 tr. ROUND 11: Work 1 tr in every tr but work 2 tr in every 15th tr = 176 tr. ROUND 12: Work 1 tr in every tr but work 2 tr in every 16th tr = 187 tr. Piece measures approx. 20 cm / 8" from center and outwards. SIZE S/M: ROUND 13: ch 1, then work 1 sc in each of the first 45 tr (= up towards neck), ch 30 loosely, skip the next 27 tr (= armhole), then work 1 sc in each of the next 88 tr (= down towards back), ch 30 loosely, skip the next 27 tr (= armhole) and fasten with 1 sl st in first sc on round. ROUND 14: Work 1 tr in every sc - but inc 2 tr evenly over the first 45 sc (= 47 tr), then work 30 tr in ch-row over armhole, work 1 tr in every sc – but inc 3 tr evenly over the bottom 88 sc (= 91 tr), and work 30 tr in ch-row over armhole = 198 tr. ROUND 15 to 19: Continue with tr – while at the same time inc 6 tr evenly on every round. After 19th round there are 228 tr on the round and piece measures approx. 33 cm / 13" from center and outwards. Continue working only over 79 tr in each side – i.e. do not work over 35 tr at top by neck or 35 tr at bottom of back. Continue with explanation under FRONT PIECE. SIZE L/XL: ROUND 13: Work 1 tr in every tr but work 2 tr in every 17th tr = 198 tr. ROUND 14: ch 1, then work 1 sc in each of the first 50 tr (= up towards neck), ch 32 loosely, skip the next 29 tr (= armhole), then work 1 sc in each of the next 90 tr (= down towards back), ch 32 loosely, skip the next 29 tr (= armhole) and fasten with 1 sl st in first sc on round. ROUND 15: Work 1 tr in every sc - but inc 3 tr evenly over the first 50 sc (= 53 tr), then work 32 tr in ch-row over armhole, work 1 tr in every sc – but inc 3 tr evenly over the bottom 90 sc (= 93 tr), and work 32 tr in ch-row over armhole = 210 tr. ROUND 16 to 20: Continue with tr – while at the same time inc 6 tr evenly on every round. After 20th round there are 240 tr on the round and piece measures approx. 35 cm / 13¾" from center and outwards. Continue working only over 81 tr in each side – i.e. do not work over 39 tr at top by neck or 39 tr at bottom of back. Continue with explanation under FRONT PIECE. SIZE XXL and XXXL: ROUND 13: Work 1 tr in every tr but work 2 tr in every 17th tr = 198 tr. ROUND 14: Work 1 tr in every tr but work 2 tr in every 18th tr = 209 tr. ROUND 15: ch 1, then work 1 sc in each of the first 54 tr (= up towards neck), ch 36 loosely, skip the next 32 tr (= armhole), then work 1 sc in each of the next 91 tr (= down towards back), ch 36 loosely, skip the next 32 tr (= armhole) and fasten with 1 sl st in first sc on round. ROUND 16: Work 1 tr in every sc - but inc 2 tr evenly over the first 54 sc (= 56 tr), then work 36 tr in ch-row over armhole, work 1 tr in every sc – but inc 3 tr evenly over the bottom 91 sc (= 94 tr), and work 36 tr in ch-row over armhole = 222 tr. ROUND 17 to 22: Continue with tr – while at the same time inc 6 tr evenly on every round. After 22nd round there are 258 tr on the round and piece measures approx. 37 cm / 14½" from center and outwards. Continue working only over 89 tr in each side – i.e. do not work over 40 tr at top by neck or 40 tr at bottom of back. Continue with explanation under FRONT PIECE. LEFT FRONT PIECE - ALL SIZES: = 79-81-89 tr. Insert a marker after 23-24-27 sts in from each side (= 33-33-35 sts between markers). Then work tr back and forth over these sts while at the same time inc 1 st at every marker on every row (i.e. inc 2 sts on row, inc alternately before and after marker) and dec 3 sts at beg and end of every row in each side – SEE DECREASE TIP 1 until a total of 6-8-12 rows back and forth have been worked. RIGHT FRONT PIECE: Work same way as on left piece over 79-81-89 tr in right side. SLEEVE (worked back and forth): Ch 46-48-53 loosely (includes 4 ch to turn with) on hook size 5 mm / H/8 with Nepal. ROW 1: 1 tr in 5th ch from hook, 1 tr in each of the next 2-4-2 ch, * skip ch 1, 1 tr in each of the next 6 ch *, repeat from *-* until 4 ch remain, skip 1 ch and work 1 tr in each of the last 3 ch = 37-39-43 tr. ROW 2: 1 tr in every tr – READ CROCHET TIP! ROW 3: ch 6 (= 1 tr + 2 ch), skip 1 tr, 1 tr in next tr, * ch 2, skip 1 tr, 1 tr in next tr *, repeat from *-* the entire row = 18-19-21 ch-spaces. ROW 4: Work 1 tr in every tr and 1 tr in every ch-space = 37-39-43 tr. Repeat row 2-4 a total of 3 times. Piece measures approx. 18 cm / 7". Then work tr on all rows until finished measurements, while at the same time inc as follows: SIZE S/M: * Inc 1 tr in one side by working 2 tr in next to last tr. On next row inc 1 tr in the other side the same way. Inc 1 more time the same way in each side, then work 1 row without inc *, repeat from *-* a total of 3 times = 12 inc = 49 tr. SIZE L/XL + XXL/XXXL: * Inc 1 tr in one side by working 2 tr in next to last tr. On next row inc 1 tr in the other side the same way *, repeat from *-* a total of 8 times = 16 inc = 55-59 tr. ALL SIZES: Continue to work until piece measures 49 cm / 19¼" in all sizes. Now dec on every row in each side for sleeve cap – SEE DECREASE TIP 2: 3 tr 1 time, 2 tr 3 times and 3 tr 1 time = 25-31-35 tr remain at the top. Fasten off. ASSEMBLY: Sew sleeve seams tog edge to edge to avoid a chunky seam. Work 1 round around the entire body and at bottom of sleeves as follows: * ch 5, 1 dc in first ch, skip 1 st, fasten with 1 sc in next st *, repeat from *-* the entire round and finish with 1 sl st in first ch. Sew in the sleeves. If desired, close the jacket with a pin or sew on a button on to left front piece (try the jacket on to see where button should be) and button it in crochet edge. |
|
 |
|
Have you finished this pattern?Tag your pictures with #dropspattern #wildflowercardigan or submit them to the #dropsfan gallery. Do you need help with this pattern?You'll find 9 tutorial videos, a Comments/Questions area and more by visiting the pattern on garnstudio.com. © 1982-2026 DROPS Design A/S. We reserve all rights. This document, including all its sub-sections, has copyrights. Read more about what you can do with our patterns at the bottom of each pattern on our site. |
|


With over 40 years in knitting and crochet design, DROPS Design offers one of the most extensive collections of free patterns on the internet - translated to 17 languages. As of today we count 324 catalogs and 12290 patterns - 12280 of which are translated into English (US/in).
We work hard to bring you the best knitting and crochet have to offer, inspiration and advice as well as great quality yarns at incredible prices! Would you like to use our patterns for other than personal use? You can read what you are allowed to do in the Copyright text at the bottom of all our patterns. Happy crafting!
Post a comment to pattern DROPS 132-2
We would love to hear what you have to say about this pattern!
If you want to leave a question, please make sure you select the correct category in the form below, to speed up the answering process. Required fields are marked *.