
Popular categories
Looking for a yarn?


Comments / Questions (68)
![]() Drops Design wrote:
Drops Design wrote:
Jo målene stemmer men det er MEGET vigtigt at du har 48p retstrik på 10 cm i højden, ellers vil du nå målene i højden inden du bliver færdig med alle ud og indtagninger.
12.09.2011 - 09:37
![]() Silja Schmelling wrote:
Silja Schmelling wrote:
Opskriften passer ikke ift. antal m og mål af arb på forstk. Har valgt 0-3 mdr. Der skulle være 28 indtagelser, men ikke nået til endnu, arb måler allerede over 17 cm. Og ift. efter 28 indtagelser, skulle der laves nye masker til ærme og arbejdet ser allerede rimelig lang ud ift placering af ærmet. Er opskriften målt korrekt?
11.09.2011 - 17:16
![]() Drops Design wrote:
Drops Design wrote:
Jo det stemmer, der hvor der står 0 gange går du jo bare videre i opskriften og fortsætter indtagningerne på hver 2.p
13.04.2011 - 12:01
![]() Margrete Bech wrote:
Margrete Bech wrote:
Der er en fejl i opskriften til forstykket til jekken. Antallet af masker der skal tages ind er angivet som: 0-0-7 (19-17) det kan vist ikke være rigtigt. Jeg vil blive meget glad for at få oplyst det rigtige antal. Venlig hilsen
13.04.2011 - 10:45
![]() Susanna wrote:
Susanna wrote:
Kiitos, näin arvelinkin!
04.04.2011 - 19:34
![]() DROPS wrote:
DROPS wrote:
Etukappaleen lisäykset tehdään kyllä etureunassa. Myöhemmin etureunassa kavennetaan silmukoita, jolloin etukappaleen keskelle muodostuu kärki.
04.04.2011 - 11:17
![]() Susanna wrote:
Susanna wrote:
Kuuluisiko etukappaleen alun lisäykset tehdä kappaleen toisessa reunassa? Ohjeessa lukee, että lisäykset tehdään keskelle eteen, mutta eihän kappaleesta silloin tule kuvan mukainen.
03.04.2011 - 10:50
![]() Karina wrote:
Karina wrote:
Vilka fina mönster du har
24.01.2011 - 19:13
|
|
Sweet Evelina#sweetevelinajacket |
|
 |
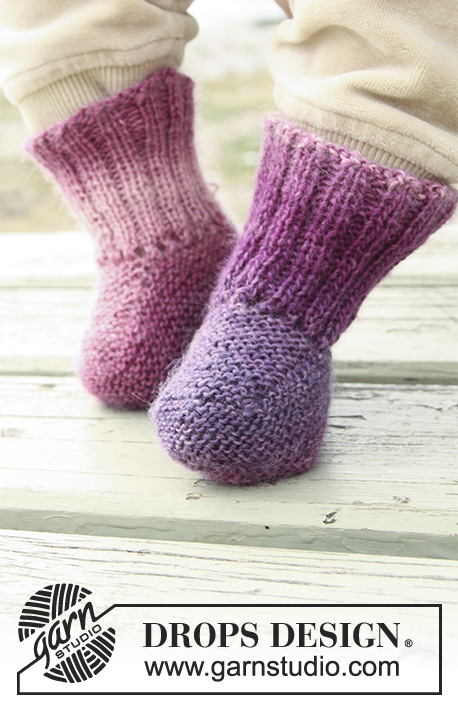 |
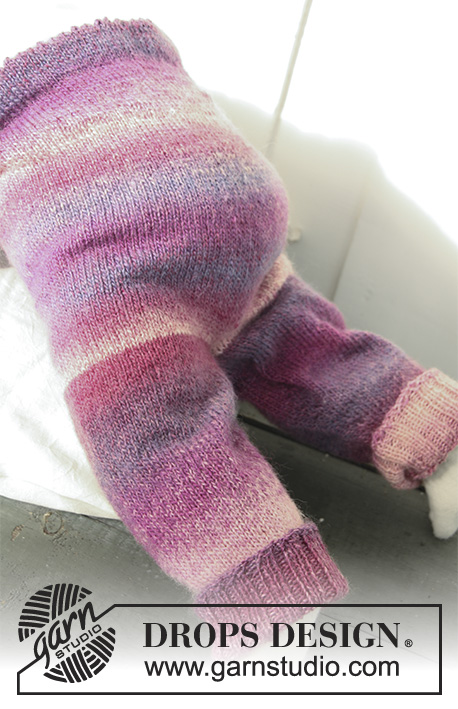
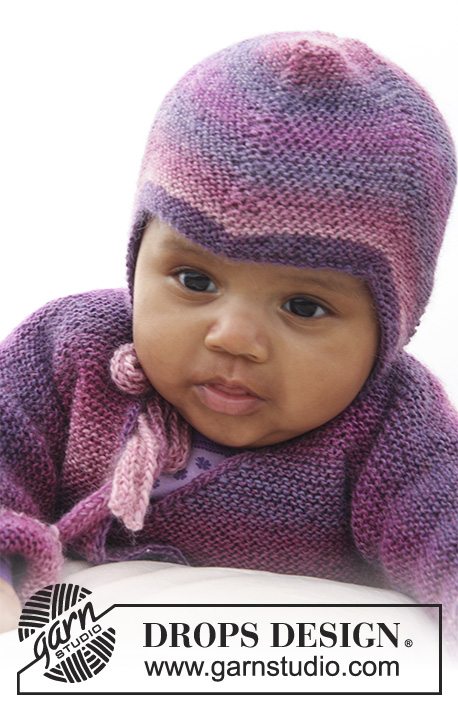
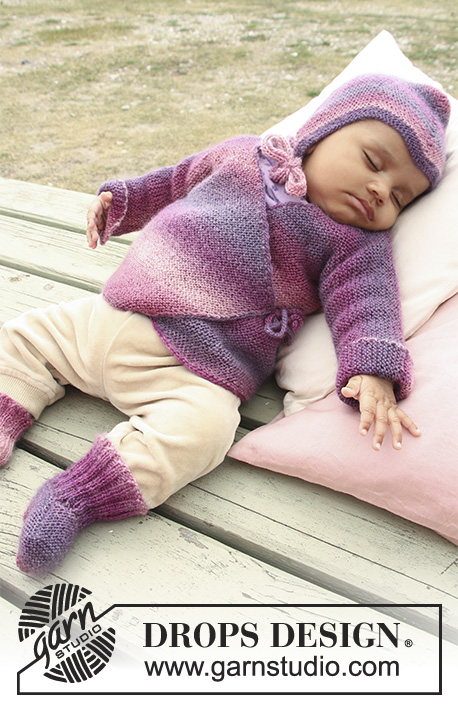
Set of knitted wrap-around jacket in garter st, socks and hat for baby and children in DROPS Delight
DROPS Baby 20-1 |
|
|
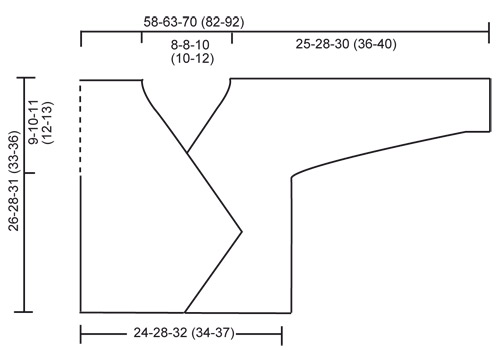
JACKET: Worked back and forth on circular needle. Beg on front piece, cast on sts for sleeve and work up to the shoulder. Knit the other front piece, place both front pieces tog and work down the back piece. LEFT FRONT PIECE: LOOSELY cast on 29-34-38 (41-44) sts on circular needle size 3 mm / US 2or3 with Delight. K all rows, i.e work in garter st – AT THE SAME TIME on 2nd row cast on 1 new st towards mid front. Repeat inc towards front edge on every 2nd and 3rd row alternately a total of 18-20-24 (28-30) times = 47-54-62 (69-74) sts. K 10 rows after last inc. Piece measures approx. 11-12-15 (17-18) cm / 4⅜"-4¾"-6" (6¾"-7"). READ ALL OF THE FOLLOWING SECTION BEFORE CONTINUING! On next RS row dec 1 st towards mid front by knitting the last 2 sts tog. Repeat dec on each row (i.e. from RS and WS): a total of 0-0-7 (19-12) times and then on every other row (i.e. from RS): a total of 28-31-29 (21-32) times (a total dec of 28-31-36 (40-44) sts). AT THE SAME TIME when piece measures 17-18-20 (21-23) cm / 6¾"-7"-8" (8¼"-9") cast on new sts at the end of row towards the side of sleeve: 6 sts 2-2-3 (3-3) times, 8 sts 1-1-1 (2-3) times and 21-22-20 (23-24) sts 1 time. After all inc and dec there are 60-65-72 (86-96) sts on the needle for shoulder/sleeve. When piece measures 26-28-31 (33-36) cm / 10¼"-11"-12¼" (13"-14¼") insert a marker = mid on shoulder – AT THE SAME TIME cast on 2 new sts at the end of the needle towards neck, repeat inc on next row towards neck = 64-69-76 (90-100) sts. Put all sts on a stitch holder. RIGHT FRONT PIECE: Cast on and knit as left front piece but opposite. BACK PIECE: Work left front piece onto circular needle, cast on 12-12-16 (16-20) new sts (= back of neck) and work right front piece onto circular needle = 140-150-168 (196-220) sts. NOW MEASURE PIECE FROM MARKERS ON SHOULDERS. Continue to K back and forth on needle. When piece measures 6.5-7.5-8 (8.5-9) cm / 2½"-2⅞"-3⅛" (3¼"-3½") begin to bind off sleeve sts. Bind off at beg of each row in each side as follows: 21-22-20 (23-24) sts 1 time, 8 sts 1-1-1 (2-3) times and 6 sts 2-2-3 (3-3) times = 58-66-76 (82-88) sts on needle. Continue until piece measures approx. 26-28-31 (33-36) cm / 10¼"-11"-12¼" (13"-14¼") – fold piece at markers on shoulders and check that front and back pieces are the same length – bind off. ASSEMBLY: Sew side and sleeve seams tog edge to edge in front loop of outermost sts. CROCHET BORDER: Work with Delight on hook size 2.5 mm/C/2 around the opening of jacket as follows: 1 sc, * ch 2, skip 2 sts/4 rows garter, 1 sc in next st *, repeat from *-*, when at the tip of front piece crochet a ribbon as follows: 1 sc in tip, then work ch for approx. 25 cm / 10", turn and work 1 sl st in each ch on return, then work 1 sc in tip of front piece again, continue crochet border around the jacket until the tip of the other front piece, crochet another ribbon as on first front piece, continue around the rest of the jacket. Work the same way around the opening of the sleeves. Then work another ribbon, similar to the one in each tip, on the inside of the seam in the right side and on the outside of the seam in the left side – make sure that the ribbons are at the same height as tips on front pieces. -------------------------------------------------------- SOCK: The sock is worked back and forth from mid back. Cast on 48-52-56 (56) sts on needle size 2.5mm/US 1or2 with 2 strands Delight. Remove 1 strand and knit rib border (= K2/P2) for 5-6-6 (7) cm / 2"-2⅜"-2⅜" (2¾") – adjust so that next row is worked from WS. P 1 row from WS at the same time dec 14-14-18 (14) sts evenly = 34-38-38 (42) sts. WITH EYELET HOLES: Work next row from RS as follows: K1, *K2 tog, 1 YO *, repeat from *-* and finish with K1. P 1 row from WS. WITHOUT EYELET HOLES: K 1 row from RS and P 1 row from WS. Now put the outermost 12-13-13 (15) sts in each side on a stitch holder. K on each row over the mid 10-12-12 (12) sts for 4-4.5-5.5 (6.5) cm / 1½"-1¾"-2¼" (2⅜"). Put sts from stitch holder back on needle and knit up 10-11-13 (16) sts on each side of mid piece = 54-60-64 (74) sts on needle. K on each row over all sts for 3-4-5 (5) cm / 1⅛"-1½"-2" (2") while at the same time after 1.5-2-2.5 (3) cm / ½"-¾"-⅞" (1⅛"), start dec on every other row as follows until sock is completed: Dec 1 st at the beg and the end of row and K2 tog on each side of the 2 mid sts. Bind off and sew sock tog mid under foot and continue up mid back – sew in outer loops of sts to avoid a chunky seam. If you wish, thread a silk ribbon through the eyelet holes. ------------------------------------------------------------ HAT: INCREASE TIP: All inc are done from RS. Inc 1 st before and after st with marker by making 1 YO. On next round knit YO twisted (i.e knit in the back loop of YO instead of front) to avoid holes. DECREASE TIP: All dec are done from RS. Dec 1 st on each side of st with marker. Beg 1 st before st with marker. Put 1 st on a cable needle behind the piece, slip 1 st (= st with marker), K next st and st on cable needle tog, psso. ---------------------------------------------------------- HAT: Worked back and forth on needle – K all rows (= garter st). Cast on 119-127-135 (139-145) sts on needle size 2.5 mm / US 1or 2 with Delight. K 6 rows (1st row = RS). Insert 7 markers in the piece as follows (from RS): 1st marker in the 1st st on needle, 2nd marker in the 22nd-24th-26st (28th-31st) st, 3rd marker in the 43rd-47th-51st (55th-61st) st, 4th marker in the 60th-64th-68th (70th-73rd) st, 5th marker in the 77th-81st-85th (85th-85th) st, 6th marker in the 98th-104th-110th (112th-115th) st and 7th marker in the last st on the needle. Continue to K – AT THE SAME TIME on 1st row, beg to inc and dec – SEE INCREASE TIP AND DECREASE TIP! Inc 1 st after 1st marker on every other row. Dec 1 st on each side of the 2nd marker every other row. Inc 1 st before 3rd marker on every other row. Inc 1 st after 3rd marker on every 4th row. Dec 1 st on each side of the 4th marker every 4th row. Inc 1 st before 5th marker on every 4th row. Inc 1 st after 5th marker on every other row. Dec 1 st on each side of the 6th marker every other row. Inc 1 st before 7th marker on every other row. When piece measures 13-15-16 (18-19) cm / 5⅛"-6"-6¼" (7"-8") (measured from bottom tip at 2nd and 6th marker) work next row from RS as follows: * K1, K2 tog *, repeat from *-* WHILE binding off. ASSEMBLY: Back of hat = bind off edge, i.e. 2 whole tips and 2 half tips. The 2nd of the 3 whole tips in the opposite side of the piece = cast on edge, goes down to the forehead at the front. Sew the hat tog edge to edge with 1 stitch in each st along the bind off edge as follows: Sew first half tip tog with first half of first whole tip. Continue to sew second half of first whole tip tog with first half of second whole tip. Then sew the other half of the second whole tip tog with the last half tip. Finish by sewing the hat tog mid back – make sure to sew edge to edge to avoid chunky seams. TIES: Cast on 4 sts on needle size 2.5 mm / US 1 with Delight. Knit as follows: * K1, place yarn in front of piece (towards you), slip 1 st as if to P, place yarn behind piece (from you) *, repeat from *-* the rest of row and on all rows. This becomes a tie worked in the round. bind off when the tie measures approx. 20-22-24 (26-28) cm / 8"-8¾"-9½" (10¼"-11"). Knit one more tie. Sew one tie at the bottom of each tip on each side. |
|
 |
|
Have you finished this pattern?Tag your pictures with #dropspattern #sweetevelinajacket or submit them to the #dropsfan gallery. Do you need help with this pattern?You'll find 15 tutorial videos, a Comments/Questions area and more by visiting the pattern on garnstudio.com. © 1982-2026 DROPS Design A/S. We reserve all rights. This document, including all its sub-sections, has copyrights. Read more about what you can do with our patterns at the bottom of each pattern on our site. |
|


With over 40 years in knitting and crochet design, DROPS Design offers one of the most extensive collections of free patterns on the internet - translated to 17 languages. As of today we count 324 catalogs and 12272 patterns - 12262 of which are translated into English (US/in).
We work hard to bring you the best knitting and crochet have to offer, inspiration and advice as well as great quality yarns at incredible prices! Would you like to use our patterns for other than personal use? You can read what you are allowed to do in the Copyright text at the bottom of all our patterns. Happy crafting!
Post a comment to pattern DROPS Baby 20-1
We would love to hear what you have to say about this pattern!
If you want to leave a question, please make sure you select the correct category in the form below, to speed up the answering process. Required fields are marked *.