
Popular categories
Looking for a yarn?


Comments / Questions (68)
![]() MK wrote:
MK wrote:
Ich verstehe nicht, wo und wie ich die Fäden zum Zubinden anbringen soll. Eine Seite ist ja unter der anderen???
25.01.2019 - 19:01DROPS Design answered:
Liebe MK, Sie haben je 1 Band außen an den Spitzen, dann eins an der einen Seite der Jacke an der Naht außen an der Jacke und eins an der anderen Seite der Jacke auch an der Naht, aber diesmal an der Innenseite, sodass Sie das Band der innen liegenden Spitze innen zubinden können. Viel Spaß beim stricken!
28.01.2019 - 08:58
![]() Lut Zurings wrote:
Lut Zurings wrote:
Hallo, ik probeer de muts Sweet Eveline model DROPS Baby 20-1 te breien. Volgens beschrijving gebeuren meerderingen en minderingen altijd aan de goede kant van het werk. Hoe zit het dan met de meerderingen en minderingen die op elke 4de naald moeten gedaan worden? 4de naald is toch steeds aan de achterkant van het werk?
05.06.2018 - 16:51DROPS Design answered:
Dag Lut, Je hoeft niet letterlijk op de 4e naald te meerderen/minderen, maar het gaat er om dat je het om de 4 naalden doet, dus je begint bijvoorbeeld op naald 1 en dan minder/meerder je weer op naald 5.
08.06.2018 - 11:08
![]() Alison wrote:
Alison wrote:
Hello, the jacket is beautiful, but is this pattern something a beginner could attempt? I;d really like to have a go at knitting this for my 19 month old daughter but want to know how hard it is first. Thanks!
29.03.2018 - 00:01DROPS Design answered:
Dear Alison, thank you for your question. While the jacket presents some challenges for the total beginner, like decreasing and increasing, I would encourage the slightly more advanced beginners to try it. And do not forget, you can find tutorial videos on our page to help you, and you can always ask for help in person in the store you bought your DROPS yarn from. Happy Knitting!
29.03.2018 - 01:57
![]() Carolien wrote:
Carolien wrote:
Een vraag over het meerderen bij het vestje. Er staat afwisselend in de 2e en 3e naald meerderen. Dus volgens onderstaande telling? -x--x-x--x-x--x (x is meerderen in deze naald). Of elke 2e en 3e naald meerderen? -xx-xx-xx etc? En ik vind het meerderen zoals in de bijbehorende video te zien is een lelijk resultaat opleveren. Kun je ook gewoon van de eerste of laatste steek de voor- en achterlus breien?
04.12.2016 - 21:19DROPS Design answered:
Hoi Carolien. Ja, de telling is correct. Je kan altijd meerderen op een andere manier als je die zelf mooier vindt
05.12.2016 - 14:23Carol Craig wrote:
I have got to the stage where I am about to cast on stitches for sleeves. Can I just check that my understanding is correct. Cast on 6sts at the sleeve side and then turn the work and knit back. Knit the row (obviously paying attention to the decreases) and then cast on another six. Then after doing the same cast on eight and so forth according to the pattern. Thanks for your help. Carol
23.09.2016 - 22:14DROPS Design answered:
Dear Mrs Craig, you're right, you've to continue paying attention to dec, and at the same time cast on sts at the end of the row at the sleeves side. For example, for size 1/3 months, you've to cast on 6 sts at the end of the row, work return row, cast on 6 sts at the end of the row, work return row, cast on 8 sts at the end of the row, work return row, cast on 21 sts at the end of the row. Happy knitting!
24.09.2016 - 10:39
![]() Karin wrote:
Karin wrote:
Ik weet niet hoe ik verder moet met de sokken: waar vandaan moet ik steken opnemen na de ribbelsteken over de middelste steken, na de gaatjesrand? En als ik de zijsteken weer op de naald zet, vouwt het middengedeelte toch dubbel?
03.11.2015 - 21:20DROPS Design answered:
Beste Karin. Je hebt het stukje van de ribbelsteken. Je zet de st van de hulpdraad terug op de nld en tegelijkertijd neem je st op langs beide zijkanten van het stukje met ribbelsteken. Dan heb je een nld als volgt (voorbeeld maat 1/3 mnd): 12 st van de hulpdraad, neem 10 st op aan de ene zijkant van het ribbelsteekstukje, 10 st van het ribbelsteekstukje, neem 10 st op aan de andere zijkant van het ribbelsteekstukje en de laatste 12 st van de hulpdraad. Het middenstukje vouwt niet dubbel.
04.11.2015 - 12:17
![]() Capelle wrote:
Capelle wrote:
Bonjour, J'ai tricoté toutes les augmentations et diminutions mais je n'arrive pas à 26cm de haut (taille 1/3ois)... que dois-je faire? Je continue à tricoter les 60 mailles jusqu'à atteindre cette hauteur? Merci, Caroline
30.10.2015 - 09:22DROPS Design answered:
Bonjour Caroline, vous continuez au point mousse jusqu'à ce que l'ouvrage mesure 26 cm. Bon tricot!
30.10.2015 - 10:34
![]() Jutta wrote:
Jutta wrote:
Hallo, ich habe eine Frage zu den Bändern: je eins an beide Vorderteile mittig ist klar, aber innen an den Nähten doch nur an einer Seite und das andere außen an der Naht, oder?
05.09.2015 - 09:39DROPS Design answered:
Sie haben je 1 Band außen an den Spitzen, dann eins an der einen Seite der Jacke an der Naht außen an der Jacke und eins an der anderen Seite der Jacke auch an der Naht, aber diesmal an der Innenseite, sodass Sie das Band der innen liegenden Spitze innen zubinden können.
13.09.2015 - 13:23
![]() Anne Turner wrote:
Anne Turner wrote:
What does it mean when the pattern says 'cast on 1 new stitch TOWARDS MID FRONT' ?
06.07.2015 - 01:53DROPS Design answered:
Dear Mrs Turner, this inc works for the slanted front edge, ie on left front piece you will inc either at the end of row from RS or at the beg of row from WS. Happy knitting!
06.07.2015 - 10:41
![]() Kaja wrote:
Kaja wrote:
Hei. Jeg forstår ikke oppskriften og måtte nettopp rekke opp og begynne på nytt. Hvor på jakken vil de maskene man legger opp bli? Hvor på pinnen skal de første økningene skje (ytterst/midt på)? Hvor på jakken vil 10p med rett bli? Håper svarene på disse spørsmålene vil sette meg i stand til å gjøre den ferdig :-) Litt mer grundigere beskrivelser/bilder ville være en fordel for å gjøre oppskriften enklere å forstå. Mvh Kaja
14.11.2014 - 12:44DROPS Design answered:
Hei Kaja. Du starter standard ved underkanten og strikker mod skulderen (hvis andet er tilfaeldet saa skrives det i mönstret). Maskerne du laegger op kommer midt for - dvs langs forkanten af forstykket: "SAMTIDIG på 2.p legges det opp 1 ny m mot midt foran. Efter sidste ökning strikker du 10 pinde ret = midt paa forstykket hvor den er breddest för du begynder at minske igen.
14.11.2014 - 16:23
|
|
Sweet Evelina#sweetevelinajacket |
|
 |
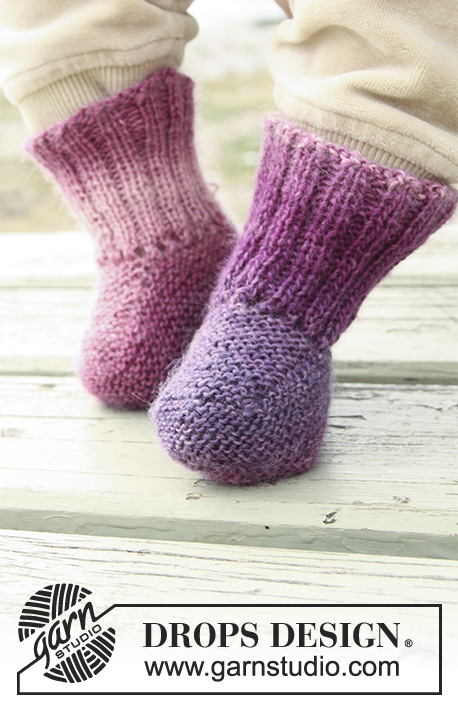 |
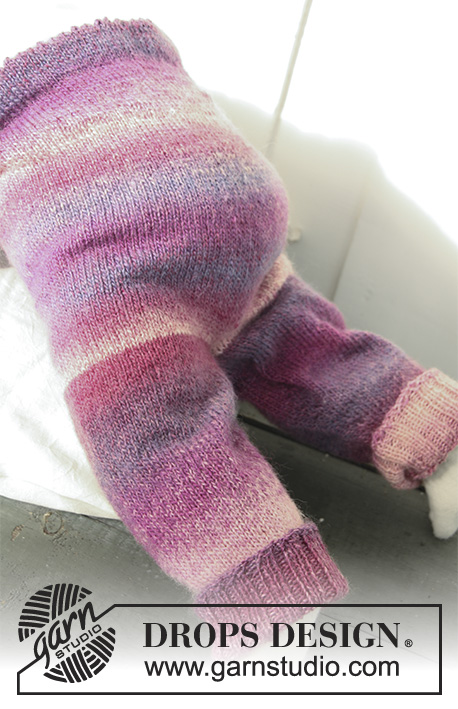
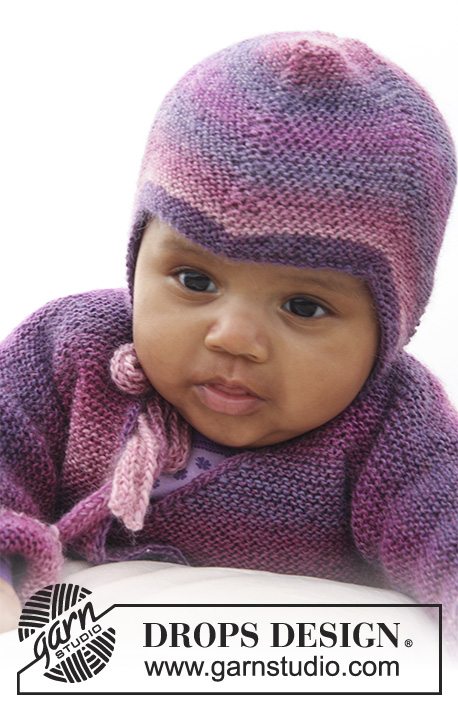
Set of knitted wrap-around jacket in garter st, socks and hat for baby and children in DROPS Delight
DROPS Baby 20-1 |
|
|
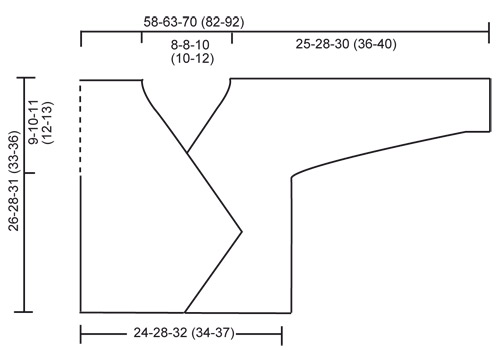
JACKET: Worked back and forth on circular needle. Beg on front piece, cast on sts for sleeve and work up to the shoulder. Knit the other front piece, place both front pieces tog and work down the back piece. LEFT FRONT PIECE: LOOSELY cast on 29-34-38 (41-44) sts on circular needle size 3 mm / US 2or3 with Delight. K all rows, i.e work in garter st – AT THE SAME TIME on 2nd row cast on 1 new st towards mid front. Repeat inc towards front edge on every 2nd and 3rd row alternately a total of 18-20-24 (28-30) times = 47-54-62 (69-74) sts. K 10 rows after last inc. Piece measures approx. 11-12-15 (17-18) cm / 4⅜"-4¾"-6" (6¾"-7"). READ ALL OF THE FOLLOWING SECTION BEFORE CONTINUING! On next RS row dec 1 st towards mid front by knitting the last 2 sts tog. Repeat dec on each row (i.e. from RS and WS): a total of 0-0-7 (19-12) times and then on every other row (i.e. from RS): a total of 28-31-29 (21-32) times (a total dec of 28-31-36 (40-44) sts). AT THE SAME TIME when piece measures 17-18-20 (21-23) cm / 6¾"-7"-8" (8¼"-9") cast on new sts at the end of row towards the side of sleeve: 6 sts 2-2-3 (3-3) times, 8 sts 1-1-1 (2-3) times and 21-22-20 (23-24) sts 1 time. After all inc and dec there are 60-65-72 (86-96) sts on the needle for shoulder/sleeve. When piece measures 26-28-31 (33-36) cm / 10¼"-11"-12¼" (13"-14¼") insert a marker = mid on shoulder – AT THE SAME TIME cast on 2 new sts at the end of the needle towards neck, repeat inc on next row towards neck = 64-69-76 (90-100) sts. Put all sts on a stitch holder. RIGHT FRONT PIECE: Cast on and knit as left front piece but opposite. BACK PIECE: Work left front piece onto circular needle, cast on 12-12-16 (16-20) new sts (= back of neck) and work right front piece onto circular needle = 140-150-168 (196-220) sts. NOW MEASURE PIECE FROM MARKERS ON SHOULDERS. Continue to K back and forth on needle. When piece measures 6.5-7.5-8 (8.5-9) cm / 2½"-2⅞"-3⅛" (3¼"-3½") begin to bind off sleeve sts. Bind off at beg of each row in each side as follows: 21-22-20 (23-24) sts 1 time, 8 sts 1-1-1 (2-3) times and 6 sts 2-2-3 (3-3) times = 58-66-76 (82-88) sts on needle. Continue until piece measures approx. 26-28-31 (33-36) cm / 10¼"-11"-12¼" (13"-14¼") – fold piece at markers on shoulders and check that front and back pieces are the same length – bind off. ASSEMBLY: Sew side and sleeve seams tog edge to edge in front loop of outermost sts. CROCHET BORDER: Work with Delight on hook size 2.5 mm/C/2 around the opening of jacket as follows: 1 sc, * ch 2, skip 2 sts/4 rows garter, 1 sc in next st *, repeat from *-*, when at the tip of front piece crochet a ribbon as follows: 1 sc in tip, then work ch for approx. 25 cm / 10", turn and work 1 sl st in each ch on return, then work 1 sc in tip of front piece again, continue crochet border around the jacket until the tip of the other front piece, crochet another ribbon as on first front piece, continue around the rest of the jacket. Work the same way around the opening of the sleeves. Then work another ribbon, similar to the one in each tip, on the inside of the seam in the right side and on the outside of the seam in the left side – make sure that the ribbons are at the same height as tips on front pieces. -------------------------------------------------------- SOCK: The sock is worked back and forth from mid back. Cast on 48-52-56 (56) sts on needle size 2.5mm/US 1or2 with 2 strands Delight. Remove 1 strand and knit rib border (= K2/P2) for 5-6-6 (7) cm / 2"-2⅜"-2⅜" (2¾") – adjust so that next row is worked from WS. P 1 row from WS at the same time dec 14-14-18 (14) sts evenly = 34-38-38 (42) sts. WITH EYELET HOLES: Work next row from RS as follows: K1, *K2 tog, 1 YO *, repeat from *-* and finish with K1. P 1 row from WS. WITHOUT EYELET HOLES: K 1 row from RS and P 1 row from WS. Now put the outermost 12-13-13 (15) sts in each side on a stitch holder. K on each row over the mid 10-12-12 (12) sts for 4-4.5-5.5 (6.5) cm / 1½"-1¾"-2¼" (2⅜"). Put sts from stitch holder back on needle and knit up 10-11-13 (16) sts on each side of mid piece = 54-60-64 (74) sts on needle. K on each row over all sts for 3-4-5 (5) cm / 1⅛"-1½"-2" (2") while at the same time after 1.5-2-2.5 (3) cm / ½"-¾"-⅞" (1⅛"), start dec on every other row as follows until sock is completed: Dec 1 st at the beg and the end of row and K2 tog on each side of the 2 mid sts. Bind off and sew sock tog mid under foot and continue up mid back – sew in outer loops of sts to avoid a chunky seam. If you wish, thread a silk ribbon through the eyelet holes. ------------------------------------------------------------ HAT: INCREASE TIP: All inc are done from RS. Inc 1 st before and after st with marker by making 1 YO. On next round knit YO twisted (i.e knit in the back loop of YO instead of front) to avoid holes. DECREASE TIP: All dec are done from RS. Dec 1 st on each side of st with marker. Beg 1 st before st with marker. Put 1 st on a cable needle behind the piece, slip 1 st (= st with marker), K next st and st on cable needle tog, psso. ---------------------------------------------------------- HAT: Worked back and forth on needle – K all rows (= garter st). Cast on 119-127-135 (139-145) sts on needle size 2.5 mm / US 1or 2 with Delight. K 6 rows (1st row = RS). Insert 7 markers in the piece as follows (from RS): 1st marker in the 1st st on needle, 2nd marker in the 22nd-24th-26st (28th-31st) st, 3rd marker in the 43rd-47th-51st (55th-61st) st, 4th marker in the 60th-64th-68th (70th-73rd) st, 5th marker in the 77th-81st-85th (85th-85th) st, 6th marker in the 98th-104th-110th (112th-115th) st and 7th marker in the last st on the needle. Continue to K – AT THE SAME TIME on 1st row, beg to inc and dec – SEE INCREASE TIP AND DECREASE TIP! Inc 1 st after 1st marker on every other row. Dec 1 st on each side of the 2nd marker every other row. Inc 1 st before 3rd marker on every other row. Inc 1 st after 3rd marker on every 4th row. Dec 1 st on each side of the 4th marker every 4th row. Inc 1 st before 5th marker on every 4th row. Inc 1 st after 5th marker on every other row. Dec 1 st on each side of the 6th marker every other row. Inc 1 st before 7th marker on every other row. When piece measures 13-15-16 (18-19) cm / 5⅛"-6"-6¼" (7"-8") (measured from bottom tip at 2nd and 6th marker) work next row from RS as follows: * K1, K2 tog *, repeat from *-* WHILE binding off. ASSEMBLY: Back of hat = bind off edge, i.e. 2 whole tips and 2 half tips. The 2nd of the 3 whole tips in the opposite side of the piece = cast on edge, goes down to the forehead at the front. Sew the hat tog edge to edge with 1 stitch in each st along the bind off edge as follows: Sew first half tip tog with first half of first whole tip. Continue to sew second half of first whole tip tog with first half of second whole tip. Then sew the other half of the second whole tip tog with the last half tip. Finish by sewing the hat tog mid back – make sure to sew edge to edge to avoid chunky seams. TIES: Cast on 4 sts on needle size 2.5 mm / US 1 with Delight. Knit as follows: * K1, place yarn in front of piece (towards you), slip 1 st as if to P, place yarn behind piece (from you) *, repeat from *-* the rest of row and on all rows. This becomes a tie worked in the round. bind off when the tie measures approx. 20-22-24 (26-28) cm / 8"-8¾"-9½" (10¼"-11"). Knit one more tie. Sew one tie at the bottom of each tip on each side. |
|
 |
|
Have you finished this pattern?Tag your pictures with #dropspattern #sweetevelinajacket or submit them to the #dropsfan gallery. Do you need help with this pattern?You'll find 15 tutorial videos, a Comments/Questions area and more by visiting the pattern on garnstudio.com. © 1982-2026 DROPS Design A/S. We reserve all rights. This document, including all its sub-sections, has copyrights. Read more about what you can do with our patterns at the bottom of each pattern on our site. |
|


With over 40 years in knitting and crochet design, DROPS Design offers one of the most extensive collections of free patterns on the internet - translated to 17 languages. As of today we count 324 catalogs and 12272 patterns - 12262 of which are translated into English (US/in).
We work hard to bring you the best knitting and crochet have to offer, inspiration and advice as well as great quality yarns at incredible prices! Would you like to use our patterns for other than personal use? You can read what you are allowed to do in the Copyright text at the bottom of all our patterns. Happy crafting!
Post a comment to pattern DROPS Baby 20-1
We would love to hear what you have to say about this pattern!
If you want to leave a question, please make sure you select the correct category in the form below, to speed up the answering process. Required fields are marked *.