
Popular categories
Looking for a yarn?


Comments / Questions (45)
![]() Yvonne Samhammer wrote:
Yvonne Samhammer wrote:
Danke für Ihre schnelle Antwort. Habe bereits mir S begonnen.Ich habe einen Umfang von 131 cm (nicht 106 cm wie in der Skizze) .Stricke ich zu locker? Kann ich nicht einfach weniger Maschen anschlagen und Ab- und Zunahmen wie Anleitung "S" beschrieben, vorgehen? Oder evtl kleinere Nadeln statt 4 und 5 ,4 und 3? Wäre nett wenn Sie mir helfen könnten. Grüße Verwendete Wolle Drops Nepal Farbe 8907.
04.02.2016 - 09:08DROPS Design answered:
Sie müssen auf jeden Fall die angegebene Maschenprobe einhalten, wenn Ihnen das mit der genannten Nadelstärke nicht gelingt, probieren Sie es mit einer kleineren Nadel. Stricken Sie auf jeden Fall erst ein Probestück glatt re mit einer Größe von ca. 13 x 13 cm und messen Sie aus, wie viele M Sie auf 10 cm benötigen. Die Maschenprobe ist unerlässlich für ein richtig passendes Kleidungsstück.
06.02.2016 - 09:23
![]() Samhammer.Yvonne wrote:
Samhammer.Yvonne wrote:
Gibt es für diese Anleitung auch Größe XS? Danke.
02.02.2016 - 09:11DROPS Design answered:
Leider können wir Ihnen nur die angegebenen Größen anbieten. Schauen Sie mal in die Maßskizze, vielleicht passt Ihnen Größe S ja auch.
03.02.2016 - 14:50
![]() Michela wrote:
Michela wrote:
Hallo, in der Anleitung für das Modell Nr. 123-12 (Jacke Warm Wishes) steht bei der Anleitung für den Kragen, 95 M aufnehmen. In der 2. Reihe sollten 122 M VERTEILT aufgenommen werden, kann dies sein? Bei 95 M ist es praktisch unmöglich, VERTEITLT 122 M zusätzlich aufzunehmen, da müsste man ja zwischen den Maschen teilweise 2 M aufnehmen. Befinde ich mich im Irrtum? Wenn ja, bitte ich Sie um eine Erklärung, wie die vielen M aufgenommen werden können. Vielen Dank
31.01.2015 - 20:24DROPS Design answered:
Liebe Michaela, Ihr Einwand ist berechtigt - in der Anleitung fehlte ein kleines Wörtchen, nämlich "auf". Sie müssen "auf" 122 M zunehmen, sodass Sie also 122 M auf der Nadel haben. Das ist dann wesentlich einfacher, als 122 M zuzunehmen... :-) Die Anleitung wird umgehend korrigiert.
01.02.2015 - 02:02
![]() Paula wrote:
Paula wrote:
Hallo liebes Drops-Team, trotz Ihre hilfreichen Antworten auf Manuelas Fragen für den Ärmel hakt da bei mir noch etwas: nachdem 6M u. 4x2M u. 3x1M abgekettet sind, wieviele M hab ich dann für Größe XL übrig? Kette ich bis 56cm wirklich 2M/Seite, also 4M pro Reihe ab? Bei mir reichen die M dafür nicht aus.
23.12.2014 - 08:51DROPS Design answered:
Sie beginnen die Abnahmen ja, wenn Sie 72 M auf der Nadel haben und der Ärmel 46 cm misst. Dann ketten Sie 6 M ab, dann beids. 4x je 2 M = 16 M und beids. 3 x je 1 M = 6 M, bleiben 44 M übrig. Der Ärmel müsste dann eine Länge von etwa 52 cm haben, dann ketten Sie beids. je 2 M ab, bis der Ärmel 56 cm misst - das passt auf jeden Fall zur M-Zahl.
06.03.2015 - 13:16
![]() Manuela wrote:
Manuela wrote:
Ärmel: Aus der Anleitung geht für mich nicht hervor, dass nach den Zunahmen die Arbeit nicht mehr rund gestrickt, sondern in Hin- u. RückR. Danke für die Aufklärung. Zum Messen: Nachdem ich die Schultern zusammengenäht habe, passt die Länge nicht mehr, vorher stimmte alles. Keine Ahnung, woran das liegt. Ich werde Ihre Tipps aber beachten. Danke.
08.12.2014 - 18:48
![]() Manuela wrote:
Manuela wrote:
Teil 3: Zum Halsausschnitt: ich habe die Arbeit hängend gemessen und demzufolge nach 73cm mit dem Halsausschnitt begonnen (Die Abnahmen hierfür sind alle ok). Vielleicht habe ich die Arbeit zum Messen anders hängen lassen. Was verstehen Sie denn unter „hängend messen“? Der Messtipp ist für mich nicht eindeutig.
07.12.2014 - 18:48DROPS Design answered:
"Hängend" bedeutet, dass Sie die Jacke beim Messen senkrecht nach unten halten, so, als würden Sie sie tragen. Durch das Garngewicht zieht sich die Jacke noch etwas in die Länge und um eine richtige Passform zu bekommen, ist es wichtig, dies beim Messen zu bedenken. Der Abstand zwischen dem ersten Zusammenstricken und dem Endmaß des Rückenteils sollte bei Ihrer Größe 12 cm betragen, passt das? Wenn das Rückenteil länger als 85 cm ist, sollten Sie auch das Vorderteil vor dem Halsausschnitt entsprechend länger stricken.
07.12.2014 - 20:49
![]() Manuela wrote:
Manuela wrote:
Teil 2: Nochmal zum Ärmel: Die Zunahmen auf 72M sind auch ok. Wenn ich danach aber, entsprechend der Anleitung, von diesen 72M mehr als die Hälfte abketten muss, also am Ende weniger M übrig habe als zu Beginn der Arbeit - wie soll da der Arm reinpassen? Laut Anleitung wird der Arm rund gestrickt.
07.12.2014 - 18:48DROPS Design answered:
Ja, der Ärmel wird zuerst in Rd gestrickt, dann werden an der unteren Ärmelmitte 6 M abgekettet & der Ärmel wird dann in Hin- & Rück-R weitergestrickt (siehe auch die Antwort von heute Vormittag). Sie ketten dann beidseitig ab - für die Armkugel, d.h. der Ärmel erhält damit die richtige Passform für den Armausschnitt und die Schulter. Die abgek. 6 M werden an die am Rumpfteil abgek. 6 M genäht; die restlichen M, die Sie für die Armkugel abketten, werden an den Armausschnitt von Vorder- und Rückenteil genäht.
07.12.2014 - 20:43
![]() Manuela wrote:
Manuela wrote:
Teil 1: Als ich mich früher schon mal an Sie wandte, wurden meine Fragen mit dem freundlichen Hinweis beantwortet, dass ich mich an das Geschäft wenden solle, wo ich die Garne gekauft habe. Zu dieser Anleitung aber trotzdem noch mal meine Fragen.
07.12.2014 - 18:48DROPS Design answered:
Liebe Manuela, wir versuchen, die Fragen an dieser Stelle so gut wie möglich, per "Ferndiagnose", zu beantworten, bei Verständnisfragen ist das in der Regel möglich. Wenn es sich um umfangreichere Probleme handelt oder um Änderungen am Modell, verweisen wir auf das Wollgeschäft, da solche Hilfen an dieser Stelle den Rahmen sprengen.
07.12.2014 - 20:34
![]() Manuela wrote:
Manuela wrote:
Teil 3: Dies ist übrigens mittlerweile die vierte Anleitung, bei der ich nur Ärger mit habe. Ich werde mir wirklich stark überlegen, ob ich mir nochmal eine DROPS-Anleitung antue oder mir irgendwo anders eine Anleitung besorge. Wirklich schade.
06.12.2014 - 17:59DROPS Design answered:
Sie können gerne immer nachfragen, wenn etwas unverständlich oder nicht eindeutig genug formuliert ist.
07.12.2014 - 10:25
![]() Manuela wrote:
Manuela wrote:
Teil 2: Außerdem sind die Zunahmen nicht gleichmäßig, sodass der Ärmel, von der Seite betrachtet, sehr unruhig und irgendwie verhunzt aussieht). Eigentlich schade, dass ich nur Ärger mit dieser Anleitung habe. Wollte sie eigentlich zu Weihnachten verschenken, aber daraus wird nun leider nichts.
06.12.2014 - 17:59DROPS Design answered:
Die Beschr. des Ärmels ist korrekt und die Zunahmen sind gleichmäßig - Sie nehmen ja immer im gleichen Abstand 2 M zu. "Nach" + cm-Angabe bezieht sich auf die Gesamtlänge. Auch das Abketten ist korrekt - der Ärmel wird erst rundgestrickt, dann ketten Sie 6 M an der unteren Ärmelmitte ab (diese passen genau zu den an Vorder- & Rückenteil zuerst für die Armausschnitte abgeketteten M) und stricken die Armkugel hin- und zurück weiter. Dazu ketten Sie beidseitig, d.h. zu Beginn jeder R, die angegebene M-Zahl ab.
07.12.2014 - 10:11
|
||||||||||||||||||||||||||||
Warm Wishes |
||||||||||||||||||||||||||||
|
|
||||||||||||||||||||||||||||
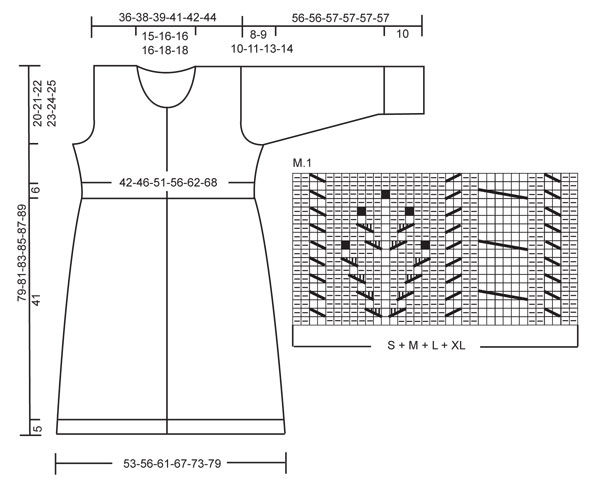
Knitted DROPS jacket with textured pattern and large collar in ”Nepal”. Size S - XXXL.
DROPS 123-12 |
||||||||||||||||||||||||||||
|
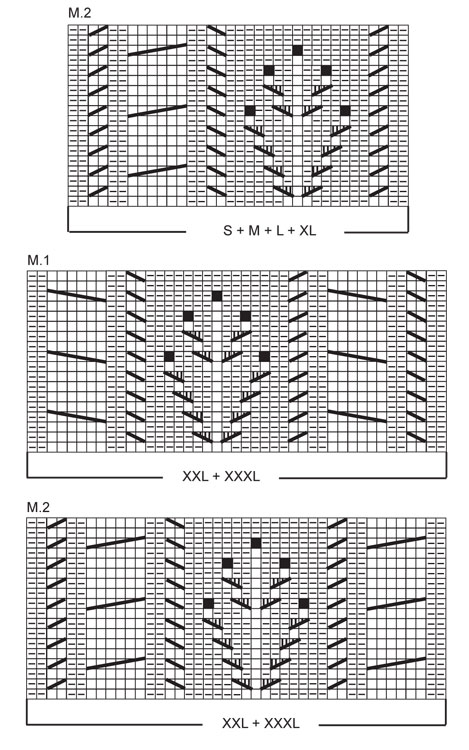
MEASUREMENT TIP: Because of the weight of the yarn all measurements should be made while the garment is hanging, otherwise it will be too long when worn. GARTER ST (back and forth on needle): K all rows. GARTER ST (in the round): K 1 round, P 1 round. PATTERN: See diagram M.1 and M.2 – NOTE: See diagram for your size. Diagram shows the pattern from RS. Row 1 in diagram = WS. INCREASING TIP (applies to garter st at waist): Inc 1 st by making 1 YO, on next row K YO into back of loop to avoid a hole. -------------------------------------------------------- JACKET: BODY PIECE: Worked back and forth on circular needle from mid front. See MEASUREMENT TIP! Cast on 252-268-296-324-352-380 sts (includes 1 edge st each side towards front edge) on circular needle size 4 mm / US 6 with Nepal. P 1 row from WS and continue in rib as follows from RS: 1 edge st in garter st, * K2, P2 *, repeat from *-* until 3 sts remain, finish with K2 and 1 edge st garter st. Continue in rib like this. When piece measures 5 cm / 2" K 1 row from RS, AT THE SAME TIME dec 60-64-76-84-86-94 sts evenly (i.e. K approx every 2nd and 3rd st tog) = 192-204-220-240-266-286 sts. K 1 row from WS and K 1 row from RS. Change to circular needle size 5 mm / US 8 and insert 2 markers in piece, 51-54-58-63-71-76 sts in from each side (= 90-96-104-114-124-134 sts between markers on back piece), let the markers follow the piece as you go along. Work next row as follows from WS: 1 edge st in garter st, M.2 (= 35 sts in SIZE S + M + L + XL and 43 sts in SIZE XXL + XXXL), stockinette st (i.e. P from WS, K from RS) until 36-36-36-36-44-44 sts remain, finish with M.1 (= 35 sts in SIZE S + M + L + XL and 43 sts in SIZE XXL + XXXL) and 1 edge st in garter st. Continue in pattern like this. REMEMBER THE KNITTING GAUGE. When piece measures 7 cm / 2¾" dec 1 st each side of both markers (= 4 dec sts). Repeat the dec on every 4.5 cm / 1¾" a total of 9 times = 156-168-184-204-230-250 sts. After 5 vertical repeats of M.1/M.2 (piece now measures approx 46 cm / 18") change to circular needle size 4 mm / US 6. Now work garter st back and forth on all sts (row 1 = K from WS) – AT THE SAME TIME dec 22-22-24-24-26-26 sts evenly on row 1 = 134-146-160-180-204-224 sts. When 2 rows remain before the garter st measures 6 cm / 2⅜" inc 22-22-24-24-26-26 sts evenly – See INCREASING TIP = 156-168-184-204-230-250 sts. Change back to circular needle size 5 mm / US 8 and continue in pattern as before. AT THE SAME TIME when piece measures 59-60-61-62-63-64 cm / 23¼"-23⅝"-24"-24⅜"-24¾"-25¼" - REMEMBER MEASUREMENT TIP –bind off 6 sts each side for armhole (i.e. 3 sts each side of marker) = 66-72-80-90-100-110 sts on back piece and 39-42-46-51-59-64 sts on each front piece. Now complete front and back pieces separately. BACK PIECE: = 66-72-80-90-100-110 sts. Continue in stockinette st back and forth on needle, AT THE SAME TIME bind off for armhole at the beg of every row each side as follows: 3 sts 0-0-0-0-1-2 times, 2 sts 0-1-2-3-4-4 times and 1 st 2-2-3-4-3-4 times = 62-64-66-70-72-74 sts. When piece measures 77-79-81-83-85-87 cm / 30⅜"-31"-32"-32¾"-33½"-34¼" bind off the middle 24-26-26-26-28-28 sts for neck and complete each shoulder separately. Bind off 1 st on neckline on next row = 18-18-19-21-21-22 sts left on shoulder. Continue until piece measures 79-81-83-85-87-89 cm / 31"-32"-32¾"-33½"-34¼"-35" - REMEMBER MEASUREMENT TIP - and bind off. RIGHT FRONT PIECE: = 39-42-46-51-59-64 sts. Continue in pattern and stockinette st AT THE SAME TIME bind off for armhole at the beg of every row from the side as described for back piece. NOTE: After 3-3-3-3-4-4 vertical repeats of M.1/M.2 continue in reverse stockinette st (as seen from RS) on the 15 sts in "berry motif" (work remaining sts as before). AT THE SAME TIME when piece measures 69-71-73-73-75-77 cm / 27⅛"-28"-28¾"-28¾"-29½"-30⅜" - adjust so that next row is from WS - dec 5 sts on the 3 cables towards front edge by P2 tog across each cable. On next row from mid front bind off 4-5-5-5-6-6 sts for neck. Bind off to shape the neckline at the beg of every row from mid front as follows: 2 sts 3 times and 1 st 3 times = 19-19-20-22-25-26 sts left on shoulder. Continue until 1 row remains before front piece measures the same as back piece. Now dec 1-1-1-1-4-4 sts evenly on cables on shoulder by K2 tog = 18-18-19-21-21-22 sts left on needle. Bind off on next row. LEFT FRONT PIECE: Like right front piece, but mirrored. SLEEVE: Worked in the round. Cast on 54-63-63-63-72-72 sts on double pointed needles size 4 mm / US 6 with Nepal and K 1 round. Now continue in rib as follows: * K2, P2, K2, P3 *, repeat from *-* to end. When rib measures 3 cm / 1⅛" dec all P3 to P2 = 48-56-56-56-64-64 sts. Continue with K2/P2 until rib measures 10 cm / 4". Now K 1 round, AT THE SAME TIME dec 8-14-14-14-20-20 sts evenly = 40-42-42-42-44-44 sts. P 1 round, then change to double pointed needles size 5 mm / US 8 and continue in stockinette st. AT THE SAME TIME when piece measures 12-12-13-14-12-13 cm / 4¾"-4¾"-5⅛"-5½"-4¾"-5⅛" inc 2 sts mid under sleeve. Repeat the inc on every 3.5-3.5-2.5-2-2-1.5 cm / 1¼"-1¼"-⅞"-¾"-¾"-½" a total of 10-10-13-15-16-19 times = 60-62-68-72-76-82 sts. When piece measures 48-47-47-46-44-43 cm / 19"-18½"-18½"-18"-17¼"-17" bind off 6 sts mid under sleeve and bind off for sleeve cap at the beg of every row each side as follows: 2 sts 2-3-3-4-4-5 times and 1 st 2-2-2-3-4-4 times, then 2 sts each side until piece measures 55-55-56-56-56-56 cm / 21⅝"-21⅝"-22"-22"-22"-22". Now bind off 3 sts at beg of the next 2 rows and bind off remaining sts. Piece measures approx 56-56-57-57-57-57 cm / 22"-22"-22½"-22½"-22½"-22½". ASSEMBLY: Sew shoulder seams. Set in sleeves. RIGHT FRONT BAND: Pick up from RS approx 165 to 181 sts (divisible by 4 + 1) along right front piece on circular needle size 4 mm / US 6 with Nepal (pick up inside 1 edge st). K 1 row from WS and K 1 row from RS. Continue in rib as follows with start from WS (= from neck towards bottom edge): 1 garter st, * P2, K2 *, repeat from *-* until 4 sts remain and finish with P2 and 2 garter sts. Continue in rib like this until front band measures approx 2.5 cm / ⅞" and now make 8 buttonholes evenly distributed. 1 BUTTONHOLE = bind off 1 st and cast on 1 new st on next row (for neatest result make buttonhole in a P-section, as seen from RS). NOTE: Place the bottom buttonhole approx 16-18 cm / 6"-7" from bottom edge and the top one 1 cm / ½" from neckline. When rib measures 5 cm / 2" bind off with K over K and P over P. LEFT FRONT BAND: Repeat along left front piece, but do not make buttonholes. NOTE: Make sure to pick up the same no of sts on both front bands. COLLAR: Pick up from RS approx 95 to 120 sts round neck (also on front bands) on circular needle size 4 mm / US 6 with Nepal. K 1 row from WS, then K 1 row from RS, AT THE SAME TIME inc evenly to 122-126-130-138-142-150 sts. Continue in rib as follows from WS: 2 garter sts, * K2, P2 *, repeat from *-* until 4 sts remain and finish with K2 and 2 garter sts (this will be RS when collar is folded down). When collar measures approx 16 cm / 6" inc all P2 to P3 (as seen from RS when collar is folded down). When collar measures approx 20-21-21-21-22-22 cm / 8"-8¼"-8¼"-8¼"-8¾"-8¾" inc all P3 to P4. Bind off with K over K and P over P when collar measures approx 24-26-26-26-28-28 cm / 9½"-10¼"-10¼"-10¼"-11"-11". |
||||||||||||||||||||||||||||
Diagram explanations |
||||||||||||||||||||||||||||
|
||||||||||||||||||||||||||||
 |
||||||||||||||||||||||||||||
 |
||||||||||||||||||||||||||||
Have you finished this pattern?Tag your pictures with #dropspattern or submit them to the #dropsfan gallery. Do you need help with this pattern?You'll find 17 tutorial videos, a Comments/Questions area and more by visiting the pattern on garnstudio.com. © 1982-2026 DROPS Design A/S. We reserve all rights. This document, including all its sub-sections, has copyrights. Read more about what you can do with our patterns at the bottom of each pattern on our site. |
||||||||||||||||||||||||||||


With over 40 years in knitting and crochet design, DROPS Design offers one of the most extensive collections of free patterns on the internet - translated to 17 languages. As of today we count 324 catalogs and 12285 patterns - 12275 of which are translated into English (US/in).
We work hard to bring you the best knitting and crochet have to offer, inspiration and advice as well as great quality yarns at incredible prices! Would you like to use our patterns for other than personal use? You can read what you are allowed to do in the Copyright text at the bottom of all our patterns. Happy crafting!
Post a comment to pattern DROPS 123-12
We would love to hear what you have to say about this pattern!
If you want to leave a question, please make sure you select the correct category in the form below, to speed up the answering process. Required fields are marked *.