
Popular categories
Looking for a yarn?


Comments / Questions (116)
EvaLena Hällgren wrote:
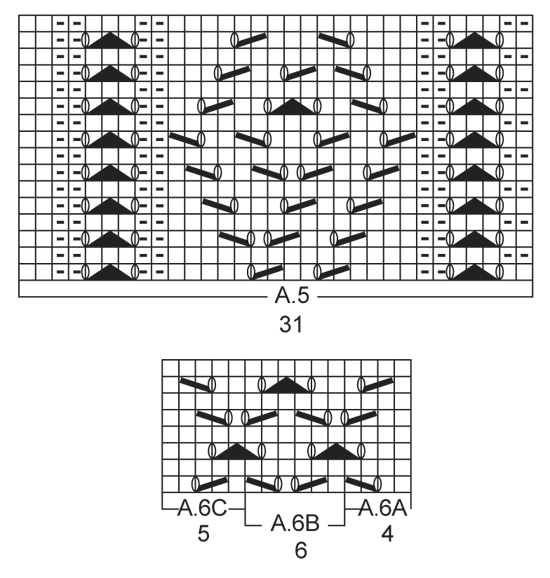
Det verkar vara nåt knas med mönster diagram A6C A6B A6A ...har stickat den 3 ggr och det har blivit fel ?
12.02.2015 - 19:08
![]() Lingonne wrote:
Lingonne wrote:
Encore un de modèle magnifique qu'il faut que je réalise....
08.02.2015 - 16:53
![]() Hermans Monique wrote:
Hermans Monique wrote:
Mooi en nu aan de slag
07.02.2015 - 16:54Cory wrote:
Absolutely would like this pattern in crochet! Possible?
04.02.2015 - 02:04Sac Main Givenchy Pas Cher wrote:
Parfait celine sac à main - SOOO Happy - Merci - grand vendeur EB sac main givenchy pas cher
02.02.2015 - 12:54Teal Short Dresses wrote:
Hi! Would you mind if I share your blog with my facebook group?There's a lot of people that I thjnk would really enjoy your content. Please let me know. Thank you
01.02.2015 - 06:10
![]() Gunilla Fors wrote:
Gunilla Fors wrote:
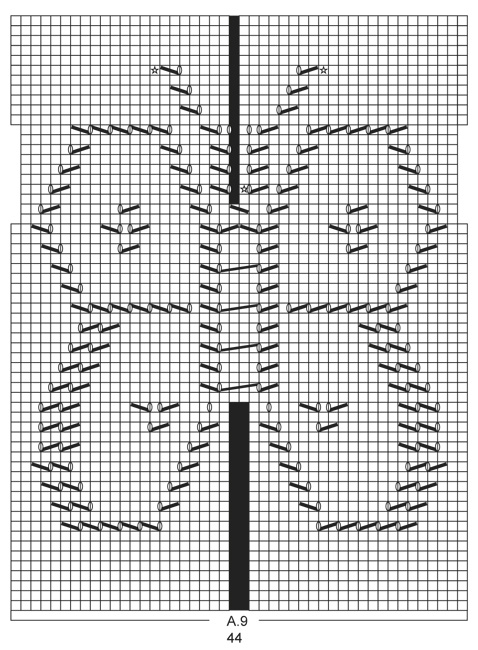
Mönster A1 slutar på ett varv från räta och nästa mönster börjar på ett varv från räta. Var är varvet från aviga? Detsamma gäller för mönster A9 som också slutar med ett räta varv och nästa mönster börjar med ett varv från räta. På mönster A9 så stämmer det inte om man gör intagningar på varv 39 rakt över vridningen i mitten. Det ska väl vara en vridning där också förmodar jag.
23.01.2015 - 07:56DROPS Design answered:
Hej Gunilla, Nu ligger det ett nytt diagram på beskrivningen. Sista varvet i A1 slutar nu från avigsidan. Tack för info!
04.02.2015 - 13:07
![]() Andersson wrote:
Andersson wrote:
Mycket fräck...
22.01.2015 - 21:16
![]() Debora MacDonald wrote:
Debora MacDonald wrote:
Hello. There are no diagrams included with this pattern. Thank You!
22.01.2015 - 20:40
![]() Katie Browne wrote:
Katie Browne wrote:
Diagram for Riviera Maya doesn't show up, which is quite frustrating, since the picture of the finished object is so pretty. How can I obtain the diagram, since the pattern can't be knitted without it?
22.01.2015 - 17:50DROPS Design answered:
Dear Mrs Browne, diagram will be updated soon, thank you. Happy knitting!
23.01.2015 - 10:38
|
||||||||||||||||||||||||||||
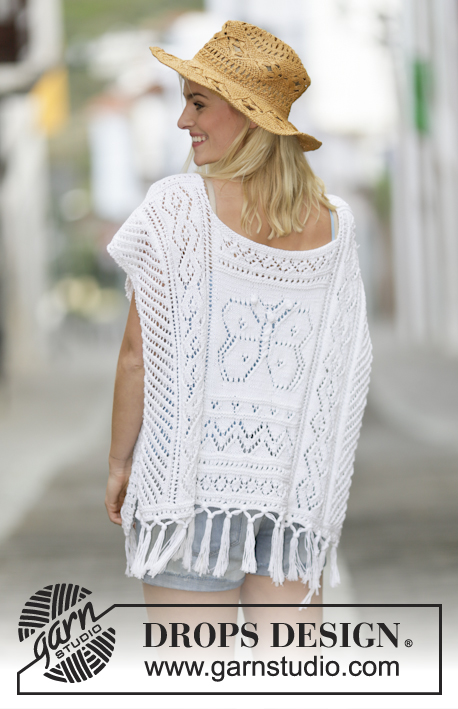
Riviera Maya#rivieramayaponcho |
||||||||||||||||||||||||||||
 |
 |
|||||||||||||||||||||||||||
Knitted DROPS poncho with lace pattern and fringes in ”Cotton Light” or "Belle". Size: S - XXXL.
DROPS 159-1 |
||||||||||||||||||||||||||||
|
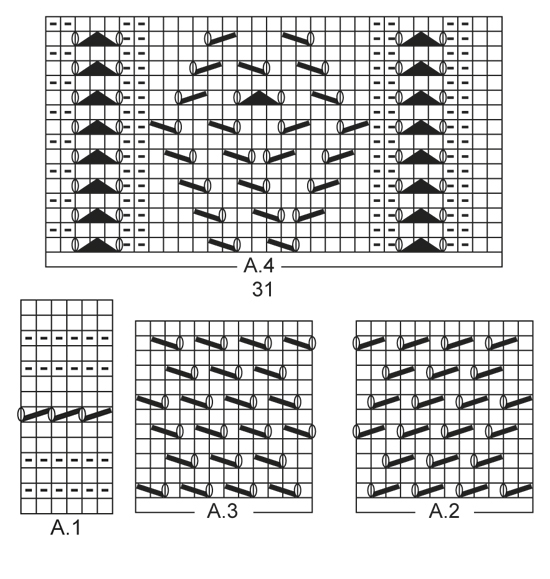
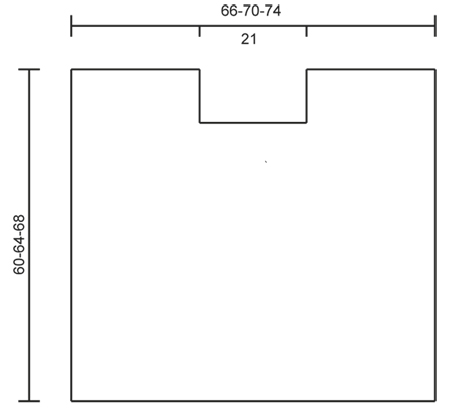
GARTER ST (back and forth): K all rows. 1 ridge = K2 rows. PATTERN: See diagrams A.1 to A.9. The diagrams show all rows in pattern seen from RS. EDGE STS: Work the outermost 4 sts in each side in garter st but on every 6th row (always from RS) work holes as follows: At beg of row: K 2 tog, 1 YO, K 2 tog, 1 YO. At end of row: 1 YO, K 2 tog, 1 YO, K 2 tog. ---------------------------------------------------------- PONCHO: Worked in 2 parts that are sewn tog on the shoulders. FRONT PIECE: The piece is worked back and forth on circular needle because of no of sts. Cast on 139-147-155 sts on circular needle size 3 mm / US 2.5 with Cotton Light or "Belle". Work first row as follows from RS: 4 EDGE STS - see explanation above, work pattern according to diagram A.1 until 5 sts remain on row, work 1st st in A.1 and finish with 4 EDGE STS. Continue the pattern like this - NOTE: On 7th row in A.1 K last st before edge sts. When A.1 has been worked, switch to circular needle size 3.5 mm / US 4. Insert 1 marker after the first 47-51-55 sts on needle and 1 marker after the next 45 sts (= 47-51-55 sts after last marker at the end of row). ALL SIZES: Work next row as follows from RS: 4 edge sts as before, work A.2 over the next 12-16-20 sts, work A.4 (= 31 sts), 1st marker, A.6A (= 4 sts), work pattern according to diagram A.6B until 5 sts remain before 2nd marker, A.6C (= 5 sts), A.5 (= 31 sts), work A.3 over the next 12-16-20 sts and finish with 4 edge sts as before. Continue pattern like this. There will be lanes with lace pattern upwards on each side of markers and work borders with lace pattern between the 2 markers. REMEMBER THE KNITTING GAUGE. Size S/M and L/XL: Continue to ALL SIZES. Size XXL/XXXL: When A.6 has been worked one time vertically, work 3 ridges between markers (work the other sts as before), then work A.6 one more time between markers (continue the other sts as before). ALL SIZES: When A.6 has been worked, work pattern according to diagram A.1 between the 2 markers mid front (continue the other sts as before) AT THE SAME TIME on next to last row in diagram (= RS) dec 4 sts evenly (= 41 sts between markers and 135-143-151 sts on row). After A.1 work A.7 between the 2 markers as follows (continue the other sts as before): Work A.7A (= 5 sts), work A.7B until 6 sts remain before marker and finish with A.7C (= 6 sts). When A.7 has been worked, work pattern according to diagram A.8 between the 2 markers (continue the other sts as before). AT THE SAME TIME on last row in diagram (= RS), inc 3 sts evenly (= 44 sts between markers and 138-146-154 sts in total on needle). After A.8 work pattern according to diagram A.9 between the 2 markers. When entire A.9 has been worked (piece measures approx. 39-39-43 cm / 15¼"-15¼"-17"), there are 45 sts between markers. Then work pattern according to diagram A.1 between markers (continue the other sts as before). After A.1 work A.6 between markers as follows: A.6A (= 4 sts), work A.6B until 5 sts remain before marker and finish with A.6C (= 5 sts). SIZE S/M: Continue to ALL SIZES. SIZE L/XL + XXL/XXXL: When A.6 has been worked one time vertically, work 3 ridges between markers (work the other sts as before), then work A.6 one more time between markers (continue the other sts as before). ALL SIZES: After A.6 work 3 ridges between markers (work the other sts as before), then bind off the 45 sts between markers for neck and finish each part separately. Continue pattern back and forth as before over the 47-51-55 sts on shoulder - NOTE: Continue the outermost 2 sts towards the neck in garter st. When 4 cm / 1½" remain before piece measures 60-64-68 cm / 23½"-25¼"-26¾" (adjust so that next row is worked from RS), switch to circular needle size 3 mm / US 2.5. Continue with pattern according to diagram A.1 before loosely binding off. Repeat in the other side. BACK PIECE: Cast on and work as front piece. ASSEMBLY: Sew the shoulder seams. The poncho should be open in each side. FRINGES: Fasten fringes along the bottom edge of poncho both front and back. Fasten fringes in holes in A.1. 1 fringe = cut 6 lengths of 35 cm / 14" each. Fold them double, pull the loops true the holes and pull the yarn ends true the loops. Fasten each fringe approx. 3 cm / 1" apart. Then split the fringes in 2 and tie tog with next fringe. Continue like this with all fringes. |
||||||||||||||||||||||||||||
Diagram explanations |
||||||||||||||||||||||||||||
|
||||||||||||||||||||||||||||
 |
||||||||||||||||||||||||||||
 |
||||||||||||||||||||||||||||
 |
||||||||||||||||||||||||||||
 |
||||||||||||||||||||||||||||
 |
||||||||||||||||||||||||||||
Have you finished this pattern?Tag your pictures with #dropspattern #rivieramayaponcho or submit them to the #dropsfan gallery. Do you need help with this pattern?You'll find 21 tutorial videos, a Comments/Questions area and more by visiting the pattern on garnstudio.com. © 1982-2026 DROPS Design A/S. We reserve all rights. This document, including all its sub-sections, has copyrights. Read more about what you can do with our patterns at the bottom of each pattern on our site. |
||||||||||||||||||||||||||||


With over 40 years in knitting and crochet design, DROPS Design offers one of the most extensive collections of free patterns on the internet - translated to 17 languages. As of today we count 324 catalogs and 12278 patterns - 12268 of which are translated into English (US/in).
We work hard to bring you the best knitting and crochet have to offer, inspiration and advice as well as great quality yarns at incredible prices! Would you like to use our patterns for other than personal use? You can read what you are allowed to do in the Copyright text at the bottom of all our patterns. Happy crafting!
Post a comment to pattern DROPS 159-1
We would love to hear what you have to say about this pattern!
If you want to leave a question, please make sure you select the correct category in the form below, to speed up the answering process. Required fields are marked *.