
Popular categories
Looking for a yarn?


Comments / Questions (116)
Ann Catrine Melin Burman wrote:
No coinciden los diagramas p.ej A7 CByA! En el diagrama hay 31 pero es talla L/XL hay 41! Que hacer????Ademas no contestáis a las preguntas!
12.04.2015 - 22:38
![]() Ann Catrine Melin Burman wrote:
Ann Catrine Melin Burman wrote:
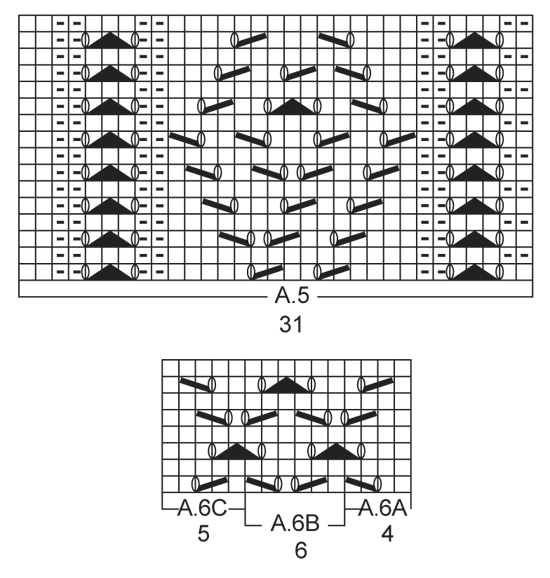
A6B A6C A6A ??? Dos puntos juntos con una vuelta cae la mitad en uno y el otro! Como lo hago?
06.04.2015 - 12:17DROPS Design answered:
Hola Ann. He revisado los diagramas y están correctos. El diagrama 6 se lee de derecha a izquierda y de abajo arriba. La parte central del diagrama (A6B o A7B) se repiten tantas vcs como pide el patrón. A6A y A7A se trabaja solo una vez al inicio de la fila y A6C y A7C una vez al final de la fila. Los 2 pjd no caen en el medio, el pt anterior si. Te recomiendo realizar una muestra antes de comenzar el diagrama.
14.04.2015 - 10:33
![]() Bettinalisa Teglgaard wrote:
Bettinalisa Teglgaard wrote:
Jeg strikke str l/xl og kan ikke få diagram A2 til at passe med 16 m
01.04.2015 - 10:12Angelika Daum wrote:
Hallo, ich bin beim Noppen stricken (im Diagramm mit Stern gekennzeichnet). Leider drehen sie sich zur Rueckseite anstatt zur Vorderseite. Was mache ich verkehrt? Viele Gruesse
31.03.2015 - 16:43
![]() Sabine wrote:
Sabine wrote:
Ich möchte den Poncho auch gern bald nachstricken. Ist das Diagramm denn jetzt richtig?? Viele Grüße.
27.03.2015 - 10:36DROPS Design answered:
Leider wurde es noch nicht geprüft und angepasst. Ich hake noch einmal nach und bitte noch um etwas Geduld.
27.03.2015 - 11:10
![]() Petra wrote:
Petra wrote:
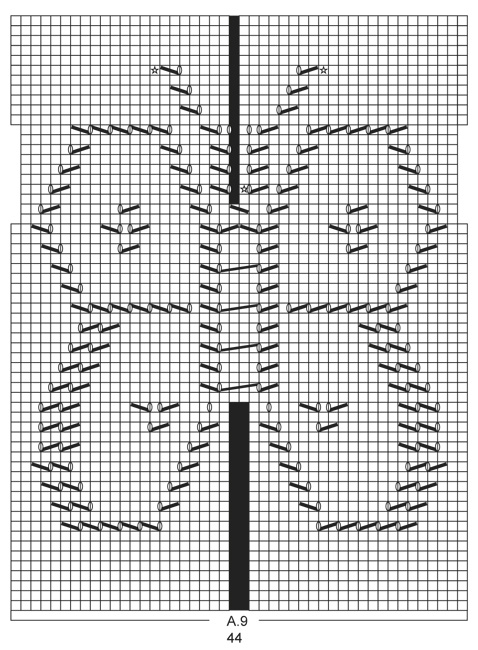
Mönstret i A9 stämmer fortfarande inte, kan ni rätta så jag vet hur jag ska fortsätta efter varv 39. Om man gör alla intagningarna får man fel antal maskor...
24.03.2015 - 15:24DROPS Design answered:
Hej Petra, Jo det är lagt ett nytt diagram A9 ut, så nu stämmer beskrivningen. Lycka till!
18.05.2015 - 11:07
![]() Ewy Sikström wrote:
Ewy Sikström wrote:
Rätta felen i mönster A8 och A9.
23.03.2015 - 09:21
![]() Ines Wecking wrote:
Ines Wecking wrote:
In der 39. Reihe verzopfen und ab der 41. Reihe ab der Mitte, also nach den 2 überzogenen Maschen, die 2. Hälfte gegengleich stricken weil die im Diagramm fasch gezeichnet ist.
14.03.2015 - 20:09DROPS Design answered:
Antwort siehe unten! :-)
15.03.2015 - 22:38
![]() Ines Wecking wrote:
Ines Wecking wrote:
In der 39. Reihe verzopfen und ab der 41. Reihe ab der Mitte, also nach den 2 überzogenen Maschen, die 2. Hälfte gegengleich stricken weil die im Diagramm fasch gezeichnet ist.
14.03.2015 - 20:09DROPS Design answered:
Das Problem in der 39. R wurde an die Designerinnen weitergeleitet, hier muss wohl tatsächlich noch einmal verzopft werden. Und Sie haben recht, das Diagramm ist auf einer Seite offenbar um eine M verrutscht und muss gegengleich gestrickt werden. Danke für den Hinweis, auch das wird weitergeleitet.
15.03.2015 - 22:37
![]() Ines Wecking wrote:
Ines Wecking wrote:
In der 39. Reihe verzopfen und ab der 41. Reihe ab der Mitte, also nach den 2 überzogenen Maschen, die 2. Seite gegengleich stricken weil die im Diagramm falsch ist.
14.03.2015 - 20:02
|
||||||||||||||||||||||||||||
Riviera Maya#rivieramayaponcho |
||||||||||||||||||||||||||||
 |
 |
|||||||||||||||||||||||||||
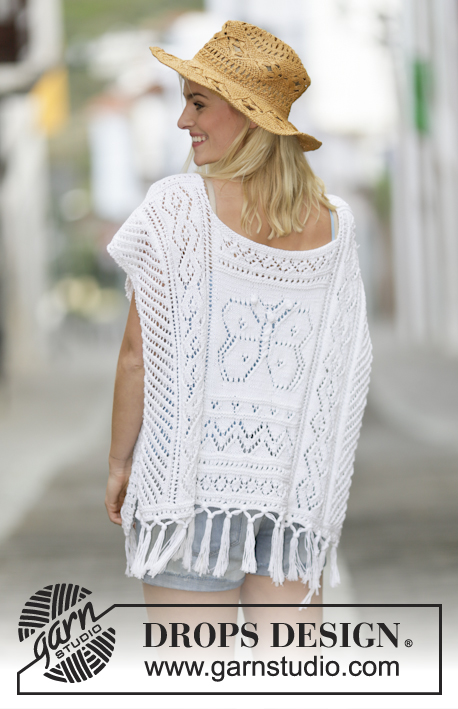
Knitted DROPS poncho with lace pattern and fringes in ”Cotton Light” or "Belle". Size: S - XXXL.
DROPS 159-1 |
||||||||||||||||||||||||||||
|
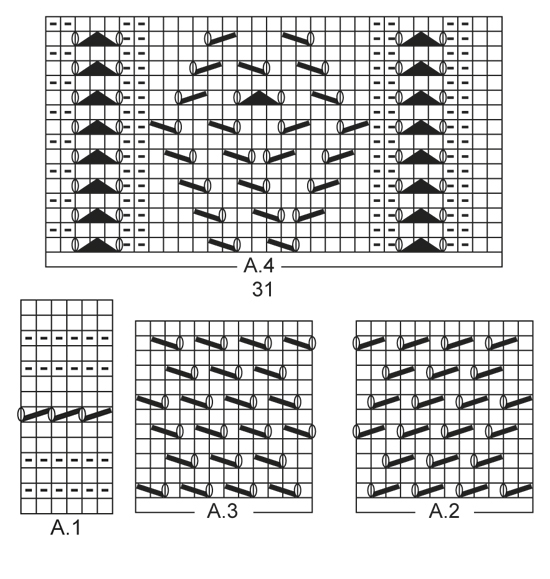
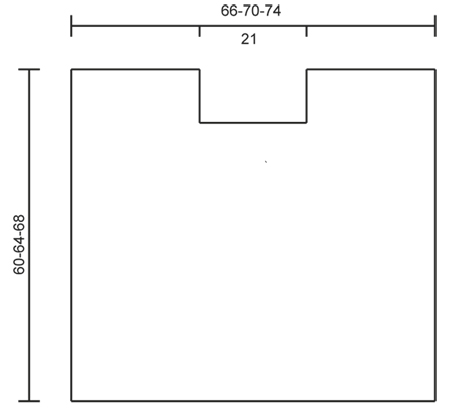
GARTER ST (back and forth): K all rows. 1 ridge = K2 rows. PATTERN: See diagrams A.1 to A.9. The diagrams show all rows in pattern seen from RS. EDGE STS: Work the outermost 4 sts in each side in garter st but on every 6th row (always from RS) work holes as follows: At beg of row: K 2 tog, 1 YO, K 2 tog, 1 YO. At end of row: 1 YO, K 2 tog, 1 YO, K 2 tog. ---------------------------------------------------------- PONCHO: Worked in 2 parts that are sewn tog on the shoulders. FRONT PIECE: The piece is worked back and forth on circular needle because of no of sts. Cast on 139-147-155 sts on circular needle size 3 mm / US 2.5 with Cotton Light or "Belle". Work first row as follows from RS: 4 EDGE STS - see explanation above, work pattern according to diagram A.1 until 5 sts remain on row, work 1st st in A.1 and finish with 4 EDGE STS. Continue the pattern like this - NOTE: On 7th row in A.1 K last st before edge sts. When A.1 has been worked, switch to circular needle size 3.5 mm / US 4. Insert 1 marker after the first 47-51-55 sts on needle and 1 marker after the next 45 sts (= 47-51-55 sts after last marker at the end of row). ALL SIZES: Work next row as follows from RS: 4 edge sts as before, work A.2 over the next 12-16-20 sts, work A.4 (= 31 sts), 1st marker, A.6A (= 4 sts), work pattern according to diagram A.6B until 5 sts remain before 2nd marker, A.6C (= 5 sts), A.5 (= 31 sts), work A.3 over the next 12-16-20 sts and finish with 4 edge sts as before. Continue pattern like this. There will be lanes with lace pattern upwards on each side of markers and work borders with lace pattern between the 2 markers. REMEMBER THE KNITTING GAUGE. Size S/M and L/XL: Continue to ALL SIZES. Size XXL/XXXL: When A.6 has been worked one time vertically, work 3 ridges between markers (work the other sts as before), then work A.6 one more time between markers (continue the other sts as before). ALL SIZES: When A.6 has been worked, work pattern according to diagram A.1 between the 2 markers mid front (continue the other sts as before) AT THE SAME TIME on next to last row in diagram (= RS) dec 4 sts evenly (= 41 sts between markers and 135-143-151 sts on row). After A.1 work A.7 between the 2 markers as follows (continue the other sts as before): Work A.7A (= 5 sts), work A.7B until 6 sts remain before marker and finish with A.7C (= 6 sts). When A.7 has been worked, work pattern according to diagram A.8 between the 2 markers (continue the other sts as before). AT THE SAME TIME on last row in diagram (= RS), inc 3 sts evenly (= 44 sts between markers and 138-146-154 sts in total on needle). After A.8 work pattern according to diagram A.9 between the 2 markers. When entire A.9 has been worked (piece measures approx. 39-39-43 cm / 15¼"-15¼"-17"), there are 45 sts between markers. Then work pattern according to diagram A.1 between markers (continue the other sts as before). After A.1 work A.6 between markers as follows: A.6A (= 4 sts), work A.6B until 5 sts remain before marker and finish with A.6C (= 5 sts). SIZE S/M: Continue to ALL SIZES. SIZE L/XL + XXL/XXXL: When A.6 has been worked one time vertically, work 3 ridges between markers (work the other sts as before), then work A.6 one more time between markers (continue the other sts as before). ALL SIZES: After A.6 work 3 ridges between markers (work the other sts as before), then bind off the 45 sts between markers for neck and finish each part separately. Continue pattern back and forth as before over the 47-51-55 sts on shoulder - NOTE: Continue the outermost 2 sts towards the neck in garter st. When 4 cm / 1½" remain before piece measures 60-64-68 cm / 23½"-25¼"-26¾" (adjust so that next row is worked from RS), switch to circular needle size 3 mm / US 2.5. Continue with pattern according to diagram A.1 before loosely binding off. Repeat in the other side. BACK PIECE: Cast on and work as front piece. ASSEMBLY: Sew the shoulder seams. The poncho should be open in each side. FRINGES: Fasten fringes along the bottom edge of poncho both front and back. Fasten fringes in holes in A.1. 1 fringe = cut 6 lengths of 35 cm / 14" each. Fold them double, pull the loops true the holes and pull the yarn ends true the loops. Fasten each fringe approx. 3 cm / 1" apart. Then split the fringes in 2 and tie tog with next fringe. Continue like this with all fringes. |
||||||||||||||||||||||||||||
Diagram explanations |
||||||||||||||||||||||||||||
|
||||||||||||||||||||||||||||
 |
||||||||||||||||||||||||||||
 |
||||||||||||||||||||||||||||
 |
||||||||||||||||||||||||||||
 |
||||||||||||||||||||||||||||
 |
||||||||||||||||||||||||||||
Have you finished this pattern?Tag your pictures with #dropspattern #rivieramayaponcho or submit them to the #dropsfan gallery. Do you need help with this pattern?You'll find 21 tutorial videos, a Comments/Questions area and more by visiting the pattern on garnstudio.com. © 1982-2026 DROPS Design A/S. We reserve all rights. This document, including all its sub-sections, has copyrights. Read more about what you can do with our patterns at the bottom of each pattern on our site. |
||||||||||||||||||||||||||||


With over 40 years in knitting and crochet design, DROPS Design offers one of the most extensive collections of free patterns on the internet - translated to 17 languages. As of today we count 324 catalogs and 12278 patterns - 12268 of which are translated into English (US/in).
We work hard to bring you the best knitting and crochet have to offer, inspiration and advice as well as great quality yarns at incredible prices! Would you like to use our patterns for other than personal use? You can read what you are allowed to do in the Copyright text at the bottom of all our patterns. Happy crafting!
Post a comment to pattern DROPS 159-1
We would love to hear what you have to say about this pattern!
If you want to leave a question, please make sure you select the correct category in the form below, to speed up the answering process. Required fields are marked *.