
Popular categories
Looking for a yarn?


Comments / Questions (116)
![]() Sabine wrote:
Sabine wrote:
Nachdem A.6 zu Ende gestr. wurde, soll man in den 45 M zw. den Markieren A.1 stricken. Reihe 7 kommt in A.1 aber nicht hin, weil 1 M übrig bleibt (gerade Anz. M in A.1 gegen 45 M zw.den Markierern.....) - was tun??? Grüße von Sabine
08.05.2015 - 21:35DROPS Design answered:
Sie gehen genau wie am Anfang vor: Sie stricken am Ende, d.h. die letzte M vor dem Markierer - die "überzählige 45. M - wie die 1. M von A.1 und in der 7. R stricken Sie diese Masche einfach rechts.
09.05.2015 - 14:17
![]() Christin wrote:
Christin wrote:
Hier meine zweite Frage: Und dann ist hier die 6. Rd, aber auch die 7. Rd als Hinrunde gekennzeichnet. Wenn ich jedoch die 6. Rd stricke, dann bin ich in der Rückrd und stricke links. Liebe Grüße Christin
27.04.2015 - 21:38DROPS Design answered:
Die beiden Reihen sind nicht als Hin-R gekennzeichnet, in allen Diagrammen folgen stets Hin- und Rück-R aufeinander. Es bedeutet, dass Sie in der 6. R (= Rück-R) linke M stricken müssen, damit sie auf der Vorderseite, die das Diagramm zeigt, rechts erscheinen. Das leere Kästchen steht für "1 M re in Hin-R, 1 M li in Rück-R" - da Sie sich bei der 6. R in einer Rück-R befinden, müssen diese M li gestrickt werden, dann erscheinen sie auf der Vorderseite als rechte M.
28.04.2015 - 23:24
![]() Christin wrote:
Christin wrote:
Hallo, leider versteh ich nicht ganz, was das zu bedeuten hat: "Die Diagramme zeigen alle Hin-und Rückrunden, wie sie auf der Vorderseite erscheinen." Ich bin erst bei Diagramm A1 und verstehe es eigentlich so, dass ich rechts in der Hinrunde, links in der Rückrunde stricke... Ist das korrekt? Mich irritiert daher das Wort "Vorderseite".
27.04.2015 - 21:37DROPS Design answered:
Sie müssen in der 1. R = Hin-R re str, in der Rück-R aber auch re str, damit die M auf der Vorderseite als linke M erscheint. "Vorderseite" bedeutet, dass man ja eine Sichtseite hat - die Vorderseite. Die Maschen sind alle so dargestellt, wie Sie auf der Sichtseite aussehen. Wenn eine Masche auf der Vorderseite links aussieht (wie in der 2. R), muss sie in der Rück-R aber rechts gestrickt werden, die Masche ist trotzdem im Diagramm so dargestellt wie eine linke Masche, weil sie auf der Vorderseite eine linke Masche ist. Alternativ könnten die Strickschriften ja auch die Maschen immer so zeigen, wie sie gestrickt werden müssen, um das auszuschließen, steht der Satz mit der Vorderseite als Hinweis dort.
28.04.2015 - 23:16
![]() Rebeca wrote:
Rebeca wrote:
Perdona, acabo de ver el fallo, el diagrama que yo tengo impreso no es el mismo que el que esta en la página. Gracias
22.04.2015 - 18:41
![]() Rebeca wrote:
Rebeca wrote:
Hola! Tengo un problema con el diagrama A9 Se supone que al final del diagrama tiene que quedar 45 puntos, pero a mi me quedan 43. Creo que el problema está en la fila 49 del diagrama. Por mucho que lo miro no se como hacerlo para que salgan 45 puntos. Por favor, podríais revisar el diagrama? Así saldré de dudas si soy yo o es el diagrama. Gracias!!!
22.04.2015 - 18:38
![]() Angela wrote:
Angela wrote:
Buongiorno ho letto nella confezione che i laterali si lasciano aperti e si cuciono solo le spalle , vorrei cucirlo lateralmente , il mio lavoro e misura s quanto spazio devo lasciare per le braccia
19.04.2015 - 14:16DROPS Design answered:
Buonasera Angela, il poncho è abbastanza largo per comprendere le braccia, per cui può semplicemente cucire i lati se lo vuole chiuso; se invece lo vuole più aderente deve pensare ad fare delle diminuzioni in vita e per lo scalfo manica. Ci riscriva se ha altri dubbi. Buon lavoro!!
19.04.2015 - 17:29
![]() Angela wrote:
Angela wrote:
Tra i due segni il diagramma A8 non mi combacia avendo 41 maglie ,mi aiuti buonasera
17.04.2015 - 22:02DROPS Design answered:
Buonasera Angela, deve lavorare il diagramma A.8 sulle 41 m tra i due segni, per cui lavorerà il diagramma in modo completo e poi lavorerà ancora 9 m seguendo il diagramma. Si ricordi di aumentare 3 m sull'ultimo f del diagramma, in modo da avere alla fine 44 m su cui lavorare il diagramma A.9. Buon lavoro!!
18.04.2015 - 21:49
![]() Angela wrote:
Angela wrote:
Aiuto, dopo avere iniziato e arrivata alla fine di A7-A8 non mi combacia il numero delle maglia non combacia,sono andata nelle correzioni ma ancora non le avete caricato.Come faccio adesso
17.04.2015 - 17:02DROPS Design answered:
Buonasera Angela, le correzioni di questo modello non riguardano i diagrammi A.7-A.8, non ci sono correzioni disponibili in merito. Ci può segnalare di preciso qual è il suo problema?Buon lavoro!
17.04.2015 - 19:40
![]() Nina Kvenild wrote:
Nina Kvenild wrote:
Skal akkurat begynne å strikke denne modellen og ser det har vært en del feil i mønsteret......kan jeg føle meg trygg på at alt stemmer og er rettet opp nå ?
16.04.2015 - 17:42DROPS Design answered:
Hej Nina. Mönstret er rettet (se under RETTELSER) og online versionen er altid up-to-date.
17.04.2015 - 11:10
![]() Helle Tanyimboh wrote:
Helle Tanyimboh wrote:
Opskriften er helt fin, men det anbefalede garn, som jeg bestilte gennem jeres forhandler, er alt for tykt og derfor for tungt til opskriften. Denne poncho skulle gerne være let og luftig .... det blev den så ikke. Det er for mit vedkommende spildt arbejde, da jeg ikke vil bruge den :-(
13.04.2015 - 08:27
|
||||||||||||||||||||||||||||
Riviera Maya#rivieramayaponcho |
||||||||||||||||||||||||||||
 |
 |
|||||||||||||||||||||||||||
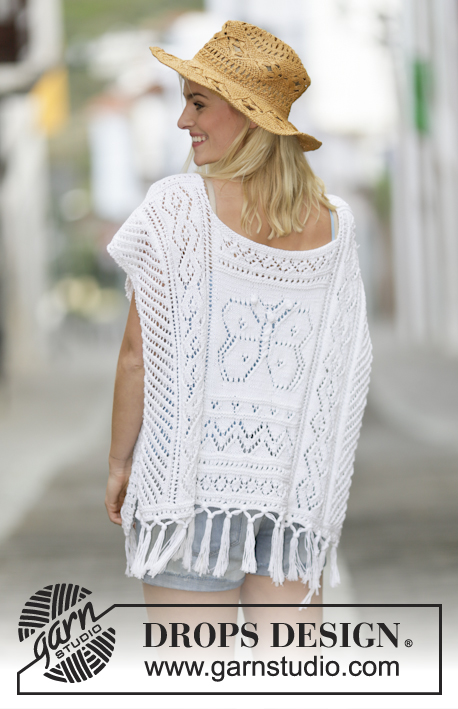
Knitted DROPS poncho with lace pattern and fringes in ”Cotton Light” or "Belle". Size: S - XXXL.
DROPS 159-1 |
||||||||||||||||||||||||||||
|
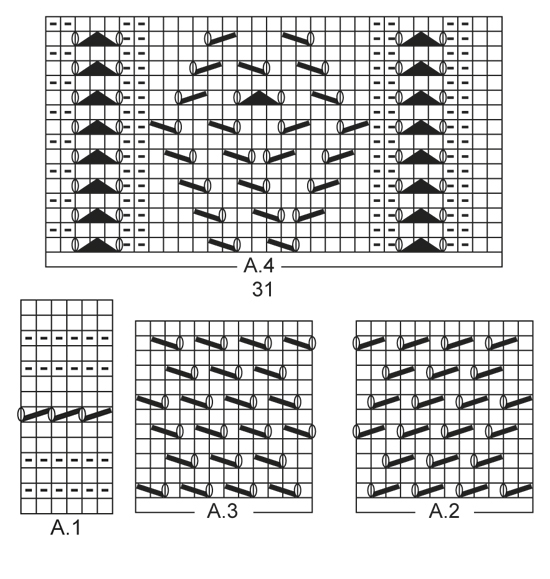
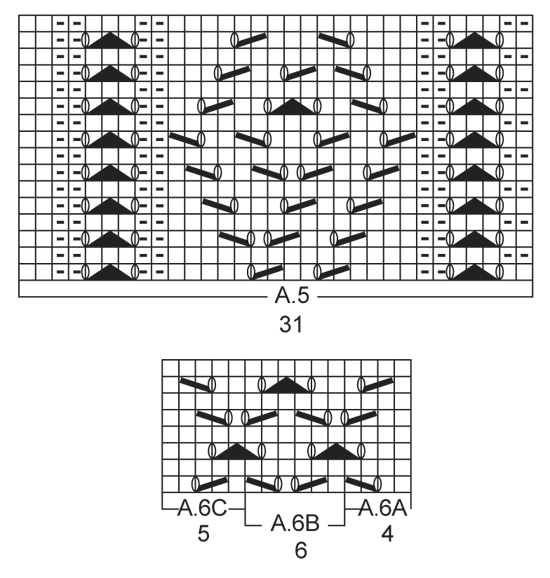
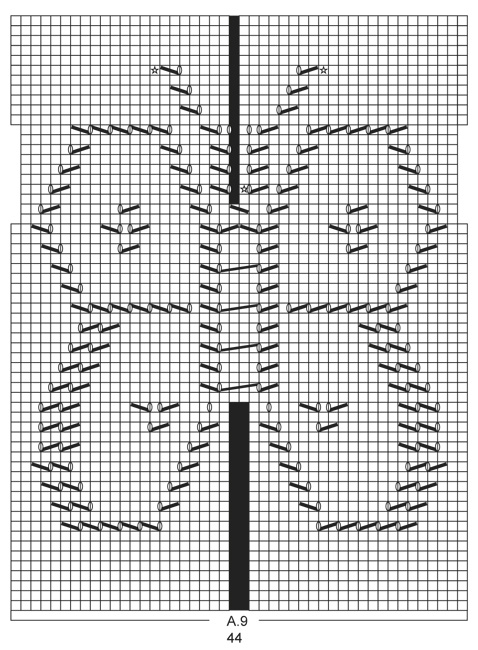
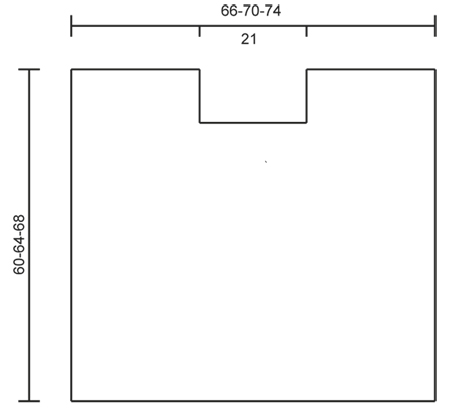
GARTER ST (back and forth): K all rows. 1 ridge = K2 rows. PATTERN: See diagrams A.1 to A.9. The diagrams show all rows in pattern seen from RS. EDGE STS: Work the outermost 4 sts in each side in garter st but on every 6th row (always from RS) work holes as follows: At beg of row: K 2 tog, 1 YO, K 2 tog, 1 YO. At end of row: 1 YO, K 2 tog, 1 YO, K 2 tog. ---------------------------------------------------------- PONCHO: Worked in 2 parts that are sewn tog on the shoulders. FRONT PIECE: The piece is worked back and forth on circular needle because of no of sts. Cast on 139-147-155 sts on circular needle size 3 mm / US 2.5 with Cotton Light or "Belle". Work first row as follows from RS: 4 EDGE STS - see explanation above, work pattern according to diagram A.1 until 5 sts remain on row, work 1st st in A.1 and finish with 4 EDGE STS. Continue the pattern like this - NOTE: On 7th row in A.1 K last st before edge sts. When A.1 has been worked, switch to circular needle size 3.5 mm / US 4. Insert 1 marker after the first 47-51-55 sts on needle and 1 marker after the next 45 sts (= 47-51-55 sts after last marker at the end of row). ALL SIZES: Work next row as follows from RS: 4 edge sts as before, work A.2 over the next 12-16-20 sts, work A.4 (= 31 sts), 1st marker, A.6A (= 4 sts), work pattern according to diagram A.6B until 5 sts remain before 2nd marker, A.6C (= 5 sts), A.5 (= 31 sts), work A.3 over the next 12-16-20 sts and finish with 4 edge sts as before. Continue pattern like this. There will be lanes with lace pattern upwards on each side of markers and work borders with lace pattern between the 2 markers. REMEMBER THE KNITTING GAUGE. Size S/M and L/XL: Continue to ALL SIZES. Size XXL/XXXL: When A.6 has been worked one time vertically, work 3 ridges between markers (work the other sts as before), then work A.6 one more time between markers (continue the other sts as before). ALL SIZES: When A.6 has been worked, work pattern according to diagram A.1 between the 2 markers mid front (continue the other sts as before) AT THE SAME TIME on next to last row in diagram (= RS) dec 4 sts evenly (= 41 sts between markers and 135-143-151 sts on row). After A.1 work A.7 between the 2 markers as follows (continue the other sts as before): Work A.7A (= 5 sts), work A.7B until 6 sts remain before marker and finish with A.7C (= 6 sts). When A.7 has been worked, work pattern according to diagram A.8 between the 2 markers (continue the other sts as before). AT THE SAME TIME on last row in diagram (= RS), inc 3 sts evenly (= 44 sts between markers and 138-146-154 sts in total on needle). After A.8 work pattern according to diagram A.9 between the 2 markers. When entire A.9 has been worked (piece measures approx. 39-39-43 cm / 15¼"-15¼"-17"), there are 45 sts between markers. Then work pattern according to diagram A.1 between markers (continue the other sts as before). After A.1 work A.6 between markers as follows: A.6A (= 4 sts), work A.6B until 5 sts remain before marker and finish with A.6C (= 5 sts). SIZE S/M: Continue to ALL SIZES. SIZE L/XL + XXL/XXXL: When A.6 has been worked one time vertically, work 3 ridges between markers (work the other sts as before), then work A.6 one more time between markers (continue the other sts as before). ALL SIZES: After A.6 work 3 ridges between markers (work the other sts as before), then bind off the 45 sts between markers for neck and finish each part separately. Continue pattern back and forth as before over the 47-51-55 sts on shoulder - NOTE: Continue the outermost 2 sts towards the neck in garter st. When 4 cm / 1½" remain before piece measures 60-64-68 cm / 23½"-25¼"-26¾" (adjust so that next row is worked from RS), switch to circular needle size 3 mm / US 2.5. Continue with pattern according to diagram A.1 before loosely binding off. Repeat in the other side. BACK PIECE: Cast on and work as front piece. ASSEMBLY: Sew the shoulder seams. The poncho should be open in each side. FRINGES: Fasten fringes along the bottom edge of poncho both front and back. Fasten fringes in holes in A.1. 1 fringe = cut 6 lengths of 35 cm / 14" each. Fold them double, pull the loops true the holes and pull the yarn ends true the loops. Fasten each fringe approx. 3 cm / 1" apart. Then split the fringes in 2 and tie tog with next fringe. Continue like this with all fringes. |
||||||||||||||||||||||||||||
Diagram explanations |
||||||||||||||||||||||||||||
|
||||||||||||||||||||||||||||
 |
||||||||||||||||||||||||||||
 |
||||||||||||||||||||||||||||
 |
||||||||||||||||||||||||||||
 |
||||||||||||||||||||||||||||
 |
||||||||||||||||||||||||||||
Have you finished this pattern?Tag your pictures with #dropspattern #rivieramayaponcho or submit them to the #dropsfan gallery. Do you need help with this pattern?You'll find 21 tutorial videos, a Comments/Questions area and more by visiting the pattern on garnstudio.com. © 1982-2026 DROPS Design A/S. We reserve all rights. This document, including all its sub-sections, has copyrights. Read more about what you can do with our patterns at the bottom of each pattern on our site. |
||||||||||||||||||||||||||||


With over 40 years in knitting and crochet design, DROPS Design offers one of the most extensive collections of free patterns on the internet - translated to 17 languages. As of today we count 324 catalogs and 12278 patterns - 12268 of which are translated into English (US/in).
We work hard to bring you the best knitting and crochet have to offer, inspiration and advice as well as great quality yarns at incredible prices! Would you like to use our patterns for other than personal use? You can read what you are allowed to do in the Copyright text at the bottom of all our patterns. Happy crafting!
Post a comment to pattern DROPS 159-1
We would love to hear what you have to say about this pattern!
If you want to leave a question, please make sure you select the correct category in the form below, to speed up the answering process. Required fields are marked *.