
Popular categories
Looking for a yarn?


Comments / Questions (138)
![]() Agnès wrote:
Agnès wrote:
Bonjour, Je ne comprends pas le départ, si je compte bien, 2 +17+(5+34) x3+5+17 = 158, or il faut monter 156m. Merci pour l'aide
11.02.2020 - 11:44DROPS Design answered:
Bonjour Agnès, c'est votre 2 en premier qui n'est pas juste, vous devez tricoter les 156 m ainsi: A.1 (= 17 m), * A.2 (= 5m), A.3 (= 34 m) *, répéter de *-* 3 fois au total (= 34+5 x3= 117 m) , A.2 (= 5 m), A.4 (= 17 m) et vous avez ainsi: 17+117+5+17= 156 m. Les 2 côtes au point mousse se tricotent sur toutes les mailles (= autrement dit, vous devez tricoter 4 rangs endroit avant de tricoter les diagrammes). Bon tricot!
11.02.2020 - 12:01
![]() Janine Möhrke wrote:
Janine Möhrke wrote:
Hallo Ich frage mich grade wie ich das Seidenband nachher durch die Krausrippen ziehen soll. Können Sie mir bitte helfen?
17.12.2019 - 20:31DROPS Design answered:
Liebe Frau Möhrke, das Seidenband ziehen Sie durch die Maschen zwischen den beiden ersten Krausrippen. Viel Spaß beim stricken!
18.12.2019 - 07:44
![]() Kate Andritsopoulou wrote:
Kate Andritsopoulou wrote:
Thank you for your help. However the pattern continues \"When A.2 has been worked 1 time vertically, there are 348 sts on needle in both sizes. \" If I am knitting A3 over A1/A4 where do I knit A2?
30.04.2019 - 08:39DROPS Design answered:
Dear Mrs Andritsopoulou, A.2 will be worked over A.2 as before = just continkue working A.2 as before, the only change is here to work A.3 over A.1/A.4. Happy knitting!
30.04.2019 - 10:07
![]() Kate Andritsopoulou wrote:
Kate Andritsopoulou wrote:
Good evening! Can you please explain: "Now continue to work in the round over all sts, continue with A.3 over A.1/A.4." Thank you.
29.04.2019 - 19:45DROPS Design answered:
Hi Kate, You have started the piece working back and forth to give the split mid front. Once the split is finished you continue in the round (so do not turn the piece, but continue straight on) to work the body of the poncho. The last part means that where you previously worked A.1/A.4 you now work A.3. I hope this helps and happy knitting!
30.04.2019 - 07:46
![]() Nina Sarkki wrote:
Nina Sarkki wrote:
Hej! När jag nu stickat första rapporten A1 och A4 en gång och ska göra rapporten en gång till inför att sedan sticka ihop alla maskor så undrar jag hur/var jag fortsätter att sticka rapport A2, från början 5/21 jag får då inte maskantalet att stämma med omslagen?? Mvh Nina
02.06.2018 - 08:28DROPS Design answered:
Hei Nina. Du skal bare fortsette A.2 videre oppover som anvist i diagrammet – altså du fortsetter med omgang 17 om du strikker størrelse S/M/L, eller med omgang 34 om du strikker størrelse XL/XXL/XXXL. God fornøyelse
07.06.2018 - 15:32
![]() Lesley Steinmeier wrote:
Lesley Steinmeier wrote:
Klopt het dat in A6 tussen al die X'en (av goede kant) vanaf rij 14 in het midden, ook nog 0'en staan? Misschien ligt het aan mn telefoon, maar ik kan het heel slecht zien (misschien een overbodige vraag omdat ik anders moet minderen, maar voorkomen beter dan genezen...)
30.04.2018 - 17:17DROPS Design answered:
Hallo Lesley, Het ligt niet aan je telefoon, hoor. Ze zijn inderdaad wat lastig om te zien maar in toer 13, 15, 17 en 19 van A.6 zitten aan beide kanten van de middelste steek een omslag. Er is een verzoek naar de designafdeling gestuurd om deze wat duidelijker in beeld te krijgen.
02.05.2018 - 21:15
![]() Katri wrote:
Katri wrote:
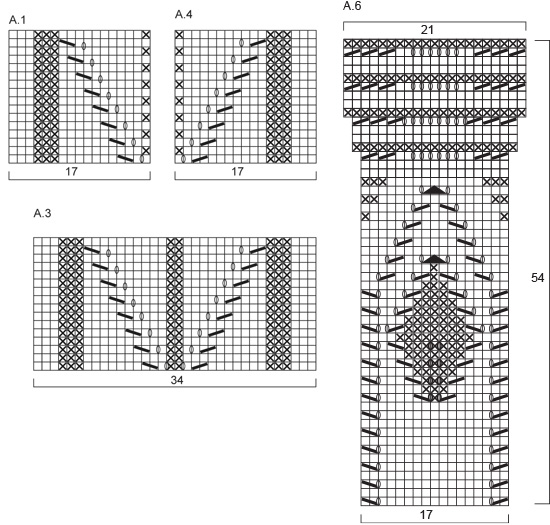
A question has been asked here several times in different languages i.e. how to proceed with the A6 pattern plus the 2sts from pattern A5. Total being 696 sts at this point, how do you reach the total of 1072 sts at the end? One pattern A6 adding only 4sts and there being in total 40 x A6 pattern, this adds only 160 sts to the 696 sts = 856. Where do the rest over 200 sts come from? Does one add an YO to the 2first sts of A5 pattern on each round and how?
08.04.2018 - 10:32DROPS Design answered:
Dear Katri, you will inc 1 st in each A.5A and 1 st in each A.5C on every other row, ie you will inc (2 sts x 27 inc row = every other row in A.6) x 4 repeats in width = 216 sts inc = there will be a total of 1072 sts after A.6 has been worked 1 time in height (including the sts inc in A.5A and A.5C). Happy knitting!
09.04.2018 - 13:27
![]() Maria wrote:
Maria wrote:
Jag förstår inte detta mönster efter varv 2 i A6. Var placerar jag de ökade maskorna i A.5 A / A.5 C fortsättningsvis för att få ihop mönstret korrekt i slutändan? Alltså, hur fortsätter jag varv 3 efter 2 X A.6??? Tacksam för svar.
08.12.2017 - 22:15DROPS Design answered:
Hej, de ökade maskorna i A.5 ska stickas räta.
11.12.2017 - 17:02
![]() Kerstin Vogel wrote:
Kerstin Vogel wrote:
Rest von Frage: Muss ich dann 2Ma re 1 U 1 Ma re und dann A6 stricken oder beginne ich immer mit 1Ma re 1U 1 Ma re dann die Maschen re die dazugekommen sind und dann Muster A6 weiter? Vielen Dank schon mal für die Antwort. Mit freundlichen Grüßen Kerstin V.
26.08.2016 - 13:09DROPS Design answered:
Hallo Kerstin, diese Frage wurde auch bei Ihrer anderen Frage beantwortet.
29.08.2016 - 09:27
![]() Kerstin Vogel wrote:
Kerstin Vogel wrote:
Rest von Frage: Muss ich dann 2Ma re 1 U 1 Ma re und dann A6 stricken oder beginne ich immer mit 1Ma re 1U 1 Ma re dann die Maschen re die dazugekommen sind und dann Muster A6 weiter? Vielen Dank schon mal für die Antwort. Mit freundlichen Grüßen Kerstin V.
21.08.2016 - 18:20
|
|||||||||||||||||||
Honeymoon#honeymoonponcho |
|||||||||||||||||||
 |
 |
||||||||||||||||||
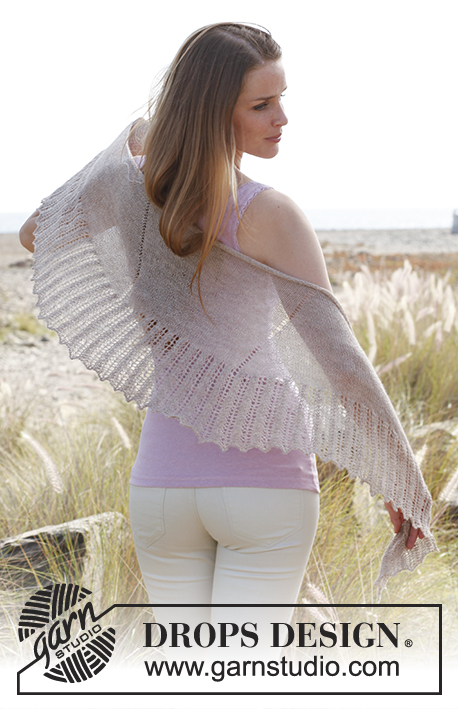
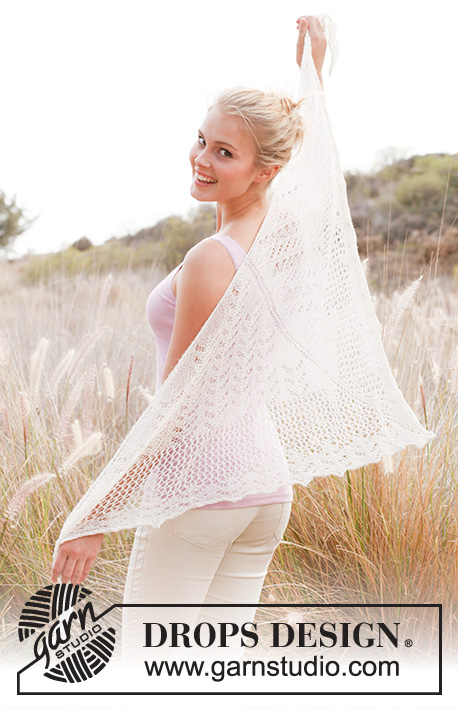
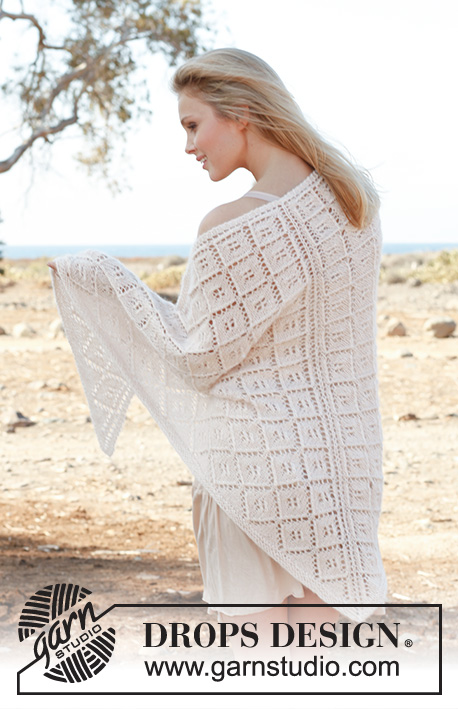
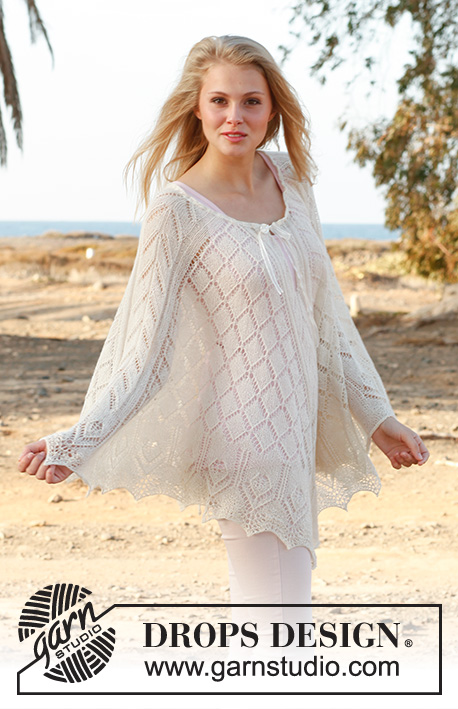
Knitted DROPS poncho with lace pattern in "BabyAlpaca Silk" or "Lace". Size: S - XXXL.
DROPS 146-4 |
|||||||||||||||||||
|
KNITTING GAUGE: This garment is to be soaked and stretched to size afterwards. The knitting gauge is therefore not that important but to get a sense of whether you are working to loose/tight, 23 sts x 30 rows on needle size 3.5 mm / US 4 = approx. 10 x 10 cm / 4" x 4". ---------------------------------------------------------- GARTER ST (back and forth on needle): K all rows. 1 ridge = 2 rows K. GARTER ST (in the round on circular needle): 1 ridge = * K 1 round and P 1 round *, repeat from *-*. PATTERN: See diagrams A.1 to A.6. Diagrams show all rows in pattern seen from RS. See arrow for your size in Diagram A.2. ---------------------------------------------------------- PONCHO: Piece is worked top down, first back and forth on circular needle and then in the round. This is done to make a vent mid front. Cast on 156-220 sts on circular needle size 3.5 mm / US 4 (40 cm / 16") with Baby Alpaca Silk or Lace. Work 2 ridges in GARTER ST - see explanation above. Then work as follows: A.1 (= 17 sts), * A.2 (= 5-21 sts), A.3 (= 34 sts) *, repeat from *-* 3 times in total, A.2 (= 5-21 sts), A.4 (= 17 sts). Continue this pattern back and forth until 2 repetitions of A.1/A.4 have been worked vertically, finish when 17 sts remain on needle. This is now the beg of round. Now continue to work in the round over all sts, continue with A.3 over A.1/A.4. Continue this pattern upwards, switch to a longer circular needle when needed. When A.2 has been worked 1 time vertically, there are 348 sts on needle in both sizes. Then work as follows: * A.3, A.5 A, A.5 B 2 times, A.5 C *, repeat from *-* 4 times in total. Every time A.5 has been worked 1 time vertically, there is 1 A.5 B more between every A.5 A and A.5 C. Continue this pattern until a total of 9-8 repetitions of A.3 and 8-8 repetitions of A.5 have been worked vertically = 732 sts on needle in both sizes. K 1 round over all sts, over all A.5 dec 9 sts evenly (= 140 sts remain over every A.5, 696 sts in total.) Then work as follows: * A.6 2 times, continue with the first 2 sts in A.5 A, work A.6 8 times, work the last 2 sts in A.5 C, * repeat from *-* 4 times in total. Continue like this until A.6 has been worked 1 time vertically – K the inc sts in A.5 = 1072 sts. Loosely bind off. BLOCKING: If the poncho is worked in Lace, it needs to be blocked to get the right measurements and shape. If it is worked in Baby Alpaca Silk, lightly stretch or steam it. Place the poncho in lukewarm water until it is soaking wet. Carefully squeeze the water out of the poncho - do not twist the poncho - then roll the poncho in a towel and squeeze to remove more water - the poncho will now only be moist. Place the poncho on a carpet or mattress - carefully stretch it out to size in a nice circle and fasten it with pins. Leave to dry. Repeat the process when the poncho has been washed. Thread a silk ribbon up and down in the ridges on the neck of poncho and tie a bow. |
|||||||||||||||||||
Diagram explanations |
|||||||||||||||||||
|
|||||||||||||||||||
 |
|||||||||||||||||||
 |
|||||||||||||||||||
Have you finished this pattern?Tag your pictures with #dropspattern #honeymoonponcho or submit them to the #dropsfan gallery. Do you need help with this pattern?You'll find 10 tutorial videos, a Comments/Questions area and more by visiting the pattern on garnstudio.com. © 1982-2026 DROPS Design A/S. We reserve all rights. This document, including all its sub-sections, has copyrights. Read more about what you can do with our patterns at the bottom of each pattern on our site. |
|||||||||||||||||||


With over 40 years in knitting and crochet design, DROPS Design offers one of the most extensive collections of free patterns on the internet - translated to 17 languages. As of today we count 324 catalogs and 12290 patterns - 12280 of which are translated into English (US/in).
We work hard to bring you the best knitting and crochet have to offer, inspiration and advice as well as great quality yarns at incredible prices! Would you like to use our patterns for other than personal use? You can read what you are allowed to do in the Copyright text at the bottom of all our patterns. Happy crafting!
Post a comment to pattern DROPS 146-4
We would love to hear what you have to say about this pattern!
If you want to leave a question, please make sure you select the correct category in the form below, to speed up the answering process. Required fields are marked *.