
Popular categories
Looking for a yarn?


Comments / Questions (42)
![]() Corrie wrote:
Corrie wrote:
Er staat 6 steken afkanten voor de mouwen, daar passen de mouwen niet tussen. Klopt dit wel?
04.10.2024 - 21:45DROPS Design answered:
Dag Corrie,
Die 6 steken zijn alleen de steken van de oksel zeg maar en daar komen de 6 steken die je onder de mouw zelf hebt tegenaan. Als je de mouwen en de panden samen voegt om de pas te breien dan wijst het zich wel.
06.10.2024 - 09:41
![]() Annelies Rennert wrote:
Annelies Rennert wrote:
Ich habe mal die maschen ausgerechnet. Ja jede vordere Reihe abnehmen, das ist jetzt klar. Nun möchte ich nur wissen ob ich reihenweise einmal links nach Markierer und die nächste Reihe rechts und das im Wechsel. LG.
03.04.2023 - 16:18DROPS Design answered:
Liebe Frau Rennert, ja genau, bei der 1. Abnahmen wird man eine Masche links von jeder Markierer abnehmen, bei der 2. Abnahmen wird man eine Masche rechts von jeder Markierer (= davor) abnehmen und so weiter stricken, abwechslungsweise nach und vor den Markierungen. Viel Spaß beim stricken!
11.04.2023 - 11:08
![]() Annelies Rennert wrote:
Annelies Rennert wrote:
Sie haben es der Nancy 2x erklärt aber jedes Mal anders. Ich muss auf JEDER vorderen Reihe MA abnehmen., oder ? NICHT ERST NACH DER 5. REIHE Nehme ich im Wechsel auf dieser Reihe einmal vor dem Markieren und beim nächsten Markierer danach ab oder wird reihenweise einmal immer links und die nächste Reihe immer rechts abgenommen? Bitte geben Sie mir eine Rückmeldung ich komme sonst nicht weiter LG. Annelies
03.04.2023 - 16:05DROPS Design answered:
Liebe Frau Rennert, die Abnahmen erfolgen in der einen Abnahme-Reihe links ALLER Markierungen, bei der nächsten Abnahme-Reihe rechts ALLER Markierungen, dann wieder links ALLER Markierungen usw. im Wechsel. Die Abnahmen erfolgen nur in Hin-Reihen, aber nicht in JEDER Hin-Reihe: Zuerst in jeder 6. R (= in jeder 3. Hin-R), dann in jeder 4. R (= in jeder 2. Hin-R), dann in jeder 2. R (= in jeder Hin-R). Gutes Gelingen!
11.04.2023 - 09:53
![]() Annelies Rennert wrote:
Annelies Rennert wrote:
Habe die Ärmel mit dem jacketeil verbunden. Meine 10 Marker gesetzt. Nun die Frage , verstehe ich es richtig das keine raglanabnahme an den Verbindungen arm mit Jackentasche erfolgt, denn die Marker sitzen ja verteilt. LG. Annelies Rennert
03.04.2023 - 10:58
![]() Annelies Rennert wrote:
Annelies Rennert wrote:
Hallöchen , habe die Ärmel auf dem nadelspiel gestrickt. Jetzt stehe ich davor 10 Markierungen zu setzten. Jetzt weiß ich nicht wie und wo die Markierungen gesetzt werden. Eigentlich dachte ich links und rechts von den eingesetzten Ärmel wie bei dem Modell Summer Fruit. Bitte um Info wie ich es machen kann. Danke mfg. Annelies Rennert
31.03.2023 - 23:21
![]() Nelá wrote:
Nelá wrote:
Ich habe jetzt die beiden Ärmel sowie den Jackenteil gestrickt. ich leider keine Beschreibung entdecken wie und an welcher Stelle ich nun die Ärmel an den Rumpf anbringe. In der Beschreibung heißt es zum Beginn der Passe "alle maschen auf eine Nadel " aber da fehlt doch dannn noch wo ich die ärmel genau integrieren soll. Oder übersehe ich da etwas?
14.10.2022 - 01:57DROPS Design answered:
Liebe Nelá, die Maschen der Ärmel legen Sie auf der Nadel, wo Sie beim Rumpfteil die Maschen für die Armlöcher abgekettet haben, so daß die 8 abgekettene Maschen bei jeder Ärmel gegen die 6 abgekettene Maschen beim Rumpfteil (die 2 Maschen weniger sind die Randmaschen für das Zusammennähen). Dieses Video zeigt, wie man so eine Ärmel auf der Nadel lieght und dann weiter strickt. Viel Spaß beim stricken!
14.10.2022 - 08:35
![]() Carol Reid wrote:
Carol Reid wrote:
To clarify the instructions for selves he edging: why is it used just on the bottom running and not all the way up the sweater front? The button band will be attached to the entire sweater front closing, including the bottom ribbing which has the selvedge edge. I use the British selvedge edge..
16.09.2022 - 16:13DROPS Design answered:
Dear Carol, the edge stitch technique is a simpler technique which we use here and is more begginner-friendly. In this case, we always knit the edge stitch. You can use the selvedge edge replacing the edge stitch in garter stitch. Happy knitting!
17.09.2022 - 16:18
![]() Carol Reid wrote:
Carol Reid wrote:
It is not clear why the sweater starts with a selvedge edge on the ribbing and then stops. The instructions after the ribbing say to garter stitch all the stitches. Can you clarify please?
15.09.2022 - 17:37DROPS Design answered:
Dear Mrs Reid, when working ribbing edge you work rib with 1 edge stitch in garter stitch then continue working all stitches in garter stitch, including 1 edge stitch on each side and these stitches are also worked in garter stitch. Happy knitting!
16.09.2022 - 09:23
![]() Elisabeth wrote:
Elisabeth wrote:
Stickfasthet enl mönster: 23 m, 44 varv sticka nr 3,5= 10 cm enl info om garnet: 23 m, 30 varv sticka nr 3,5 = 10 cm Hur tänkte man här?
28.02.2022 - 14:22DROPS Design answered:
Hei Elisabeth Informasjon på etiketten er anbefalt strikkefasthet i glattstrikk, men på hver enkel oppskrift er det skrevet en egen strikkefasthet, avhengig av hvordan den strikkes. Denne jakken er strikket i riller (rett fra både retten og vrangen), man får flere pinner i høyden ved rillestrikk enn glattstrikk, derfor er det skrevet 44 pinner. mvh DROPS Design
28.02.2022 - 15:17
![]() Nancy wrote:
Nancy wrote:
Ok bedeutet das nun das ich in jeder Abnahme Reihe jeweils bevor und nach dem Marker abnehme? In der Anleitung steht nämlich „zum Schluss abwechslungsweise rechts/links des Markierers abnehmen
18.11.2021 - 18:32DROPS Design answered:
Liebe Nancy, das 1. Mal nehmen Sie 1 Maschen links jeder Markierung bzw nach jeder Markierung ab, das 2. Mal rechts jeder Markierung = vor jeder Markierung, dann das 3. Mal links jeder Markierung, das 4. Mal vor jeder Markierung und so weiter, es wir jeweils 1 Masche bei jeder Markierung (abwechslungsweise links und rechts / nach und vor jeder Markierung) abgenommen = es sind 10 Markierung, es wird jeweils 10 Maschen abgenommen . Viel Spaß beim stricken!
19.11.2021 - 07:10
|
|
Heathcliff#heathcliffcardigan |
|
|
|
|
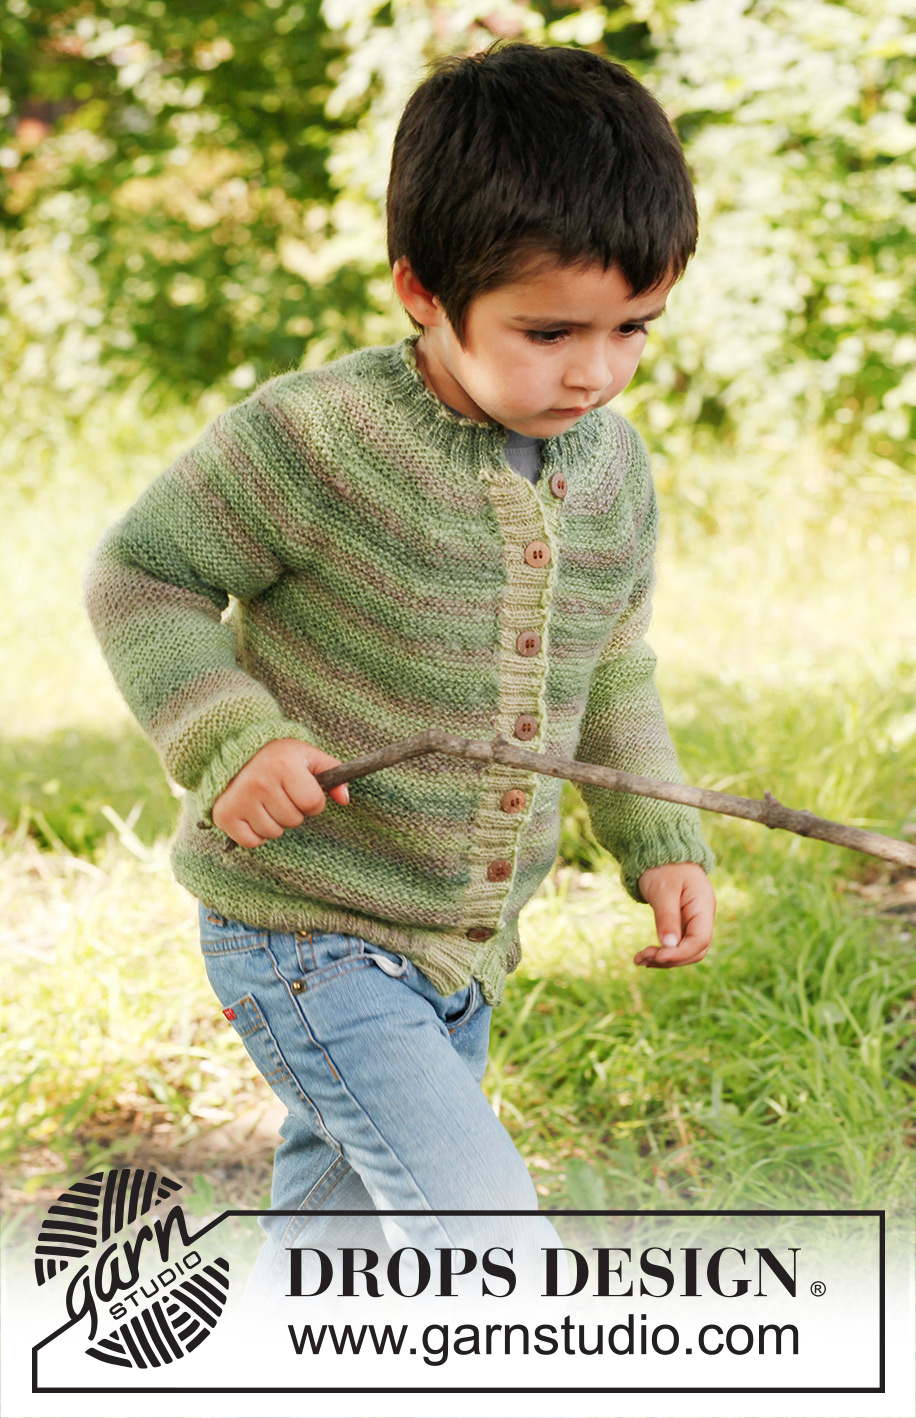
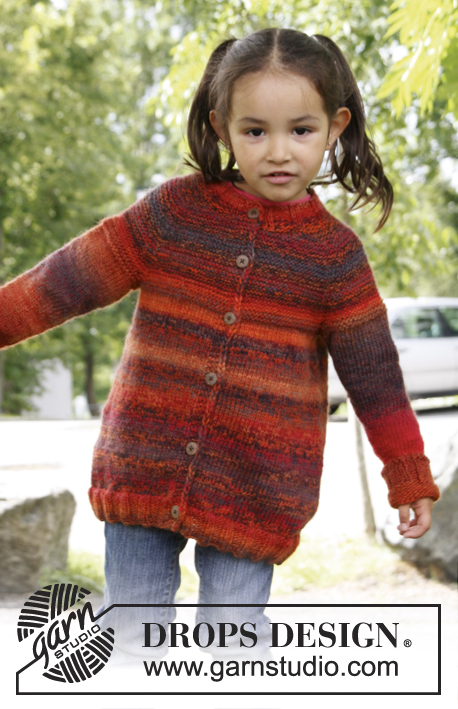
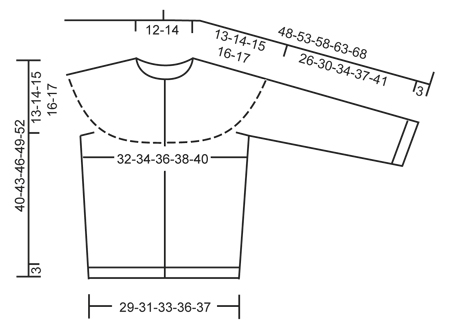
Knitted cardigan in garter st, with round yoke in DROPS Delight. Size children 3 to 12 years.
DROPS Children 22-5 |
|
|
YARN CHANGE TIP: To make the color transitions in Delight pretty when switching ball, it is important to find a ball that starts with the same color that last ball ended with. GARTER ST (back and forth on needle): K all rows. -------------------------------------------------------- JACKET: Worked back and forth on circular needle from mid front. READ YARN CHANGE TIP! Cast on 152-164-176-188-196 sts (includes 1 edge st in each side towards mid front) on circular needle size 2.5 mm / US 1or2 with Delight. Work as follows (seen from from RS): 1 edge st in GARTER ST - see explanation above - * K 2, P 2 *, repeat from *-* until 3 sts remain, K 2 and 1 edge st in garter st. When piece measures 3 cm / 1⅛", switch to circular needle size 3.5 mm / US 4. K 1 row (from RS) over all sts while AT THE SAME TIME dec 18-20-22-24-24 sts evenly = 134-144-154-164-172 sts. Insert 2 markers in the piece; 34-36-38-41-43 sts in from each side (= 66-72-78-82-86 sts between markers on back piece). Continue in garter st over all sts. REMEMBER THE GAUGE! When piece measures 7-8-9-10-11 cm / 2¾"-3⅛"-3½"-4"-4⅜", inc 1 st on each side of both markers. Repeat inc every 5-6-6-7-7 cm / 2"-2⅜"-2⅜"-2¾"-2¾" a total of 3 times = 146-156-166-176-184 sts. When piece measures 27-29-31-33-35 cm / 10⅝"-11⅜"-12¼"-13"-13¾", bind off 6 sts in each side for armholes (i.e. bind off 3 sts on each side of both markers) = 134-144-154-164-172 sts remain on needle. Put piece aside and knit the sleeves. SLEEVE: Worked back and forth on needle. Cast on 50-54-54-58-58 sts (includes 1 edge st in each side) on needle size 2.5 mm / US 1or2 with Delight. Work rib = K 2/P 2 with 1 edge st in garter st in each side. When piece measures 3 cm / 1⅛", switch to circular needle size 3.5 mm / US 4. K 1 row (from RS) while at the same time dec 6-6-4-4-2 sts evenly = 44-48-50-54-56 sts. Continue in garter st over all sts. When piece measures 6 cm / 2⅜", inc 1 st in each side. Repeat inc every 3-4-4-4½-4½ cm / 1⅛"-1½"-1½"-1¾"-1¾" a total of 7-7-8-8-9 times = 58-62-66-70-74 sts. When piece measures 29-33-37-40-44 cm / 11⅜"-13"-14½"-15¾"-17¼", bind off 4 sts at beg and end of next row from RS = 50-54-58-62-66 sts remain on needle, cut the yarn. Put piece aside and knit another sleeve. YOKE: Slip sleeves on to same circular needle as body where armholes were bound off = 234-252-270-288-304 sts. Insert 10 markers in the piece as follows: First marker after 18-18-18-18-17 sts, then 22-24-26-28-30 sts between the markers, 18-18-18-18-17 sts remain after last marker. K 5-5-7-7-7 rows before starting dec (1st row = WS). On next row (= RS), dec 1 st on the left side of all markers by K 2 tog. Repeat dec every 6th row a total of 4-4-5-5-5 times, every 4th row a total of 4-5-5-5-6 times and then every other row a total of 8-8-8-9-9 times – NOTE: Dec alternately on the right and left side of all markers. After all dec, 74-82-90-98-104 sts remain on needle. Then work an elevation in the back as follows: Work 43-47-51-55-58 sts, turn, tighten yarn and work 12 sts back, turn, tighten yarn and work 18 sts, turn, tighten yarn and work 24 sts, turn, continue like this by working 6 sts more on every turn until a total of 60-60-72-72-84 sts have been worked. Turn and work until mid front again. Slip sts on a stitch holder and work the bands. LEFT FRONT BAND: Pick up approx. 90 to 120 sts on circular needle size 2.5 mm / US 1or2 with Delight, pick up inside 1 edge st along left front edge. K 1 row from WS while at the same time adjusting no of sts to 109-117-125-133-141. Then work rib as follows from RS (from the top): 1 st in garter st, * K 2, P 2 *, repeat from *-*, finish with K 2 and 2 sts in garter st. When rib measures 2.5 cm / ⅞", bind off with K over K and P over P. RIGHT BAND: Work as left band but after 1 cm / ⅜", bind off for 7-7-7-8-8 button holes evenly. 1 BUTTON HOLE = bind off 2 P sts and cast on 2 new sts on next row over these sts. Upper button hole should be approx. 1 cm / ⅜" from the top, and bottom hole approx. 4-5 cm / 1½"-2" from bottom edge. NECK EDGE: Pick up 6 sts at the top of right front band on circular needle size 2.5 mm / US 1or2 with Delight. Then work the 74-82-90-98-104 sts from stitch holder back on needle, then knit up 6 sts at the top of left front band = 86-94-102-110-116 sts. K 1 row from WS while at the same time dec 2-6-6-6-8 sts evenly (do not dec over band sts) = 84-88-96-104-108 sts. Continue to work rib as follows seen from RS: 1 st in garter st, * K 2, P 2 *, repeat from *-*, finish with K 2 and 1 st in garter st. When edge measures approx. 2.5 cm / ⅞", bind off with K over K and P over P. ASSEMBLY: Sew the sleeve seams inside 1 edge st. Sew tog the openings under the sleeves and sew on buttons. |
|
 |
|
Have you finished this pattern?Tag your pictures with #dropspattern #heathcliffcardigan or submit them to the #dropsfan gallery. Do you need help with this pattern?You'll find 15 tutorial videos, a Comments/Questions area and more by visiting the pattern on garnstudio.com. © 1982-2026 DROPS Design A/S. We reserve all rights. This document, including all its sub-sections, has copyrights. Read more about what you can do with our patterns at the bottom of each pattern on our site. |


With over 40 years in knitting and crochet design, DROPS Design offers one of the most extensive collections of free patterns on the internet - translated to 17 languages. As of today we count 324 catalogs and 12260 patterns - 12250 of which are translated into English (US/in).
We work hard to bring you the best knitting and crochet have to offer, inspiration and advice as well as great quality yarns at incredible prices! Would you like to use our patterns for other than personal use? You can read what you are allowed to do in the Copyright text at the bottom of all our patterns. Happy crafting!
Post a comment to pattern DROPS Children 22-5
We would love to hear what you have to say about this pattern!
If you want to leave a question, please make sure you select the correct category in the form below, to speed up the answering process. Required fields are marked *.