
Popular categories
Looking for a yarn?


Comments / Questions (12)
![]() Chrissi wrote:
Chrissi wrote:
Hallo, Ich verstehe nicht ganz wie, der Kragen gestrickt wird beim Vorderteil. Ich habe jetzt die 12 abgekettet und jetzt die 16 Maschen zu Ende gestrickt. Wie geht es dann weiter. Zur Schulter zurückstrichen, wenden, dann 8 Maschen und dann? Könnt Ihr mir da weiterhelfen?
01.03.2025 - 12:10DROPS Design answered:
Liebe Christi, jetzt stricken Sie diese 16 Maschen mit verkürzten Reihen, beginnen Sie mit einer Rückreihe (linkes Vorderteil) / Hinreihe (rechtes Vorderteil) und alle Maschen stricken, wenden, alle Maschen stricken, wenden, nur die 8 ersten Maschen stricken (die 8 restlichen Maschen auf der linken Nadel lassen), wenden und diese 8 Maschen stricken. Diese 4 Reihen wiederholen Sie bis den Kragen ca 7 cm an der kürzesten Seite misst. Viel Spaß beim Stricken!
03.03.2025 - 08:54
![]() Lynn wrote:
Lynn wrote:
Many thanks for the detailed instructions for casting off the neckline and shoulders of the back piece!
21.06.2024 - 18:19
![]() Lynn wrote:
Lynn wrote:
Hello. I am confused. Can you provide more detailed instructions for binding off back neckline and shoulders “at the same time”? What is the order and how many rows involved? it mentions Dec1 at neckline after instructions said to bind off neckline. Size large has 86 st. Bind off instructions mention 24+10+10. The math doesn’t add up. Thanks, if you can help I would greatly appreciate 🙂
11.06.2024 - 01:41DROPS Design answered:
Dear Lynn, work 1 row from RS casting off the middle 24 sts = 31 sts for each shoulder, finish the row from RS, turn and cast off the first 10 sts from WS, work the remaining 21 sts. Turn and cast off 1 st at the beg of row from RS (from neck) and work the remaining 20 sts. Turn and cast off the first 10 sts, work the remaining 10 sts, turn and work these 10 sts turn and cast off these 10 sts. You have cast off 10 sts 3 times at the beg of row from armhole for the shoulder and cast off 1 st at the beg of row from neck. Repeat on other shoulder casting off from RS for shoulder and from WS for neck. Happy knitting!
11.06.2024 - 08:13
![]() Beatriz wrote:
Beatriz wrote:
Merci beaucoup pour votre aide, précieuse. C'est parfait et j'ai bien compris c'est un modèle magnifique.
04.10.2020 - 00:02
![]() Beatriz Ferrada wrote:
Beatriz Ferrada wrote:
Modele 109-43 Je ne comprends pas comment finir du côté de l'encolure, svp, voulez vous m'indiquer comment faire? il faut rabatte côté épaule et laisser seulement 8 mailles pour finir le col? merci
01.10.2020 - 17:28DROPS Design answered:
Bonjour Mme Ferrada, vous rabattez les mailles de l'épaule et tricotez le col sur les 16 m (en taille S,M et L) restantes (= 8 m point mousse, 8 m au double point de riz) avec des rangs raccourcis ainsi: 2 rangs sur toutes les mailles (tricotez ces mailles comme avant), 2 rangs sur les 8 premières mailles- le 1er rang du col devant gauche se tricote sur l'envers et celui du devant droit sur l'endroit (on doit avoir plus de rangs côté extérieur du col). Bon tricot!
02.10.2020 - 08:54
![]() Sylvie wrote:
Sylvie wrote:
Bonjour. Quand il faut augmenter 1 m de chaque côté pour le dos il est marqué qu'il faut augmenter 1m de chaque côté 3 fois. En fait pour avoir 72 m il faut augmenter 1m de chaque côté 4 fois, idem je pense pour les devants. Merci de m'eclairer sur ce point.
23.03.2019 - 21:09DROPS Design answered:
Bonjour Sylvie, tout à fait, on va augmenter 4 fois au total, la correction a été faite, merci. Bon tricot!
25.03.2019 - 11:02Ellie wrote:
Ein schoenes Muster! Modisch!!!!An stelle von 2 Knoepfen werde ich ein grossen Knopf benutzen.
14.10.2008 - 23:45
![]() Ruth Snodgrass wrote:
Ruth Snodgrass wrote:
Another "must-do"! I love this for ME!!!
14.07.2008 - 22:56
![]() Debi wrote:
Debi wrote:
How PERFECT this one is... would be nice for Christmas gifts for my daughters.
21.06.2008 - 05:34
![]() Diane Benjamin wrote:
Diane Benjamin wrote:
Interesting stitching + little touches of shaping make this very nice piece!
15.06.2008 - 23:14
|
|
DROPS 109-43 |
|
|
|
|
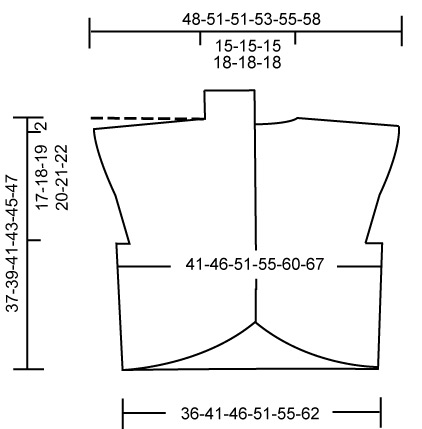
DROPS short waistcoat in double moss st in 2 threads ”Kid-Silk”. Size S - XXXL.
DROPS 109-43 |
|
|
Knitting tip: Always start a new ball of yarn at the side and not mid piece. Garter st, back and forth on needle: K all rows. Double moss st: Row 1: * K2, P2 *, repeat from *-*. Row 2: K over K and P over P. Row 3: P over K and K over P. Row 4: K over K and P over P. Repeat row 1-4. BACK PIECE Worked back and forth on needle. See Knitting tip! Cast on 64-72-80-88-96-108 sts (includes 1 edge st each side) on needle size 5 mm [US 8] with 2 threads heather and work garter st – see above - until piece measures 8 cm [3⅛"], adjust so that next row is from RS. Change to 1 thread of each color and continue in double moss st – see above - with 1 edge st each side. Remember the knitting gauge! When piece measures 10 cm [4"] inc 1 st each side and repeat the inc on every 2-2-2-3-3-3 cm [¾"-¾"-¾"-1⅛"-1⅛"-1⅛"] another 3 times = 72-80-88-96-104-116 sts. Incorporate the inc sts in moss st as you go along. When piece measures 18-19-20-21-22-23 cm [7"-7½"-8"-8¼"-8 ¾"-9"] bind off 3-5-7-9-11-13 sts each side for armhole = 66-70-74-78-82-90 sts. Continue in double moss st with 4 garter sts each side. When piece measures 23-25-30-32-34-38 cm [9"-9¾"-11¾"-12½"-13⅜"-15"] inc for wide shoulder each side – inc 1 st by making 1 YO inside the 4 garter sts and work YO into back of loop on return row. Incorporate inc sts in double moss st as you go along. Repeat the inc on every 4th row another 7-7-5-5-5-3 times = 82-86-86-90-94-98 sts. When piece measures 35-37-39-41-43-45 cm [13¾"-14½"-15¼"-16⅛"-17"-17¾"] bind off for neckline and shoulder at the same time. Neckline: Bind off the middle 24-24-24-28-28-28 sts for neck and complete each shoulder separately. Dec 1 st on neckline on next row. Shoulder: Loosely bind off 8-10-10-10-10-12 sts at the side, from shoulder towards neckline, work remaining sts on row and work return row. Repeat the dec on next row, work return row and bind off the remaining 12-10-10-10-12-10 sts on next row. Piece measures approx 37-39-41-43-45-47 cm [14½"-15¼"-16⅛"-17"-17¾"-18½"] where longest. LEFT FRONT PIECE Cast on 5-9-13-17-21-29 sts on needle size 5 mm [US 8] with 2 threads heather. Work garter st, at the same time cast on 3 new sts at the end of every row towards mid front a total of 10 times = 35-39-43-47-51-59 sts. When piece measures 8 cm [3⅛"] change to 1 thread of each color and continue as follows from RS: 1 edge st, double moss st on the next 28-32-36-40-44-52 sts and 6 garter sts (= front band). At the same time when piece measures 10 cm [4"] beg inc at side as described for back piece = 39-43-47-51-55-63 sts. When piece measures 18-19-20-21-22-23 cm [7"-7½"-8"-8¼"-8 ¾"-9"] bind off 3-5-7-9-11-13 sts at side for armhole = 36-38-40-42-44-50 sts. Continue in double moss st with 4 garter sts at side until finished measurements. When piece measures 23-25-30-32-34-38 cm [9"-9¾"-11¾"-12½"-13⅜"-15"] inc for wide shoulder as described for back piece = 44-46-46-48-50-54 sts. When piece measures 35-37-39-41-43-45 cm [13¾"-14½"-15¼"-16⅛"-17"-17¾"] loosely bind off 8-10-10-10-10-12 sts for shoulder from side towards neckline, work return row and repeat the dec. Work return row and now loosely bind off 12-10-10-10-12-10 sts = 16-16-16-18-18-20 sts left for collar. Continue in garter st on 6 sts towards mid front and double moss st on remaining sts as follows (beg from mid front): * 2 rows on all sts, 2 rows on the 8-8-8-10-10-12 sts towards mid front only *, repeat from *-* until collar measures approx 7-7-7-9-9-9 cm [2¾"-2¾"-2¾"-3½"-3½"-3½"] (where shortest) from shoulder. Bind off. RIGHT FRONT PIECE Like left front piece, but mirrored. Also make 2 buttonholes on front band. 1 buttonhole = K tog 3rd and 4th st from mid front and make 1 YO. Bind off for buttonhole when piece measures 12 and 16 cm [4¾" and 6¼"] at the side (i.e. when front band measures approx 4 and 8 cm [1½" and 3⅛"]). ASSEMBLY Sew shoulder seams. Sew side seam inside 1 edge st. Sew collar tog mid back and sew to back piece. Sew on buttons. Crochet a border round the whole opening (i.e. round collar, front bands and bottom edge) with crochet hook size 3.5 mm [E/4] and 2 threads heather as follows: 1 sc in first st, * 3 ch, skip 1 cm [⅜"], 1 sc in next st *, repeat from *-*. |
|
 |
|
Have you finished this pattern?Tag your pictures with #dropspattern or submit them to the #dropsfan gallery. Do you need help with this pattern?You'll find 17 tutorial videos, a Comments/Questions area and more by visiting the pattern on garnstudio.com. © 1982-2026 DROPS Design A/S. We reserve all rights. This document, including all its sub-sections, has copyrights. Read more about what you can do with our patterns at the bottom of each pattern on our site. |


With over 40 years in knitting and crochet design, DROPS Design offers one of the most extensive collections of free patterns on the internet - translated to 17 languages. As of today we count 324 catalogs and 12245 patterns - 12235 of which are translated into English (US/in).
We work hard to bring you the best knitting and crochet have to offer, inspiration and advice as well as great quality yarns at incredible prices! Would you like to use our patterns for other than personal use? You can read what you are allowed to do in the Copyright text at the bottom of all our patterns. Happy crafting!
Post a comment to pattern DROPS 109-43
We would love to hear what you have to say about this pattern!
If you want to leave a question, please make sure you select the correct category in the form below, to speed up the answering process. Required fields are marked *.