
Popular categories
Looking for a yarn?


Comments / Questions (56)
![]() Gunda Fink wrote:
Gunda Fink wrote:
Bei dem Muster Winters Night bei der Größe L kommt nach der Passe die Anleitung für die Pfeile .Bei Pfeil 5 steht 36 Maschen aufnehmen dann habe ich 348 Maschen dann kommt bei Pfeil 6, 4 Maschen zunehmen das man 328 Maschen hat?Ich habe ja schon durch die Zunahme bei Pfeil 5 ,348 Maschen das wären ja dann 352 Maschen .Dann kommt bä die Einteilung für das Vorder und Rückenteil und da hätte ich wenn ich alle Maschen zusammen rechne 368 Maschen wo kommen dann die restlichen 20 Maschen her?
24.07.2024 - 18:06DROPS Design answered:
Liebe Gunda, die 352 Maschen sind in der Anleitung für Größe L genannt, nicht 328, diese gelten für Größe M: "= 306-328-352 Maschen" - die letzte Angabe ist die für Größe L. Bei der Teilung für das Vorderteil und das Rückenteil schlagen Sie zusätzlich an beiden Seiten des Rumpfteils für die Armausschnitte je 8 Maschen an, also sind es 16 neue Maschen, 352 + 16 = 368. Viel Spaß beim Weiterstricken!
26.07.2024 - 22:42
![]() Daniel wrote:
Daniel wrote:
What is the best way to avoid visible jogs in the pattern?
03.07.2024 - 06:09DROPS Design answered:
Dear Daniel, sice the pattern is rather busy, jogs are not to apparent, however, THIS video tutorial also might help you. Happy Stitching!
03.07.2024 - 08:16
![]() Eelke Storm wrote:
Eelke Storm wrote:
Heel mooi patroon. Ik heb het twee keer gebreid ( maat L en maat XXL) en beide keren heb kimme mouwen met 6 a 7 cm verlengd.
19.06.2024 - 11:24
![]() Jennie wrote:
Jennie wrote:
Hello, I am knitting the Large pattern and I have just split for sleeves, and I now have total of 224 stitches for the body but I am still finishing A.2 but I am on a 6 stitch repeat which doesn't work for 224 stitches. How do I work these? Thanks!
15.02.2024 - 16:16DROPS Design answered:
Hi Jennie, You can either work the stitches which don't fit in stocking stitch under each sleeve or work part of a repeat of A.2 under each sleeve to give a slight "jump" in the pattern . Whichever you choose, make sure the main pattern is continued neatly from the yoke onto the body. Happy knitting!
16.02.2024 - 07:04
![]() Spiliotopoulos Andreas wrote:
Spiliotopoulos Andreas wrote:
Hello. I am making an XL size. Somehow I reached the division before arrow 7. So what should I do? Is it OK to increase 6+7 at the same time? Or something else? Thank you!
01.12.2023 - 12:23DROPS Design answered:
Dear Mr Spiliotopoulos, your tension in height might not be right, you might then to adjust the increase round to match your tension and the required measurements adjusting to the number of sts required for the diagram/repeats. Happy knitting!
01.12.2023 - 15:36
![]() Nicole Cointeaux wrote:
Nicole Cointeaux wrote:
Toutes mes excuses Je n’avais pas lu correctement les explications !IL est noté de faire la rehausse après les cotes 2/2 !
18.09.2023 - 16:35
![]() Nicole Vointeaux wrote:
Nicole Vointeaux wrote:
Bonjour J’ai une question a propos de la rehausse dos ,elle se fait avec quelque rangs de jersey et après on doit tricoter l’empiètement , il n’y a donc pa d’encolure en cotes 2/2 , Peut-on tricoter la rehausse en cote s 2/2 ou bien tricoter en cotes2/2 après la rehausse Merci de me conseiller Nicole
18.09.2023 - 16:13DROPS Design answered:
Bonjour Mme Vointeaux, la réhausse se tricote en jersey après le col (on tricote d'abord 5 cm de côtes, 1 tour en ajustant le nombre de mailles, puis on tricote cette réhausse en jersey, avant de commencer l'empiècement. Bon tricot!
18.09.2023 - 16:20
![]() Nicole wrote:
Nicole wrote:
Je vais tricoter le modèle 219_15 et pouvez vous me dire comment choisir la bonne taille Le tour de poitrine étant de 89 cm Merci pour votre aide
12.08.2023 - 15:23DROPS Design answered:
Bonjour Nicole, mesurez un vêtement dont la personne pour qui vous tricotez ce pull aime la forme, et comparez ces mesures à celles du schéma du bas de page, ce sera ainsi plus simple de trouver la bonne taille. - retrouvez plus d'infos ici. Bon tricot!
14.08.2023 - 09:13
![]() Michal wrote:
Michal wrote:
Hi Drops team, how do I divide for the body and sleeves section (for size M) when I reach 24cm yoke in length several rows before the last #6 arrow increase? I do have 324 stitches o the neeedles, not 328 as required for the body and sleeves division. thank you 😀
24.06.2023 - 11:00DROPS Design answered:
Dear Michal, if you don't have the correct amount of stitches when reaching 24 cm of the yoke, then your vertical gauge is incorrect ( you have less rows per cm than you should, so you may be working more loosely than you should). Try the jumper and see if the length and width fits. If it does, simply increase 4 stitches evenly on the next row and then start dividing for the body and sleeves as explained in the pattern. Check from time to time that the pattern will not get interrupted. Happy knitting!
25.06.2023 - 13:44
![]() LOL wrote:
LOL wrote:
Bonjour Au niveau dos & devant, en XL, il me reste des rangs de A2 à faire. J'ai un souci car 244/8 mailles formant A2, est = à 30,50. Il me reste donc 4 mailles pour finir mon rang mais ça ne coïncide pas avec le début du rang suivant en milieu dos. Que faire ? Diminuer 4 mailles pour finir A2 ? Merci de votre aide
12.05.2023 - 17:48DROPS Design answered:
Bonjour Lol, tricotez simplement le maximum de mailles en suivant A.2 jusqu'au milieu sous les manches, le motif ne tombera pas juste au début du tour et de l'autre côté, c'est normal. Vous augmenterez 2 m au 1er tour de A.3 pour tricoter A.3 en rond. Bon tricot!
15.05.2023 - 07:53
|
|||||||||||||
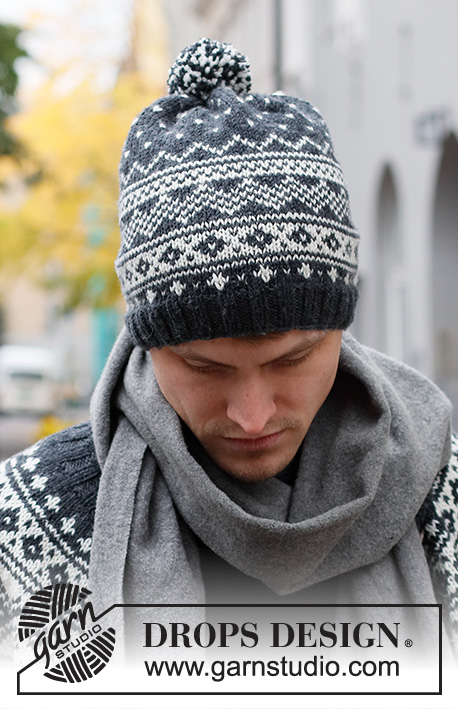
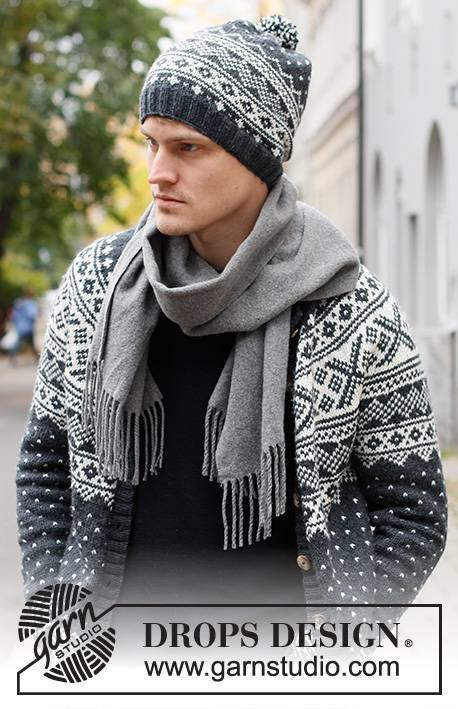
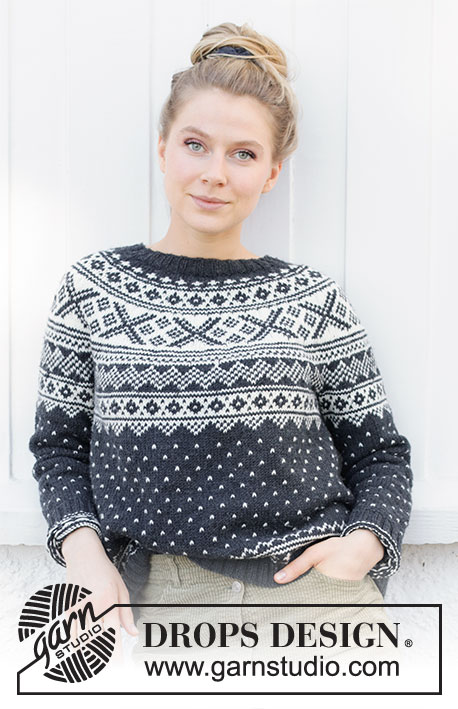
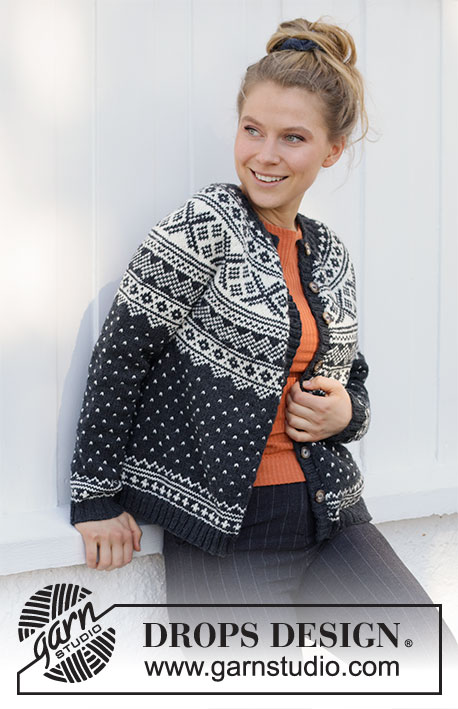
Winter's Night Enchantment#wintersnightenchantmentsweater |
|||||||||||||
 |
 |
||||||||||||
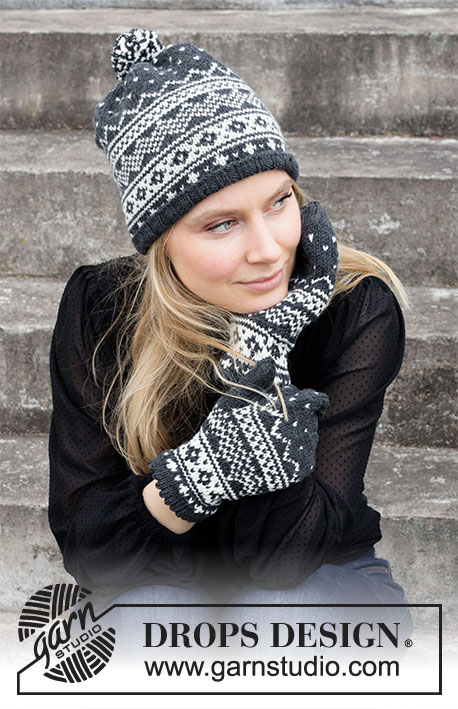
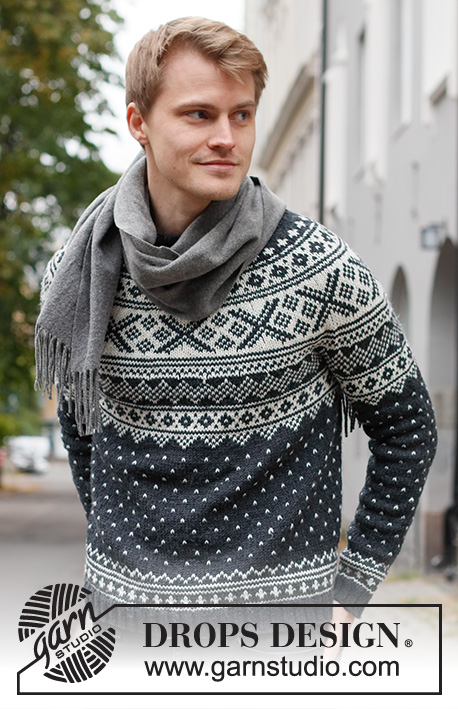
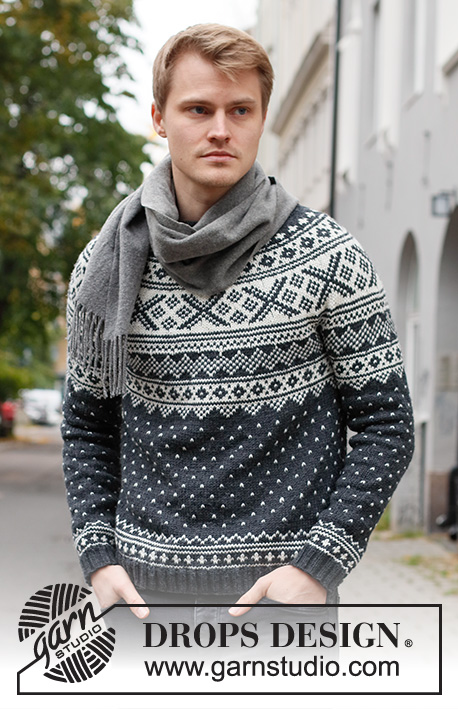
Knitted jumper for men in DROPS Karisma. The piece is worked top down with round yoke and Nordic pattern. Sizes S - XXXL.
DROPS 219-15 |
|||||||||||||
|
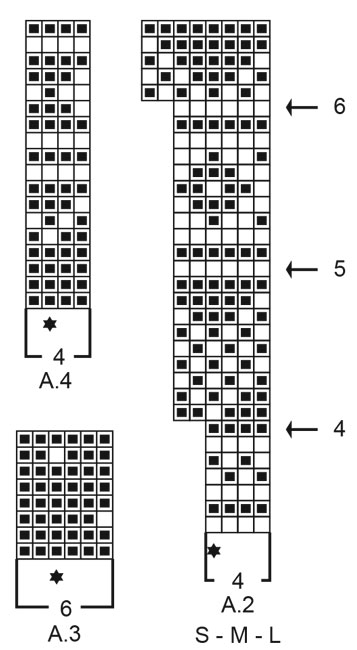
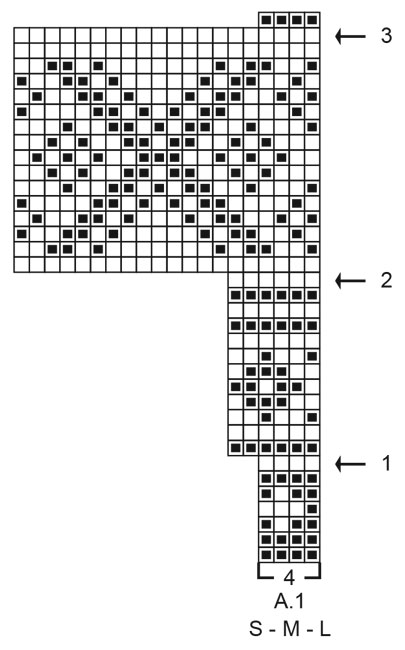
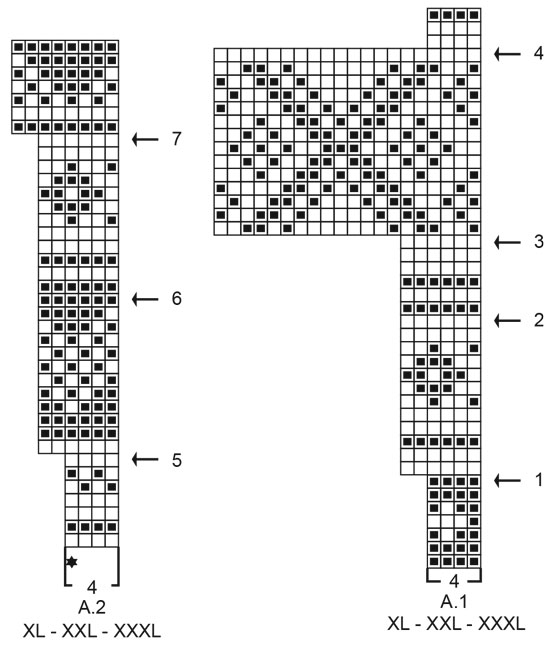
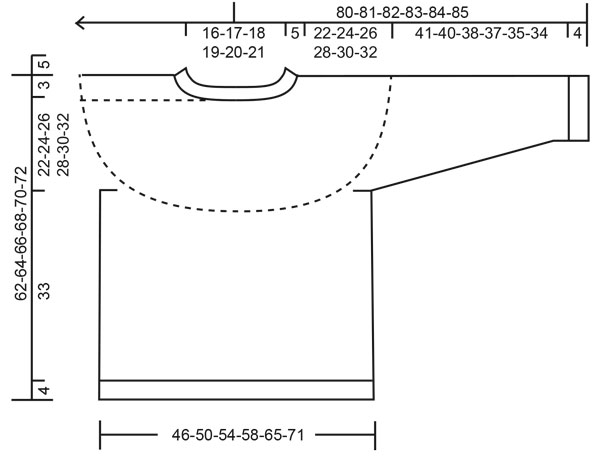
------------------------------------------------------- EXPLANATIONS FOR THE PATTERN: ------------------------------------------------------- INCREASE/DECREASE TIP (evenly spaced): To work out how to increase/decrease evenly, count the total number of stitches on needle (e.g. 92 stitches) and divide by the number of increases/decreases to be made (e.g. 28) = 3.3. In this example, increase by making 1 yarn over after approx. each 3rd stitch. On the next round knit the yarn overs twisted to avoid holes. When decreasing, knit together approx. each 2nd and 3rd stitch. ELEVATION (back of neck): To make the back of the neck slightly higher when working the yoke, you can work an elevation as described here. Skip this section if you do not want an elevation. Insert 1 marker at the start of the round = mid-back. Start from the right side with anthracite and knit 12-13-14-15-15-16 stitches past the marker-stitch, turn, tighten strand and purl 24-26-28-30-30-32 stitches back. Turn, tighten strand and knit 36-39-42-45-45-48 stitches, turn, tighten strand and purl 48-52-56-60-60-64 stitches back. Turn, tighten strand and knit 60-65-70-75-75-80 stitches, turn, tighten strand and purl 72-78-84-90-90-96 stitches back. Turn, tighten the strand and knit back to mid-back. Then work YOKE as described in the text. PATTERN: See diagrams A.1 to A.4. Choose diagram for your size (applies to A.1 and A.2). The whole pattern is worked in stocking stitch. KNITTING TIP: To avoid the knitting tension becoming tighter when working the pattern, it is important that the strands at the back are not tight. Use a size larger needle when working pattern if this is a problem. If the knitting tension is too tight in height, the garment will be short and the armholes too small – you can correct this by regularly working an extra row in the one-coloured sections. If your work is loose, the garment will be too long and the armholes too big – you can correct this by regularly working one less row in the one-coloured sections. DECREASE TIP (for sleeves): Decrease 2 stitches mid-under the sleeve as follows: S: Work until there are 2 stitches left before the marker under the sleeve, knit 2 together with anthracite, marker, knit 2 twisted together with anthracite (= 2 stitches decreased). M, L, XL, XXL and XXXL: Work until there are 2 stitches left before the marker-stitch under the sleeve, knit 2 together with anthracite, knit the marker stitch with anthracite and knit 2 twisted together with anthracite (= 2 stitches decreased). CASTING-OFF TIP: To avoid the cast-off edge being tight you can cast off with a larger size needle. If the edge is still tight, make 1 yarn over after approx. each 4th stitch at the same time as casting off; the yarn overs are cast off as normal stitches. ------------------------------------------------------- START THE PIECE HERE: ------------------------------------------------------- JUMPER – SHORT OVERVIEW OF THE PIECE: The neck and yoke are worked in the round with circular needle, from mid back and top down. The yoke is divided for body and sleeves and the body is continued in the round with circular needle. The sleeves are worked with short circular needle/double pointed needles, top down. NECK: Cast on 92-96-100-104-108-112 stitches with short circular needle size 3 mm and anthracite. Knit 1 round then work rib in the round (knit 2, purl 2) for 5 cm. Change to circular needle size 4 mm and knit 1 round where you increase 28-28-32-32-36-40 stitches evenly spaced – read INCREASE/DECREASE TIP = 120-124-132-136-144-152 stitches. Insert 1 marker mid-front; the yoke is measured from this marker! Now you can work an ELEVATION at the back of the neck – read description above. If you do not want an elevation, go straight to YOKE. YOKE: Work 0-0-2-2-4-6 rounds of stocking stitch with anthracite. Read KNITTING TIP and work A.1 in the round (= 30-31-33-34-36-38 repeats of 4 stitches). Continue this pattern and when A.1 has been completed, work A.2 in the same way REMEMBER THE KNITTING TENSION! AT THE SAME TIME on each round marked with an arrow in A.1 and A.2 increase stitches as described below – remember INCREASE/DECREASE TIP: SIZES S, M and L: Arrow-1: Increase 36-38-42 stitches evenly spaced = 156-162-174 stitches (there is now room for 26-27-29 repeats of 6 stitches). Arrow-2: Increase 64-58-66 stitches evenly spaced = 220-220-240 stitches (there is now room for 11-11-12 repeats of 20 stitches). Arrow-3: Increase 32-40-36 stitches evenly spaced = 252-260-276 stitches (there is now room for 63-65-69 repeats of 4 stitches). Arrow-4: Increase 30-34-36 stitches evenly spaced = 282-294-312 stitches (there is now room for 47-49-52 repeats of 6 stitches). Arrow-5: Increase 24-30-36 stitches evenly spaced = 306-324-348 stitches (there is now room for 51-54-58 repeats of 6 stitches). Arrow-6 (only in sizes M and L, because in S the piece is divided for the body and sleeves before this section starts): Increase 4-4 stitches evenly spaced = 306-328-352 stitches (there is now room for 41-44 repeats of 8 stitches in sizes M and L). SIZES XL, XXL and XXXL: Arrow-1: Increase 44-48-52 stitches evenly spaced = 180-192-204 stitches (there is now room for 30-32-34 repeats of 6 stitches). Arrow-2: Increase 42-48-54 stitches evenly spaced = 222-240-258 stitches (there is now room for 37-40-43 repeats of 6 stitches). Arrow-3: Increase 18-20-22 stitches evenly spaced = 240-260-280 stitches (there is now room for 12-13-14 repeats of 20 stitches). Arrow-4: Increase 60-64-68 stitches evenly spaced = 300-324-348 stitches (there is now room for 75-81-87 repeats of 4 stitches). Arrow-5: Increase 54-54-60 stitches evenly spaced = 354-378-408 stitches (there is now room for 59-63-68 repeats of 6 stitches). Arrow-6: Increase 30-30-30 stitches evenly spaced = 384-408-438 stitches (there is now room for 64-68-73 repeats of 6 stitches). Arrow-7: Increase 8-8-10 stitches evenly spaced = 392-416-448 stitches (there is now room for 49-52-56 repeats of 8 stitches. ALL SIZES: Continue working until the piece measures 22-24-26-28-30-32 cm from the marker on the neck. NOTE: In some sizes there will be a number of rows left in A.2 when you divide for the body and sleeves – the rest of A.2 will be worked on the body and sleeves. Now divide for the body and sleeves as follows: Work 45-49-52-57-63-69 stitches as before (= ½ back piece), place the next 63-66-72-82-82-86 stitches on 1 thread for the sleeve, cast on 6-6-8-8-10-10 new stitches on the needle (= in side under sleeve), work 90-98-104-114-126-138 stitches as before (= front piece), place the next 63-66-72-82-82-86 stitches on 1 thread for the sleeve, cast on 6-6-8-8-10-10 new stitches on the needle (= in side under sleeve) and work the remaining 45-49-52-57-63-69 stitches as before (= ½ back piece). Body and sleeves are finished separately. THE PIECE IS NOW MEASURED FROM HERE! BODY: = 192-208-224-244-272-296 stitches. Finish A.2 – make sure the pattern matches the A.2 on the yoke, but be aware that the pattern does not fit under the sleeves in all sizes when working the last rows in A.2. When A.2 has been completed, work A.3 in the round – AT THE SAME TIME on the first round increase 0-2-4-2-4-4 stitches evenly spaced = 192-210-228-246-276-300 stitches. There is now room for 32-35-38-41-46-50 repeats of A.3 with 6 stitches. Repeat A.3 in height until the piece measures approx. 27 cm from the division in all sizes, finishing after a row with «spots». There is approx. 10 cm left to finished length; try the jumper on and continue A.3 to desired length. Work A.4 in the round – AT THE SAME TIME on the first round decrease 0-2-4-2-4-4 stitches evenly spaced = 192-208-224-244-272-296 stitches (there is now room for 48-52-56-61-68-74 repeats of A.4 with 4 stitches). When A.4 has been completed, the piece measures approx. 33 cm from the division. The body is finished with anthracite. Knit 1 round where you increase 40-44-44-48-56-60 stitches evenly spaced = 232-252-268-292-328-356 stitches. This is done to avoid the rib being tight. Change to circular needle size 3 mm and work rib (knit 2, purl 2) for 4 cm. Cast off with knit over knit and purl over purl – read CASTING-OFF TIP! The jumper measures approx. 62-64-66-68-70-72 cm from the shoulder down. SLEEVE: Place the 63-66-72-82-82-86 stitches from the thread on the one side of the piece on double pointed needles/short circular needle size 4 mm and knit up 1 stitch in each of the 6-6-8-8-10-10 stitches cast on under the sleeve = 69-72-80-90-92-96 stitches. Insert 2 markers in the piece without working the stitches: S: Insert 1 marker mid-under the sleeve in the middle of the middle 6 stitches, count 34 stitches, insert 1 marker in the next stitch = 34 stitches left to end of round. M, L, XL, XXL and XXXL: Start mid-under the sleeve, in the middle of the 6-8-8-10-10 stitches, insert 1 marker in the first stitch after the middle, count 35-39-44-45-47 stitches, insert 1 marker in the next stitch = 35-39-44-45-47 stitches left to end of round. ALL SIZES: Allow the markers to follow your work onwards; the marker under the sleeve is used when decreasing under the sleeve. The marker on top is when positioning the start of the pattern. Continue with PATTERN at the same time as you DECREASE mid-under the sleeve as described below – read the rest of the sleeve section before continuing: PATTERN: Start the round mid-under the sleeve and finish A.2 in the same way as on the body; count from the marker on top of the sleeve to the start of the pattern – the marker-stitch matches the stitch with the star in A.2 (decrease under the sleeve at the same time as you work the pattern). When A.2 has been completed, work A.3 in the round in the same way. Repeat A.3 in height until the sleeve measures approx. 35-34-32-31-29-28 cm from the division, finishing after a round of “spots”. NOTE: Shorter measurements in larger sizes due to wider neck and longer yoke. There is approx. 10 cm left to finished length; try the jumper on and continue A.3 to desired length. Then work A.4 in the round. DECREASING: At the same time, when the sleeve measures 3 cm from the division in all sizes, decrease 2 stitches mid-under the sleeve – read DECREASE TIP. Decrease like this every 4-3½-2½-2-1½-1½ cm a total of 9-10-13-17-18-19 times = 51-52-54-56-56-58 stitches. When A.4 has been completed and the decreases are finished, the sleeve measures approx. 41-40-38-37-35-34 cm from the division. Continue with anthracite. Knit 1 round where you increase 9-8-10-8-8-10 stitches evenly spaced = 60-60-64-64-64-68 stitches. Change to double pointed needles size 3 mm and work rib (knit 2, purl 2) for 4 cm. Cast off with knit over knit and purl over purl – remember CASTING-OFF TIP. The sleeve measures approx. 45-44-42-41-39-38 cm from the division. Work the other sleeve in the same way. |
|||||||||||||
Diagram explanations |
|||||||||||||
|
|||||||||||||
 |
|||||||||||||
 |
|||||||||||||
 |
|||||||||||||
 |
|||||||||||||
Have you finished this pattern?Tag your pictures with #dropspattern #wintersnightenchantmentsweater or submit them to the #dropsfan gallery. Do you need help with this pattern?You'll find 29 tutorial videos, a Comments/Questions area and more by visiting the pattern on garnstudio.com. © 1982-2026 DROPS Design A/S. We reserve all rights. This document, including all its sub-sections, has copyrights. Read more about what you can do with our patterns at the bottom of each pattern on our site. |
|||||||||||||


With over 40 years in knitting and crochet design, DROPS Design offers one of the most extensive collections of free patterns on the internet - translated to 17 languages. As of today we count 325 catalogues and 12298 patterns translated into English (UK/cm). 12298
We work hard to bring you the best knitting and crochet have to offer, inspiration and advice as well as great quality yarns at incredible prices! Would you like to use our patterns for other than personal use? You can read what you are allowed to do in the Copyright text at the bottom of all our patterns. Happy crafting!
Post a comment to pattern DROPS 219-15
We would love to hear what you have to say about this pattern!
If you want to leave a question, please make sure you select the correct category in the form below, to speed up the answering process. Required fields are marked *.