
Popular categories
Looking for a yarn?


Comments / Questions (26)
![]() Gunilla Hamel wrote:
Gunilla Hamel wrote:
Det blir en ganska kort ärm i i storlek L om den ska vara som det anges i mönstret, 39 cm.I andra liknande tröjor ska ärmen vara 45-49 cm med tillägget av ungefär lika bred resår. Stämmer det?
14.12.2024 - 18:18DROPS Design answered:
Hei Gunilla. Du kan fint strikke ermet lengre om du ønsker det (og har nok garn), men sammelignet med andre DROPS herre gensere ligger målet på 82-83 cm fra nakken og ut (se tallene på målskissene på andre herre gensere). Målet på 39 cm fra ermhullet og til vrangborden er også lik mange andre DROPS gensere. Du må også sammenligne overvidden på plagget. Er den stor kan ermene være mindre, og omvendt. Men sammenlign genseren med en genser vedkommende som skal få genseren allerede har, og se om du må justere lengden. mvh DROPS Design
16.12.2024 - 11:43
![]() Kate Gry wrote:
Kate Gry wrote:
Hei Jeg er ferdig med halsen og har avsluttet med en runde rettstrikk hvor jeg har økt med 12 masker. skal jeg strikke en runde til med rett hvor økningene kommer med i runden, eller skal jeg snu strikketøyet og gå rett på vrangstrikk og forhøyningen? Sprsmål 2, når jeg nå står ved startmerket og skal strikke vrang (strikketøyet er snudd) skal jeg strikke en hel runde + 9 forbi merket eller kun 9 masker og så starte med forhøyningen?
13.11.2024 - 14:59DROPS Design answered:
Hei Kate. Svar 1) Nei, start rett på forhøyningen (fra vrangen). Du strikker forhøyningen bak før du starter med raglanøkningene i denne oppskrften. Svar 2) Kun 9 masker vrang etter merket. mvh DROPS Design
18.11.2024 - 13:08
![]() Margaret wrote:
Margaret wrote:
Hi I had posted already about knitting the neck elevation in the wrong place , if I cut the elevation and rip back to the neck and body could I just Kitchener stitch the two parts together ? Thanks
03.05.2024 - 01:47DROPS Design answered:
Dear Margaret, the suggestion made last time sounds the best, but feel free to ask your yarn store, they might have any other idea. Happy knitting!
03.05.2024 - 08:27
![]() Margaret Lacey wrote:
Margaret Lacey wrote:
Hi , I’m knitting 208-4, I’ve put the neck elevation in, but somehow got my markers mixed up and rather than this being in the centre back it’s over one sleeve … is there anything I can do to fix this? I’m almost finished knitting the second sleeve when I realised . Is it possible to cut into the elevation and rip back to the neck and body and then stich it back together ? Other than that the jumper looks amazing 🤣
25.04.2024 - 16:43DROPS Design answered:
Dear Margaret, I am afraid, there is no other way, but to frog it, unless, you are willing to cut into the piece under the elevation, carefully pick out the stitches in one round, pick up the stitches and knit the yoke again, to the opposite way (from the bottom up). We hope you can solve this. Happy Knitting!
25.04.2024 - 23:07
![]() Helle Espersen wrote:
Helle Espersen wrote:
Jeg forsøger at starte på at strikke drops 208-4. Jeg skal starte oppefra med 80 masker. 2 ret og 2 vrang. Jeg forstår ikke at jeg skal starte med 2 ret og slutte med 2 ret. Det vil sige at jeg får 4 ret samme sted i ribben. Kan det være rigtigt? Vh Helle Espersen
08.02.2024 - 12:21
![]() Maggie Lacey wrote:
Maggie Lacey wrote:
Hi when working the yarn over increases on the raglan sleeve do I use the main colour or the colour of next fair isle stitch? So is the yarn over always in dark grey or sometimes in beige and white ? Hope this makes sense. Thank you
19.01.2024 - 15:52DROPS Design answered:
Dear Mrs Lacey, always work the yarn over for the raglan increases with the back ground colour, on next round, work the yarn over with the colour shown in the diagram. Happy knitting!
19.01.2024 - 16:06
![]() Liv Aurora wrote:
Liv Aurora wrote:
Hej. 1)Hvis jeg skal starte med at strikke bærestykket først og dernæst strikke forhøjningen, passer det ikke overens med ærmerne. Forhøjningen kommer til at gå hen over et af ærmerne. 2) - eller skal jeg strikke forhøjningen først og dernæst sætte mærker til raglan udtagning? 3) Skal der ikke tages ud til raglan på retsiden mens man strikke forhøjningen? På forhånd tak.
11.12.2023 - 21:56
![]() Louise wrote:
Louise wrote:
Hej Drops Jeg har valgt at strikke Akranes i Nepal i stedet for Alaska. Samme garngruppe C. Jeg har lavet strikkeprøve i Nepal efter bandarolen, som siger pind 5. Men opskriften siger pind 5,5. Hvilken pind skal jeg vælge? Mvh Louise
14.11.2023 - 18:52DROPS Design answered:
Hej Louise, du skal vælge den pind som giver dig 16 masker på 10 cm ifølge opskriften (da vil størrelsen stemme med de mål du finder i måleskitsen nederst i opskriften) :)
16.11.2023 - 14:20
![]() Karin wrote:
Karin wrote:
Kan se flere skriver at garnmængden ikke passer, er det rettet eller er det stadig et problem jeg skal tage højde for ?
19.09.2023 - 22:37DROPS Design answered:
Hei Karin. 23.11.2021 la vi til en rettelse i oppskriften + en rød link (se nederst på oppskriften). Dersom de kommentarene du har lest før den datoen, er oppskriften rettet. mbh DROPS Design
26.09.2023 - 14:36
![]() Lea wrote:
Lea wrote:
Jeg har et spørgsmål: jeg har strikket alle 24 pinde første gang, der er 192 masker på pinden, som der skal. Men nu skal jeg til at gentage diagrammet i samme fremgangsmåde. Det passer med maskerne først, da A2b skal gentages yderligere 4 gange, men jeg kan ikke forstå A4, der er 13 masker i den første omgange, som ville gøre at omslaget lå midt i ærmet? Jeg er ny i at strikke efter diagram- er det mig der har misforstået noget? 😅 Håber i kan hjælpe ✨ Mvh Lea
22.07.2023 - 16:26DROPS Design answered:
Hei Lea Du skal ikke starte på 1. omgang av diagrammet igjen, men du skal fortsette mønstert på samme måte. Slik at når du skal fortsette med A.4 i høyden starter du med kast, så strikker du 37 rettmasker før du gjør et nytt kast. På neste omgang er det 39 rettmasker (A.4) mellom raglansøkningene (på ermet). På neste omgang økes det igjen og du strikker da A.4 slik: 1 kast, mønstret over 39 masker og avslutt med 1 kast. Når du øker på begynnelsen og slutten av A.4 vil det bli flere og flere masker mellom økningene, der mønstret strikker. mvh DROPS Design
27.07.2023 - 10:06
|
||||||||||||||||
Akranes#akranessweater |
||||||||||||||||
 |
 |
|||||||||||||||
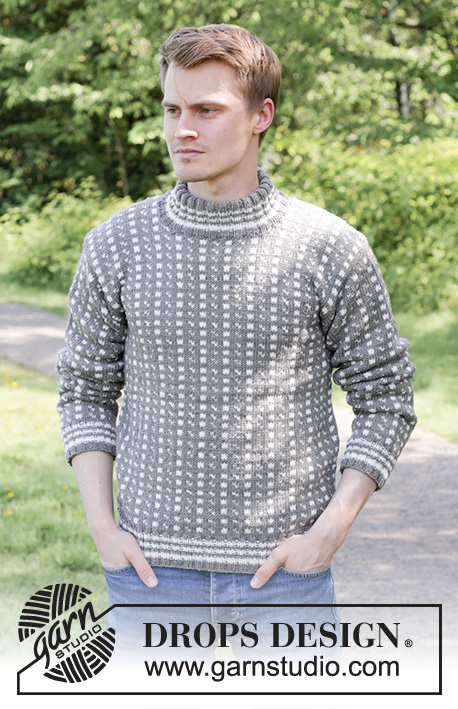
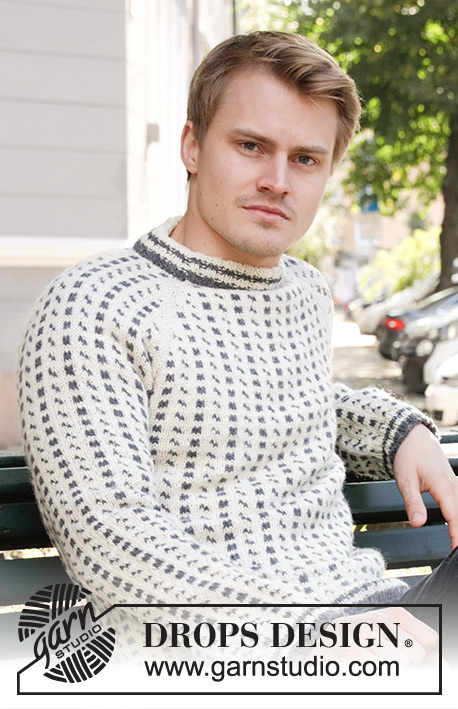
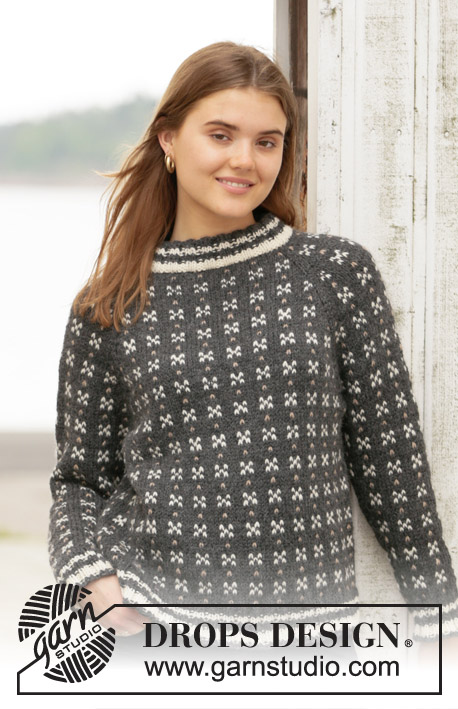
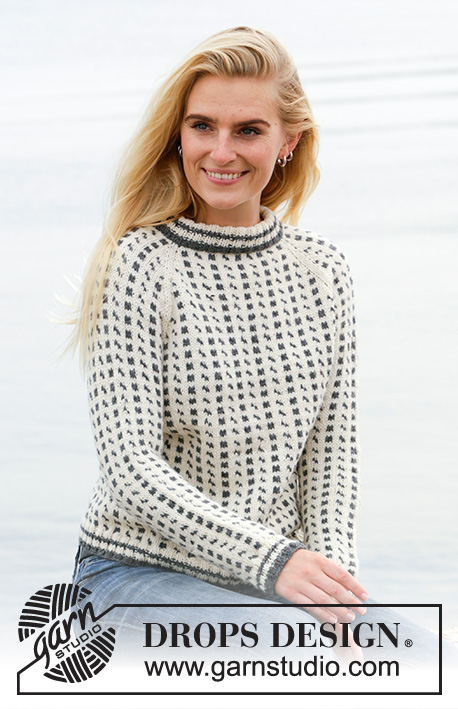
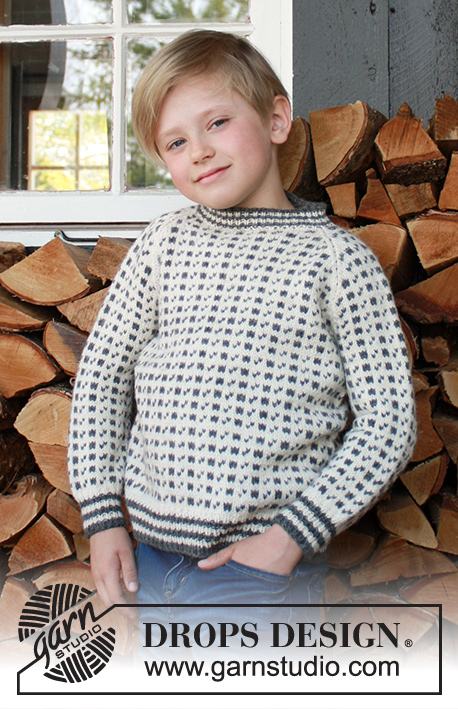
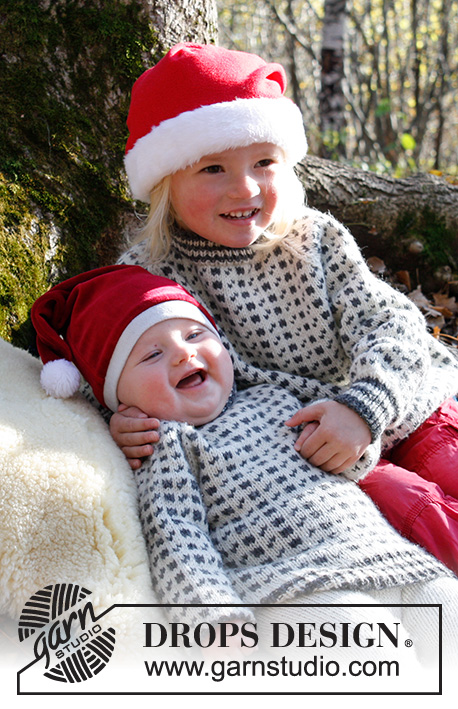
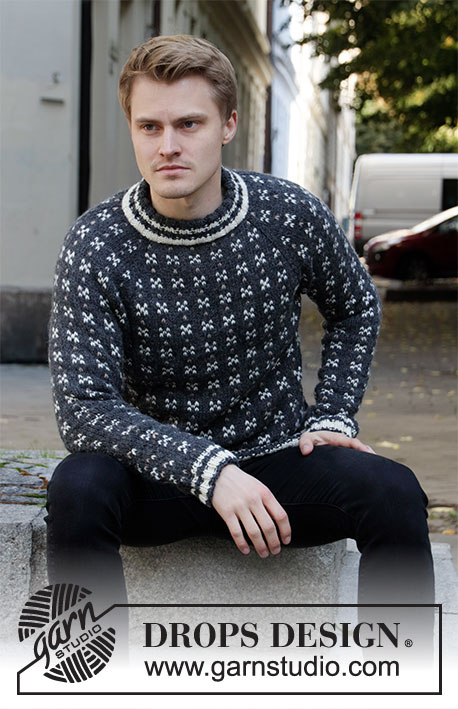
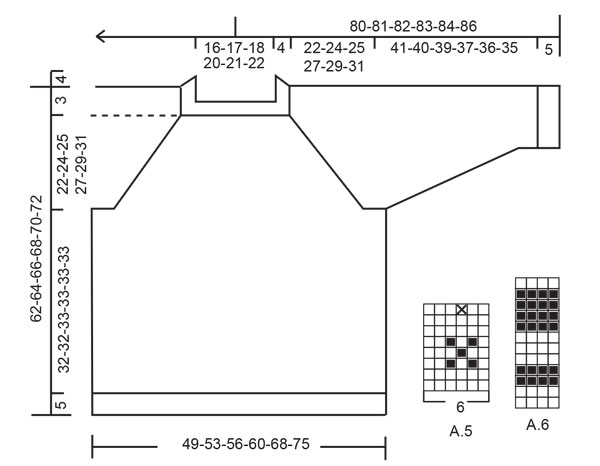
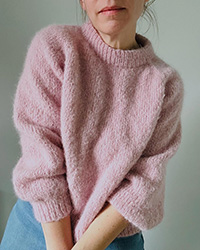
Knitted jumper for men with raglan in DROPS Alaska. The piece is worked top down with Nordic pattern. Sizes S - XXXL.
DROPS 208-4 |
||||||||||||||||
|
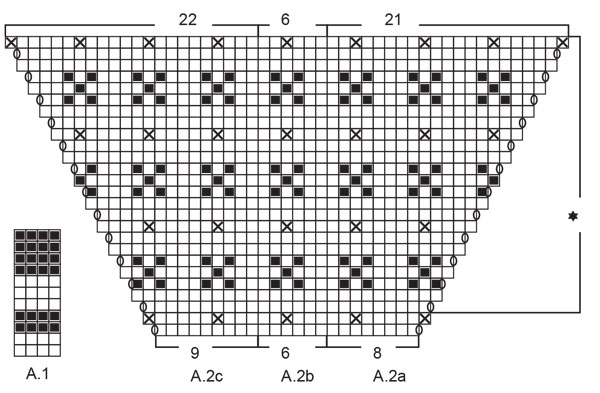
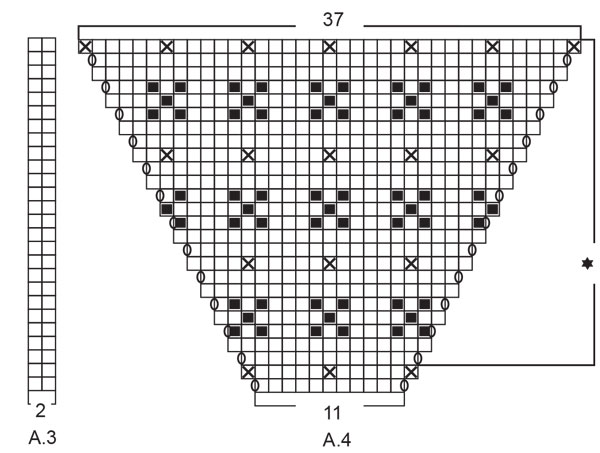
------------------------------------------------------- EXPLANATIONS FOR THE PATTERN: ------------------------------------------------------- PATTERN: See diagrams A.1 to A.6. Patterns A.1 and A.6 are worked in rib. Patterns A.2 to A.5 are worked in stocking stitch. INCREASE TIP (evenly spaced): To work out how to increase evenly, count the total number of stitches on the needle (e.g. 76 stitches) and divide by the number of increases to be made (e.g. 12) = 6.3. In this example, increase by making 1 yarn over after approx. each 6th stitch. On the next round knit the yarn overs twisted to avoid holes. ELEVATION (back of neck): Skip this section if you do not want an elevation. Start from the wrong side with dark grey and purl 8-8-8-9-9-9 stitches past the marker thread at the beginning of the round, turn, tighten the strand and knit 16-16-16-18-18-18 back. Turn, tighten the strand and purl 24-24-24-27-27-27, turn, tighten the strand and knit 32-32-32-36-36-36 back. Turn, tighten the strand and purl 40-40-40-45-45-45, turn, tighten the strand and knit 48-48-48-54-54-54 back. Turn, tighten the strand and purl to 15-15-15-18-18-18 stitches past the marker thread. Move the marker thread to this point. Then work YOKE as described in the text. KNITTING TIP: To avoid the knitting tension becoming tighter when working pattern with several colours, it is important that the strands at the back are not tight. Use a size larger needle when working pattern if this is a problem. CASTING-OFF TIP: To avoid the cast-off edge being tight you can use a ½ size larger needle. DECREASE TIP (for sleeves): Decrease 1 stitch on each side of the marker thread as follows: Work until there are 2 stitches left before the marker thread, knit 2 together with dark grey (marker thread sits here), slip 1 stitch as if to knit, knit 1 with dark grey and pass the slipped stitch over the knitted stitch. ------------------------------------------------------- START THE PIECE HERE: ------------------------------------------------------- JUMPER – SHORT OVERVIEW OF THE PIECE: The neck and yoke and body are worked in the round with circular needle, from mid back and top down. After the neck you can work an elevation at the back for a better fit. This elevation can be left out; the neck is then the same front and back – see description above. The sleeves are worked in the round with short circular needle/double pointed needles, top down. NECK: Cast on 76-80-80-88-88-92 stitches with short circular needle size 4.5 mm and off-white. Change to dark grey and knit 1 round. Work rib (= knit 2 / purl 2) for 4 cm, then work A.1 in rib – TAKE CARE when reading the symbols. Knit 1 round with dark grey where you increase 12-8-8-12-12-12-8 stitches evenly spaced – read INCREASE TIP = 88-88-88-100-100-100 stitches. Change to circular needle size 5.5 mm and insert a marker thread at the beginning of the round. You can now work an ELEVATION at the back of the neck – read description above or go straight to YOKE. YOKE: The first round is worked as follows: Work A.2a (= 8 stitches), A.2b over the next 12-12-12-18-18-18 stitches (= 2-2-2-3-3-3 repeats of 6 stitches) and A.2c (= 9 stitches) (= back piece), work A.3 (= 2 stitches, raglan-line), A.4 (= 11 stitches, sleeve), A.3 (= 2 stitches, raglan-line), A.2a (= 8 stitches), A.2b over the next 12-12-12-18-18-18 stitches (= 2-2-2-3-3-3 repeats of 6 stitches) and A.2c (= 9 stitches) (= front piece), work A.3 (= 2 stitches, raglan-line), A.4 (= 11 stitches, sleeve), A.3 (= 2 stitches, raglan-line). There are 96-96-96-108-108-108 stitches on the needle (= first increase to raglan is now completed). Continue this pattern onwards; i.e. increase 1 stitch on each side of A.2 and A.4 as shown in the diagrams (= a total of 8 stitches increased every 2nd round). Read KNITTING TIP and REMEMBER THE KNITTING TENSION! When A.2 to A.4 have been worked 1 time in height there are 192-192-192-204-204-204 stitches on the needle. Continue this pattern onwards; i.e. the pattern is repeated as shown in A.2/A.4. Diagram A.2b is worked 4 more times in width each time the 24 rows are repeated in height. Continue to increase until you have increased a total of 19-22-25-25-28-31 times on each side of A.2/A.4. When the last increase is finished there are 240-264-288-300-324-348 stitches on the needle and the piece measures approx. 19-22-25-25-28-31 cm from the neck-edge. Continue the pattern but without further increases. When the piece measures 22-24-25-27-29-31 cm from the neck-edge (making sure the next round is without pattern), work as follows: Work 70-76-82-88-94-103 stitches as before (= back piece), place the next 48-54-60-60-66-66 stitches on 1 thread for the sleeve, cast on 6-6-6-6-12-12 new stitches on the needle (= in side under the sleeve), work 72-78-84-90-96-108 stitches as before (= front piece), place the next 48-54-60-60-66-66 stitches on 1 thread for the sleeve, cast on 6-6-6-6-12-12 new stitches on the needle (= in side under the sleeve) and work the remaining 2-2-2-2-2-5 stitches as before (= back piece). Cut the strand. Body and sleeves are finished separately. THE PIECE IS NOW MEASURED FROM HERE! BODY: = 156-168-180-192-216-240 stitches. Insert 1 marker thread on the one side of the piece, in the middle of the 6-6-6-6-12-12 stitches cast on under the sleeve. Allow the thread to follow your work onwards; it marks the beginning of the round. Work A.5 in the round (= 26-28-30-32-36-40 repeats of 6 stitches) – start on the right stitch and the right round in the diagram to continue the repeats of the pattern in both width and height. Continue working until the piece measures approx. 32-32-33-33-33-33 cm from the division – adjust to after round 2 or 7 in A.5. Change to circular needle size 4.5 mm and knit 1 round with dark grey where you increase 28-32-36-36-40-48 stitches evenly spaced = 184-200-216-228-256-288 stitches. Work A.6 in rib (= knit 2 / purl 2). When A.6 is finished cast off with knit over knit and purl over purl and dark grey – read CASTING-OFF TIP. SLEEVE: Place the 48-54-60-60-66-66 stitches from the thread on the one side of the piece on short circular needle/double pointed needles size 5.5 mm and knit up 1 stitch in each of the 6-6-6-6-12-12 stitches cast on under the sleeve = 54-60-66-66-78-78 stitches. Insert a marker thread in the middle of the 6-6-6-6-12-12 stitches under the sleeve. Allow the thread to follow your work onwards; it will be used when decreasing under the sleeve. Start the round by the marker thread. Work A.5 in the round (= 9-10-11-11-13-13 repeats of 6 stitches) – start on the right stitch and the right round in the diagram to continue the repeats of the pattern in both width and height; but the first and last stitch on the round are always worked with dark grey (to give neat decreases mid under the sleeve). When the piece measures 1 cm from the division, decrease 2 stitches mid under the sleeve – read DECREASE TIP. Decrease like this every 2nd round a total of 1-2-1-1-3-2 times = 52-56-64-64-72-74 stitches. Then decrease like this every 4-3½-2½-2-1½-1½ cm a total of 8-9-12-12-14-15 times = 36-38-40-40-44-44 stitches left on the needles. Continue working until the sleeve measures 41-40-39-37-36-35 cm from the division (shorter measurements in larger sizes due to wider neck and longer yoke) – adjust to after round 2 or 7 in A.5. Change to double pointed needles size 4.5 mm and knit 1 round with dark grey where you increase 8-6-8-8-8-8 stitches evenly spaced = 44-44-48-48-52-52 stitches. Work A.6 in rib (= knit 2 / purl 2). When A.6 is finished cast off with knit over knit and purl over purl and dark grey – remember CASTING-OFF TIP. Work the other sleeve in the same way. ASSEMBLY: Fold the neck to the wrong side and sew the cast-on edge down with off-white – sew with small, neat stitches on the inside of the jumper (make sure the seam does not show on the right side and the seam is not tight). |
||||||||||||||||
Diagram explanations |
||||||||||||||||
|
||||||||||||||||
 |
||||||||||||||||
 |
||||||||||||||||
 |
||||||||||||||||
Have you finished this pattern?Tag your pictures with #dropspattern #akranessweater or submit them to the #dropsfan gallery. Do you need help with this pattern?You'll find 25 tutorial videos, a Comments/Questions area and more by visiting the pattern on garnstudio.com. © 1982-2026 DROPS Design A/S. We reserve all rights. This document, including all its sub-sections, has copyrights. Read more about what you can do with our patterns at the bottom of each pattern on our site. |
||||||||||||||||


With over 40 years in knitting and crochet design, DROPS Design offers one of the most extensive collections of free patterns on the internet - translated to 17 languages. As of today we count 324 catalogues and 12232 patterns translated into English (UK/cm). 12232
We work hard to bring you the best knitting and crochet have to offer, inspiration and advice as well as great quality yarns at incredible prices! Would you like to use our patterns for other than personal use? You can read what you are allowed to do in the Copyright text at the bottom of all our patterns. Happy crafting!
Post a comment to pattern DROPS 208-4
We would love to hear what you have to say about this pattern!
If you want to leave a question, please make sure you select the correct category in the form below, to speed up the answering process. Required fields are marked *.