
Looking for a yarn?


Comments / Questions (31)
![]() Lotta wrote:
Lotta wrote:
När byter man till rundsticka 80 cm?
25.09.2019 - 10:46DROPS Design answered:
Hej Lotta, du byter när du har ett antal maskor så de når runt på stickan. :)
25.09.2019 - 11:57
![]() Anne Romedahl wrote:
Anne Romedahl wrote:
Har fået 12 nøgler forærende. Hvor mange nøgler skal der bruges til en str m, det synes jeg ikke, at jeg kan læse nogle steder Hilsen Anne
23.08.2019 - 15:29DROPS Design answered:
Hei Anne. Garnmengden står under MATERIALER. I str M til denne genseren brukes det 350 garn (7 nøster). Slik står det i oppskriften: DROPS FLORA fra Garnstudio (tilhører garngruppe A) 300-350-350-400-450-500 g farge 03, lys grå. God Fornøyelse!
09.09.2019 - 11:28
![]() Sandrag wrote:
Sandrag wrote:
Bonjour, j'aimerais faire ce pull pour ma mère qui préfère les cols montants ! J'ai pensé ne monter que 100m au départ, faire les 3cm de côtes et au tour d'augmentation/diminution, AUGMENTÉ de 20m pour obtenir les 120m (= taille M) avant l'empiècement. Ensuite, j'ai pensé rajouter une partie de côtes anglaises d'environ 3 à 4 cm... Qu'en pensez-vous ? Cela fera t'il un joli col montant ? Merci beaucoup pour votre réponse et votre aide...
21.08.2019 - 08:45DROPS Design answered:
Bonjour Sandrine, nous ne sommes malheureusement pas en mesure de pouvoir ajuster chacun de nos modèles à chaque demande, toutefois ces modèles de top down avec col montant pourront peut-être vous aider. Bon tricot!
21.08.2019 - 08:53
![]() Jette wrote:
Jette wrote:
Hej. Jeg vil så gerne strikke en lidt tyk sweater i Flora garn, gerne dobbelt. Men jeg kan ikke finde en opskrift, hvor jeg kan bruge dobbelt Flora? Kan i hjælpe mig? Mvh Jette
02.08.2019 - 22:36DROPS Design answered:
Hej Jette, Jo 2 tråde fra garngruppe A giver samme strikkefasthed som garngruppe C. Her finder du nogle opskrifter: Garngruppe C Vælg en af dem som har 16 eller 17 m på 10 cm (det står under billedet). God fornøjelse!
16.08.2019 - 11:09
![]() Mrs O S Poulter wrote:
Mrs O S Poulter wrote:
In 50 years of knitting I have never come across English rib and I am finding the instructions difficult to follow. I have found a video, but, ironically, it shows how to do it using the continental knitting method. I cannot adapt this to my knitting method. Is there any chance that you could produce a video using the English method - yarn in the right hand.
20.07.2019 - 22:04DROPS Design answered:
Dear Mrs O S Poulter, English rib are worked the same way, even with the yarn in the right hand, just have a look on the a href="https://www.garnstudio.com/video.php?id=188&lang=en">video and follow where the yarn is over needle and not where it is in the hand, ie when making the yo, place the yarn in front of piece, slip next st, and knit the next stitch, the yarn will automatically be over the needle and make the yarn over. Happy knitting!
06.08.2019 - 08:49
![]() Eva Doggen wrote:
Eva Doggen wrote:
Hello, you didn't read the complete question... On the first row after the ribbing I have to decrease 25... And the very NEXT row I have to increase 55... So why not have me increase just 30 on the row after the ribbing....
17.07.2019 - 11:08DROPS Design answered:
Dear Mrs Doggen, after you have decreased for neck, you then have to increase for yoke and the English rib, this will help to make a nice transition between neck edge and yoke. Happy knitting!
17.07.2019 - 11:16
![]() Eva wrote:
Eva wrote:
Why do see have to decrease on the row after the starting ribbing, only to increase on the next row... Make absolutely no sense at all!
16.07.2019 - 16:50DROPS Design answered:
Dear Eva, to make the neck edge wide enough with rib you need more stitches than you will need afterwards for yoke working with larger needles that's the reason why you will need to decrease when neck edge is done. Happy knitting!
17.07.2019 - 10:59
![]() Erna wrote:
Erna wrote:
Mukavan myötäilevä malli, mahtuu takin alle.
10.06.2019 - 19:01
![]() Natalia Gomez Moreno wrote:
Natalia Gomez Moreno wrote:
Sehr schön, schlicht aber nicht langweilig. Ich hoffe, dass sie für den Pullover eine Anleitung bald anbieten können.
10.06.2019 - 08:35
![]() Doris wrote:
Doris wrote:
Wunderschöner Pullover, bitte die Anleitung unbedingt veröffentlichen!
09.06.2019 - 19:11
|
|
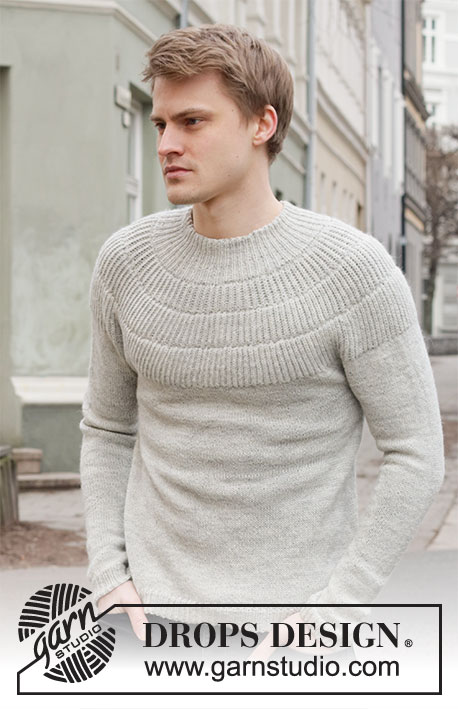
Winter Bride#winterbridesweater |
|
 |
 |
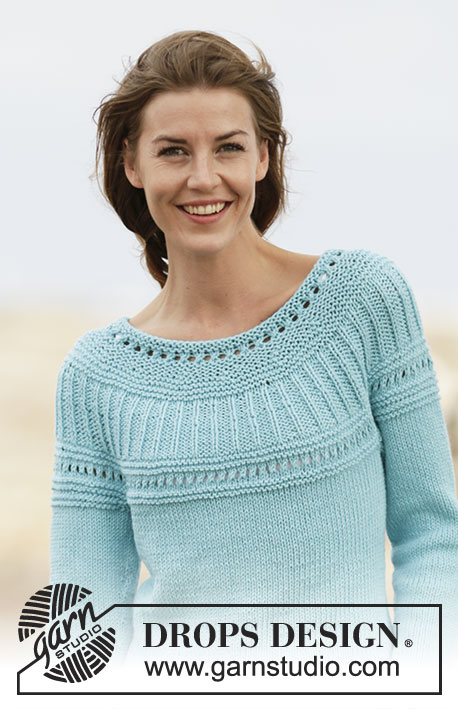
Knitted jumper with round yoke in DROPS Flora. The piece is worked top down with English rib on the yoke. Sizes S - XXXL.
DROPS 207-3 |
|
|
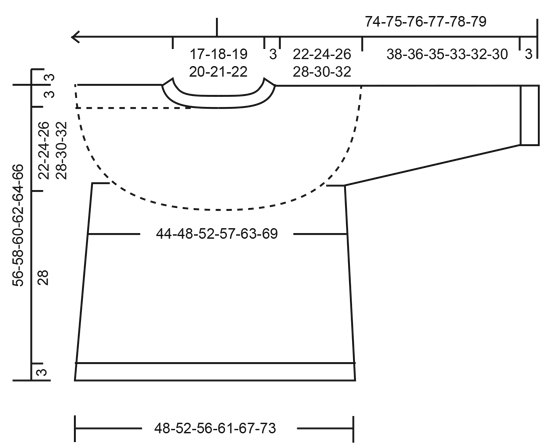
------------------------------------------------------- EXPLANATIONS FOR THE PATTERN: ------------------------------------------------------- DECREASE/INCREASE TIP (evenly spaced): To work out how to decrease/increase evenly, count the total number of stitches on needle (e.g. 126 stitches) and divide by the number of decreases/increases to be made (e.g. 16) = 7.8. In this example decrease by knitting together approx. each 7th and 8th stitch When increasing pick up the strand between 2 stitches after approx. each 8th stitch (the strand is knitted twisted to avoid holes). ENGLISH RIB: ROUND 1: * Make 1 yarn over, slip 1 stitch as if to purl, knit 1 *, repeat from *-* to end of round. ROUND 2: * Purl the yarn over and slipped stitch together, make 1 yarn over, slip 1 stitch as if to purl *, repeat from *-* to end of round. ROUND 3: * Make 1 yarn over, slip 1 stitch as if to purl, knit the yarn over and slipped stitch together *, repeat from *-* to end of round. Repeat rounds 2 and 3 onwards. INCREASE TIP (for sides of body): Work until there are 2 stitches left before the marker thread, make 1 yarn over, knit 4 (marker thread sits between these 4 stitches) make 1 yarn over. Repeat at the other marker thread (4 stitches increased on round). On the next round knit the yarn overs twisted to avoid holes. Then work the new stitches in stocking stitch. DECREASE TIP (for mid under sleeve): Decrease 1 stitch on each side of the marker thread as follows: Work until there are 3 stitches left before the marker thread, knit 2 together, knit 2 (marker thread sits between these 2 stitches), slip 1 stitch as if to knit, knit 1 and pass the slipped stitch over the knitted stitch. ------------------------------------------------------- START THE PIECE HERE: ------------------------------------------------------- JUMPER – SHORT OVERVIEW OF THE PIECE: The piece is worked in the round with circular needle, top down. The sleeves are worked in the round with short circular needle/double pointed needles. NECK: Cast on 126-132-138-144-150-156 stitches with circular needle size 2.5 mm and Flora. Knit 1 round. Then work rib (= knit 1 / purl 2) for 3 cm. Knit 1 round where you decrease 16-17-18-19-20-22 stitches evenly spaced – read DECREASE/INCREASE TIP = 110-115-120-125-130-134 stitches. Insert a marker thread here. THE PIECE IS NOW MEASURED FROM HERE! YOKE: Change to circular needle size 3 mm. Knit 1 round where you increase 50-51-54-55-56-62 stitches evenly spaced – remember DECREASE/INCREASE TIP = 160-166-174-180-186-196 stitches. Knit 1 round. Now work ENGLISH RIB – read description above, for 4-4-4-5-5-5 cm. REMEMBER THE KNITTING TENSION! Knit 1 round where the yarn overs are knitted together with their respective stitches and increase at the same time 68-72-80-88-96-104 stitches evenly spaced = 228-238-254-268-282-300 stitches. Knit 1 round. Now work English rib for 5-5-5-6-6-6 cm. Knit 1 round where the yarn overs are knitted together with their respective stitches and increase at the same time 68-72-80-88-96-104 stitches evenly spaced = 296-310-334-356-378-404 stitches. Knit 1 round. Now work English rib for 6-6-6-7-7-7 cm. Knit 1 round where the yarn overs are knitted together with their respective stitches and increase at the same time 16-29-32-38-42-49 stitches = 312-339-366-394-420-453 stitches. Continue with stocking stitch. When the piece measures 20-21-22-24-25-26 cm increase 16-29-32-38-42-49 stitches evenly spaced = 328-368-398-432-462-502 stitches. When the piece measures 22-24-26-28-30-32 cm from the marker thread the yoke is finished. The next round is worked as follows: Work the first 47-52-56-62-68-76 stitches (= half back piece), place the next 69-79-86-91-94-99 stitches on a thread for sleeve and cast on 10-10-12-12-14-14 new stitches on the needle (= in side under sleeve), work the next 95-105-113-125-137-152 stitches (= front piece), place the next 69-79-86-91-94-99 stitches on a thread for sleeve and cast on 10-10-12-12-14-14 new stitches on the needle (= in side under sleeve), finally work the remaining 48-53-57-63-69-76 stitches (= half back piece). BODY: There are 210-230-250-274-302-332 stitches on the body. Insert a marker thread on both sides of the body in the middle of the 10-10-12-12-14-14 stitches cast on under both sleeves (= 5-5-6-6-7-7 new stitches on each side of the threads). Work stocking stitch in the round. When the piece measures 4 cm increase 1 stitch on each side of both marker threads – read INCREASE TIP. Increase like this every 5 cm a total of 5 times = 230-250-270-294-322-352 stitches. When the piece measures 28 cm increase 46-50-54-57-62-68 stitches evenly spaced = 276-300-324-351-384-420 stitches. Change to circular needle size 2.5 mm and work rib (= knit 1 / purl 2) for 3 cm. Cast off with knit over knit and purl over purl. The jumper measures approx. 56-58-60-62-64-66 cm from the shoulder down. SLEEVE: Place the 69-79-86-91-94-99 stitches from the one side of the piece onto short circular needle/double pointed needles size 3 mm and knit up 1 stitch in each of the 10-10-12-12-14-14 stitches cast on under the sleeve = 79-89-98-103-108-113 stitches. Insert a marker thread in the middle of the new stitches (= 5-5-6-6-7-7 new stitches on each side of the thread). Work stocking stitch in the round. When the sleeve measures 4 cm decrease 1 stitch on each side of the marker thread under the sleeve – read DECREASE TIP. Decrease like this every 2½-1½-1½-1-1-1 cm a total of 12-16-19-21-22-23 times = 55-57-60-61-64-67 stitches. Continue with stocking stitch until the sleeve measures 38-36-35-33-32-30 cm. Now increase 11-12-12-14-14-14 stitches evenly spaced = 66-69-72-75-78-81 stitches. Change to circular needle size 2.5 mm and work rib (= knit 1 / purl 2) for 3 cm. Cast off with knit over knit and purl over purl. The sleeve measures approx. 41-39-38-36-35-33 cm from the division. Work the other sleeve in the same way. |
|
 |
|
Have you finished this pattern?Tag your pictures with #dropspattern #winterbridesweater or submit them to the #dropsfan gallery. Do you need help with this pattern?You'll find 23 tutorial videos, a Comments/Questions area and more by visiting the pattern on garnstudio.com. © 1982-2025 DROPS Design A/S. We reserve all rights. This document, including all its sub-sections, has copyrights. Read more about what you can do with our patterns at the bottom of each pattern on our site. |
|


With over 40 years in knitting and crochet design, DROPS Design offers one of the most extensive collections of free patterns on the internet - translated to 17 languages. As of today we count 320 catalogues and 12092 patterns translated into English (UK/cm). 12092
We work hard to bring you the best knitting and crochet have to offer, inspiration and advice as well as great quality yarns at incredible prices! Would you like to use our patterns for other than personal use? You can read what you are allowed to do in the Copyright text at the bottom of all our patterns. Happy crafting!
Post a comment to pattern DROPS 207-3
We would love to hear what you have to say about this pattern!
If you want to leave a question, please make sure you select the correct category in the form below, to speed up the answering process. Required fields are marked *.