
Looking for a yarn?


Comments / Questions (228)
![]() IM Igen wrote:
IM Igen wrote:
Se min tidigare fråga. Jag ser vad det står i mönstret, men det som står i mönstret stämmer inte med hur tröjärmen ser ut på bilden. När jag stickade efter mönstret blev ärmen för kort, trots korrekt masktäthet. Har ändrat själv nu, tänkte bara att det verkar vara fel.
11.11.2024 - 10:20
![]() IM wrote:
IM wrote:
Visst måste det vara fel i mönstret? På bilden ser ärmen ut att (efter resåren) vara stickad A4 och sedan A1, men så står det inte i mönstret. Jag har just rivit upp en hel arm för att den blev för kort...
07.11.2024 - 07:47DROPS Design answered:
Hei IM. Usikker hvor du mener at det står at man skal strikke A.1 etter A.4, for i oppskriften står det under ÄRMAR og LÄS HELA AVSNITTET INNAN DET STICKAS VIDARE: När A.4 har stickats 1 gång på höjden stickas A.2. Og når A.2 har stickats 1 gång på höjden, stickas A.3. Altså du strikker først en vrangbord på 5 cm, så A.4, deretter A.2 og tilslutt A.3 (til pilen i den str. du strikker etter). mvh DROPS Design
11.11.2024 - 09:15
![]() Barbara wrote:
Barbara wrote:
Hallo, ich frage mich warum die Höhe in Größe M, laut Maßzeichnung, ab dem Bündchen bis zum Ärmelausschnitt nur 35 cm beträgt, wogegen die Höhe für Größe S 38 cm und für Größe L 40 cm beträgt Vielen Dank im Voraus Barbara
06.10.2024 - 17:38DROPS Design answered:
Liebe Barbara, in M wird Rumpfteil 40 cm (5 cm Bündchen und 35 cm Muster), dann dazukommen die 23 cm Passe + 3 cm Schulter so wird insgesamt 66 cm sein, dh wie bei S aber unterschiedlich verteilt. Viel Spaß beim Stricken!
07.10.2024 - 08:19
![]() Tricotine19 wrote:
Tricotine19 wrote:
Malgré vos réponses dans commentaires , je ne comprends toujours pas comment incorporer les augmentations dans les grilles de jacquard des manches et rien dans vos vidéos. Merci de votre aide
01.10.2024 - 13:40DROPS Design answered:
Bonjour Tricotine19, en début de tour, tricotez les nouvelles mailles comme les dernières du diagramme (fin d'un nouveau motif, vu en début de tour) et en fin de tour, tricotez les nouvelles mailles comme les premières du diagramme (d'un nouveau motif qui recommence). Ainsi, vous augmentez en début de tour en rajoutant un motif = on tricote les mailles en lisant le diagramme de gauche à droite; et on augmente en fin de tour de sorte que l'on rajoute un motif, on lit un nouveau motif comme les autres = de droite à gauche. Bon tricot!
01.10.2024 - 16:23
![]() Andrea wrote:
Andrea wrote:
Hallo, ich finde nirgendwo in der Anleitung, dass zur Runde geschlossen wird; wird nicht in Runden gestrickt? Vielen Dank
16.09.2024 - 19:45DROPS Design answered:
Liebe Andrea, der Rumpfteil wird bis die Armlöcher in Runden gestrickt und die Maschen werden stillgelegt; beide Ärmel bis Armlöcher stricken und dann alle Maschen auf der Rundnadel für die Passe zusammen stricken. Viel Spaß beim Stricken!
17.09.2024 - 09:00
![]() Cindy wrote:
Cindy wrote:
Hi, je ne comprend pas pour comment je dois faire avec mon jersey en même temps que je fais mes augmentations pour les manches? si je commence mes augmentation à 9cm, et que j'augmente de 2 mailles tous les 1½ cm, 21 fois, je vais arriver en même temps à mon motif A2. Les augmentations vont soit décaler mon motif soit, si je les fais de couleur uni pour reprendre mon motif quand j'y suis, j'aurais une grosse bande uni à l'intérieur de ma manche
03.04.2024 - 22:15DROPS Design answered:
Bonjour Cindy, tricotez les augmentations en les incorporant au même motif que le reste de la manche, autrement dit, au début du tour, commencez un nouveau motif en lisant de gauche à droite pour élargir le motif vers la droite, et à la fin du tour, commencez un nouveau motif en lisant le diagramme de la droite vers la gauche pour élargir le motif vers la gauche. Bon tricot!
04.04.2024 - 08:26
![]() Mona Ekra wrote:
Mona Ekra wrote:
Hvor står brystmål etter størrelse ? Klarer ikke tyde det utfra modellen .
13.03.2024 - 16:26DROPS Design answered:
Hei Mona, Du finner en målskisse på bunnen av oppskriften, med alle mål til de forskjellige størrelsene. God fornøyelse!
14.03.2024 - 12:32
![]() Momo wrote:
Momo wrote:
Hello, I am confused about the sleeve length. Why are the sleeves shorter in the large sizes than in the small sizes?
08.03.2024 - 09:53DROPS Design answered:
Dear Momo, the sleeves are shorter in the larger sizes because the shoulders are larger. See also measurement chart. Happy knitting!
08.03.2024 - 13:34
![]() Nora wrote:
Nora wrote:
Jeg strikker Valdres str S. har begynt på 1 erme nå men skjønner ikke hvordan jeg skal strikke er A4, a, b og c?
26.02.2024 - 13:00DROPS Design answered:
Hej Nora. Det står i texten vilken del av A4 du ska sticka och hur många gånger. Står det kun A.4 så är det alla delar (a,b,c). Mvh DROPS Design
27.02.2024 - 14:08
![]() Leticia wrote:
Leticia wrote:
Hi, where can i see the size guide or even just the size the model is wearing? thanks in advance, also, thanks for all the patterns you are sharing :)
14.01.2024 - 06:52DROPS Design answered:
Dear Leticia, our model is wearing an M size. You can see the list of sizes at the top of the pages, in the materials section. The measurements in cm for each size are indicated in the size charts; you can read more on the size charts here: https://www.garnstudio.com/lesson.php?id=24&cid=19. Happy knitting!
14.01.2024 - 13:17
|
||||||||||||||||
Valdres#valdressweater |
||||||||||||||||
 |
 |
|||||||||||||||
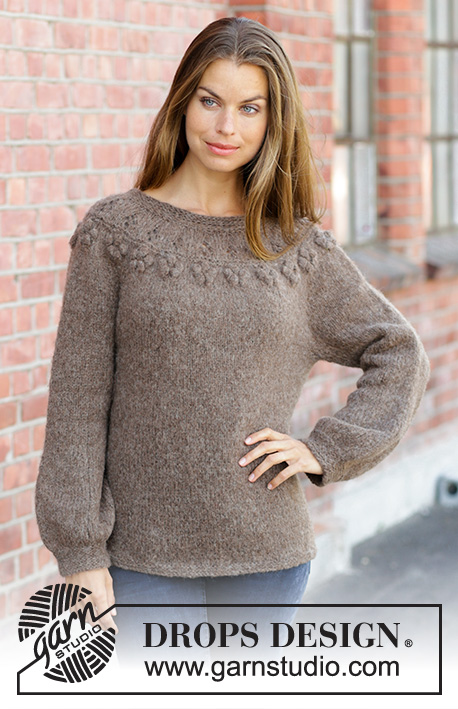
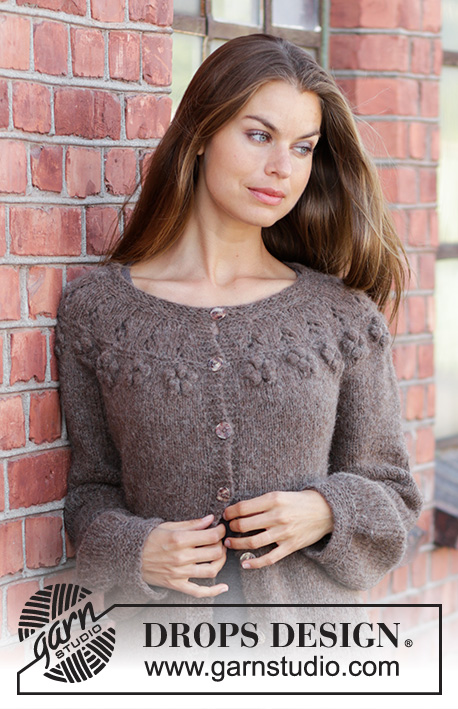
Knitted jumper with raglan in DROPS Karisma. The piece is worked bottom up with Nordic pattern and textured pattern in stripes. Sizes S - XXXL.
DROPS 197-1 |
||||||||||||||||
|
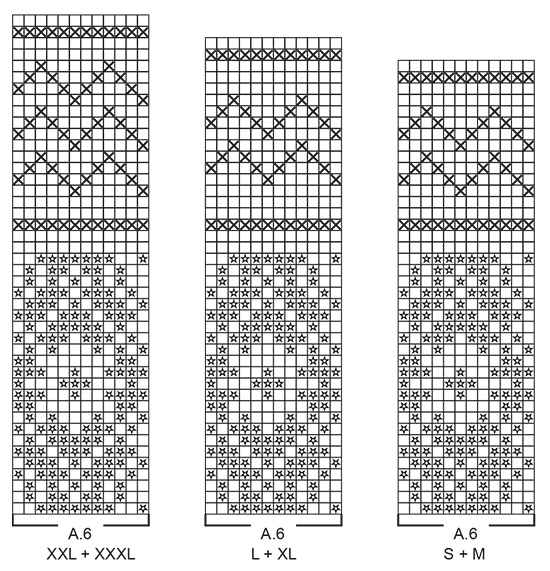
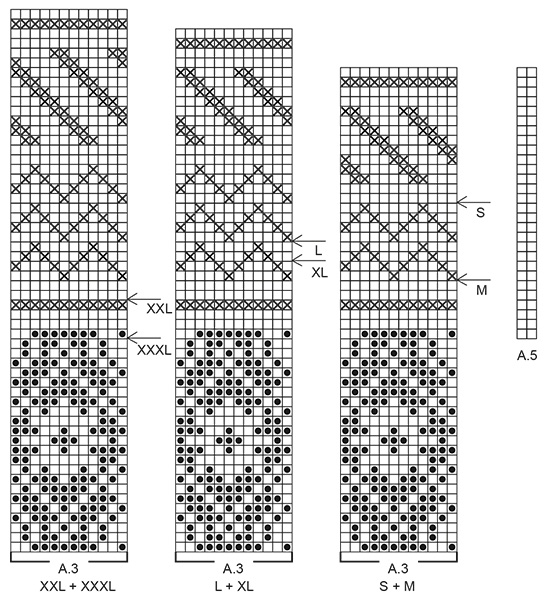
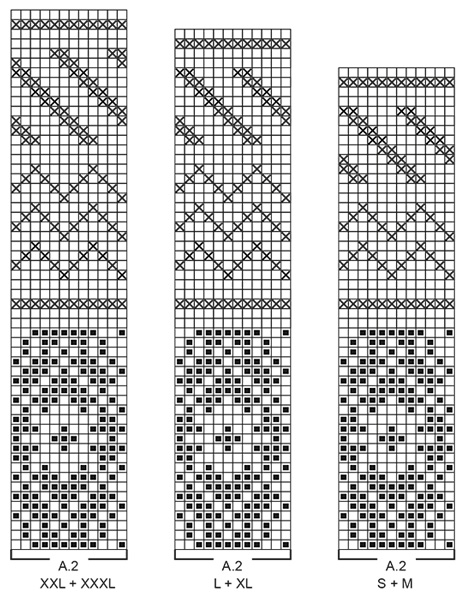
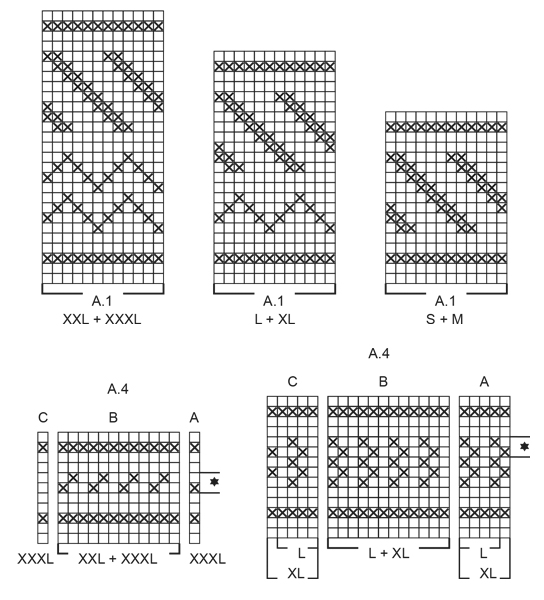
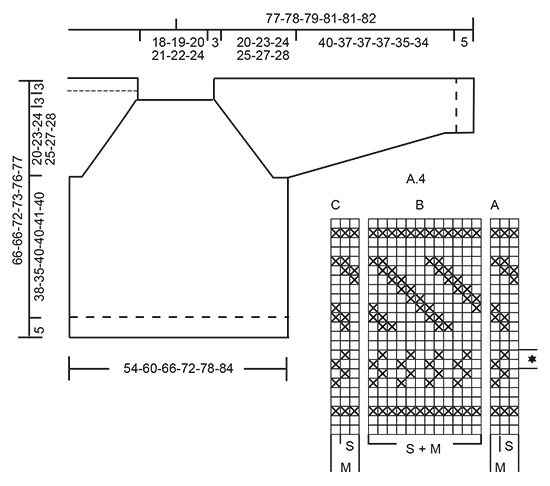
------------------------------------------------------- EXPLANATIONS FOR THE PATTERN: ------------------------------------------------------- PATTERN: See diagrams A.1 to A.6. Choose diagram for your size. DECREASE TIP (evenly spaced): To work out how to decrease evenly, count the total number of stitches on the needle (e.g. 260 stitches) and divide by the number of decreases to be made (e.g. 44) = 5.9. In this example, work together approx. each 5th and 6th stitch. KNITTING TIP-1: To avoid the knitting tension becoming tighter when working Nordic pattern, it is important that the strands at the back of the piece are not tight. You can use a size larger needle when working pattern if this is a problem. KNITTING TIP-2 (for yoke): If the knitting tension is not right in height and you work more rows on 10 cm than described in the text, the yoke will be too short and the armholes too small. This can be adjusted for by working 1 extra row of stocking stitch regularly on the yoke. INCREASE TIP (for sleeves): Work until there are 2 stitches left before the marker thread, make 1 yarn over (= 1 stitch increased), knit 4 (the marker thread sits in the middle of these 4 stitches), make 1 yarn over (= 1 stitch increased). On the next round knit the yarn overs twisted to avoid holes. RAGLAN: Decrease to raglan on each side of each A.5 as follows: Decrease 1 stitch after A.5 as follows: Slip the last stitch in A.5, knit 1, pass the slipped stitch over the knitted stitch (= 1 stitch decreased). Decrease 1 stitch before A.5 as follows: Work until there is 1 stitch left before A.5, knit the next 2 stitches together (= 1 stitch decreased). In other words you decrease 2 stitches by each A.5 and a total of 8 stitches on the round. ------------------------------------------------------- START THE PIECE HERE: ------------------------------------------------------- JUMPER - SHORT OVERVIEW OF THE PIECE: The piece is worked in the round with circular needle, bottom up. The sleeves are worked with short circular needle/double pointed needles. The pieces are placed together and the yoke is worked in the round. BODY: Cast on 260-288-316-344-376-400 stitches with circular needle size 3.5 mm and light oak. Work rib (= knit 2 / purl 2) for 5 cm. Change to circular needle size 4.5 mm and knit 1 round where you decrease 44-48-52-56-64-64 stitches evenly on round – read DECREASE TIP = 216-240-264-288-312-336 stitches. Knit 1 round as follows: Insert 1 marker in the first stitch, knit 107-119-131-143-155-167 stitches, insert 1 marker in the next stitch, knit to end of round. The markers mark the sides of the piece. Then work A.1 over all stitches (= 18-20-22-24-26-28 repeats of 12 stitches). REMEMBER THE KNITTING TENSION! When A.1 has been worked 1 time in height, insert 1 marker in the middle of the round (you will measure from this marker later). Then work A.2 over A.1- read KNITTING TIP-1. When A.2 has been worked 1 time in height, work A.3 over A.2. When you have worked as far as the arrow in A.3 (see arrow for your size) work the next round in A.3 as follows: Cast off 4 stitches, work the next 101-113-125-137-149-161 stitches as before, cast off the next 7 stitches, work the next 101-113-125-137-149-161 stitches as before, cast off the last 3 stitches. The piece measures approx. 32-29-32-32-31-30 cm from the marker (approx. 43-40-45-45-46-45 cm whole length). Lay the piece to one side and work the sleeves. SLEEVES: The piece is worked in the round with double pointed needles; change to short circular needle when necessary. Cast on 48-52-52-56-56-60 stitches with double pointed needles size 3.5 mm and light oak. Work rib (= knit 2 / purl 2) for 5 cm. Change to double pointed needles size 4.5 mm and knit 1 round where you decrease 8-10-8-10-8-10 stitches evenly on round = 40-42-44-46-48-50 stitches. READ THE WHOLE SECTION BEFORE CONTINUING: You work a pattern of approx. 8-8-5-5-4-4 cm, if you wish to adjust the length of the sleeve, do it now – see below. Then work the same pattern stripe as on the body (from the marker to the armhole = approx. 32-29-32-32-31-30 cm), i.e. the whole sleeve should measure approx. 45-42-42-42-40-39 cm. Work as follows: Insert 1 marker thread at the beginning of the round (= mid under sleeve). Work 1 round in stocking stitch, then work the next round as follows: Work A.4a (= 2-3-4-5-0-1 stitches), A.4b (= 12 stitches) a total of 3-3-3-3-4-4 times in width, A.4c (= 2-3-4-5-0-1 stitches). Continue until A.4 has been worked 1 time in height – NOTE: if you would like a longer sleeve, repeat the 2 rows marked with a star to desired length before continuing with the next round in A.4. If you would like a shorter sleeve, just work the desired number of rounds of A.4, but work a minimum of 1 of the purled rounds. – AT THE SAME TIME when the piece measures 10-9-9-10-12-12 cm increase 1 stitch on each side of the marker thread (= 2 stitches increased) – read INCREASE TIP! Increase like this every 2-1½-1½-1½-1-1 cm a total of 16-21-20-19-24-23 times = 72-84-84-84-96-96 stitches. The stitches in A.4a and A.4c and the increased stitches are worked into pattern A.4b as you go. When A.4 has been worked 1 time in height, work A.2 (= 12 stitches) over all stitches – A.2 is worked over A.4b and is adjusted out to each side; the increased stitches are worked into the pattern as you go. When A.2 has been worked 1 time in height, work A.3 (= 12 stitches) over A.2. When all the stitches under the sleeve are increased, work A.3 a total of 6-7-7-7-8-8 times in width. When you have worked as far as the arrow in A.3, work the next round as follows: Cast off 4 stitches, work the next 65-77-77-77-89-89 stitches as before, cast off the last 3 stitches. The sleeve measures approx. 45-42-42-42-40-39 cm. Work 1 more sleeve in the same way. YOKE: Place the sleeves on the same circular needle as the body, where you cast off stitches for the armholes = 332-380-404-428-476-500 stitches. Start the round in the transition between right sleeve and back piece. Work as follows: * A.5 (= 2 stitches, raglan line), continue with A.3 as before over the next 97-109-121-133-145-157 stitches (= front/back piece), A.5 (= 2 stitches, raglan line), work pattern A.3 as before over the next 65-77-77-77-89-89 stitches (= sleeve) *, work from *-* a total of 2 times – read KNITTING TIP-2. Continue this pattern and decrease to RAGLAN – read description above, every 2nd round a total of 27-31-32-33-37-39 times. When A.3 has been completed in height, work A.6 (= 12 stitches) over A.3. After the last decrease to raglan there are 116-132-148-164-180-188 stitches on the round. Continue until A.6 has been completed. The yoke measures approx. 20-23-24-25-27-28 cm. You can now work an elevation in the back of the neck so that the yoke is slightly higher at the back. This elevation can be left out; the neck is then the same both front and back. Work elevation in back of neck or go straight to working neck if you do not want an elevation. ELEVATION IN BACK OF NECK: Skip this section if you do not want an elevation. Insert 1 marker at the beginning of the round (this marks the start of the round after the elevation has been worked). Continue with light oak and knit to mid back, insert 1 marker. Start from the right side and knit as far as 30-30-34-34-40-40 stitches past the marker, turn, tighten the strand and purl 60-60-68-68-80-80 stitches back. Turn, tighten the strand and knit 54-54-61-61-72-72 stitches, turn, tighten the strand and purl 48-48-54-54-64-64 stitches back. Turn, tighten the strand and knit 42-42-48-48-56-56 stitches, turn, tighten the strand and purl 36-36-42-42-48-48 stitches back. Turn, tighten the strand and knit 30-30-35-35-40-40 stitches, turn, tighten the strand and purl 24-24-28-28-32-32 stitches, turn, tighten the strand and knit to mid back. Cut the strand. The round now starts at the marker, i.e. the transition between right sleeve and back piece. NECK: Continue with light oak and work the next round with decreases as follows: Knit * 40-46-54-58-66-70 stitches and decrease 0-6-12-13-19-22 stitches evenly over these stitches – remember DECREASE TIP, knit together the next 18-20-20-24-24-24 stitches 2 and 2 (= 9-10-10-12-12-12 stitches decreased) *, work from *-* a total of 2 times = 98-100-104-114-118-120 stitches. Change to circular needle size 3.5 mm and work the next round as follows: * Knit 2, purl 2, knit 1, 1 yarn over (= 1 stitch increased), purl 2, knit 2, 1 yarn over (= 1 stitch increased), purl 1 *, work from *-* until there are 8-0-4-4-8-0 stitches left, work rib (= knit 2 / purl 2) over the remaining stitches = 116-120-124-136-140-144 stitches. The yarn overs are worked twisted in rib (i.e. knit 2 / purl 2) on the next round to avoid holes. Cast off with knit over knit and purl over purl when the rib measures 3 cm. ASSEMBLY: Sew the openings under the sleeves in the outermost loop of the outermost stitch. |
||||||||||||||||
Diagram explanations |
||||||||||||||||
|
||||||||||||||||
 |
||||||||||||||||
 |
||||||||||||||||
 |
||||||||||||||||
 |
||||||||||||||||
 |
||||||||||||||||
Have you finished this pattern?Tag your pictures with #dropspattern #valdressweater or submit them to the #dropsfan gallery. Do you need help with this pattern?You'll find 30 tutorial videos, a Comments/Questions area and more by visiting the pattern on garnstudio.com. © 1982-2025 DROPS Design A/S. We reserve all rights. This document, including all its sub-sections, has copyrights. Read more about what you can do with our patterns at the bottom of each pattern on our site. |
||||||||||||||||


With over 40 years in knitting and crochet design, DROPS Design offers one of the most extensive collections of free patterns on the internet - translated to 17 languages. As of today we count 320 catalogues and 12094 patterns translated into English (UK/cm). 12094
We work hard to bring you the best knitting and crochet have to offer, inspiration and advice as well as great quality yarns at incredible prices! Would you like to use our patterns for other than personal use? You can read what you are allowed to do in the Copyright text at the bottom of all our patterns. Happy crafting!
Post a comment to pattern DROPS 197-1
We would love to hear what you have to say about this pattern!
If you want to leave a question, please make sure you select the correct category in the form below, to speed up the answering process. Required fields are marked *.