
Popular categories
Looking for a yarn?


Comments / Questions (89)
![]() Caterina Caria wrote:
Caterina Caria wrote:
Siccome mi piace moltissimo questo progetto,potrei avere uno schema scritto che mi aiuta a capire bene i grafici? Grazie e buon lavoro.
11.04.2022 - 08:43DROPS Design answered:
Buonasera Caterina, i nostri modelli si avvalgono dei diagrammi per essere più facilmente comprensibili da persone provenienti da paesi diversi, non abbiamo spiegazioni scritte oltre a quelle che già trova nel modello. Buon lavoro!
11.04.2022 - 21:27
![]() Caterina Caria wrote:
Caterina Caria wrote:
E' un progetto veramente spettacolare che rimarrà nei miei sogni.Da principiante non so interpretare diagrammi così complessi, avrei bisogno di un video che spiega passo passo il procedimento. Mi complimento con Voi per la Vostra bravura e maestria e per i Vostri bellissimi modelli.Buon lavoro.
07.04.2022 - 20:42
![]() Joos wrote:
Joos wrote:
Hallo, ik ben met het vest bezig en ben bij het einde van de beschrijving van het vest gekomen. In de een na laatste zin staat: pas aan tot het einde na een toer met stokjesgroepen. Ik heb a3 eenmaal gehaakt en ben verder gegaan met de lossenboogjes. Mijn vraag is nu hoe eindig ik? Met alleen de lossenboogjes tot ik aan de cm's zit, of eindig ik met een stokjestoer en dan nog 1 lossenboogjes toer? Ik kan dit niet goed zien op de foto's.
06.03.2022 - 21:37DROPS Design answered:
Dag Joos,
Het is de bedoeling dat je de 9 toeren van A.3 steeds herhaalt in de hoogt, dus dat je ook de toer van stokjesgroepen erin verwerkt. Je eindigt na een toer waarin de stokjesgroepen zitten en niet na een toer met boogjes.
07.03.2022 - 13:16
![]() Celestial wrote:
Celestial wrote:
I'm super confused. Is there a video I can watch that shows how this pattern, the Butterfly Queen, works? Even one in another language would be better than nothing.
28.11.2021 - 06:09DROPS Design answered:
Dear Celestial, there is no full video tutorial of this pattern. You can check some videos to help you make the pattern below the diagrams. Happy crochetting!
28.11.2021 - 19:04
![]() Caryn Karason wrote:
Caryn Karason wrote:
Does that mean that the "chain 7, chain 5, chain 5, etc" in row 7 will all be connected by 1sc in the chain 5 below in row 6 instead of being one long chain? I understand the "1sc, chain 3, 1sc" portion of A.1b but not after the arrows.
28.10.2021 - 12:44DROPS Design answered:
Dear Mrs Karason, at the end of repeat of A.1b from row 4 to 7 you will end with either 5 or 7 chains, then start a new repeat of A.1b = 1 sc as the first stitch in A.1b. The arrows just show how to work the stitches between each "pineaple" but to avoid you losing one row because there are some spaces in the chart due to the form of the diagram. Happy crocheting!
02.11.2021 - 13:25
![]() Caryn Karason wrote:
Caryn Karason wrote:
I'm so confused in A.1b. This is my first time doing a diagram. Does row 7 make you chain 7 then chain 5 and chain 5 again etc, so it forms a loooooong chain? I'm also not sure how to follow the arrows further on from row 8. Do you chain 14 after the arrow and then do the double groups in that row? I wish the diagram was divided into rows properly with faint lines because it's hard to tell which goes into which row
27.10.2021 - 18:05DROPS Design answered:
Dear Caryn, between those chain stitches there are 1 dc (or sc in american) around the stitch of the orecuizs row, so the row is mostly a series of chain loops. The arrows shows where you should continue your row. Happy Stitching!
28.10.2021 - 11:44
![]() Helen wrote:
Helen wrote:
Cancel request - I've fixed it!
13.03.2021 - 13:08
![]() Helen wrote:
Helen wrote:
This is driving me crazy. I can't work out the pattern (and I've done yours before)! I've got the first round (after the chain circle) I think (although the joining doesn't look right) and then I have the second round that eventually has six trebles and 14 chains? I have no idea about the three chains to the left. I have five chains and 11 trebles on the next row but where do the three trebles on the left go? Do NOT say 'happy crocheting' - not happy! Also, you need helpful translations!
12.03.2021 - 20:26
![]() Denise Williams wrote:
Denise Williams wrote:
Does Drops have a SHAWL version of the Butterfly Queen? Thank You
16.01.2021 - 22:19DROPS Design answered:
Dear Mrs Williams, we don't, sorry. You will find our crochet patterns to shawls here. Happy crocheting!
18.01.2021 - 09:01
![]() Maria Concepcion Felix-Corral wrote:
Maria Concepcion Felix-Corral wrote:
Me encantó el modelo drops 186-11, sólo que los diagramas están segmentados, lo que complica su comprensión. ¿Podrían ayudarme?
28.10.2020 - 02:25DROPS Design answered:
Hola María, los patrones Drops están generalmente escritos en formato mixto: parte está explicado en texto escrito y otra parte está en forma de diagrama. Para saber qué diagrama hay que trabajar en qué momento, tienes que seguir las explicaciones en el texto. Si te resulta difícil seguir los diagramas, puedes leer la siguiente lección: https://www.garnstudio.com/lesson.php?id=68&cid=23
19.11.2020 - 11:57
|
|||||||||||||||||||||||||||||||||||||||||||||||||||||||||||||||||||||||||||||||||||||
Butterfly Queen#butterflyqueenjacket |
|||||||||||||||||||||||||||||||||||||||||||||||||||||||||||||||||||||||||||||||||||||
 |
 |
||||||||||||||||||||||||||||||||||||||||||||||||||||||||||||||||||||||||||||||||||||
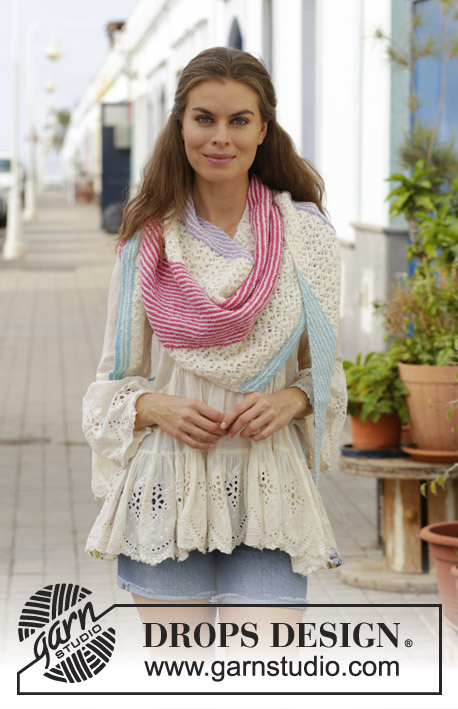
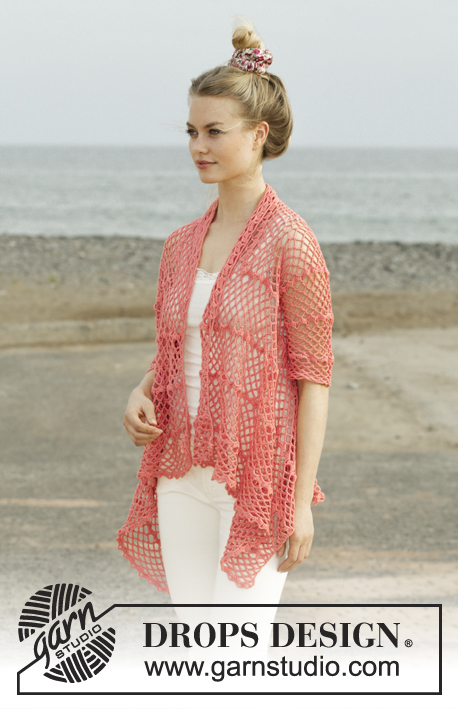
Crocheted jacket worked in a square with lace pattern. Size: S - XXXL Piece is crocheted in DROPS Flora.
DROPS 186-11 |
|||||||||||||||||||||||||||||||||||||||||||||||||||||||||||||||||||||||||||||||||||||
|
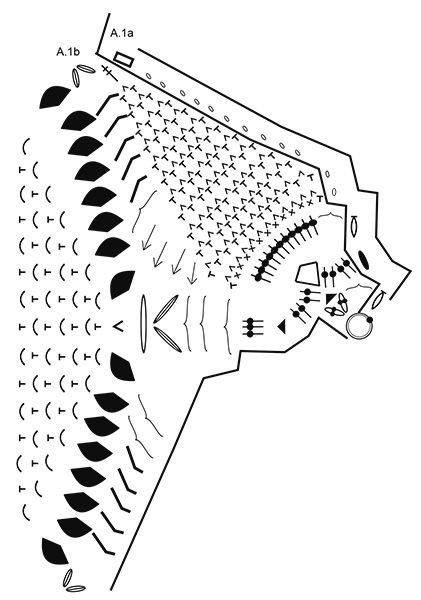
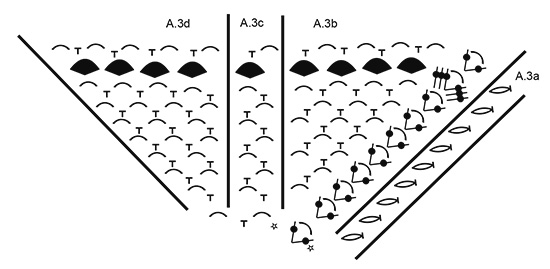
INFORMATION FOR PATTERN: PATTERN: See diagrams A.1 to A.4. CROCHET INFO (applies A.4): Replace first double crochet at beginning of row with 1 chain stitch. Replace first triple treble crochet at beginning of row with 5 chain stitches. DECREASE TIP (applies to mid under sleeve): Work 5 chain stitches, skip 1 double crochet + 1 chain space, work 1 double crochet around next chain space + 1 chain space (= 1 repetition decreased), continue pattern as before until 1 chain space remains + 1 double crochet on previous row, skip these stitches and finish with 1 double treble crochet in first chain stitch at beginning of previous row (= 1 repetition decreased). ---------------------------------------------------------- JACKET: Worked in the round from mid back on back and outwards as a square, then work back and forth on front pieces. Work sleeves back and forth from body, then sew them together under sleeve. Work 4 chain stitches on hook size 3.5 mm with Flora and form a ring with 1 slip stitch in first chain stitch. Then work pattern in the round according to diagram A.1b 4 times in total on round - diagram A.1a shows how rounds begin and end and is worked in addition to A.1b. REMEMBER THE CROCHET TENSION! When entire diagram A.1a and A.1b is cut the tread, and begin next round around chain space between last treble group worked and fasten thread with 1 slip stitch in this chain space. Now work in the round according to diagram A.2 as follows: * Work A.2b, repeat A.2c 6 times in total in width, A.2d *, repeat from *-* 4 times in total on round – diagram A.2a shows how rounds begin and end and are worked in addition to A.2b/c/d. When entire diagram A.2a and A.2b have been worked, square measures approx. 36 x 36 cm. There are now 4 corner chain spaces (1 treble crochet + 6 chain stitches + 1 treble crochet) and 14 chain spaces along each of the sides on square. READ THE REST OF BODY BEFORE CONTINUING! Continue to work as follows: * Work A.3b around corner space, repeat A.3c until 1 chain space remains before corner, work A.3d around next chain space *, repeat from *-* 4 times in total on round – diagram A.3a shows how rounds begin and end and are worked in addition to A.3b/c/d. AT THE SAME TIME when piece measures approx. 36-38-40-42-44-46 cm x 36-38-40-42-44-46 cm work armholes as follows: Work A.3 as before until first corner, work around chain space as before. Now work chain stitches until middle of next side (i.e. in the middle between first and second corner) as follows: Work 1 chain stitch for every chain stitch/double crochet skipped. Then work pattern as before until the middle between 3rd and 4th corner. Now work chain stitches until 4th corner as follows: Work 1 chain stitch for every chain stitch/double crochet skipped, work around chain space in corner and the rest of round as before. On next round work A.3 as before over all stitches again (i.e. adjust pattern over armholes so that round is correct). Continue A.3 in the round (repeat the 9 rounds vertically) until square measures 68-70-72-74-76-78 cm x 68-70-72-74-76-78 cm (i.e. approx. 16 cm from armhole in all sizes) – adjust to finish after a round with treble groups. Cut the yarn and insert 1 marker in piece (between first and second corner). FRONT PIECE: Now work back and forth between first and second corner. NOTE! Work front pieces without increases. Read CROCHET INFO! Work A.4a around corner, repeat A.4b until 1 chain space remains before corner, work A.4c around this chain space and around corner. Continue pattern as shown in diagram and repeat A.4 vertically until row with treble groups has been worked 2 times in total vertically, then repeat only rows with chain spaces until piece measures approx. 19-20-21-22-23-24 cm from marker, then work row with treble groups 1 time in all sizes. Piece now measures 21-22-23-24-25-26 cm from marker. Fasten off. Work the same way on the other side (i.e. work back and forth between third and fourth corner). SLEEVE: Work sleeve directly out from armhole on body. Work back and forth, top down and sew together when finished. Begin mid under sleeve and work as follows: Remember CROCHET INFO! Work A.4a around first chain space, repeat A.4b 15-16-17-18-19-20 times in total in width (adjust to distribute A.4b evenly along armhole, i.e. either 2 chain spaces must be worked around same chain space or skip 1 chain space), work A.4c around the last 2 chain spaces. Continue A.4 back and forth – AT THE SAME TIME when piece measures 4 cm (adjust to work next row with chain stitches/double crochets) decrease 1 repetition in each side – read DECREASE TIP. Decrease like this approx. every 8-8-8-6-6-6 cm 3-3-3-4-4-4 times in total = 12-13-14-15-16-17 chain spaces of 6 stitches after last decrease. Continue until piece measures approx. 28 cm in all sizes - finish after a row with chain spaces. Fasten off. Work the other sleeve the same way in the other side of piece. ASSEMBLY: Sew the seems under the sleeves, sew in the outermost stitches and make sure that the seam does not tighten the piece. |
|||||||||||||||||||||||||||||||||||||||||||||||||||||||||||||||||||||||||||||||||||||
Diagram explanations |
|||||||||||||||||||||||||||||||||||||||||||||||||||||||||||||||||||||||||||||||||||||
|
|||||||||||||||||||||||||||||||||||||||||||||||||||||||||||||||||||||||||||||||||||||
|
|||||||||||||||||||||||||||||||||||||||||||||||||||||||||||||||||||||||||||||||||||||

|
|||||||||||||||||||||||||||||||||||||||||||||||||||||||||||||||||||||||||||||||||||||
|
|||||||||||||||||||||||||||||||||||||||||||||||||||||||||||||||||||||||||||||||||||||

|
|||||||||||||||||||||||||||||||||||||||||||||||||||||||||||||||||||||||||||||||||||||
Have you finished this pattern?Tag your pictures with #dropspattern #butterflyqueenjacket or submit them to the #dropsfan gallery. Do you need help with this pattern?You'll find 12 tutorial videos, a Comments/Questions area and more by visiting the pattern on garnstudio.com. © 1982-2025 DROPS Design A/S. We reserve all rights. This document, including all its sub-sections, has copyrights. Read more about what you can do with our patterns at the bottom of each pattern on our site. |
|||||||||||||||||||||||||||||||||||||||||||||||||||||||||||||||||||||||||||||||||||||


With over 40 years in knitting and crochet design, DROPS Design offers one of the most extensive collections of free patterns on the internet - translated to 17 languages. As of today we count 314 catalogues and 11820 patterns translated into English (UK/cm). 11820
We work hard to bring you the best knitting and crochet have to offer, inspiration and advice as well as great quality yarns at incredible prices! Would you like to use our patterns for other than personal use? You can read what you are allowed to do in the Copyright text at the bottom of all our patterns. Happy crafting!
Post a comment to pattern DROPS 186-11
We would love to hear what you have to say about this pattern!
If you want to leave a question, please make sure you select the correct category in the form below, to speed up the answering process. Required fields are marked *.