
Popular categories
Looking for a yarn?


Comments / Questions (27)
![]() Loredana wrote:
Loredana wrote:
Salve, non ci sono segnapunti che dividono le parti del cardigan? Inoltre mi sembra che ci sia un errore nella spiegazionè iniziale, dopo A1 dovrebbe esserci il davanti, mentre trovo scritto metà dietro!!!! Grazie Loredana
05.06.2017 - 16:34DROPS Design answered:
Buongiorno Loredana. Abbiamo tolto l'indicazione metà dietro dopo A.1. I segnapunti vengono inseriti dopo aver messo in attesa le maglie delle maniche. Per gli aumenti per il raglan: quelli sulle maniche sono inseriti nei diagrammi A2, A4 e A6 e quelli sul corpo li trova indicati all'inizio delle spiegazioni. Se preferisce, può comunque inserire i segnapunti per individuare meglio dove aumentare anche per il raglan. Buon lavoro!
05.06.2017 - 16:50
![]() Laura wrote:
Laura wrote:
Como se hacen los aumentos en las mangas!? Pone que corresponden con una parte de los diagramas,... entonces con seguir el diagrama es suficiente!? No hay que hacer más aumentos!!?
30.05.2017 - 23:47DROPS Design answered:
Hola Laura. Los aumentos en las mangas se trabajan según los diagramas A2, A4 y A6.
11.06.2017 - 16:29
![]() Laura wrote:
Laura wrote:
Muchas gracias, después de darle muchas vueltas, llegué a esa conclusión... Pero me surgió otra duda! En el caso de las mangas, cómo se aumenta!? Pone dos puntos cada 2ª fila, pero donde!? Al inicio y al final de A.2., echando hebra!? Gracias
29.05.2017 - 00:03DROPS Design answered:
Ver la respuesta arriba.
11.06.2017 - 16:33
![]() Laura wrote:
Laura wrote:
Estoy tratando de hacer la talla S. No entiendo cómo hacer los aumentos del cuerpo. No comprendo por qué pone "cada fila", "cada 2ª fila, y "cada 4ª fila", y dentro de 4ª fila pone fila 1, fila 2, fila 3 y fila 4. No entiendo cuando tengo que aumentar, si en todas las filas, o cuando... Creo que esta regular explicado... Si podéis ayudarme
28.05.2017 - 16:59DROPS Design answered:
Hola Laura. Tienes que hacer los aumentos según las explicaciones del patrón: " En las mangas aumentar cada 2ª fila 22-26-29-31-32-33 veces, en el cuerpo: cada fila 0-0-0-0-0-6 veces, después cada 2ª fila 14-16-17-25-30 veces, y finalmente cada 4ª fila 4-5-6-3-0-0 veces. " Antes del patrón está explicado, como trabajar cada aumento , por ejemplo para la talla S aumentamos solo cada 2ª y 4ª filas. En el apartado *Aumentos cada 4ª fila* está explicado como trabajar cada una de los 4 filas. Te recomiendo leer el patrón entero antes de empezar a trabajar.
28.05.2017 - 21:24
![]() Hellyh wrote:
Hellyh wrote:
Hej. Tack för svar. Jag har dock svårt att avgöra var jag ska börja, det är det jag behöver hjälp med. Jag har provat flera olika varianter men det blir inte rätt. Innan jag satte maskorna på tråd hade jag avslutat ärmen med alla varv av A4+3 rapporter av A5+A6. Kan man verkligen börja med A5 direkt där man tidigare stickat A4? Tack.
03.05.2017 - 16:04DROPS Design answered:
Jo men det är ju samma mönster i A.4-5-6 bara kanten som du har ökat i varje sida är olika, så det är bara att fortsätta med samma mönster utan ökningar, och om du har m över skall de slätstickas. Lycka till!
08.05.2017 - 16:53
![]() Hellyh wrote:
Hellyh wrote:
Fortsättning på min fråga. När jag ska sticka ärmen börjar jag första rapporten av A5 på den första maskan jag plockat upp från tråden, men mönstret fortsätter inte på det som redan är stickat innan jag satte maskorna på tråd. Vad gör jag fel? Var ska jag börja sticka den första rapporten av A5?
02.05.2017 - 20:11DROPS Design answered:
Hej igen, jo men det är viktigt att det stämmer över det mönster du redan har stickat. Börja med en hel stickat rapport, titta i diagrammet och räkna sedan vilken m du måste börja med (har du inte m för en hel rapport sticka i slätst).
03.05.2017 - 13:49
![]() Hellyh wrote:
Hellyh wrote:
När jag har plockat upp maskorna för ärmen från tråden, var ska jag börja med A5 för att mönstret ska passa in med det jag redan har stickat (innan maskorna sattes på tråd)?
29.04.2017 - 18:59DROPS Design answered:
Hej, du kan sikkert se hvilken pind i diagrammet du strikkede sidst på ærmet og så fortsætter du med næste pind ifølge A.5 (de masker som ikke går op under ærmet strikkes i glatstrik). God fornøjelse!
03.05.2017 - 11:36
![]() María wrote:
María wrote:
Hola, no encuentro el tamaño de los botones ni las instrucciones para los ojales... ¿O no lo estoy buscando bien? Muchas gracias!
12.04.2017 - 10:33DROPS Design answered:
Hola Maria. Ya está publicada la corrección. Buen tricot.
14.04.2017 - 13:17
![]() Laila Jensen wrote:
Laila Jensen wrote:
Hvordan finder jeg ud af hvor mange garnnøgler jeg skal bruge? Jeg skal lave (eller dvs. min mor skal) en str. M.
22.03.2017 - 10:45DROPS Design answered:
Hej Laila. Det staar överst i opskriften: Størrelse: S - M - L - XL - XXL - XXXL Materialer: DROPS MERINO EXTRA FINE fra Garnstudio (tilhører garngruppe B) 400-450-500-550-600-650 g farve 24, lys gul. 1 nögle Merino EF er 50 gr, saa str M: 450/50 = 9 nögler.
22.03.2017 - 11:25
![]() Pernille wrote:
Pernille wrote:
Skal hele A4, A5 &A6 strikkes før der skal strikkes 3 rapporter A5 mellem A4 & A5?
20.03.2017 - 19:22DROPS Design answered:
Hej Pernille. Naar du har strikket 1 rapport i höjden af A.4 til A.6, saa er der plads til 3 rapporter af A.5 (36 masker).
21.03.2017 - 14:55
|
||||||||||||||||||||||||||||
Honey Blossom Cardigan#honeyblossomcardigan |
||||||||||||||||||||||||||||
|
|
||||||||||||||||||||||||||||
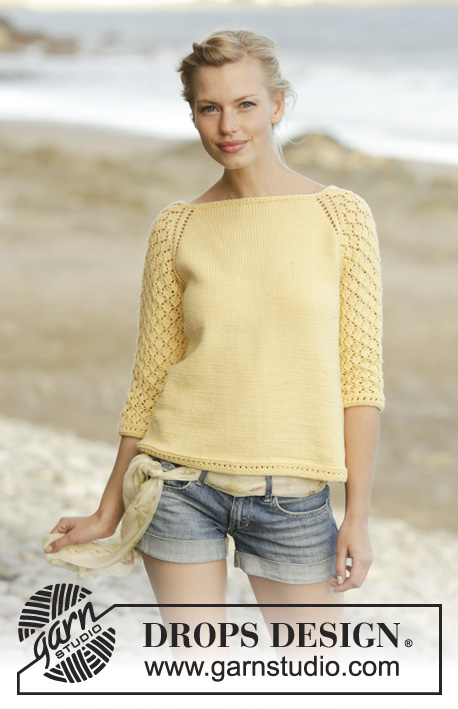
Knitted jacket with lace pattern and lace edge, worked top down with ¾ length sleeves in DROPS Merino Extra Fine. Sizes S - XXXL.
DROPS 176-9 |
||||||||||||||||||||||||||||
|
RIDGE/GARTER STITCH (worked back and forth): 1 ridge = Work 2 rows knit. PATTERN: See diagrams A.1 to A.7. The diagrams show all rows in the pattern seen from the right side. A.1 is the left band and A.3 is the right band. RAGLAN: SLEEVE: Increases on the sleeve are part of diagrams A.2, A.4 and A.6. Increase 2 stitches on each sleeve every 2nd row, purl the yarn overs on the next row, there will be holes. BODY: Increase 2 stitches on the back piece and 1 stitch on each front piece as follows: ON EACH ROW: Increase as follows from the right side: Start 2 stitches before A.2: Make 1 yarn over, knit 2, work A.2, knit 2, make 1 yarn over. Repeat before and after the next A.2. Purl the yarn overs on next row, there will be holes. Increase as follows from the wrong side: Start 2 stitches before A.2: Make 1 yarn over, purl 2, work A.2, purl 2, make 1 yarn over. Repeat before and after the next A.2. Knit the yarn overs on next row, there will be holes. ON EVERY 2ND ROW: Increase as follows from the right side: Start 2 stitches before A.2: Make 1 yarn over, knit 2, work A.2, knit 2, make 1 yarn over. Repeat before and after the next A.2. Purl the yarn overs on next row, there will be holes. ON EVERY 4TH ROW: ROW 1 (= from the right side): Start 2 stitches before A.2: Make 1 yarn over, knit 2, work A.2, knit 2, make 1 yarn over. Repeat before and after the next A.2. ROW 2 (= from the wrong side): Purl the yarn overs, there will be holes. ROW 3 (= from the right side): Start 4 stitches before A.2: Knit 2 together, make 1 yarn over, knit 2, work A.2, knit 2, make 1 yarn over, slip 1 stitch as if to knit, knit 1, pass the slipped stitch over the stitch that was knitted – there are no increases, but the row of holes continues as before. Repeat before and after the next A.2. ROW 4 (= from the wrong side): Purl the yarn overs, there will be holes. INCREASE TIP: Start 1 stitch before the marker thread, make 1 yarn over, knit 2 (the marker thread sits between theses stitches), make 1 yarn over. Purl the yarn overs twisted on next row. DECREASE TIP: Start 3 stitches before the marker thread, knit 2 together, knit 2 (the marker thread sits between these 2 stitches), slip 1 stitch as if to knit, knit 1, pass the slip stitch over the stitch that was knitted. The stitches that do not fit the pattern mid under sleeve are worked in stocking stitch. ---------------------------------------------------------- JACKET: The piece is worked back and forth on a circular needle from mid front, top downwards. Cast on 110-114-118-122-126-130 stitches (including 11 band stitches in each side towards mid front) with circular needle size 4 mm and Merino Extra Fine. Work 2 RIDGES – see description above, on the last row of the ridges increase 20 stitches evenly along the row = 130-134-138-142-146-150 stitches. Continue to work as follows – from the right side: Work A.1 (= 11 stitches ), 16-17-18-19-20-21 stitches stocking stitch, 1 yarn over, 1 stitch stocking stitch (= left front piece), A.2 (= 17 stitches) (= left sleeve), 1 stitch stocking stitch, 1 yarn over, 38-40-42-44-46-48 stitches stocking stitch, 1 yarn over, 1 stitch stocking stitch ( = back piece), A.2 (= right sleeve), 1 stitch stocking stitch, 1 yarn over, 16-17-18-19-20-21 stitches stocking stitch, A.3 (= 11 stitches) (= right front piece). The first increase to RAGLAN is now complete. Continue upwards with this division of pattern and stocking stitch. Increase to raglan as described above. On the sleeve increase every 2nd row 22-26-29-31-32-33 times, on the body increase every row 0-0-0-0-0-6 times, then every 2nd row 14-16-17-25-32-30 times, and finally every 4th row 4-5-6-3-0-0 times. NOTE! When A.2 is finished, continue working as follows (across the stitches on the sleeves): A.4 (= 8 stitches), A.5 (= 12 stitches), A.6 (= 7 stitches). When A.4 to A.6 are worked 1 time in height work as follows: A.4, A.5 across the next 36 stitches (= 3 repeats), A.6. Every time A.4, A.5 and A.6 are worked one time in height continue with 2 more repeats of A.5 between A.4 and A.6. Finish A.4, A.5 and A.6 when you have increased in total 22-26-29-31-32-33 times on the sleeves and in total 18-21-23-28-32-36 times on each front piece/back piece. After all the increases, there are 61-69-75-79-81-83 stitches on each sleeve, 76-84-90-102-112-122 stitches on the back piece and 46-50-53-59-64-69 stitches on each front piece= 290-322-346-378-402-426 stitches in total. The next row is worked as follows from the wrong side: Work 46-50-53-59-64-69 stitches (= right front piece), place the next 61-69-75-79-81-83 stitches on a thread (= sleeve), cast on 8-8-10-10-12-14 new stitches, work the next 76-84-90-102-112-122 stitches (= back piece), place the next 61-69-75-79-81-83 stitches on a thread (= sleeve), cast on 8-8-10-10-12-14 new stitches, work the last 46-50-53-59-64-69 stitches (= left front piece). BODY: There are now 184-200-216-240-264-288 stitches on the body. Continue with A.1, stocking stitch and A.3 as before. Insert a marker thread in each side, in the middle of the 8-8-10-10-12-14 new stitches which were cast on. THE PIECE IS NOW MEASURED FROM HERE. When the piece measures 3 cm increase 1 stitch on each side of each marker thread (= 4 stitches increased), increase every 7 cm in total 4 times – READ INCREASE TIP = 200-216-232-256-280-304 stitches. When the piece measures 27-26-26-26-27-29 cm work A.7 with A.1 and A.3 in each side, then cast off. The piece measures approx. 50-52-54-56-58-60 cm from the cast-on edge. SLEEVE: Place the stitches from the thread back on double pointed needles size 4 mm and knit up 1 stitch in each of the 8-8-10-10-12-14 stitches which were cast on under the sleeve = 69-77-85-89-93-97 stitches. Insert 1 marker thread in the middle of the new stitches = mid undersleeve. Continue with A.5, the stitches which do not fit the pattern mid under sleeve are worked in stocking stitch. Continue this pattern. When the piece measures 3-3-3-5-5-5 cm decrease 1 stitch on each side of the marker thread, decrease every 3-2-1½-1½-1-1 cm in total 9-12-15-16-17-18 times – READ DECREASE TIP = 51-53-55-57-59-61 stitches. When the piece measures 33-30-29-28-28-28 cm work A.7 across all the stitches. Cast off when A.7 has been worked 1 time in height, the sleeve measures approx. 36-33-32-31-31-31 cm. Work the other sleeve the same way. Place 6-6-6-7-7-7 buttons evenly distributed on left front band and sew them on. There are no buttonholes, use the holes in the pattern on right front band. |
||||||||||||||||||||||||||||
Diagram explanations |
||||||||||||||||||||||||||||
|
||||||||||||||||||||||||||||

|
||||||||||||||||||||||||||||

|
||||||||||||||||||||||||||||

|
||||||||||||||||||||||||||||
Have you finished this pattern?Tag your pictures with #dropspattern #honeyblossomcardigan or submit them to the #dropsfan gallery. Do you need help with this pattern?You'll find 28 tutorial videos, a Comments/Questions area and more by visiting the pattern on garnstudio.com. © 1982-2025 DROPS Design A/S. We reserve all rights. This document, including all its sub-sections, has copyrights. Read more about what you can do with our patterns at the bottom of each pattern on our site. |
||||||||||||||||||||||||||||


With over 40 years in knitting and crochet design, DROPS Design offers one of the most extensive collections of free patterns on the internet - translated to 17 languages. As of today we count 314 catalogues and 11821 patterns translated into English (UK/cm). 11821
We work hard to bring you the best knitting and crochet have to offer, inspiration and advice as well as great quality yarns at incredible prices! Would you like to use our patterns for other than personal use? You can read what you are allowed to do in the Copyright text at the bottom of all our patterns. Happy crafting!
Post a comment to pattern DROPS 176-9
We would love to hear what you have to say about this pattern!
If you want to leave a question, please make sure you select the correct category in the form below, to speed up the answering process. Required fields are marked *.